Using an electric nail drill can change the way you do your nails, whether at home or in a salon. These tools are not just for professionals—many people now use them to shape, smooth, and clean their nails with precision.
But using an electric nail drill safely and effectively takes more than just plugging it in. If you want salon-quality results without damaging your nails, you need to understand the tool, choose the right bits, and master the technique. Let’s look closely at how to use an electric nail drill, step by step, so you can get great results every time.
What Is An Electric Nail Drill?
An electric nail drill is a handheld device that rotates different drill bits at high speed. Nail technicians use them for filing, shaping, cuticle cleaning, callus removal, and even removing acrylic or gel nails. You might hear people call it an “e-file” or “nail machine.” Most electric nail drills have adjustable speed settings and come with various bits for different tasks.
The main parts of an electric nail drill are:
- Handpiece: The part you hold, which contains the motor.
- Drill bits: Attachments for filing, smoothing, or cleaning nails.
- Control unit: (Sometimes) a base with power and speed controls.
- Foot pedal: (Optional) for hands-free speed control.
These drills can save you time and make your manicure look more professional, but only if you know how to use them correctly.
Choosing The Right Electric Nail Drill
Before you start, it’s important to pick the right drill. Here’s what to consider:
1. Speed And Power
Look for a drill with a speed range of 15,000 to 35,000 RPM (rotations per minute). Lower speeds are for natural nails, higher speeds for acrylic or gel. Power (measured in watts) affects how smoothly the drill works—20 to 30 watts is enough for home use.
2. Vibration And Noise
Cheaper drills often vibrate more and make more noise. Too much vibration can make your hand tired or damage your nails. Read user reviews and, if possible, test the drill before buying.
3. Handpiece Weight And Comfort
A lighter handpiece is easier to control. Look for ergonomic designs that fit comfortably in your hand, especially if you plan to do multiple nails at once.
4. Bit Compatibility
Some drills use only special bits, while most standard e-files accept 3/32-inch bits. Make sure you can buy replacement bits easily.
5. Safety Features
Features like overload protection and heat dissipation help prevent accidents and keep the device running longer.
6. Price And Warranty
A good home-use electric nail drill usually costs between $50 and $150. Professional ones can be more expensive. Check for at least a one-year warranty for peace of mind.
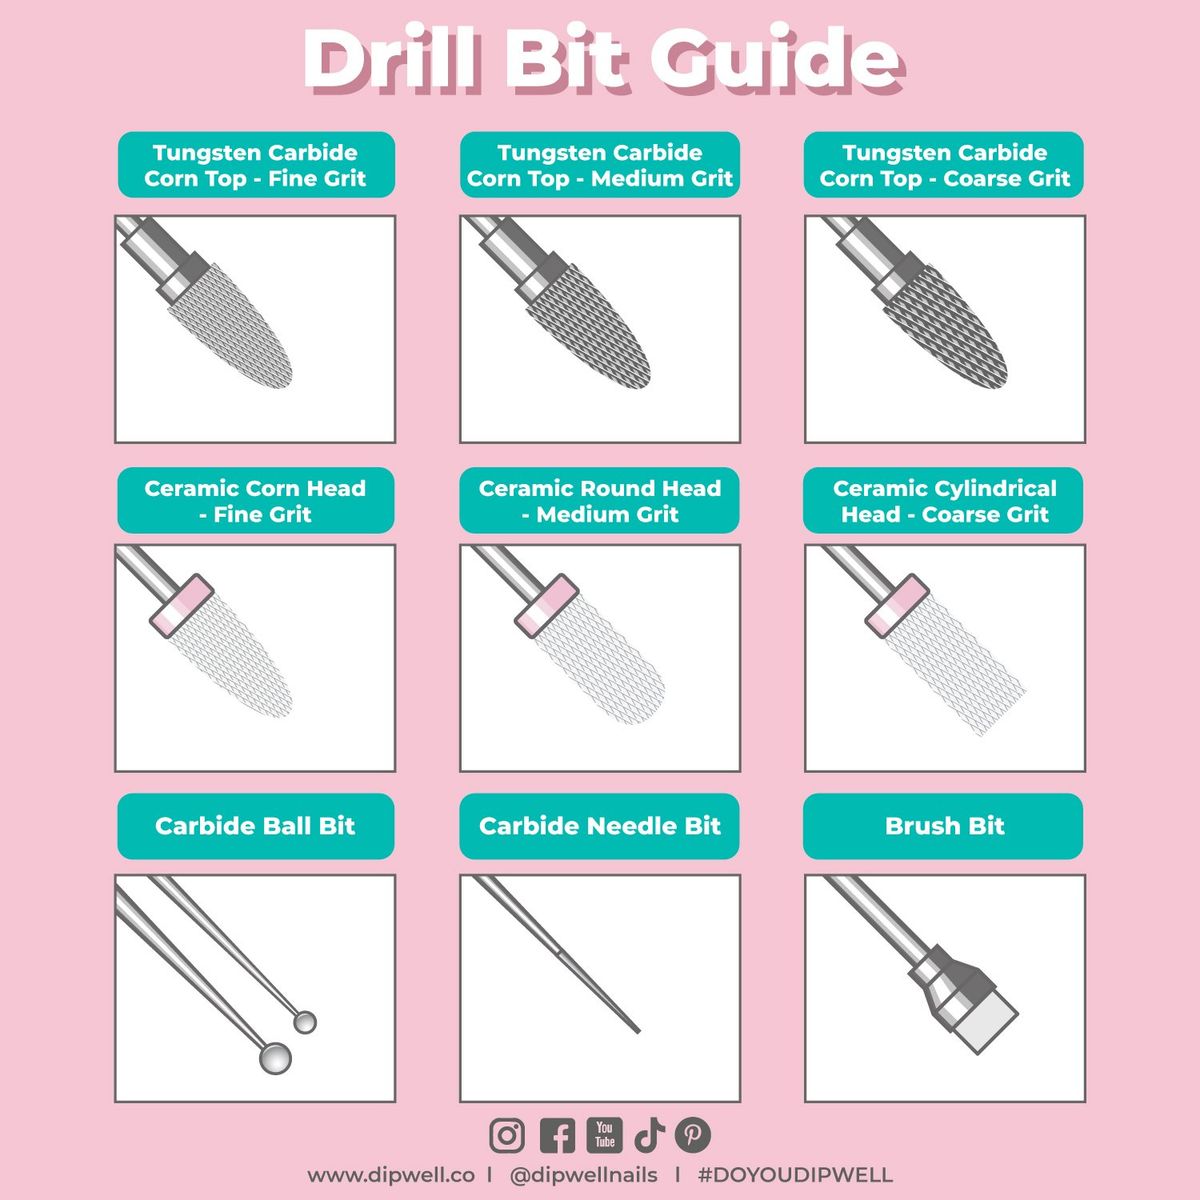
Understanding Nail Drill Bits
Drill bits are just as important as the drill itself. Each bit has a different purpose, material, and shape.
Common Bit Materials
- Carbide: Durable, long-lasting, used for acrylic or hard gel.
- Ceramic: Stays cooler, gentle on natural nails, resists clogging.
- Diamond: Fine and precise, good for cuticle work and gentle filing.
- Mandrel + Sanding Bands: Metal rod (mandrel) with replaceable sanding sleeves; great for beginners.
Popular Bit Shapes And Uses
- Barrel Bit: For surface smoothing and shortening.
- Cone Bit: For under-nail cleaning, sidewalls, or cuticles.
- Needle/Pointed Bit: For detail work and hard-to-reach areas.
- Safety Bit: Rounded top to avoid cuts; ideal for beginners.
- Mandrel with Sanding Band: Great for removing gel polish or prepping the nail surface.
Grit Levels
- Coarse (60–100): For acrylic removal.
- Medium (120–180): For shaping and smoothing.
- Fine (240+): For natural nails or finishing.
Pro tip: Always start with a fine or medium bit if you’re new to using a nail drill.
Preparing Your Workspace And Nails
Preparation is key to a safe, clean, and successful manicure.
1. Clean Your Hands And Tools
Wash your hands and sanitize your drill bits. Disinfecting helps prevent infections.
2. Set Up A Clean, Well-lit Area
Good light helps you see what you’re doing. Place a towel or disposable pad under your hands to catch dust.
3. Remove Old Polish
Take off any old nail polish with a remover. If you have gel or acrylic, you’ll use the drill for this step.
4. Push Back Cuticles
Gently push back your cuticles with a cuticle pusher. Don’t cut them unless you know what you’re doing.
5. Wear A Mask And Eye Protection
Electric nail drills create fine dust, which can irritate your lungs and eyes. A simple dust mask and safety glasses help protect you.
Step-by-step Guide: How To Use An Electric Nail Drill
Let’s break down the process so you can get professional results at home.
Step 1: Attach The Right Bit
Choose the right bit for your task. Insert it into the handpiece and make sure it’s secure. Don’t force or overtighten it.
Step 2: Adjust The Speed
Set your drill to a low speed (about 5,000–10,000 RPM) for natural nails. Use higher speeds (up to 25,000 RPM) for acrylics or gels. Always start slow and increase only if needed.
Step 3: Hold The Drill Correctly
Hold the handpiece like a pencil, but with a relaxed grip. Rest your pinky or side of your hand on the table for stability. This prevents accidental slips.
Step 4: Test On A Practice Nail
Before you touch your own nails, test the drill on a fake nail or plastic tip. This helps you feel the vibration and speed.
Step 5: Begin Filing
Gently touch the bit to your nail. Move the drill in one direction—not back and forth like a manual file. Use smooth, even strokes. Don’t press down hard; let the bit do the work.
For Natural Nails
- Use a fine or medium grit.
- File the surface lightly to remove shine or smooth ridges.
- Don’t stay in one spot for more than 2 seconds.
For Acrylic Or Gel
- Use a medium or coarse bit.
- Start with the body of the nail, not near the cuticle.
- Reduce speed and switch to a fine bit as you get close to the natural nail.
Step 6: Shape The Nail
Choose a barrel or cone bit for shaping. File the free edge to your desired shape: square, oval, almond, etc. Move the drill from the sidewalls toward the center, not across the entire tip at once.
Step 7: Clean Up The Cuticle Area
Switch to a safety or needle bit with a fine grit. Carefully clean around the cuticle area. This removes any dead skin and helps the polish last longer. Never press hard or stay in one place.
Step 8: Smooth And Buff
Use a fine or buffing bit to smooth the nail surface. This prepares the nail for polish and gives a glossy finish.
Step 9: Remove Dust
Brush away dust with a nail brush or wipe with alcohol. Clean nails help polish or gel stick better.
Step 10: Finish Up
Apply cuticle oil and massage it into your nails and skin. If you’re applying polish, wait until the oil is absorbed and wipe nails with alcohol again.
Common Tasks With An Electric Nail Drill
Removing Gel Polish
- Use a medium sanding band or ceramic bit.
- Set speed between 10,000 and 15,000 RPM.
- Lightly file off the shiny top coat only.
- Soak nails in acetone for 10 minutes, then gently push off loosened gel.
Removing Acrylic Nails
- Start with a coarse carbide or ceramic bit.
- Use a speed of 20,000–25,000 RPM.
- File off most of the acrylic, but stop before reaching your natural nail.
- Switch to a finer bit and finish gently.
Cleaning Under Nails
- Use a cone or needle bit.
- Set speed low (about 5,000 RPM).
- Gently clean under the free edge, moving side to side.
Smoothing Calluses
- Attach a coarse barrel or sanding band.
- Use medium speed.
- Gently smooth rough skin on your hands or feet.
Safety Tips And Common Mistakes To Avoid
Safety First
- Never use a high speed on natural nails.
- Don’t press the bit into your nail. Let the drill do the work.
- Always move the bit, never stay in one spot.
- Change bits when they become dull.
- Clean and disinfect bits after each use.
- Don’t use a nail drill on thin, weak, or damaged nails.
Common Mistakes
- Over-filing: Can cause thin, painful, or sensitive nails.
- Wrong bit choice: Using coarse bits on natural nails causes damage.
- Too much pressure: Leads to heat build-up and burns.
- Skipping cleaning: Increases risk of infection and poor results.
- Ignoring pain: If you feel heat or pain, stop immediately.
Non-obvious insight: Most beginners overlook the importance of bit angle. Hold the bit at a slight angle (10–15 degrees) to the nail for better control and less risk of gouging.
Another tip: If you see white spots or feel heat, you’re filing too aggressively. Pause and check your technique.
Cleaning And Maintaining Your Electric Nail Drill
Regular maintenance extends the life of your device and keeps your nails healthy.
After Each Use
- Remove dust with a brush or wipe with alcohol.
- Disinfect bits in a cleaning solution (follow manufacturer’s instructions).
- Store bits in a clean, dry container.
Weekly
- Check cords and connections for damage.
- Wipe the handpiece with a damp cloth.
- If your drill has a removable filter, clean or replace it.
Every Few Months
- Lubricate the handpiece if recommended in the manual.
- Replace worn bits.
Pro tip: Never soak the handpiece in water. Moisture can damage the motor.

Comparing Electric Nail Drills: Home Vs. Professional
If you’re unsure which type to buy, here’s a simple comparison.
| Feature | Home-Use Drill | Professional Drill |
|---|---|---|
| RPM Range | 10,000–20,000 | 20,000–35,000 |
| Power | 10–20W | 20–40W |
| Weight | Light | Heavier |
| Noise & Vibration | Moderate | Low |
| Price | $50–$150 | $150–$400 |
| Durability | Good for personal use | Designed for daily use |
If you plan to do nails often or on clients, invest in a professional model. For occasional home use, a quality home-use drill is enough.
Comparing Nail Drill Bits By Material
Not all drill bits are created equal. Here’s a quick overview:
| Material | Best For | Pros | Cons |
|---|---|---|---|
| Carbide | Acrylic removal, shaping | Durable, fast removal | Can be rough on natural nails |
| Ceramic | Gel polish, sensitive nails | Stays cool, gentle | Can chip if dropped |
| Diamond | Cuticle, fine filing | Precise, long-lasting | Slower for bulk removal |
| Sanding Band | Surface prep, beginners | Cheap, easy to use | Single-use, less durable |
Non-obvious insight: Ceramic bits are less likely to heat up, making them safer for beginners who haven’t mastered pressure control yet.
Practicing Good Technique
Skill with a nail drill comes with practice. Here are some practical tips to help you progress safely:
- Practice on fake nails before touching your own.
- Film yourself or use a mirror to watch your technique and grip.
- Switch hands: Try using your non-dominant hand to build ambidexterity.
- Start slow: Don’t rush to high speeds. Nail damage is hard to fix.
- Take breaks: If your hand or wrist feels tired, rest to avoid mistakes.
Troubleshooting Common Problems
Even with care, you might face issues. Here’s how to solve them:
- Drill feels hot: Check for jammed bits or dust. Let it cool down.
- Bits don’t fit: Make sure you’re using the right size (usually 3/32-inch).
- Nails hurt or feel hot: Lower speed, use finer bits, and avoid pressure.
- Dust everywhere: Use a dust collector or vacuum next to your work area.
- Drill stops working: Check the power cord, connections, and try another outlet.
If you can’t fix a problem, consult the manual or contact the manufacturer.

Electric Nail Drill Vs. Manual Nail File
Why use a drill instead of a classic file? Here’s a quick look:
| Feature | Electric Nail Drill | Manual Nail File |
|---|---|---|
| Speed | Very fast | Slower |
| Precision | High, with practice | Good for simple shapes |
| Effort | Low | High (can tire hands) |
| Risk of Damage | Higher if used wrong | Lower |
| Suitable For | Gel, acrylic, natural nails | Mainly natural nails |
Manual files are safer for natural nails, but drills save time—especially for artificial nails.
When To Avoid Using An Electric Nail Drill
There are times when you should skip the drill:
- If your nails are thin, peeling, or damaged
- If you have fungal infections or open wounds
- If you’re not confident with your technique
- On children’s nails
In these cases, stick to a manual file until your nails recover.
Upgrading Your Nail Routine
Once you’re comfortable with basic drilling, you can try advanced techniques:
- Creating nail art: Use fine bits for engraving simple designs.
- Perfecting shapes: Get precise almond, stiletto, or coffin shapes.
- Filling and rebalancing: Remove old gel or acrylic and blend new growth seamlessly.
There’s a wide world of nail art and design you can explore once you master the basics. For more professional techniques and safety, consider reading guides from trusted sources like Nails Magazine.
Frequently Asked Questions
How Often Should I Change My Drill Bits?
Change sanding bands after each use. For carbide, ceramic, and diamond bits, replace them every 3–6 months or when they become dull. Disinfect after each use.
Can I Use An Electric Nail Drill On Natural Nails?
Yes, but only with fine or medium grit bits and low speed. Never use coarse bits or high speed on natural nails.
What Speed Should I Use For Different Tasks?
- Natural nails: 5,000–10,000 RPM
- Gel polish: 10,000–15,000 RPM
- Acrylic removal: 20,000–25,000 RPM
Start with the lowest speed and increase only if needed.
How Do I Clean And Disinfect Nail Drill Bits?
Remove dust with a brush, soak bits in disinfectant solution, and let them dry completely. Never soak the handpiece.
Is An Electric Nail Drill Safe For Beginners?
With the right bit, low speed, and gentle touch, yes. Practice on fake nails first to avoid mistakes.
Mastering an electric nail drill opens up new possibilities for your nail routine, but it’s a tool that demands respect. With care, practice, and proper technique, you can enjoy salon-quality results safely at home.