When your multimeter suddenly stops working, it can feel confusing and even a little worrying. Maybe you were measuring voltage or current, and now the display is blank or shows an error. For many people, the problem is often a blown fuse inside the multimeter. Fuses protect the meter from damage when too much current flows through, but replacing them can seem difficult if you have never tried before. In this article, you will learn everything you need about multimeter fuse replacement—from how to identify a blown fuse, to choosing the right replacement, to safe installation. Whether you are a student, hobbyist, or technician, these steps will help keep your tool working safely and reliably.
What Is A Multimeter Fuse And Why Does It Matter?
A multimeter fuse is a small safety device inside your meter. Its job is to break (blow) if the electric current flowing through is too high. This protects the sensitive parts of your multimeter from serious damage. Without a working fuse, your device could be ruined by a short circuit or overload.
There are usually one or two fuses inside a multimeter:
- One fuse for high current (like 10A)
- Another for low current or milliamp (mA) measurements
If you try to measure current in the wrong way—like connecting across a voltage source—the fuse will blow to save the meter. Even professionals sometimes make mistakes, so fuses are essential.
Why Fuses Blow
Common reasons for a blown fuse include:
- Setting the meter to measure current, but connecting across a voltage source
- Measuring a circuit with more current than the fuse rating
- Accidentally touching the test leads together when in current mode
Fuses are designed to be the “weakest link”—they break first to protect everything else.
Safety First
Never ignore a blown fuse. Using a multimeter with a missing or incorrect fuse is dangerous. It can cause electric shocks, inaccurate readings, or even fires. Always replace a blown fuse with the correct type and rating.
Signs Your Multimeter Fuse Needs Replacement
Sometimes, a multimeter just stops working as expected. But how do you know it’s the fuse? Here are clear signs to check:
- No reading or always zero when measuring current (A or mA ranges), but voltage and resistance modes work fine.
- Error message or special “fuse” icon on the display (on some digital multimeters).
- Physical inspection: You open the meter and see a blackened or broken fuse wire inside the glass tube.
- Continuity test fails: Test the fuse itself using the meter’s continuity mode. If there is no beep or reading, the fuse is blown.
Remember, a fuse problem rarely affects voltage or resistance measurement. If only current readings have stopped, suspect the fuse first.
Tools And Materials Needed For Multimeter Fuse Replacement
Before you open your meter, gather these items for a safe and smooth process:
- Replacement fuse(s) with the exact rating and size (see below for choosing the right one)
- Small Phillips or flat-head screwdriver
- Tweezers or small pliers (optional, for removing/installing fuse)
- Protective gloves (recommended for safety)
- Cleaning brush or compressed air (if you want to remove dust inside)
- User manual for your multimeter (if available)
Most multimeter fuses are glass or ceramic tubes, easy to find at electronics stores or online.
How To Choose The Correct Replacement Fuse
Not all fuses are the same. Choosing the wrong one can be dangerous or damage your multimeter. Here’s what you must consider:
1. Fuse Size
Measure the fuse length and diameter. Common sizes are:
- 5 x 20 mm
- 6 x 32 mm (1/4 x 1-1/4 inch)
Check your old fuse or user manual for the exact size.
2. Current Rating (amps)
The fuse must match the current value shown near the input jack or in the manual, such as:
- 10A
- 400mA or 500mA
Never use a fuse with a higher rating. It will not protect your meter.
3. Voltage Rating
Most fuses are rated for 250V or 600V. The voltage must be equal to or higher than your meter’s maximum voltage.
4. Fuse Type
There are two main types:
- Fast-blow: Breaks quickly. Used for voltage protection.
- Slow-blow (time-delay): Handles short surges. Most multimeters use these for current ranges.
Always check the type printed on the fuse or in your meter’s manual.
5. Breaking Capacity
Some fuses are “high breaking capacity” (HBC) or “high rupture capacity” (HRC). These are designed to safely stop large currents. For safety, especially in high-end or professional meters, use HRC fuses if required.
Example: Reading A Fuse Label
Suppose your fuse is marked:
- F 500mA 250V
This means:
- Fast-blow (F)
- 500 milliampere (0.5A)
- 250 volts
Replace with the exact same specification.
Where To Buy
You can find fuses at electronics stores, online retailers, or even the multimeter manufacturer’s website. Always buy from trusted sources to avoid low-quality copies.
Step-by-step Guide: How To Replace A Multimeter Fuse
Replacing a fuse might sound technical, but with care, anyone can do it. Follow these clear steps for a successful replacement.
1. Turn Off And Unplug The Multimeter
Remove all test leads. If your meter uses batteries, take them out too. This prevents accidental shocks or shorts.
2. Open The Multimeter Case
Use the correct screwdriver to remove the screws on the back. Place the screws in a safe spot so you don’t lose them. Gently lift the back cover. Some meters may have clips—work slowly to avoid breaking them.
3. Locate The Fuse(s)
Inside, you’ll see one or two cylindrical fuses, usually near the input jacks. Multimeters often have one fuse for high current (10A) and one for lower ranges (mA).
4. Inspect The Fuse
Look for obvious signs:
- Broken wire inside the glass tube
- Black or burnt marks
- Loose or rattling pieces
5. Remove The Blown Fuse
Use your fingers, tweezers, or small pliers to gently lift the fuse out. Some fuses are held by clips; do not force them.
6. Check The Fuse Rating
Read the old fuse’s label. Double-check size, current, voltage, and type. Get your replacement fuse ready.
7. Install The New Fuse
Align the new fuse and press gently into the clips. Make sure it sits firmly and does not wobble.
8. Clean And Inspect
Before closing, check for dust, loose wires, or damaged parts. Clean with a brush or compressed air if needed.
9. Reassemble The Multimeter
Put the cover back and screw it tight. Do not over-tighten, as plastic can crack.
10. Test The Multimeter
Reinsert the batteries, connect test leads, and try a simple current measurement. If all works well, your multimeter is ready.
Multimeter Fuse Types: Ceramic Vs. Glass Fuses
Not all fuses are created equal. You may wonder if it’s okay to switch between ceramic and glass fuses. Here’s a quick comparison:
| Feature | Glass Fuse | Ceramic Fuse |
|---|---|---|
| Appearance | Clear glass tube, visible wire | Opaque white or brown tube |
| Breaking Capacity | Low (not for high current faults) | High (safe for large currents) |
| Use Case | Basic meters, low voltage | Professional meters, high energy circuits |
| Cost | Cheaper | More expensive |
Ceramic fuses are safer for higher currents, as they don’t shatter and can contain arcs. If your meter came with a ceramic fuse, always replace with the same type.

Common Mistakes To Avoid When Replacing Multimeter Fuses
Even experienced users make errors with fuse replacement. Here are frequent mistakes, and how you can avoid them:
1. Using The Wrong Fuse Rating
A fuse with a higher amp value will not blow in time, risking meter damage. A lower value may blow too quickly.
2. Mixing Fuse Types
Don’t replace a slow-blow with a fast-blow, or glass with ceramic, unless the manual says it is safe.
3. Not Checking Both Fuses
If your meter has two fuses, check both—even if only one range stopped working.
4. Forgetting To Remove Batteries
Working with batteries inside can cause short circuits.
5. Closing The Case Without Testing
Always test the fuse and basic meter functions before reassembling fully.
6. Buying Cheap, Unbranded Fuses
These may not break safely, putting you and your multimeter at risk.
7. Not Reading The Manual
Even similar meters can have different fuse needs—double-check your model.
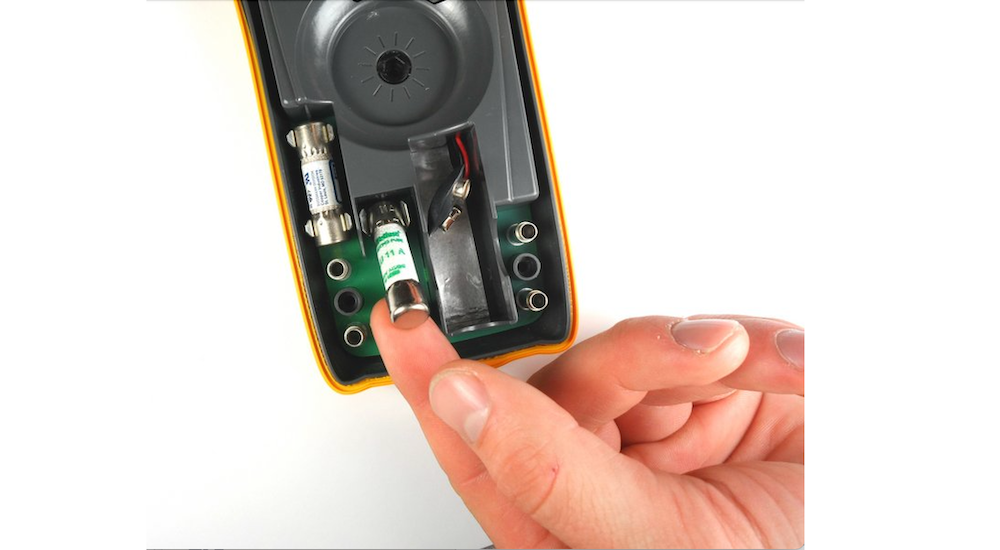
Practical Example: Replacing A Fuse In A Popular Multimeter
Let’s walk through a real-world example using a common Fluke 117 digital multimeter.
- Symptoms: The meter reads zero when measuring current, but voltage and resistance work fine.
- Disassembly: Remove the battery, then unscrew the back cover.
- Fuse Location: Inside, you find two fuses—a 440mA/1000V ceramic fuse and an 11A/1000V ceramic fuse.
- Diagnosis: The 440mA fuse is blown (broken wire, dark marks).
- Replacement: Buy a new 440mA, 1000V, HRC ceramic fuse (the exact Fluke part).
- Installation: Insert carefully into the clip.
- Test: With the new fuse, the current measurement works again.
This careful process avoids damage or safety problems.
How To Test A Multimeter Fuse
Not sure if your fuse is blown? Here’s how to test it:
- Remove the fuse from the multimeter.
- Set your multimeter to continuity or ohms mode.
- Touch the test leads to each end of the fuse.
- If you hear a beep or see a resistance close to zero, the fuse is good.
- If there is no beep or the display shows “OL” (overload), the fuse is blown.
Testing a fuse is quick and avoids wasting time replacing a working part.
What Happens If You Use The Wrong Fuse?
Using the wrong fuse can have serious consequences:
- Too high rating: The fuse might not break if you make a mistake, so the meter can burn or explode.
- Too low rating: The fuse blows often, even on safe currents.
- Wrong type (glass instead of ceramic): In case of a big short circuit, a glass fuse may explode, sending pieces inside the meter.
- Poor quality: Fake fuses may not break safely, risking injury.
Always match the specifications exactly. If you’re unsure, check the manual or contact the manufacturer.
Multimeter Fuse Replacement Cost
Replacing a fuse is usually inexpensive. Here’s a simple comparison:
| Fuse Type | Average Price (USD) | Where to Buy |
|---|---|---|
| Glass, 5x20mm, 0.5A, 250V | $0.20 – $1.00 | Electronics shops, online |
| Ceramic, HRC, 440mA, 1000V | $2.00 – $8.00 | Official dealers, Fluke/UNI-T sites |
| Bulk packs (10 pieces) | $3.00 – $10.00 | Amazon, eBay |
Professional fuses cost more, but are vital for safety. Never risk your multimeter with cheap, unsafe fuses.
Tips For Preventing Blown Fuses In Your Multimeter
You can avoid many blown fuse problems by using your meter correctly:
- Double-check your range before measuring current. Never measure voltage with the leads in the current input.
- Start with the highest current range if you are unsure of the current.
- Never connect across a voltage source when set to measure current.
- Remove test leads after use, especially from the high current jack.
- Read the user manual for your specific model.
- Store your meter safely to avoid dropping or impacts that might damage the fuse.
These habits will save you time, money, and frustration.

Multimeter Models And Their Fuse Types
Different brands and models use different fuses. Here are examples from popular models:
| Multimeter Model | Fuse 1 (mA) | Fuse 2 (A) |
|---|---|---|
| Fluke 117 | 440mA, 1000V, HRC, 10x38mm | 11A, 1000V, HRC, 10x38mm |
| UNI-T UT61E | 0.5A, 250V, glass, 5x20mm | 10A, 250V, glass, 5x20mm |
| Extech EX330 | 0.5A, 250V, glass, 5x20mm | 10A, 250V, glass, 5x20mm |
| Sanwa CD800a | 0.5A, 250V, glass, 6x30mm | 10A, 250V, glass, 6x30mm |
Always check your meter’s label, manual, or manufacturer’s website for the most accurate information.
When To Seek Professional Help
While most users can replace a fuse themselves, sometimes it’s better to let an expert handle it. Consider professional help if:
- The fuse blows again immediately after replacement (there may be a deeper fault).
- You see burnt or damaged circuit board parts.
- The meter smells burnt or shows signs of overheating.
- The fuse is soldered (very rare, but found in some specialized meters).
Do not risk using a damaged multimeter—it may cause shock or fire.
Real-world Insights And Non-obvious Tips
Many beginners don’t realize these practical points:
- Some meters have hidden fuses inside the circuit board, not just near the input jacks. Always check your manual or look closely.
- Fuses can age over time, especially in environments with lots of vibration or temperature changes. If your meter gives strange readings, it’s worth checking the fuse—even if you haven’t made a measurement mistake.
- Aftermarket fuses may fit physically but not meet the safety standards of the original. Choose fuses that mention “UL,” “BS,” or “IEC” certification for peace of mind.
- Some autoranging meters will not show any error if the fuse is blown; they simply stop reading current. Always check the fuse if you suspect problems.
- If your meter is under warranty, replacing the fuse yourself might void it. Check the terms before opening the case.
Frequently Asked Questions
What Happens If I Use My Multimeter Without A Fuse?
If you use a multimeter without a fuse, you remove the main safety barrier. This means that if you accidentally overload the meter, the inner electronics or even the meter’s case can burn, explode, or cause electric shock. Always use the correct fuse for your safety.
Can I Use A Fuse With A Higher Amp Rating Than The Original?
No. If you use a fuse with a higher amp rating, it may not blow in time to protect your meter. This can result in serious internal damage or safety hazards. Always match the original rating.
How Do I Know Which Fuse My Multimeter Needs?
Check your user manual, look for markings near the fuse holder, or read the label on the old fuse. If you are not sure, contact the manufacturer or visit a trusted source like Wikipedia for more information.
Are All Multimeter Fuses Interchangeable?
No, multimeter fuses come in different sizes, ratings, and types. Using the wrong fuse can damage your meter or make it unsafe. Always use the exact type and rating your meter requires.
Where Can I Buy High-quality Replacement Fuses?
You can buy quality fuses from electronics stores, online retailers like Digi-Key or Mouser, or directly from the multimeter manufacturer. Avoid very cheap, unbranded fuses from unknown sources, as they may not offer proper protection.
Replacing a multimeter fuse is a simple, important skill for anyone using electrical measurement tools. By following the advice in this article, you’ll keep your multimeter safe, accurate, and ready for your next project.