Using power tools can change how you work on projects at home or at a job site. One of the most useful tools for drilling into tough materials is the hammer drill. This tool does much more than a regular drill. If you want to mount shelves on concrete walls, install anchors in brick, or make holes in stone, a hammer drill helps you get the job done quickly and safely. However, using it the right way is important for the best results and your safety.
Many people buy or rent a hammer drill but do not use it effectively. Some use the wrong drill bits, while others do not know how to set the right speed. This can damage both the tool and the material.
In this guide, you will learn everything you need to know to use a hammer drill. Whether you are a DIY beginner or have basic experience with tools, you will find clear steps, important tips, and expert advice to get the best from your hammer drill.
What Is A Hammer Drill?
A hammer drill is a power tool that combines two actions: spinning (like a standard drill) and hammering forward and backward. This hammering action helps the drill bit break up hard materials, allowing it to drill through surfaces like concrete, brick, and stone. Hammer drills are not the same as impact drivers or rotary hammers, which have different designs and uses.
Most hammer drills let you turn off the hammer function. This means you can use them as a regular drill for wood or metal. But their real strength is in masonry work—jobs that need both force and speed.
Hammer Drill Vs. Regular Drill
People often confuse a hammer drill with a regular drill. Here are the main differences:
- Hammer drills: Add a rapid hammering motion to the spinning, making them good for masonry.
- Regular drills: Only spin, best for wood, metal, or plastic.
Common Uses For Hammer Drills
Hammer drills are best for:
- Drilling holes in concrete walls and floors
- Installing anchors or screws in brick
- Making holes for plumbing or electrical wiring in hard surfaces
- Removing ceramic tiles (with special attachments)
Understanding what a hammer drill is and what it does will help you use it more safely and efficiently.
Types Of Hammer Drills
There are several types of hammer drills. Each has strengths and weaknesses. Picking the right one depends on your project, material, and how often you will use the tool.
Corded Hammer Drills
Corded models plug into an outlet. They usually have more power and do not run out of battery during long jobs. Corded hammer drills are good for heavy-duty tasks but are less portable.
Cordless Hammer Drills
Cordless models run on batteries. They are easier to move around, especially if you work in places without easy access to power. Modern lithium-ion batteries give good power and runtime, but for big jobs, you may need extra batteries.
Rotary Hammer Drills
Rotary hammers are larger and stronger. They use a different mechanism (piston-driven) to create more force. These are used for large holes and tough materials, like thick concrete walls or floors.
Below is a comparison between the main types of hammer drills:
| Type | Power Source | Best For | Limitations |
|---|---|---|---|
| Corded Hammer Drill | Electric outlet | Heavy-duty, long jobs | Less portable |
| Cordless Hammer Drill | Battery | Medium-duty, portable | Battery life |
| Rotary Hammer | Electric/Battery | Very tough materials | Heavy, expensive |
Key Parts Of A Hammer Drill
Before using your hammer drill, get familiar with its main parts. Knowing what each part does helps you set up and operate the tool safely.
- Chuck: Holds the drill bit in place. Some use a key to tighten, others are keyless.
- Trigger: Starts and stops the drill. Squeeze to start, release to stop.
- Mode Selector: Switches between drilling, hammering, or both.
- Auxiliary Handle: Gives extra control and stability.
- Depth Stop Rod: Sets how deep you drill.
- Speed/Power Control: Adjusts how fast the drill turns.
Knowing these parts helps you choose the right settings for each job and avoid mistakes.
Safety Precautions Before You Start
Using a hammer drill is safe if you follow the right steps. Many injuries happen because people skip basic safety. Here are important rules to protect yourself and your tool:
- Wear safety goggles to keep dust and small pieces out of your eyes.
- Use ear protection because hammer drills are loud.
- Wear a dust mask when drilling concrete or masonry.
- Use gloves for better grip and to protect your hands.
- Check the drill and cord for damage before starting.
- Secure your work area—clear away children, pets, or obstacles.
- Mark the drilling spot to avoid mistakes.
- Read the manual for your specific model.
Many beginners forget to check for hidden wires or pipes behind walls. Use a stud finder or detector to avoid drilling into electrical or plumbing lines.
Choosing The Right Drill Bit
The drill bit is just as important as the drill itself. Using the wrong bit can ruin your tool or damage the material.
- Masonry bits: Used for concrete, brick, or stone. They have a carbide tip for strength.
- Twist bits: For wood or metal, not for hammer drilling.
- SDS bits: Used in rotary hammers, have a special shank for heavy-duty work.
Check the bit size and type before you start. Most hammer drills list the maximum bit size they can use. Do not force a bit larger than the recommended size.
How To Insert A Drill Bit
- Unplug or remove the battery from the drill.
- Open the chuck (use the key or twist by hand).
- Insert the bit as deep as possible.
- Tighten the chuck fully.
- Give the bit a gentle pull to check it’s secure.
Never use a bent or damaged bit. It can break during use and cause injury.
Setting Up Your Hammer Drill
Proper setup makes your work easier and safer. Here is how to get your hammer drill ready:
- Choose the correct mode: Set to ‘hammer drill’ for masonry, or ‘drill’ for wood/metal.
- Adjust the speed: Use a lower speed for harder materials; higher speed for softer materials.
- Attach the auxiliary handle: This gives you more control, especially with big holes.
- Set the depth stop rod: If you need a hole of a certain depth, adjust this rod.
- Charge the battery (if cordless): Make sure you have enough power for your job.
Some beginners skip the auxiliary handle. This makes the drill harder to control, especially if the bit gets stuck. Always use both hands for safety.
How To Drill With A Hammer Drill: Step-by-step
Now you are ready to drill. Follow these steps for the best results:
1. Mark The Spot
Use a pencil or marker to show exactly where you want to drill. Double-check measurements to avoid mistakes.
2. Secure The Material
If possible, clamp or hold the workpiece steady. For walls, make sure nothing will move or shift during drilling.
3. Start Drilling
Hold the drill with both hands. Place the tip of the bit on your mark. Squeeze the trigger slowly to start. Begin at a low speed to create a guide hole.
4. Increase Speed And Pressure
Once the bit is set, press a little harder and increase speed. Do not push too hard—let the hammer action do the work. Forcing the drill can burn out the motor or break the bit.
5. Pull Out To Clear Dust
Every few seconds, pull the bit out a little to clear dust from the hole. This helps drilling go faster and prevents overheating.
6. Finish And Clean Up
When the desired depth is reached, stop the drill and remove it from the hole. Brush away any dust and check the hole size.
If the bit gets stuck, reverse the drill slightly while pulling out. Do not force it, as this can damage the bit or drill.
Tips For Drilling Into Different Materials
Hammer drills are powerful, but materials react in different ways. Here is how to get the best results for each:
Concrete
- Start with a small pilot hole, then use a larger bit.
- Use steady pressure, not force.
- Take breaks to avoid overheating.
Brick
- Drill into the mortar joints (the softer lines between bricks) for easier and safer holes.
- Avoid drilling close to the edge of bricks to prevent cracking.
Stone
- Go slow; stone is very hard.
- Use a water spray bottle to cool the bit (if safe for your tool).
- Expect the bit to wear out faster.
Tiles
- Use a glass or tile bit to start a hole, then switch to masonry bit.
- Tape the spot to prevent slipping and cracking.
Common Mistakes And How To Avoid Them
Many users make the same errors with hammer drills. Here is what to watch for:
- Using the wrong bit: Only use masonry bits with the hammer function.
- Applying too much force: Let the drill do the work.
- Not clearing dust: Dust buildup makes drilling slow and heats up the bit.
- Drilling too close to edges: This can crack concrete or brick.
- Ignoring safety gear: Skipping goggles or ear protection can lead to injury.
- Not checking for wires or pipes: Always scan before drilling into walls.
An often-missed detail: after long drilling, the bit and chuck get very hot. Wait for them to cool before touching or changing bits.
Maintenance And Storage Of Hammer Drills
A well-maintained drill lasts longer and works better. Here is how to care for your tool:
- Clean dust off after every use with a dry cloth or compressed air.
- Lubricate the chuck and moving parts as recommended in the manual.
- Check and replace worn bits promptly.
- Store in a dry place to prevent rust.
- Charge batteries only as needed, and store them separately from the drill.
If you notice sparks, burning smell, or unusual noises, stop using the tool and have it checked by a professional.
When To Use Hammer Drill Mode—and When Not To
Knowing when to turn on the hammer action is important. Hammer mode should be used only on masonry—concrete, brick, or stone. For wood, metal, or plastic, turn off the hammer function and use the standard drilling mode.
If you use hammer mode on soft materials, you can split or damage them, and the drill bit can become stuck or dull.
Advanced Uses And Attachments
Hammer drills can do more than just basic drilling. Many models have extra features and attachments:
- Chisel attachments: Some rotary hammers can be used for chiseling or removing tiles.
- Depth gauges: For making holes of exact length, helpful for anchors or plugs.
- Dust extraction systems: Attachments that connect to a vacuum to keep the work area clean.
Some drills include a clutch setting. This helps avoid overdriving screws or damaging delicate surfaces.
Choosing The Right Hammer Drill For Your Needs
Selecting the right hammer drill depends on your tasks, frequency of use, and budget. Here’s a quick comparison of key factors:
| Feature | Basic Hammer Drill | Professional Hammer Drill |
|---|---|---|
| Power | 500-700W | 800-1200W |
| Max Bit Size | Up to 13mm | Up to 20mm+ |
| Weight | 2-3 kg | 3-5 kg |
| Price | Low to medium | Medium to high |
| Durability | Moderate | High |
For casual home use, a basic model is often enough. For frequent or heavy jobs, consider a higher-power, professional model.
Practical Insights: What Beginners Often Miss
Many new users focus on power and speed. But two key details can make a big difference:
- Bit cooling: Long drilling sessions heat up the bit. Let it cool between holes. This prevents burning out the tip and keeps holes cleaner.
- Proper anchoring: After drilling, clean the hole with a brush or air. This helps anchors or screws grip better and last longer.
Also, always check the maximum hole size for your drill. Trying to make oversized holes can break the tool or cause dangerous kickback.

When To Use A Hammer Drill Vs. A Rotary Hammer
Not all tough jobs need the biggest tool. Here is a simple guide to help you choose:
- For holes up to 13mm in concrete, a standard hammer drill is fine.
- For holes larger than 13mm, or deep into thick concrete, use a rotary hammer.
- For tile removal or chiseling, use a rotary hammer with chisel mode.
If you are unsure, start with a smaller hammer drill and upgrade only if needed.
How To Drill Straight Holes
A common problem is drilling at an angle by accident. Here is how to get a straight, clean hole:
- Mark your spot and use a center punch to make a small dent. This guides the bit.
- Hold the drill perpendicular to the surface. Use a bubble level if available.
- Start slow to avoid wandering.
- Check the drill’s angle often, especially for deep holes.
If you need extra help, use a drilling guide or a simple block of wood with a hole as a template.
Troubleshooting: What To Do When Things Go Wrong
Even with care, problems can happen. Here are some quick fixes:
- Bit stuck in material: Reverse the drill slowly while pulling out.
- Drill not making progress: Check if the bit is dull or the wrong type.
- Overheating: Stop, let the tool and bit cool, and clear dust from the hole.
- Strange noises or shaking: Stop using the tool. Check for loose parts or damage.
Regular checks and good maintenance keep your tool running smoothly.
Environmental And Health Considerations
Drilling in concrete or masonry creates a lot of dust, which can be harmful if inhaled. Always wear a dust mask and work in a well-ventilated area. Some countries have rules about managing construction dust—check local laws if working professionally.
If drilling creates a lot of debris, use a dust extractor or vacuum. Wetting the area can also help reduce dust, but be careful with water near electric tools.
Real-world Example: Installing A Shelf On A Concrete Wall
Let’s walk through a common project:
- Mark shelf height with a pencil. Use a level to ensure lines are straight.
- Check the wall for hidden wires or pipes with a detector.
- Mark and drill pilot holes using a small masonry bit.
- Switch to the correct size bit for your anchors.
- Drill to the right depth using the depth stop rod.
- Clean holes with a brush or air blower.
- Insert anchors, tap gently with a hammer if needed.
- Mount the shelf with screws.
This method prevents mistakes and keeps your work secure.
Responsible Use And Disposal
When your hammer drill or batteries reach the end of life, recycle them properly. Most cities have special collection points for power tools and batteries. Never throw them in regular trash.
For more information on recycling electronics, check resources like EPA Recycling.
Frequently Asked Questions
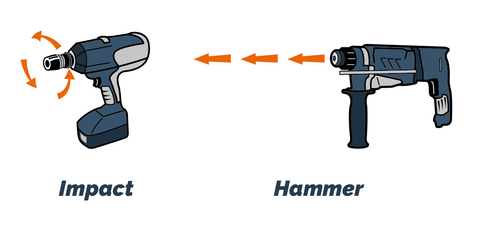
What Is The Difference Between A Hammer Drill And An Impact Driver?
A hammer drill adds forward hammering action to help with masonry, while an impact driver uses sideways torque for driving screws and bolts. They are built for different tasks.
Can I Use A Hammer Drill On Wood Or Metal?
Yes, but turn off the hammer mode. Use regular drill bits and the ‘drill only’ setting to avoid damaging the material.
How Do I Know If My Drill Bit Is Worn Out?
If you see chipped edges, feel slow progress, or notice the bit getting very hot, it’s likely worn out. Replace it to keep your work safe and efficient.
Is It Safe To Drill Into All Walls?
No. Always check for hidden wires or pipes before drilling. Use a detector and review building plans if available.
Can I Use A Hammer Drill For Mixing Paint Or Plaster?
It’s not recommended. Hammer drills are not designed for mixing. Use a dedicated mixing tool to avoid damaging your drill or attachments.
Using a hammer drill is not complicated once you know the basics and pay attention to details. Safe and smart use will help you finish projects faster, with better results and less effort. Remember, always read your tool’s manual and take care of your equipment for a long, productive life.