When you want to repair, salvage, or upgrade electronic devices, removing components from a circuit board—called desoldering—is a crucial skill. Whether you are a hobbyist, a student in electronics, or an experienced engineer, learning how to desolder components correctly can save money, reduce waste, and open up new possibilities for creativity and learning. But if you have never done it before, desoldering can seem difficult, even risky. Done wrong, it can damage both the component and the printed circuit board (PCB). Done right, it allows you to reuse expensive parts and fix broken electronics with confidence.
In this guide, you will discover everything you need to know about desoldering components. We’ll cover the tools you need, step-by-step methods, common mistakes, practical tips for all skill levels, and answers to the most asked questions. By the end, you will have a clear understanding and the practical confidence to desolder safely and successfully.
What Is Desoldering And Why Is It Important?
Desoldering is the process of removing electronic components from a PCB by melting and removing the solder that holds them in place. In electronics, solder is a metal alloy (often tin and lead, or lead-free alternatives) that connects components to the board, ensuring both electrical contact and mechanical stability.
Desoldering is essential for many reasons:
- Repairing broken or faulty components.
- Upgrading parts, such as swapping old capacitors for new ones.
- Reusing valuable or rare electronic components.
- Learning electronics through hands-on practice.
Many beginners think desoldering is just the reverse of soldering. But it requires its own techniques and tools. Poor desoldering can rip pads off the board, overheat components, and even ruin the device. That’s why understanding the basics—and the details—matters.
Essential Tools And Materials For Desoldering
Before you start, gather the right tools. The exact equipment you need depends on the size and type of the components and the complexity of the board. Here are the most important items:
- Soldering Iron: This is the core tool. For desoldering, a fine tip (1–2mm) is usually best for precise work. Temperature control is a bonus, as you often need to adjust heat for different types of solder.
- Solder Sucker (Desoldering Pump): This handheld vacuum tool removes melted solder from joints. It is ideal for through-hole components and is easy to use.
- Desoldering Braid (Wick): This flat, braided copper wire absorbs molten solder when heated. It is excellent for cleaning pads or removing excess solder.
- Desoldering Station: For frequent or professional work, a dedicated desoldering station combines a heated tip and vacuum pump for efficient removal.
- Tweezers: Fine-tip tweezers help you lift components after desoldering, especially surface-mount devices.
- Flux: Applying flux helps solder flow and makes removal easier, reducing the risk of damaging pads.
- Isopropyl Alcohol and Brushes: For cleaning residue after desoldering.
- Protective Gear: Safety glasses and a fume extractor protect your eyes and lungs.
- Spare Solder: Sometimes, adding a little new solder can make old solder easier to remove.
Not every project needs all these tools, but having them ready saves time and prevents mistakes.
Preparing For Desoldering: Safety And Setup
Before you turn on your iron, a little preparation goes a long way. Here’s how to set up for safe, successful desoldering:
- Work in a ventilated area: Solder fumes can be harmful. Use a fume extractor or open window.
- Wear safety glasses: Tiny solder splashes can injure your eyes.
- Organize your workspace: Keep tools within reach and clear away clutter.
- Secure the board: Use a PCB holder or “helping hands” to hold the board steady.
- Set the right temperature: For most leaded solder, 320–350°C (608–662°F) works well. For lead-free solder, you may need up to 370°C (698°F).
- Have a wet sponge or brass wool: Clean your soldering iron tip often to ensure good heat transfer.
- Identify the component and pads: Know exactly which part you want to remove and check for nearby sensitive parts.
Many beginners miss the importance of workspace setup. Rushing or working in a messy area leads to accidents and ruined boards. Taking a few minutes to prepare saves hours of frustration later.
Understanding Solder Types And Their Impact
Not all solder is the same, and this affects how you desolder. The two main types are leaded and lead-free solder.
- Leaded solder (typically 60% tin, 40% lead) melts at around 183°C (361°F). It is easy to work with and flows well.
- Lead-free solder (often tin, copper, silver) melts at higher temperatures, usually 217°C (423°F) or more. It can be harder to remove and may require more heat and patience.
Older electronics (before 2006) usually use leaded solder. Newer devices, especially from Europe and Asia, often use lead-free due to regulations.
Here’s a quick comparison:
| Solder Type | Melting Point | Ease of Desoldering | Health Concerns |
|---|---|---|---|
| Leaded | ~183°C (361°F) | Easy | Lead exposure risk |
| Lead-free | ~217°C (423°F) | Harder | No lead, but higher fumes |
When in doubt, start with a lower temperature and increase if the solder does not melt. Never overheat, as this damages pads and components.

The Step-by-step Process To Desolder Components
Desoldering is not a one-size-fits-all process. The method you use depends on the type of component: through-hole or surface-mount. Let’s break down the steps for each.
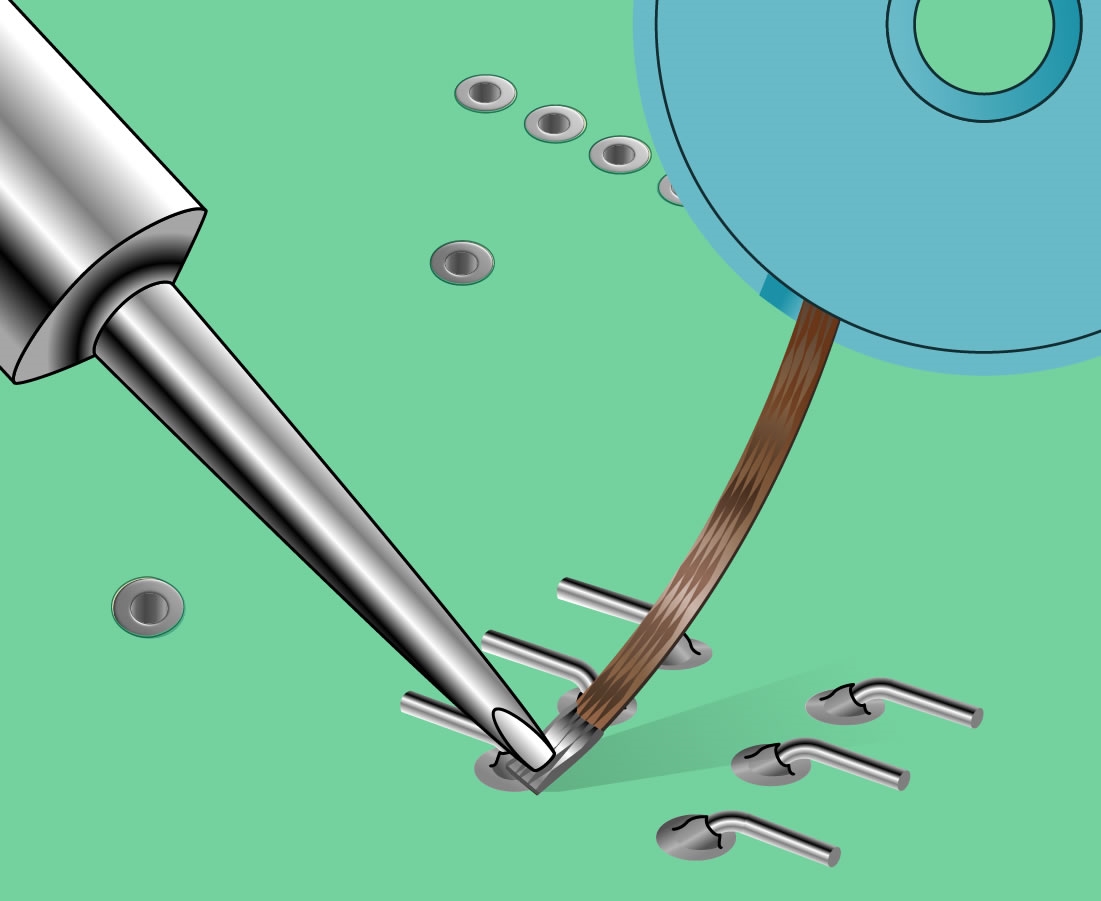
Desoldering Through-hole Components
These are parts with leads that pass through holes in the PCB—common in older devices and DIY kits.
1. Heat The Solder Joint
- Place the tip of your soldering iron on the solder joint.
- Wait a few seconds until the solder melts and becomes shiny.
2. Remove The Solder
- If using a solder sucker: Quickly press the pump’s button to suck up the molten solder. Repeat if necessary.
- If using desoldering braid: Place the braid on the joint, then press the iron tip on top. The braid will soak up the solder. Remove both once the solder is absorbed.
3. Free The Lead
- Gently wiggle the component lead. If it moves freely, the joint is clear.
- If not, repeat the heating and removal steps.
4. Remove The Component
- Use tweezers or your fingers (if cool) to pull the component out of the board.
5. Clean The Area
- Use isopropyl alcohol and a brush to clean leftover flux and debris.
Pro Tip: Sometimes, adding a small amount of fresh solder helps old, oxidized solder to melt more easily. This is called “reflowing” the joint.
Desoldering Surface-mount Components (smd)
SMD parts are smaller and sit on the surface of the PCB. They require more care and precision.
1. Apply Flux
- Add a drop of flux to the solder joints. This helps the solder melt and protects the pads.
2. Heat Both Ends
- For two-pin components (like resistors or capacitors): Alternate heating each end with the iron, gently nudging the part until it lifts off.
- For multi-pin ICs: Use a wide tip or two irons, or heat each pin in sequence while gently lifting the part.
3. Use Tweezers
- Once the solder is melted, use tweezers to lift the component away from the board.
4. Clean Pads
- Use desoldering braid to remove excess solder from the pads.
- Clean with isopropyl alcohol.
Non-Obvious Insight: For stubborn SMD chips, low-melt solder alloys can be added to lower the melting point, making removal safer and easier. These are available from electronics suppliers.
Common Desoldering Techniques Explained
Let’s look at the main techniques in more detail, including their pros, cons, and when to use each:
| Technique | Best For | Pros | Cons |
|---|---|---|---|
| Solder Sucker | Through-hole, single-sided boards | Fast, inexpensive, reusable | Can be messy, sometimes leaves solder |
| Desoldering Braid | Cleaning pads, SMD, small joints | Precise, cleans thoroughly | Needs practice, can lift pads if overheated |
| Desoldering Station | High-volume, professional work | Efficient, less risk to board | Expensive, bulky |
| Hot Air Rework Station | SMD, multi-pin ICs | Can remove complex chips, no direct contact | Risk of overheating, requires skill |
Most hobbyists start with a solder sucker and braid. For frequent work, a desoldering station or hot air tool is a good investment.
Special Cases: Desoldering Challenging Components
Some parts are harder to desolder than others. Here’s how to handle tricky cases:
Multi-pin Ics
Integrated circuits with many pins, like DIP chips or SMD packages, are difficult because you must free all pins at once.
- For DIP (through-hole): Try a desoldering station with a hollow tip, or desolder each pin and gently rock the chip out. Avoid force—pads can lift easily.
- For SMD: Use hot air rework stations or low-melt solder to make all joints liquid at once.
Large Connectors Or Heat Sinks
These parts absorb heat and are slow to desolder.
- Use a higher temperature (carefully) and plenty of flux.
- Warm the whole area first, then target each pin.
Old Or Oxidized Solder
Old solder may not melt easily.
- Add a small amount of fresh solder and flux before attempting removal.
- Use braid to clean up any residue.
Insight Most Miss: Many boards use thermal relief patterns—thin connections to pads that make desoldering easier. But ground planes or power pads can be hard to heat due to their size. In these cases, patience and extra flux are key.
Avoiding Common Mistakes In Desoldering
Even experienced technicians make errors. Here are the most frequent problems and how to avoid them:
- Overheating Pads: Too much heat can lift or destroy PCB pads. Always use just enough heat and avoid lingering.
- Forcing Components: If a part doesn’t come out easily, don’t pull. Reapply heat and check for leftover solder.
- Not Using Flux: Skipping flux makes solder removal harder and increases the risk of damage.
- Dirty Tips: A dirty iron tip does not transfer heat well. Clean your tip often.
- Insufficient Solder Removal: If solder remains in the hole, leads may stick. Use braid or reflow with more solder.
- Not Cleaning Residue: Flux and solder splashes can cause corrosion or shorts. Always clean after desoldering.
- Poor Workspace Lighting: Dim light hides small bridges or pad damage. Always work in a well-lit area.
Practical Tip: If you damage a pad, you can sometimes repair it with a small wire “jumper” to reconnect the trace. It’s not ideal, but it can save a board.
Tips For Successful, Clean Desoldering
Desoldering is as much about technique as tools. Here are proven ways to get better results:
- Practice on scrap boards: Before working on valuable electronics, use old PCBs to build skill.
- Use the right tip size: Match the soldering iron tip to the joint size for better control.
- Apply fresh solder first: For joints that won’t melt, a little new solder often helps.
- Let the board cool between steps: Too much heat in one area can warp the board.
- Label components: If you plan to reuse parts, label them so you remember their values and placement.
- Be patient: Rushing leads to mistakes. Take your time.
- Work from simple to complex: Start with large, easy components, then move to smaller or more delicate ones.
Environmental And Health Considerations
Desoldering can expose you to harmful chemicals and waste. Here’s how to stay safe and responsible:
- Lead exposure: Always wash your hands after handling solder. Do not eat or touch your face while working.
- Fume inhalation: Use a fume extractor or fan to avoid breathing in flux or solder smoke.
- Proper disposal: Collect used solder, braid, and components. Dispose of them as electronic waste, not in regular trash.
- Recycle components: Whenever possible, reuse or donate salvaged parts.
For more guidance, you can visit Wikipedia’s desoldering page for further reading.
Comparing Desoldering Techniques For Different Users
Not all methods are right for every user. Here’s a quick comparison for hobbyists, students, and professionals:
| User Type | Recommended Tools | Cost Level | Learning Curve |
|---|---|---|---|
| Hobbyist | Soldering iron, solder sucker, braid | Low | Easy |
| Student | Soldering iron, solder sucker, braid, flux | Low–Medium | Moderate |
| Professional | Desoldering station, hot air tool, full kit | High | Steep |
Choose what fits your needs, but remember: skill matters more than expensive equipment.
When To Consider Professional Desoldering Services
Some boards are too valuable or complex to risk at home. If you face any of these, consider professional help:
- High-density PCBs with many small SMD parts
- Expensive or rare components that must not be damaged
- Multi-layer boards where internal traces can be affected
- Medical or industrial electronics with strict quality standards
Professional services use specialized tools (infrared, rework stations) and have experience with delicate jobs. This can save time and prevent costly mistakes, especially for beginners.
How To Practice And Improve Your Desoldering Skills
Like any skill, desoldering gets easier with practice. Here’s how to improve:
- Collect old electronics: Radios, toys, computer parts—all are good for practice.
- Try different techniques: Use braid, sucker, and hot air to see what works best.
- Challenge yourself: Move from large, spaced parts to tiny SMD components.
- Record your progress: Take notes or photos to track improvement and avoid past mistakes.
- Ask for feedback: Online forums and local maker spaces can give helpful advice.
Non-Obvious Insight: Many modern components are “no-lead” or “leadless” (like QFN chips). Special tools and tricks (like hot air and pre-heating) are needed for these. Watch online tutorials or ask experts before attempting.
Frequently Asked Questions
What Is The Safest Way To Desolder Components Without Damaging The Pcb?
The safest way is to use the right amount of heat, apply flux, and use a solder sucker or braid gently. Always heat each joint just enough to melt the solder—never linger, as this can lift pads. If the solder is stubborn, add a little new solder to help it flow, and use tweezers to gently remove the part.
Clean up with isopropyl alcohol to prevent residue damage.
Can I Reuse Components After Desoldering Them?
Yes, many components can be reused if removed carefully. Avoid overheating or bending leads, as this can weaken or break them. Always test components before reuse—especially semiconductors, which can be damaged by static or heat. Clean off old solder and inspect for signs of damage or corrosion.
What Should I Do If A Pad Lifts Off The Pcb During Desoldering?
If a pad lifts, stop immediately. You can sometimes glue the pad back down using epoxy, then reconnect it to the trace with a thin wire. For important connections, it’s best to check the circuit diagram and run a wire from the component lead to the next connection point.
Avoid using boards with multiple lifted pads for critical devices.
Is It Possible To Desolder Smd Components Without A Hot Air Rework Station?
Yes, small SMD parts (like resistors, capacitors, LEDs) can be desoldered with a soldering iron and tweezers. Apply flux, heat each end in turn, and gently lift the part. For larger ICs or chips with many pins, a hot air rework station is safer and faster.
Some people also use two soldering irons for multi-pin chips, but this takes practice.
How Do I Choose Between A Solder Sucker And Desoldering Braid?
Use a solder sucker for removing solder from through-hole joints, especially when there is a lot of solder. It’s fast and effective for clearing holes. Use desoldering braid when you need to clean pads completely, remove small amounts of solder, or work with surface-mount parts.
Both tools are useful, and many people use them together for the best results.
Learning how to desolder components is a skill that pays off in repairs, upgrades, and creative projects. With the right knowledge, tools, and a bit of patience, anyone can master the art of desoldering.