Using a Dremel tool can feel like unlocking a new world of creativity and DIY skills. But if you want to sand, smooth, or shape materials with real control, Dremel sanding discs are your best friend. These small but powerful attachments turn your rotary tool into a mini sander, letting you work on wood, metal, plastic, and more. Yet, many people struggle to get the right finish or even damage their projects because they don’t use sanding discs the right way. If you want professional results and less frustration, it’s important to know exactly how to use Dremel sanding discs—from choosing the right disc to mastering the technique and keeping things safe.
This guide will break down everything you need to know about Dremel sanding discs. You’ll learn which discs to use for each job, how to attach and use them, and the common mistakes that can ruin your work. Whether you’re a hobbyist or a beginner in DIY, you’ll discover practical tips that save you time and improve your results.
Let’s dive into the details and unlock the full potential of your Dremel tool.
Understanding Dremel Sanding Discs
Dremel sanding discs are circular, abrasive pads that attach to the end of a Dremel rotary tool. They come in different sizes, grits, and materials. The disc spins at high speed, letting you sand, smooth, or remove material with precision.
Main features:
- Abrasive surface: Grinds and smooths surfaces.
- Attachment hole: Fits onto a mandrel, which connects to your Dremel.
- Variety of grits: From coarse (removes lots of material) to fine (for finishing).
Common uses:
- Smoothing rough edges on wood or metal
- Removing paint or rust
- Shaping small objects
- Preparing surfaces for painting or finishing
Knowing which disc to use and how to handle it is key to getting good results.
Types Of Dremel Sanding Discs
Not all sanding discs are the same. Choosing the right one depends on your material and the finish you want.
| Disc Type | Best For | Common Grit Range | Example Material |
|---|---|---|---|
| Coarse Sanding Discs | Heavy material removal | 40–80 | Wood, metal, rust removal |
| Medium Sanding Discs | Smoothing rough surfaces | 100–150 | Wood, plastic |
| Fine Sanding Discs | Finishing touches | 180–240 | Wood, soft metals |
| Specialty Discs | Polishing, detail work | 320+ | Jewelry, glass, ceramics |
Coarse discs are good for fast work but leave scratches. Fine discs create a smoother surface, perfect for finishing. Specialty discs can even be used for polishing or delicate materials.

Choosing The Right Sanding Disc For Your Project
Picking the right sanding disc is more than just grabbing any pack from the shelf. The wrong grit or type can ruin your project or waste your time.
Consider Your Material
- Wood: Start with a medium grit (100–150) for most jobs. For rough lumber, begin with a coarse disc.
- Metal: Use a coarse disc (40–80) to remove rust or paint, then finish with a fine disc.
- Plastic: Always use fine or extra-fine discs to avoid melting or gouging.
- Glass/Ceramics: Only use specialty discs designed for these materials.
Match The Grit To The Job
- Heavy removal: Coarse (40–80 grit)
- General smoothing: Medium (100–150 grit)
- Finishing: Fine (180–240 grit)
- Polishing: Extra fine (320+)
Practical Example
If you’re restoring an old wooden chair:
- Start with a coarse disc to remove old paint.
- Switch to a medium disc to smooth rough wood.
- Finish with a fine disc before applying new paint or varnish.
Non-obvious Insight
Some beginners think finer grit is always better. But if you start with too fine a disc, you’ll waste time and wear out your sanding discs quickly. Always start coarse, then move finer.
Preparing Your Dremel Tool And Workspace
Before you start sanding, a few minutes of preparation can make a big difference.
Safety First
- Eye protection: Always wear safety goggles. Small particles can fly off at high speed.
- Dust mask: Sanding creates fine dust, which can be harmful if inhaled.
- Work gloves: Protects your hands from heat and sharp edges.
Tool Setup
- Unplug the Dremel or remove the battery if it’s cordless.
- Select the right mandrel for your sanding disc. Most discs use a screw-on mandrel.
- Attach the disc securely. Loose discs can fly off and cause injury.
- Check the speed setting. Start at a lower speed, especially for plastics or delicate materials.
Workspace Tips
- Use a well-lit area so you can see your work.
- Secure your project with clamps or a vice.
- Keep flammable materials away—sanding can create sparks, especially with metal.
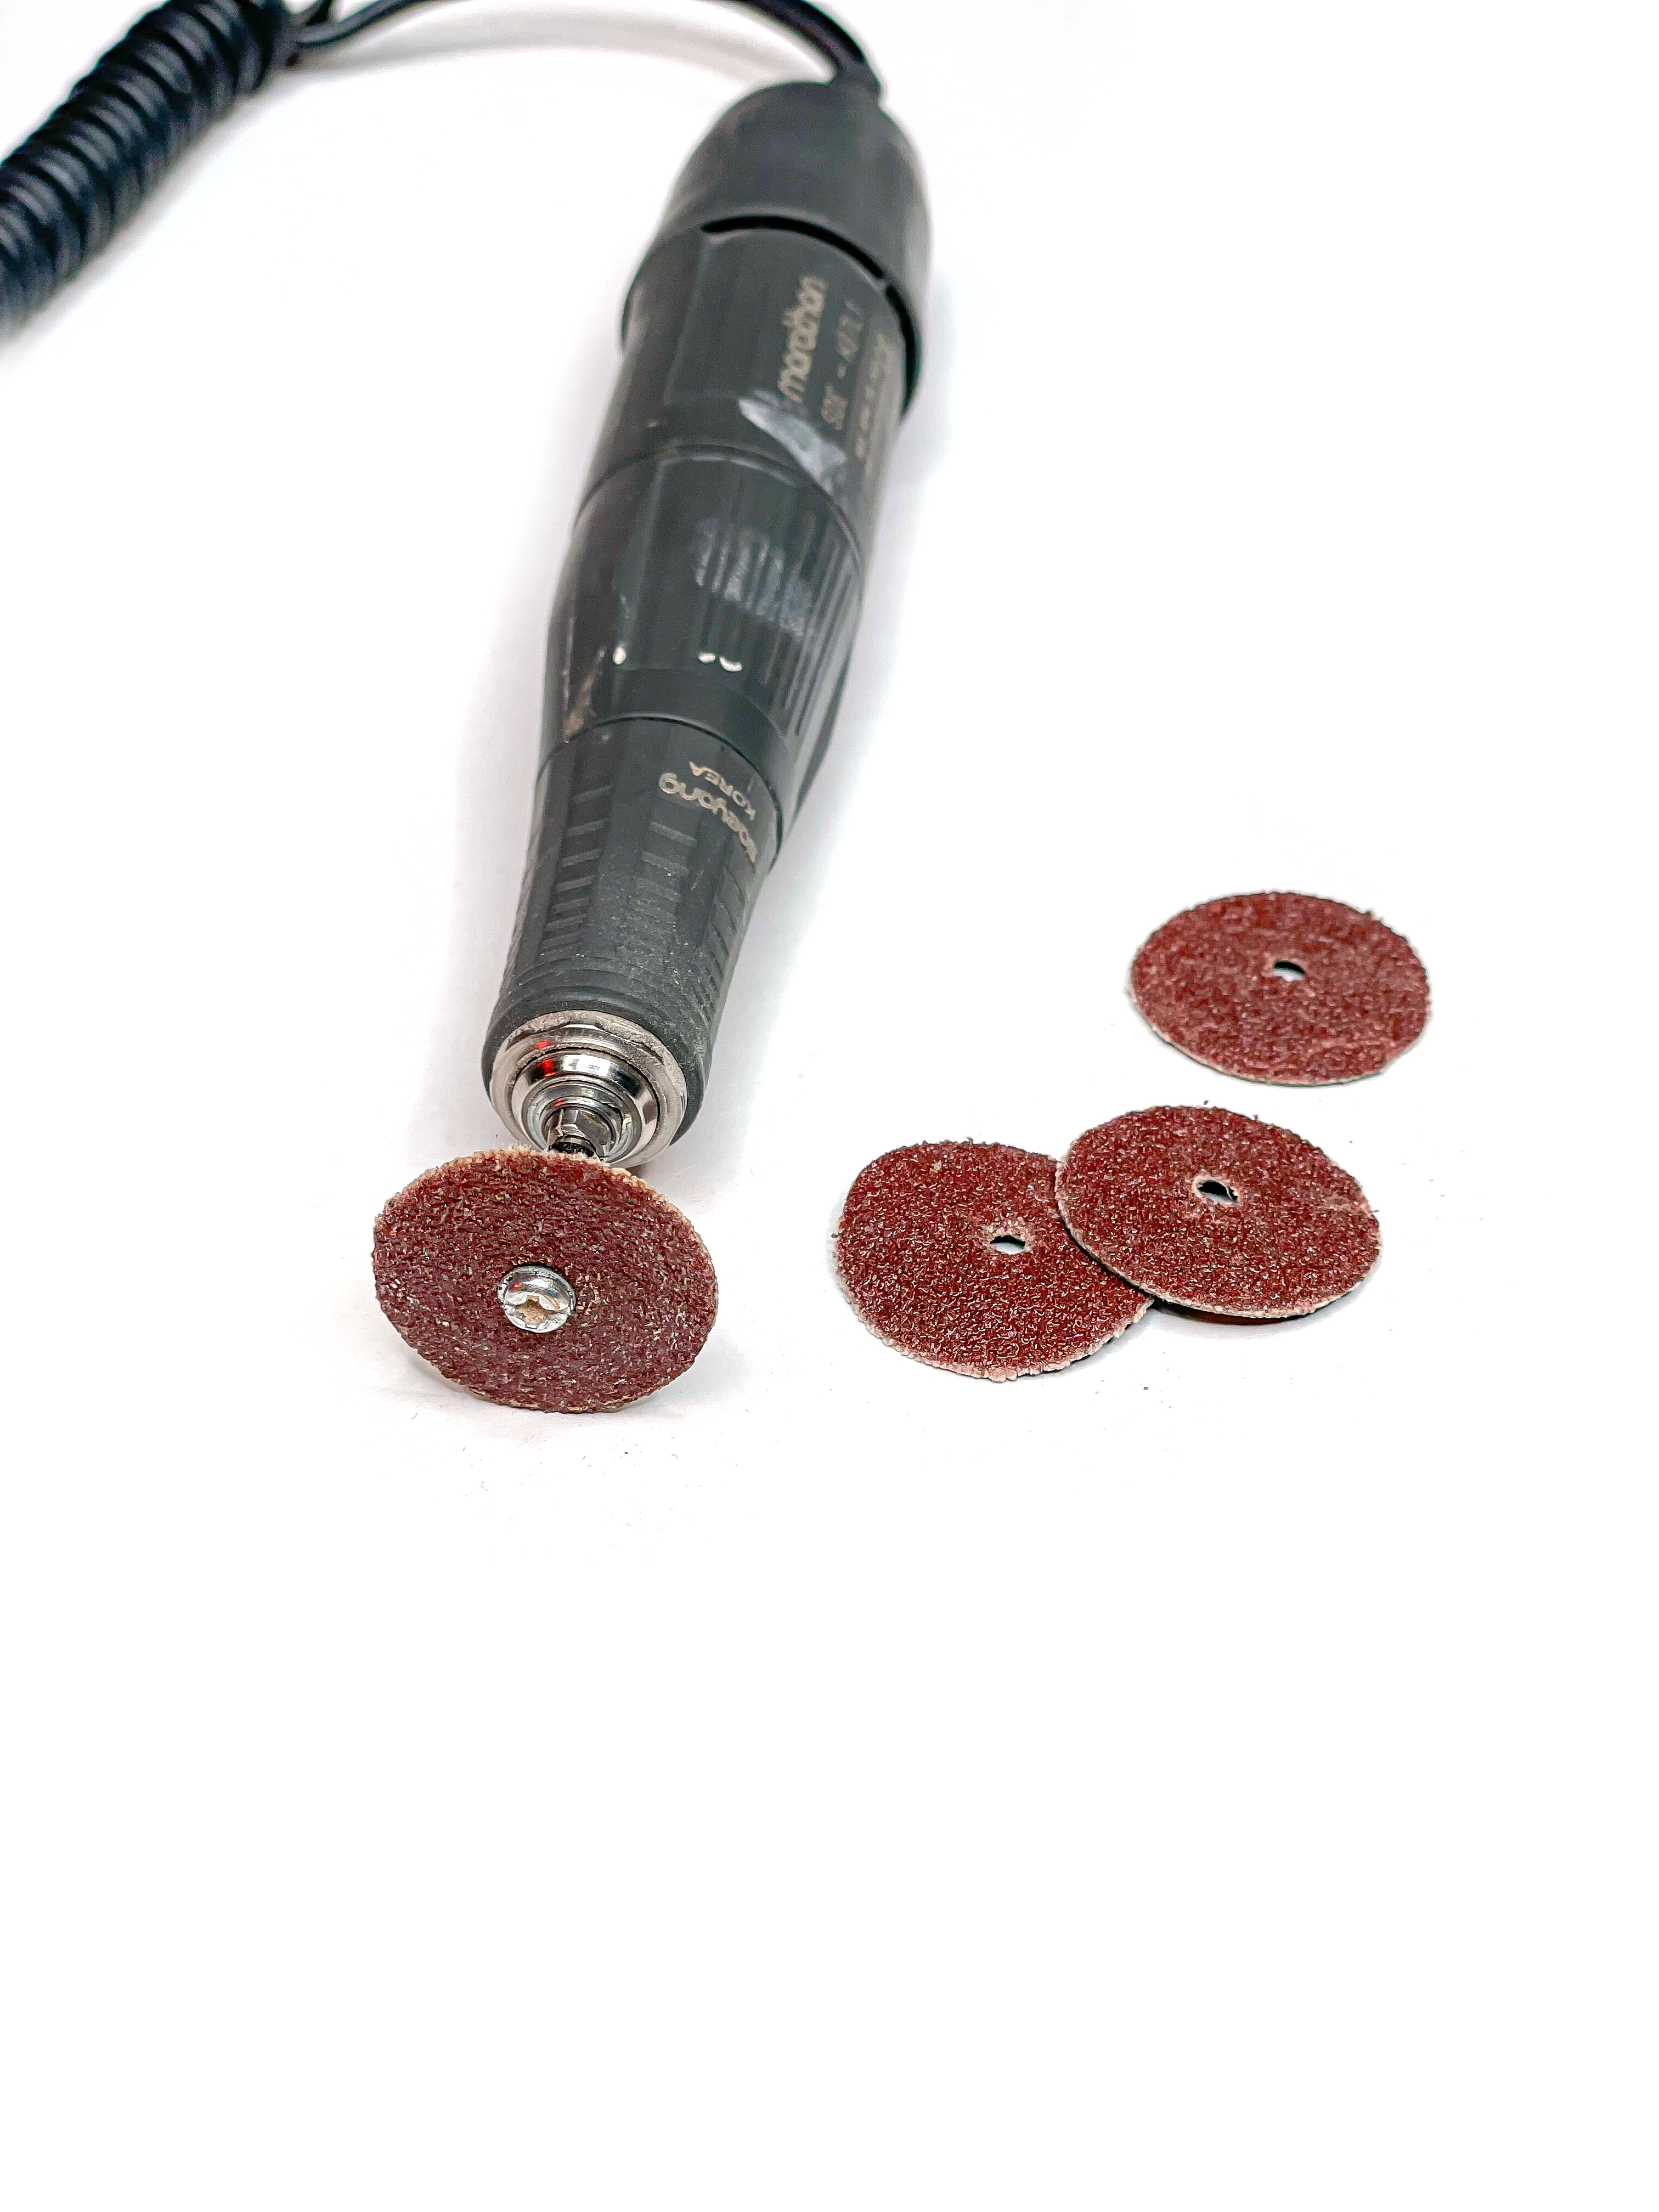
Attaching And Replacing Dremel Sanding Discs
A common mistake is not attaching the disc correctly, which can cause wobbling or even breakage.
Attaching A Sanding Disc
- Insert the mandrel into the Dremel tool.
- Place the disc on the mandrel. Most discs have a small hole that fits over the mandrel’s screw.
- Tighten the screw firmly, but don’t over-tighten—it can crack the disc.
- Test for security by giving the disc a gentle tug. It should not move.
Changing The Disc
- Allow the disc to cool down if it’s been used recently.
- Unscrew the mandrel, remove the old disc, and replace it with a new one.
- Always inspect new discs for cracks or defects before use.
Pro tip: If your disc keeps slipping or wobbling, check if the mandrel is worn out. Old mandrels can cause poor performance and should be replaced.
Basic Sanding Techniques With A Dremel
Getting a smooth finish is not just about the disc—it’s about how you use the tool.
Hold The Tool Correctly
- Use both hands for control. One hand on the body, one guiding the tip.
- Keep your wrists steady. Avoid jerky movements.
Sand At The Right Angle
- Hold the sanding disc flat against the surface for even sanding.
- For edges or curves, tilt the disc slightly and move gently.
Move Smoothly
- Keep the tool moving. Holding the disc in one spot will cause gouges or burns.
- Use light pressure. Let the tool do the work. Pressing too hard can wear out the disc and damage your material.
Control Your Speed
- Start slow. Increase speed gradually as you get comfortable.
- Lower speeds for plastics and delicate materials.
- Higher speeds for metal or hard wood, but always test on a scrap piece first.
Example
When sanding a wooden spoon, move the disc along the grain, not across. This reduces scratches and gives a better finish.
Advanced Techniques For Professional Results
After you’ve mastered the basics, a few advanced tricks can help you get even better results.
Layered Sanding
For the best finish, work through several grits in order:
- Start with coarse grit for shaping.
- Move to medium grit for smoothing.
- Finish with fine grit for polishing.
This technique is called “grit progression” and is used by professionals for a flawless surface.
Using Sanding Discs For Detail Work
Dremel discs are small, making them perfect for tight spots or intricate shapes. Use the edge of the disc to get into corners or along grooves. But be careful—not to stay in one spot too long, or you’ll wear through the material.
Wet Sanding
Some projects (like metal polishing) benefit from wet sanding. Dampen the surface lightly—this reduces dust and helps the disc last longer. Do not use wet sanding on electrical parts or with the tool plugged in.
Shaping And Sculpting
You can use sanding discs not just to smooth, but to shape wood or plastic. By applying more pressure and moving slowly, you can round corners or create curves.
Non-obvious insight: For very fine work, use a worn-out disc instead of a new one. Old discs are less abrasive and act almost like a polishing pad.
Common Mistakes And How To Avoid Them
Many users, especially beginners, make the same errors. Avoiding these can save your project.
- Using the wrong grit. Always start coarse and move finer.
- Applying too much pressure. This burns the material and wears out the disc.
- Holding the tool in one spot. Causes uneven surfaces and can damage your project.
- Not wearing safety gear. Eye injuries and dust inhalation are real risks.
- Forgetting to clean the disc. Dust buildup reduces performance. Clean with a brush or replace as needed.
- Skipping test runs. Always test on a scrap piece first to check your settings and technique.
Cleaning And Maintaining Your Sanding Discs
Taking care of your sanding discs will save you money and keep your tool working its best.
Cleaning Tips
- Use a stiff brush or old toothbrush to remove built-up dust.
- For sticky residue (from paint or glue), a quick dip in mineral spirits can help—just make sure the disc is dry before using again.
When To Replace
- Discs that are worn smooth or have cracks should be thrown away.
- If the disc starts vibrating or wobbling, it’s probably damaged.
Storage
- Store discs in a dry, cool place. Moisture can weaken the adhesive and cause the disc to come apart during use.
- Keep discs in a small box or organizer to avoid bending or breaking.
Pro tip: Mark new discs with the date you started using them. This helps track their lifespan for big projects.
Safety Tips For Using Dremel Sanding Discs
Safety should always be your top priority when using any power tool.
- Always wear goggles to protect your eyes from dust and flying debris.
- Use a dust mask or respirator, especially when sanding paint or treated wood.
- Keep hair and loose clothing away from the spinning disc.
- Work in a well-ventilated area to avoid breathing in fine dust.
- Unplug the tool before changing discs or making adjustments.
For more in-depth safety guidelines, you can visit the Occupational Safety and Health Administration (OSHA) site.
Comparing Dremel Sanding Discs To Other Sanding Methods
How does using a Dremel with sanding discs stack up against other common sanding tools? Here’s a quick comparison:
| Tool | Best For | Pros | Cons |
|---|---|---|---|
| Dremel Sanding Discs | Detail work, small projects | High precision, easy to use in tight spots, versatile | Not for large surfaces, discs wear out quickly |
| Hand Sanding | Flat surfaces, finishing | Inexpensive, good control | Slow, tiring for large areas |
| Orbital Sander | Medium-large surfaces | Fast, consistent results, less effort | Hard to use on small or detailed areas |
| Belt Sander | Heavy removal, large surfaces | Very fast, removes a lot of material | Can damage small or delicate workpieces |
Dremel sanding discs are best for detailed work, small objects, or places where other sanders can’t reach.
Project Ideas Using Dremel Sanding Discs
Knowing how to use sanding discs opens up many project possibilities.
- Restoring furniture: Remove old paint, smooth edges, and prepare surfaces for refinishing.
- Model making: Sand tiny parts for a perfect fit and finish.
- Jewelry making: Shape and polish metal, glass, or stone beads.
- Tool sharpening: Clean and smooth tool edges (use with care).
- Pet nail trimming: Specialized sanding drums or discs can safely file down pet nails.
- Removing rust: Clean old tools or garden equipment.
- Plastic repair: Smooth edges after cutting plastic pipes or sheets.
Creative tip: You can even use worn-out discs for distressing or creating special textures on wood.
Troubleshooting Common Problems
Even with good technique, things can go wrong. Here are some common issues and how to fix them.
Disc Wears Out Too Fast
- Possible causes: Too much pressure, wrong grit, or poor quality disc.
- Solution: Use lighter pressure, start with coarser grit, and buy reputable brands.
Disc Keeps Slipping
- Possible causes: Worn mandrel, improper attachment.
- Solution: Replace the mandrel, make sure the disc is screwed on tight.
Uneven Sanding Or Gouges
- Possible causes: Holding the tool in one place, using too coarse a grit.
- Solution: Keep the tool moving, switch to finer grit as you progress.
Overheating
- Possible causes: High speed, too much pressure, poor ventilation.
- Solution: Lower speed, take breaks, work in a cool area.
Dust Buildup
- Possible causes: Not cleaning discs, no dust extraction.
- Solution: Clean discs regularly, use a vacuum or dust collector.
Expert Tips For Best Results
Here are some tips even experienced users sometimes overlook:
- Use the edge for tight spots: The side of the disc can get into grooves or corners.
- Practice on scraps: Test your technique before starting on the real project.
- Keep spare discs handy: Discs wear out quickly, especially on tough materials.
- Work with the grain: On wood, always sand in the direction of the grain to avoid scratches.
- Don’t rush: Let the tool do the work. Rushing leads to mistakes and poor finishes.
- Label your discs: If you use different grits, mark them with a pen for quick identification.
- Cool-down breaks: Give your tool and discs a rest during long jobs to avoid overheating.

Frequently Asked Questions
What’s The Difference Between Sanding Discs And Sanding Drums On A Dremel?
Sanding discs are flat, circular pads ideal for flat surfaces and edges. Sanding drums are cylindrical and better for smoothing curves or inside holes. Both attach to the Dremel but serve different purposes.
How Do I Know Which Grit Sanding Disc To Start With?
Start with a coarse grit if you need to remove a lot of material or old finishes. For most smoothing jobs, begin with a medium grit. Always finish with a fine grit for the best surface. If you’re unsure, test on a scrap piece first.
Can I Use Dremel Sanding Discs On Metal?
Yes, but use coarse or medium grit discs for removing rust or paint, and switch to fine grit for polishing. Always wear safety gear, as sanding metal can create sparks and sharp particles.
Why Does My Sanding Disc Wear Out So Quickly?
Common reasons include too much pressure, using the wrong grit, or poor-quality discs. Let the tool do the work and make sure you’re using the right disc for your material.
Is It Safe To Use Dremel Sanding Discs On Plastic?
Yes, but use low speed and fine grit discs. High speed or coarse grit can melt or gouge plastic. Move the tool gently and avoid staying in one spot too long.
Using Dremel sanding discs unlocks a new level of precision for DIY, crafts, and repairs. With the right technique, safety, and a little practice, you’ll see professional results on any project. Whether you’re restoring furniture, making models, or just fixing up something around the house, these small discs can make a big difference.
Remember, start slow, stay safe, and enjoy the creative process.