Using a multimeter can seem tricky at first, but it is one of the most useful tools you can have for electrical and electronic work. Whether you are fixing household electronics, checking your car battery, or learning about electricity, a multimeter helps you measure voltage, current, resistance, and more.
Knowing how to use a multimeter safely and correctly will save you time, protect your devices, and help you avoid mistakes. In this detailed guide, you’ll learn everything you need to use a multimeter with confidence, even if you are a complete beginner.
What Is A Multimeter?
A multimeter is a handheld device that measures different electrical values. The three main things it checks are:
- Voltage (V): The electrical force between two points.
- Current (A): The flow of electrical charge.
- Resistance (Ω): How much something resists the flow of electricity.
Some multimeters can also measure continuity, capacitance, frequency, and test batteries or diodes. There are two main types:
- Analog multimeter: Uses a moving needle to show values.
- Digital multimeter (DMM): Shows readings on a digital screen. Most people use DMMs today because they are easier to read and more accurate.
You’ll find multimeters everywhere from home toolkits to professional laboratories.
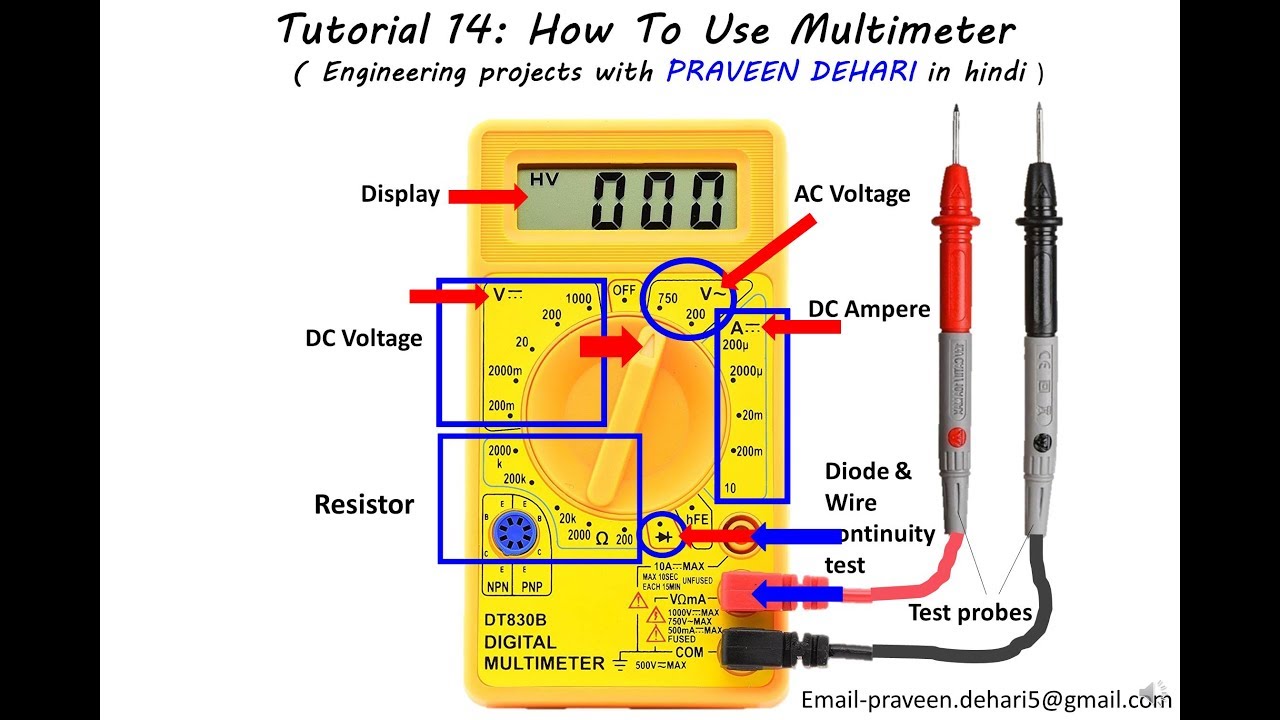
Main Parts Of A Multimeter
Understanding the main parts of your multimeter helps you use it correctly and safely.
- Display screen: Shows the measured value.
- Dial/rotary switch: Lets you select what you want to measure (voltage, current, resistance, etc. ).
- Input jacks: Where you plug in the test leads. Common jacks are COM (common/ground), VΩmA (for voltage, resistance, and low current), and 10A or 20A (for higher current).
- Test leads: Flexible wires with metal tips (usually one red, one black) used to connect the multimeter to whatever you’re testing.
- Hold button (on some models): Freezes the current reading on the screen.
Here’s a quick comparison of analog vs. digital multimeters:
| Feature | Analog Multimeter | Digital Multimeter |
|---|---|---|
| Display | Needle scale | Digital screen |
| Accuracy | Lower | Higher |
| Ease of Use | Harder to read | Easy to read |
| Price | Usually cheaper | Usually more expensive |
| Features | Basic | Many extra functions |
Safety Tips When Using A Multimeter
Before you start, remember that safety is critical. Multimeters measure electricity, and mistakes can cause shocks, burns, or damage to your device. Always follow these tips:
- Check the multimeter’s condition. Never use a damaged meter or leads.
- Set the correct function and range before testing.
- Start with the highest range if you don’t know the expected value.
- Never touch the metal tips of the leads when measuring.
- Disconnect power before measuring resistance or continuity.
- Observe polarity: Red is usually positive, black is negative (ground).
- Wear rubber-soled shoes and stand on a dry surface for extra safety.
A common mistake is to forget to switch back to the voltage setting after measuring current or resistance. This can blow a fuse inside your meter or damage it if you connect it to voltage while set to current mode.
How To Prepare Your Multimeter
Before testing anything, get your multimeter ready:
- Insert the batteries: Most digital meters need a 9V battery. Check the back.
- Plug in the test leads: Black goes in the COM jack, red goes in the VΩmA jack for most tasks.
- Set the dial to the function you want to measure (V, A, or Ω).
- Check the leads for damage or exposed metal.
- Zero the meter (if analog): Short the leads together and adjust to zero.
Some digital meters auto-range (they choose the best range automatically). Others require you to set the range manually. If you’re not sure, always start at the highest setting to protect the meter.
Measuring Voltage
Types Of Voltage
- AC Voltage (VAC): Found in wall outlets and mains supply.
- DC Voltage (VDC): Found in batteries, solar panels, and electronics.
Steps To Measure Voltage
- Set the dial to V (with a straight line for DC or wavy line for AC).
- Plug black lead into COM, red into VΩmA.
- Select the correct range. If unsure, start high (e.g., 600V).
- Touch the black probe to the negative/ground side.
- Touch the red probe to the positive/live side.
- Read the value on the screen.
Example: Measuring A 9v Battery
- Set to DC V.
- Place black on the battery’s minus (-), red on plus (+).
- Reading should be close to 9V.
Example: Checking A Wall Socket (ac Voltage)
- Set to AC V.
- Carefully insert probes into the two holes.
- Typical reading in the US is about 120V AC; in Europe, about 230V AC.
Practical Tips
- Don’t switch settings while the probes are connected to live voltage.
- Never measure voltage on the current (A) setting. This can damage your meter.
- Some digital meters beep if you try to use the wrong setting.
Measuring Current
Measuring current is a bit different from measuring voltage. You have to connect the multimeter in series with the circuit, not just touch across two points.
Types Of Current
- DC Current (ADC): Flows in one direction (used in electronics, batteries).
- AC Current (AAC): Alternates direction (used in household wiring).
Steps To Measure Current
- Move the red lead to the correct jack (often labeled 10A for high current).
- Set the dial to A (with straight line for DC, wavy for AC).
- Select the correct range.
- Turn off power to the circuit.
- Break the circuit at the point you want to measure.
- Connect the meter in series: One probe to each side of the break.
- Restore power and read the value.
Example: Measuring Current Draw Of A Small Motor
- Open the circuit so one wire is disconnected.
- Attach one probe to the loose wire, the other to the now-empty terminal.
- Power up and read the current.
Important Safety Note
- Never try to measure current by touching probes across a battery’s terminals. This creates a short and can damage both the battery and the meter.
- Start with the highest current setting to avoid blowing the meter’s fuse.
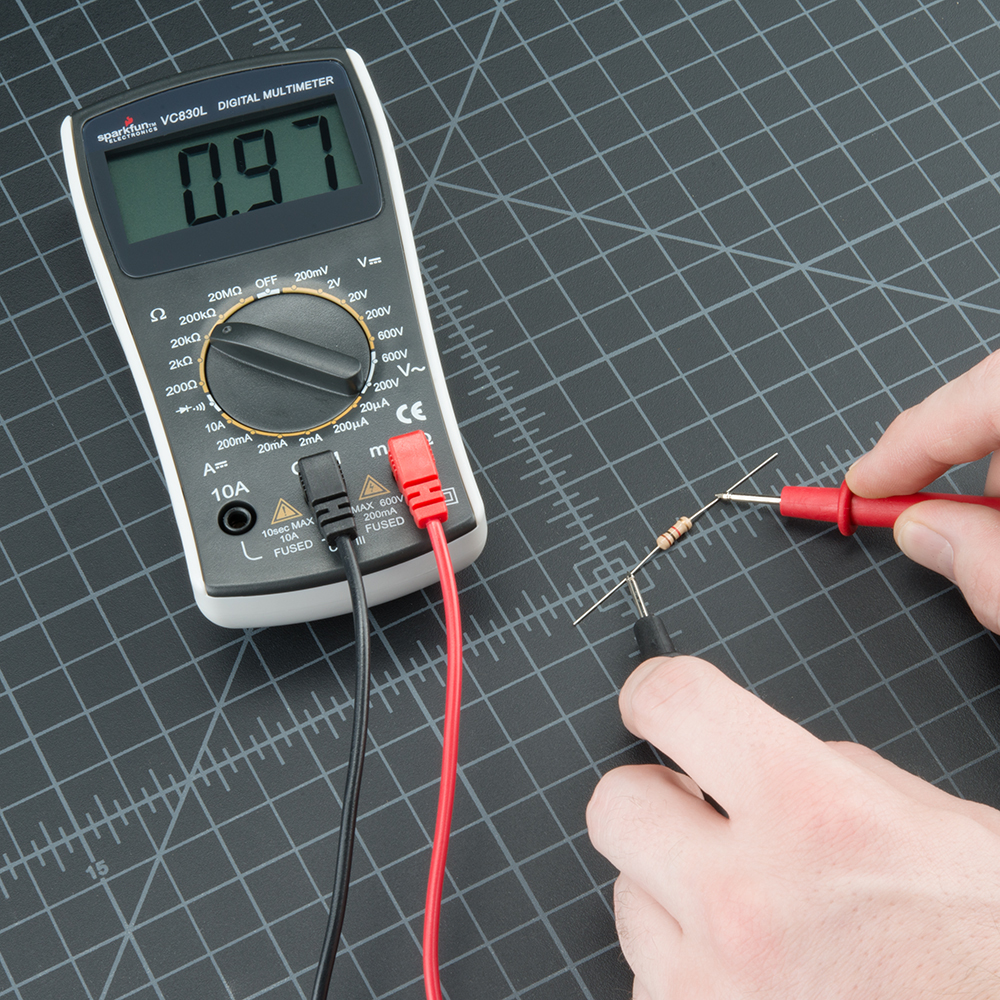
Measuring Resistance
Resistance measurement checks how much a material or component slows down the flow of electricity. This is useful for testing resistors, wires, or checking for broken connections.
Steps To Measure Resistance
- Turn off power to the circuit or component.
- Set the dial to Ω (ohms).
- Plug leads into COM and VΩmA.
- Touch the probes to each end of the resistor or wire.
- Read the value on the screen.
Example: Testing A Resistor
- Identify the resistor.
- Touch one probe to each end.
- Compare reading to resistor’s color code value.
Example: Checking A Wire For Breaks
- Touch probes to each end of the wire.
- A very high or infinite reading means the wire is broken.
Tips
- Don’t measure resistance on a live circuit.
- Some meters have a beep function for continuity (low resistance).
Testing Continuity
Continuity means that electricity can flow from one point to another (the path is not broken). This is important for checking fuses, wires, and switches.
How To Test Continuity
- Set the dial to continuity (often a sound wave symbol or diode symbol).
- Power off the circuit.
- Touch probes to both ends of the component or wire.
- Listen for a beep or look for a low resistance reading.
If the meter beeps or shows close to zero ohms, the path is good. If not, it is broken.
Practical Example
Testing a household extension cord: Touch one probe to the plug end, the other to the socket. If the meter beeps, the wire is good.
Testing Diodes And Transistors
Some multimeters have a diode test mode. Diodes only allow current to flow in one direction.
How To Test A Diode
- Set the dial to diode symbol.
- Power off the circuit.
- Connect red probe to anode (positive side), black to cathode (negative).
- Read the value: A good silicon diode usually shows 0.6–0.7V in one direction and “OL” (open loop) in the other.
For transistors, some meters have a hFE socket or transistor test mode. Check your manual for details.
Measuring Capacitance And Frequency
Many modern digital multimeters can check capacitance (for capacitors) and frequency (for AC signals).
Measuring Capacitance
- Set the dial to the capacitor symbol.
- Discharge the capacitor before testing.
- Connect probes to the capacitor’s leads.
- Read the value.
Measuring Frequency
- Set the dial to Hz (hertz).
- Connect probes across the signal.
- Read the frequency.
These functions are mainly useful for electronics repair or hobby work.
How To Use Auto-ranging And Manual Ranging
Auto-ranging means the meter finds the best range for you. Just set the function, and the meter does the rest.
Manual ranging means you must set the range yourself. Start at the highest setting, then move down until you get a good reading.
Here’s a comparison of auto-ranging vs. manual ranging:
| Feature | Auto-Ranging | Manual Ranging |
|---|---|---|
| Ease of Use | Very easy | Requires experience |
| Speed | Slower (sometimes takes a second to find range) | Faster if you know the range |
| Beginner Friendly | Yes | No |
| Accuracy | Same | Same |
If you’re new, use auto-ranging if possible. Manual ranging gives you more control but takes practice.
Common Mistakes And How To Avoid Them
Even careful users can make mistakes. Here are some to watch for:
- Wrong setting: Measuring voltage while set to current can blow a fuse in your meter.
- Leads in wrong jack: Always check if the red lead is in the correct slot.
- Testing resistance on a live circuit: This can damage your meter or give false readings.
- Not breaking the circuit for current: Multimeter must be in series, not parallel, when measuring current.
- Touching metal parts: This can cause shocks or inaccurate readings.
- Forgetting to discharge capacitors: Charged capacitors can shock you or damage the meter.
- Not checking battery: A weak battery in your meter can give wrong readings.
Two non-obvious insights beginners often miss:
- Input protection: Many good meters have fuses or input protection, but these are not foolproof. Always check your meter’s fuse if something stops working.
- Temperature drift: Cheap meters can show different readings if they get hot or cold. For best accuracy, let your meter adjust to room temperature before using it for sensitive work.
How To Choose The Right Multimeter
If you don’t own a multimeter yet, picking the right one is important. Consider these factors:
- Accuracy: Look for at least 0.5% accuracy for most work.
- Features: Do you need to measure capacitance, frequency, or temperature? Basic models may not have these.
- Safety ratings: For AC/mains work, choose a meter with CAT II, CAT III, or CAT IV safety rating.
- Build quality: Sturdy cases, good leads, and clear screens make a difference.
- Auto-ranging or manual: Beginners should choose auto-ranging.
- Price: You can get a decent basic meter for $20–$40. Professional meters cost $100+.
Here’s a quick comparison of three popular multimeter models:
| Model | Type | Accuracy | Features | Price Range |
|---|---|---|---|---|
| Fluke 117 | Digital | 0.5% | Auto-ranging, True RMS, Non-contact voltage | $200–$250 |
| AstroAI AM33D | Digital | 1.0% | Manual ranging, Basic functions | $20–$30 |
| Extech EX330 | Digital | 0.5% | Auto-ranging, Temperature, Capacitance | $50–$60 |
Practical Examples Of Using A Multimeter
1. Checking If A Fuse Is Blown
- Set the meter to continuity.
- Touch probes to both ends of the fuse.
- If the meter beeps, the fuse is good. If not, it’s blown.
2. Testing A Car Battery
- Set the meter to DC volts, 20V range.
- Red probe to positive, black to negative.
- A healthy 12V car battery should read about 12.6V or higher.
3. Finding A Faulty Light Bulb
- Remove the bulb.
- Set meter to resistance or continuity.
- Touch probes to the bulb’s contacts.
- No reading = broken filament.
4. Checking Household Wiring
- Set meter to AC volts.
- Carefully insert probes into outlet slots.
- Typical reading should match your country’s standard.
5. Verifying Solar Panel Output
- Set meter to DC volts.
- Connect probes to solar panel terminals in sunlight.
- Compare voltage to panel’s rated value.
How To Care For Your Multimeter
Treating your meter well helps it last longer and stay accurate.
- Store in a case to protect from dust and drops.
- Replace the battery as soon as the low-battery sign appears.
- Check leads regularly for cracks or wear.
- Don’t expose to moisture or extreme temperatures.
- Clean the screen and body with a dry cloth.
A good multimeter can last many years if you look after it.
Advanced Multimeter Features
Some higher-end models offer extra features:
- True RMS: Measures AC signals more accurately, useful for modern electronics.
- Data hold: Freezes the value on screen.
- Backlight: For working in dark places.
- Non-contact voltage detection: Lets you check for live wires without touching.
- Temperature probe: Measures temperature with a special sensor.
If you plan to work with complex circuits or need high accuracy, these features are worth considering.
Multimeter Myths And Misunderstandings
There are a few myths about multimeters:
- Myth: All multimeters are equally safe. Fact: Only meters with proper safety ratings (like CAT III or CAT IV) are safe for high-voltage work.
- Myth: You can measure current anywhere in a circuit. Fact: The meter must always be in series, not parallel, for current.
- Myth: You can’t get shocked with a multimeter. Fact: If you touch live wires or metal probe tips, you can get a shock.
Always respect electricity and use your meter carefully.
Where To Learn More
If you want to learn even more about multimeters and electrical measurement, check out this detailed guide from Wikipedia.
Frequently Asked Questions
What Is The Difference Between Ac And Dc Measurement On A Multimeter?
AC (Alternating Current) changes direction back and forth, like the electricity in your home. DC (Direct Current) flows in one direction, like in batteries. On your multimeter, AC is usually marked with a wavy line (~) and DC with a straight line (—). Always set the meter to the correct type before measuring.
Can I Use A Multimeter To Test Live Wires?
Yes, but with caution. Set the meter to AC voltage, use the correct probes, and never touch the metal tips. Always make sure you are using a meter with a high enough safety rating (CAT III or CAT IV) for mains voltage.
Why Does My Meter Show “ol” Or “1” When Measuring Resistance?
“OL” stands for over limit or open loop. It means the resistance is too high to measure, or there is no connection. This often happens if you try to measure resistance on an open circuit or across a broken wire.
How Do I Replace The Fuse In My Multimeter?
First, turn off and disconnect the meter. Open the back cover (usually with a small screwdriver). Find and remove the blown fuse (it will look black or broken inside). Replace with a fuse of the same type and rating, then close the meter.
Why Is My Multimeter Not Giving Any Reading?
Check the following: Is the battery good? Are the leads plugged in tightly? Is the dial set to the right function and range? Is the fuse blown inside the meter? Try these steps to find the problem.
Using a multimeter opens up a world of possibilities for repairs, testing, and learning about electricity. With this guide, you’re ready to use your multimeter safely and effectively, whether for home projects, automotive checks, or electronics experiments. Always respect electricity, use your meter with care, and you’ll get accurate results every time.