Building your own router table can transform your woodworking projects. A router table is a workbench that holds a router upside down, giving you more control and precision for tasks like edge profiling, joinery, and making grooves. While buying a ready-made router table is easy, building one yourself lets you customize every detail for your workspace and needs.
You can also save money and learn practical skills along the way.
Many people hesitate because they think making a router table is too complicated or expensive. But with the right approach, even a beginner can create a sturdy, reliable table that works as well as commercial options. This guide will show you exactly how to build a router table step by step, explain what materials and tools you need, and help you avoid common mistakes that frustrate first-timers.
Why Build A Router Table?
A router table isn’t just for professionals. It lets you use a handheld router in new ways. Here’s why building your own is a smart move:
- Customization: You can adjust the size, height, and features for your comfort.
- Cost Savings: Commercial tables can cost hundreds of dollars. DIY often costs less.
- Skill Growth: You’ll learn woodworking techniques you can use in other projects.
- Add-On Features: Build in storage, dust collection, or extra safety features.
- Precision: The stability and control of a table help you create cleaner, more accurate cuts.
Many woodworkers say their router table is the most-used tool in their shop after a table saw. Even a simple, homemade version can handle 90% of the tasks a store-bought table does.
Planning Your Router Table Build
Before you start building, make a clear plan. This avoids wasted time, money, and effort. Key points to consider:
1. Table Size And Height
- Standard size is about 24 x 32 inches, big enough for most tasks but still easy to move.
- Height should match your workbench or be comfortable for you, usually between 32–36 inches.
- If you have limited space, a smaller or portable design may be better.
2. Type Of Router Table
There are three main types:
- Benchtop Router Table: Sits on your workbench. Best for small shops or occasional use.
- Freestanding Router Table: Has its own legs and base. More stable, can include cabinets.
- Extension Wing Table: Attaches to a table saw. Saves space but less flexible.
Choose the style that fits your space and woodworking goals.
3. Materials And Budget
- Plywood is strong, flat, and affordable for most parts.
- Medium-density fiberboard (MDF) is smooth and flat, good for the top.
- Solid hardwood is best for edging, but not required.
- Plan your budget. Most DIY router tables cost between $75–$250, depending on features.
4. Features To Include
- Fence: Guides your workpiece for straight cuts.
- Insert Plate: Holds the router and lets you remove it easily.
- Dust Collection: Helps keep your workspace clean.
- Storage: Drawers or shelves for bits and tools.
Think about what you really need. Extra features are nice, but a simple table can still do excellent work.

Tools And Materials You’ll Need
You don’t need a fancy workshop to build a router table. Here’s what you’ll need:
Essential Tools
- Circular saw or table saw (for straight, long cuts)
- Drill and drill bits
- Jigsaw (for cutting openings)
- Measuring tape
- Square (to keep everything at 90° angles)
- Screwdriver
- Clamps
- Router (the tool you’ll mount)
Suggested Materials
- 3/4″ plywood or MDF (for tabletop, sides, and shelves)
- 1×2 or 1×3 hardwood strips (for edging)
- Router insert plate (store-bought or homemade from aluminum/plastic)
- Wood screws, bolts, and washers
- Wood glue
- Hinges (if adding doors)
- Drawer slides (for storage)
- Dust port (optional, for connecting to a shop vac)
- Paint or polyurethane (for finishing)
Cost Comparison
Here’s a quick look at how building your own router table stacks up against buying one:
| Option | Estimated Cost | Main Benefits | Main Drawbacks |
|---|---|---|---|
| DIY Router Table | $75–$250 | Custom size, features, lower cost | Time, skill required |
| Basic Store-Bought | $150–$400 | Ready to use, warranty | Limited features, fixed size |
| Premium Store-Bought | $400–$1200 | High precision, many features | Expensive, may be too large |
Step-by-step Guide: How To Build A Router Table
Let’s break down the process into clear steps. Take your time and double-check each measurement for best results.
Step 1: Design Your Table
Sketch your design on paper or use free online design tools. Decide the dimensions, type of base, and where you want storage or dust ports. Many people find it helpful to look at photos of homemade router tables for inspiration.
Non-obvious insight: Make the tabletop slightly larger than you think you need. Extra space helps with long boards and safer handling.
Step 2: Cut The Top And Edges
Cut a piece of 3/4″ MDF or plywood for your tabletop. A standard size is 24″ x 32″. Use a circular saw or table saw for straight, clean edges.
- Cut hardwood strips (like maple or oak) for edging. This protects the table and keeps it flat.
- Attach the edging with wood glue and brads or screws. Clamp until dry.
Tip: Seal the MDF top with polyurethane to protect against moisture and wear.
Step 3: Make The Insert Plate Opening
The insert plate holds your router and lets you remove it easily for bit changes.
- Place your insert plate (store-bought or homemade) on the table.
- Trace around it, then mark another line about 1/8″ inside for the lip.
- Drill a starter hole inside the lines.
- Use a jigsaw to cut out the opening. Go slowly for accuracy.
- Create a shallow rabbet (recess) around the edge so the plate sits flush with the tabletop. This can be done with a router and straight bit.
Common mistake: Cutting the opening too big or too small. Test fit the plate before finalizing.
Step 4: Build The Base
Choose between a cabinet base (with storage) or a simple stand.
- For a cabinet, cut four panels for sides, back, and bottom from plywood.
- Assemble with wood glue and screws. Use a square to keep everything at 90 degrees.
- Add shelves or drawers if desired.
A simple open stand is faster, using four legs and stretchers for stability.
Practical advice: Add adjustable feet to the legs. This helps keep the table level, even on uneven floors.
Step 5: Attach The Top To The Base
Place the tabletop upside down. Center the base on it.
- Secure with screws from inside the base up into the tabletop.
- Use washers to avoid pulling screws through the wood.
- Make sure the screws do not poke through the tabletop.
Step 6: Mount The Router
Follow these steps for safe mounting:
- Attach your router to the insert plate, following the plate’s instructions.
- Drop the plate into the tabletop opening.
- Secure the plate with screws if needed.
Non-obvious insight: Some routers are heavy. If your plate sags, support it with blocks under the table.
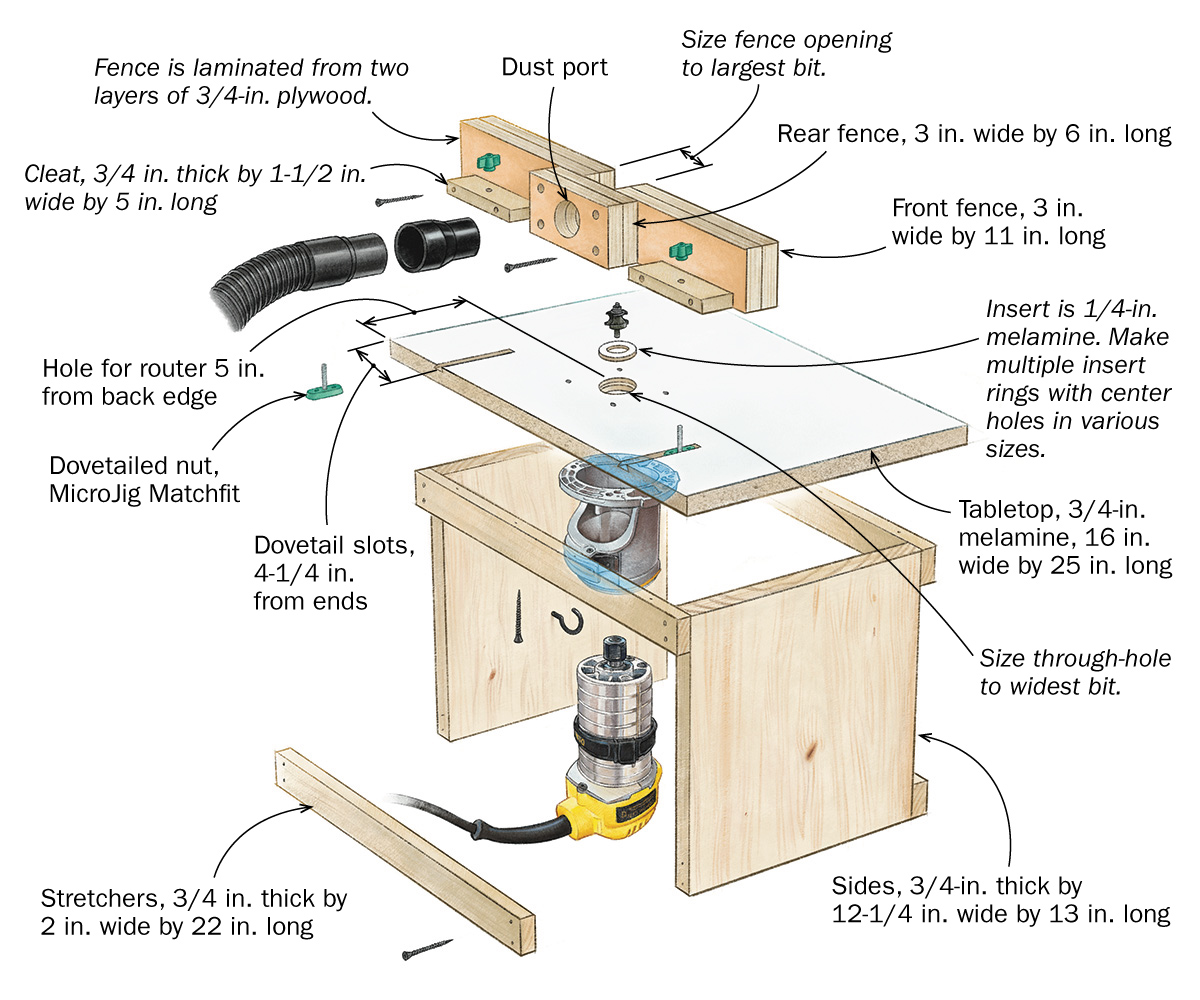
Step 7: Build And Attach The Fence
The fence is key for safe, accurate cuts.
- Cut two pieces of straight plywood or MDF for the fence: One tall (about 4–6″) and one short (about 2–3″).
- Glue and screw them together at a right angle.
- Add T-slots or clamps to hold the fence firmly to the table.
- Make a dust port in the fence if you want to use a shop vac.
The fence should slide back and forth and lock in position easily.
Step 8: Add Accessories
You can improve your router table with useful extras:
- Featherboards: Hold wood tight to the fence for safer cuts.
- Guard: Covers the bit for safety.
- Mitre track: Lets you use a mitre gauge for angled cuts.
- Power switch: Easier to turn the router on/off without reaching under the table.
Don’t try to add too much at once. Start simple and upgrade as you use the table.
Step 9: Finishing Touches
- Sand all surfaces smooth.
- Paint or seal the base for durability.
- Wax the tabletop for slick, easy sliding.
- Test everything for stability and safety before your first use.
Key Features To Consider For Your Router Table
Not all router tables are the same. Think about which features matter most to you. Here’s how they compare:
| Feature | Benefit | DIY Difficulty | Worth Adding? |
|---|---|---|---|
| Adjustable Fence | Improves accuracy, handles different bit sizes | Easy | Yes |
| Dust Collection Port | Keeps workspace clean | Medium | Yes (if you have a shop vac) |
| Mitre Track | Allows angled cuts, use of jigs | Medium | Optional |
| Storage Drawers | Organizes bits and tools | Medium | Nice to have |
| Router Lift | Easy bit changes, height adjustment | Hard | Advanced users |
When starting out, focus on a solid top, a flat fence, and a safe mounting system. You can always add more features later.
Common Mistakes And How To Avoid Them
Even experienced woodworkers make mistakes when building router tables. Here are the most common ones and how to sidestep them:
- Poorly Supported Top: If the tabletop flexes, your cuts will be uneven. Use thick MDF/plywood and strong supports.
- Misaligned Insert Plate: If the plate isn’t flush, your workpiece will catch. Take time to rout the recess accurately.
- Unstable Base: Wobbly tables are unsafe. Check for square corners and add cross-bracing if needed.
- Ignoring Dust Collection: Sawdust can clog your router and make a mess. Add a port or at least plan for one.
- Skipping Test Cuts: Always test on scrap wood before working on your real project.
Pro tip: Use a straightedge to check the tabletop flatness after assembly. Even a small dip can affect your results.
Safety Tips For Using A Router Table
A router table is powerful, but it can be dangerous if you’re not careful. Here’s how to stay safe:
- Always use push sticks or featherboards to keep hands away from the bit.
- Wear eye and ear protection. Routers are loud and create lots of chips.
- Don’t remove the guard unless you absolutely need to for a specific cut.
- Check that the router is unplugged before changing bits or making adjustments.
- Feed wood against the direction of the bit’s rotation for control.
- Keep your workspace clean to avoid accidents.
Some beginners forget to check the bit height or fence alignment before starting. This can ruin your workpiece or even cause kickback. Double-check everything before each cut.
Upgrades And Customizations
Once your basic router table is working, you may want to add upgrades:
- Router lift: Lets you adjust the bit height from above the table, no tools needed.
- T-track systems: For attaching stops, featherboards, and other jigs.
- Mobile base: Add casters to roll the table around your shop.
- Lighting: A small LED light helps you see your work better.
- Sound insulation: Lining the cabinet with foam can reduce noise.
These upgrades can make your table more enjoyable and efficient. However, focus on getting the basics right first. A simple, well-built router table is better than a complicated one that’s hard to use.
Real-world Examples And Lessons Learned
Many DIYers share their router table projects online. Here are a few lessons from their experiences:
- Start simple: One woodworker built a basic table from scrap plywood. It wasn’t pretty, but it worked for years.
- Measure twice, cut once: Another builder realized his insert plate was crooked only after assembly. He had to rebuild the top.
- Add wheels if space is tight: A small shop owner put locking casters on the base. Now he can move the table out of the way easily.
- Upgrading is easy: After a year, one user added drawers and a dust port to his original design.
A good router table doesn’t need to look perfect. Function and safety are more important.
Maintenance And Care
A router table will last many years if you take care of it:
- Clean the top and fence after each use to prevent buildup.
- Check for loose screws every few months.
- Wax or oil the tabletop once in a while to keep wood sliding smoothly.
- Store bits in a dry place to prevent rust.
- Vacuum out dust from inside the cabinet or base regularly.
If you notice any sagging or damage, repair it quickly. A flat, stable table is key to safe and accurate work.

Comparing Diy And Commercial Router Tables
Let’s see how a homemade router table matches up with a commercial model:
| Aspect | DIY Router Table | Commercial Router Table |
|---|---|---|
| Cost | Lower | Higher |
| Customization | Full (size, features) | Limited |
| Setup Time | Several hours/days | Ready out of box |
| Learning Opportunity | High | Low |
| Precision (with care) | Excellent | Excellent |
| Upgrade Potential | Easy | Hard/expensive |
Building your own router table is not just about saving money. It lets you learn, solve problems, and create a tool that fits your workflow. Even if you buy a commercial table later, your experience will help you use it better.
Frequently Asked Questions
What Size Should My Router Table Be?
The ideal router table size depends on your workspace and projects. For most users, 24 x 32 inches is a good starting point. This size handles most boards but is still easy to move. If you work with large panels, consider a bigger table. For small shops, a benchtop model (about 16 x 24 inches) might be best.
Can I Use Any Router With A Homemade Router Table?
Most mid-size and large routers can be mounted to a DIY table, but check the base size and mounting holes. Some compact routers may need an adapter plate. Always make sure the router is securely attached and the bit is centered in the opening. Avoid using very small trim routers for heavy cuts.
How Do I Make Sure The Insert Plate Is Level?
To level the insert plate, rout a shallow rabbet so the plate sits flush with the tabletop. Use shims or adjustable leveling screws at the corners if needed. Double-check with a straightedge. A plate that is not level will cause the wood to catch or tip during use.
Do I Really Need Dust Collection?
Dust collection is not required, but it makes woodworking cleaner and safer. Routers make a lot of fine dust that can be harmful to breathe. Adding a dust port to your fence or cabinet, and connecting a shop vac, will help keep your workspace tidy. If you don’t have a vacuum, sweep or blow out dust regularly.
Where Can I Find More Plans And Tips For Router Tables?
There are many free and paid router table plans online. Woodworking forums, YouTube, and official sites like Popular Woodworking have detailed guides and videos. Always compare a few designs before starting, and look for plans with clear measurements and step-by-step photos.
Building a router table is a rewarding project that pays off every time you use it. With patience and careful work, you can make a tool that boosts your woodworking skills for years to come.