If you use a miter saw often, you know how important a sharp, reliable blade is. A dull or damaged blade can ruin your cuts, slow your work, and even create safety risks. Changing a miter saw blade might look tricky at first, but with the right steps, it’s simple and safe.
Whether you’re a DIY beginner or a woodworking enthusiast, learning how to change a miter saw blade is a skill that will save you time, money, and frustration. This guide will walk you through every detail, including safety, tools you need, step-by-step instructions, and expert tips that most people miss.
Why Changing A Miter Saw Blade Matters
A sharp blade gives clean, precise cuts. When a blade gets dull, you’ll see burn marks, splintered wood, or even feel the saw vibrating more than usual. Besides poor results, a worn blade forces your saw to work harder, which can damage the motor over time.
If you use your saw for fine woodworking, trim, or framing, a blade change could be needed every few weeks. For most home users, changing the blade every few months is common, depending on how much you cut and what materials you use.
Not all blades are the same, either. Different blades are designed for wood, metal, plastic, or even specific cuts like crosscuts or rip cuts. The right blade makes all the difference.
Tools And Items You Need
Before you start, gather these items. Having everything ready keeps the process smooth and safe.
- New miter saw blade (check your saw’s manual for the correct size and type)
- Wrench or blade-changing tool (usually comes with your saw)
- Work gloves (for hand protection)
- Safety glasses
- Dust mask (optional but recommended)
- Screwdriver (if your saw’s blade cover uses screws)
- Clean cloth (for wiping dust and debris)
Pro Tip: Always unplug or remove the battery from your saw before starting. Many accidents happen because the saw is still connected to power.
Safety First: Reducing Risks
Changing a blade is not dangerous if you follow some basic safety rules:
- Disconnect power: Unplug corded saws, or remove the battery from cordless models.
- Wear gloves: Saw blades are sharp, even when dull.
- Clear workspace: Remove scraps and tools so nothing gets in the way.
- Read the manual: Each saw has unique parts; check the manual if you’re unsure.
Non-obvious insight: Even after unplugging, wait a few seconds before touching the blade. Some saws have capacitors that can hold power briefly.
Understanding Your Miter Saw
Before you dive in, it helps to know the key parts of your saw. Here are the main components you’ll interact with:
- Blade guard: Covers the spinning blade for safety.
- Spindle lock: A button or lever that holds the spindle still.
- Arbor bolt: The bolt that holds the blade in place.
- Washer/flange: Metal pieces that secure the blade.
- Blade cover screws: On some models, you’ll need to remove these.
Each miter saw brand—like DeWalt, Makita, Bosch, or Ryobi—uses slightly different designs. But the basics stay the same.
Step-by-step: How To Change A Miter Saw Blade
Let’s walk through the process, step by step. Take your time and don’t rush—precision and safety matter more than speed.
1. Disconnect The Power
Always unplug the saw or remove the battery. Even a momentary slip can cause a serious injury if the saw starts unexpectedly.
2. Raise The Blade Guard
Lift the blade guard to expose the blade. On some saws, you’ll need to loosen a screw to move the guard. Others have a lever or button. Don’t force anything—if it’s stuck, check your manual.
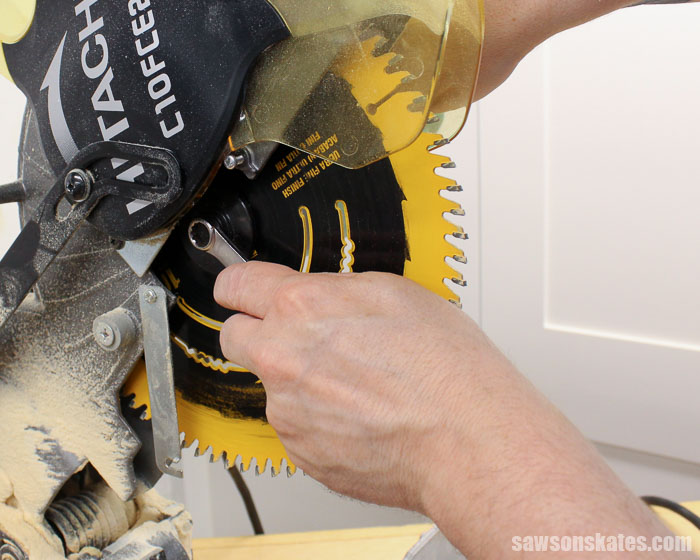
3. Lock The Spindle
Find the spindle lock. This is usually a button or lever near the blade’s center. Press and hold it. This stops the blade from spinning, making it safe to loosen the blade bolt.
4. Loosen The Arbor Bolt
Using the wrench or tool, turn the arbor bolt counterclockwise (most saws). Some saws use a reverse-thread bolt, so check your manual if it doesn’t loosen easily. Don’t use pliers or tools that might strip the bolt.
5. Remove The Old Blade
Once the bolt and washers are off, carefully slide the blade out. Set the old blade aside—don’t drop it, as even dull blades can cut you.
6. Clean The Blade Area
Wipe away sawdust and debris with a clean cloth. If you see resin or pitch build-up, gently scrape it off. A clean surface helps the new blade seat properly.
7. Install The New Blade
Slide the new blade onto the arbor. Make sure the teeth point in the correct direction (usually towards you at the bottom of the blade). Place the washers back on and hand-tighten the arbor bolt.
8. Tighten The Arbor Bolt
Press the spindle lock again and tighten the arbor bolt with the wrench. Don’t over-tighten; just make it snug.
9. Lower The Blade Guard
Return the blade guard to its original position. Tighten any screws or fasteners you loosened.
10. Reconnect Power And Test
Plug the saw back in or insert the battery. Run the saw for a few seconds without cutting anything. Listen for odd sounds or vibrations. If the blade wobbles, unplug the saw and check that everything is tight.
Common Mistakes To Avoid
Most people make one or more of these mistakes when changing a miter saw blade:
- Forgetting to disconnect power: This is the most dangerous mistake.
- Installing the blade backward: Double-check the direction of the teeth.
- Over-tightening or under-tightening the arbor bolt: Both can damage your saw or cause accidents.
- Not cleaning the blade area: Dirt or resin can make the blade wobble.
- Losing washers or bolts: Keep all small parts in a cup or tray.
Non-obvious insight: Some blades have a thin paper washer between the blade and the flange. Don’t throw this away—it helps reduce vibration.

Choosing The Right Replacement Blade
Not all blades are equal. Picking the right one depends on what and how you cut.
Blade Size And Arbor
Check your saw’s manual for the correct diameter and arbor size. Most common sizes are 10-inch and 12-inch blades.
Tooth Count
- 24-40 teeth: Good for quick, rough cuts in construction lumber.
- 60-80 teeth: Better for fine woodworking, trim, and smooth edges.
Blade Type
- Carbide-tipped: Longer life and better performance.
- Steel: Cheaper, but dull faster.
Special Blades
Some blades are made for cutting metal, laminate, or plastic. Never use a wood blade on metal—it’s dangerous.
Table: Blade Types Compared
| Blade Type | Material | Best For | Average Price |
|---|---|---|---|
| Standard Steel | Steel | Rough cuts | $15-$25 |
| Carbide-Tipped | Steel with carbide | Finish cuts, trim | $30-$60 |
| Specialty (Laminate/Metal) | Carbide/Alloy | Plastics, metals | $50-$100 |
How Often Should You Change The Blade?
Blade life varies by:
- Material you cut (hardwoods dull blades faster)
- Frequency of use
- Blade quality
Signs you need to change the blade:
- More effort needed to push material through
- Smoking or burning smell
- Tear-out or chipping on cuts
- Blade is missing teeth
Quick tip: Some professionals change blades weekly. For home use, check your blade every 2-3 months.
Dealing With Stuck Bolts Or Guards
Sometimes, parts get stuck due to sawdust, rust, or over-tightening. Here’s how to handle it:
- Use a penetrating oil if the arbor bolt is rusty.
- Tap the wrench gently with a rubber mallet to loosen stubborn bolts.
- If the blade guard won’t lift, clean around the hinge with compressed air.
If nothing works, don’t force the part. Forcing can break delicate pieces. Instead, consult your manual or call a service center.
Cleaning And Maintaining Your Saw After Changing The Blade
A clean saw lasts longer and works better. After changing the blade:
- Wipe down the table and fence.
- Clean out dust from vents and moving parts.
- Check the power cord or battery contacts for wear.
Every few months, lubricate moving joints with a dry lubricant. Never use oil, as it attracts sawdust.

Storing Old Or Spare Blades
Don’t toss your old blade in the trash—blades can often be sharpened for reuse. Store them safely by:
- Hanging them on a pegboard.
- Placing in a blade case or cardboard sleeve.
- Keeping away from moisture to prevent rust.
Never leave blades loose in drawers; they can cut you or get damaged.
Advanced Tips For Professionals
If you use your miter saw every day, here are some expert-level habits:
- Label your blades: Use a marker to note what each blade is for (e.g., “trim,” “framing,” or “metal”).
- Keep a spare bolt and washer: These small parts can get lost during busy workdays.
- Rotate your blades: Swap between two blades to extend their life.
- Inspect the arbor flange: If it’s warped or dirty, it can cause vibration and poor cuts.
Troubleshooting: After Changing The Blade
Sometimes, things don’t go perfectly. Here are common issues and what to do.
Saw Vibrates Excessively
- Check that the blade is seated properly.
- Make sure the washers and arbor bolt are tight.
- Inspect the blade for warps or bends.
Blade Makes Rough Cuts
- The blade could be dull or the wrong type.
- Clean off any pitch or resin.
- Confirm the blade is installed in the right direction.
Saw Won’t Start
- Double-check the power connection.
- Make sure the blade guard isn’t stuck in the “open” position.
- Inspect the safety interlock (some saws won’t run if the guard is not closed).
Table: Common Problems And Solutions
| Problem | Possible Cause | Solution |
|---|---|---|
| Saw vibrates | Loose bolt or washer | Tighten all parts, check blade seating |
| Burn marks on wood | Dull or dirty blade | Clean or replace blade |
| Blade doesn’t fit | Wrong size or arbor | Check manual, use correct blade |
When To Seek Professional Help
If your saw has any of these issues after a blade change, get expert help:
- The blade wobbles even after reseating.
- The arbor bolt is stripped or won’t tighten.
- The blade guard is broken.
- The saw makes unusual noises or smells.
Trying to fix serious mechanical problems yourself can void your warranty or make the saw unsafe.
Environmental Tips: Disposal And Recycling
Old blades shouldn’t go in regular trash, especially if they’re carbide-tipped or made from alloys. Many hardware stores offer blade recycling. Some local recycling centers accept metal blades. Always check your city’s rules.
Pro Tip: If you sharpen your own blades, wear eye protection and use a proper jig. Improper sharpening is dangerous.
Saving Money: Sharpen Or Replace?
Sharpening a blade can be cheaper than buying new, especially for high-quality carbide blades. But:
- Cheap steel blades usually aren’t worth sharpening.
- Blades missing teeth should be replaced.
- If you only cut occasionally, buying a new blade every few years is easier.
Professional sharpening costs $8–$15 per blade. Compare this to the cost of a new blade.
How To Make Blade Changes Faster
Professionals often need to switch blades quickly for different jobs. Here’s how to save time:
- Keep your wrench with the saw, attached by a magnet or string.
- Practice the steps with the saw unplugged until you’re comfortable.
- Use blades with quick-change features if your saw supports them.
Non-obvious insight: Some high-end saws have tool-free blade changing systems. If you change blades often, this feature can save hours over a year.
Miter Saw Blade Change: Quick Reference Checklist
- Disconnect power.
- Raise blade guard.
- Lock spindle.
- Loosen arbor bolt.
- Remove old blade.
- Clean blade area.
- Install new blade (teeth facing right way).
- Replace washers and bolt.
- Lower blade guard.
- Tighten everything.
- Restore power and test.
Keep this checklist in your workshop for fast reference.
How Blade Choice Affects Your Work
Your blade isn’t just a tool; it’s a key factor in your results. The right blade makes cuts cleaner and reduces sanding time. The wrong blade can split expensive wood or leave rough edges. If you use your saw for trim, picture frames, or furniture, investing in a quality blade pays off with better-looking projects.
Table: Blade Choice By Project Type
| Project | Recommended Blade | Teeth Count |
|---|---|---|
| Framing | Carbide-tipped, 24T | 24 |
| Trim/Molding | Fine finish, 80T | 80 |
| Laminate | Specialty laminate blade | 60+ |
| Metal | Carbide metal-cutting | 60-80 |
Where To Learn More
For deeper knowledge, check the official site of your miter saw brand, or look for woodworking forums with detailed guides. One trusted resource for power tool safety and maintenance is Family Handyman.
Frequently Asked Questions
How Do I Know When My Miter Saw Blade Needs Replacing?
Look for signs like burning smells, rough or uneven cuts, chipped blade teeth, or the saw feeling harder to push. If you see these, it’s time for a new blade.
Can I Use Any Blade Brand On My Miter Saw?
No, you must match the blade diameter and arbor size to your saw. Most brands are interchangeable if these match, but always check your manual.
Is It Safe To Sharpen My Own Miter Saw Blades?
Sharpening is possible with the right equipment and experience, especially for carbide-tipped blades. If you’re not sure, use a professional sharpening service.
What Should I Do If The Arbor Bolt Won’t Come Loose?
Apply a penetrating oil, wait 10 minutes, then try again. Tap the wrench gently with a mallet if needed. Never use excessive force—ask a pro if it remains stuck.
Can I Use A Wood-cutting Blade For Metal?
No. Using the wrong blade type is dangerous and can damage both the blade and saw. Always use a blade designed for the material you’re cutting.
Changing a miter saw blade is an essential skill for anyone serious about woodworking or home projects. With the right steps and safety habits, you’ll get cleaner cuts, protect your equipment, and work with confidence. Take your time, follow this guide, and your miter saw will reward you with years of smooth, accurate performance.