If you often work with electrical wires—whether you are a DIY hobbyist, a student, or someone who wants to fix things at home—knowing how to use a wire stripper is a must-have skill. This simple tool can save you time, help you avoid frustration, and most importantly, keep you safe. Many people damage wires or hurt themselves because they don’t use a wire stripper properly. In this guide, you’ll learn not just how to use a wire stripper, but also how to pick the right one, avoid common mistakes, and handle wires safely for the best results. Even if you are a complete beginner, you’ll finish reading with the confidence to strip wires like a pro.
What Is A Wire Stripper?
A wire stripper is a hand tool designed to remove the insulation (the plastic or rubber cover) from electrical wires. This is necessary when you want to connect wires to switches, outlets, or other wires. The tool exposes the bare metal conductor so electricity can flow where you need it.
Wire strippers are popular because they make the process quick, safe, and precise. Trying to strip wire with a knife or scissors often damages the wire or leaves rough edges, which can cause poor connections or even electrical fires.
Types Of Wire Strippers
There are several types of wire strippers, each with its own advantages. Choosing the right one depends on your needs, the kind of wires you use, and your skill level.
Manual Wire Strippers
These are the most common and affordable. They look like pliers with several notches for different wire sizes. You place the wire in the correct notch, squeeze the handles, and pull off the insulation.
Pros:
- Cheap and widely available
- Simple to use
- Good for small projects
Cons:
- Requires hand strength
- Slower for big jobs
Self-adjusting (automatic) Wire Strippers
Self-adjusting strippers automatically grab and strip the insulation when you squeeze the handles. You don’t need to pick a notch or wire size.
Pros:
- Fast and easy
- Great for many wires of different sizes
- Less chance of damaging the wire
Cons:
- More expensive
- Bulky for tight spaces
Precision Wire Strippers
These are designed for very small wires, often used in electronics or fine work. They have small, sharp notches and often a spring return.
Pros:
- Perfect for electronics and delicate wires
- More control
Cons:
- Not suitable for thick wires
- Usually higher price
All-in-one Wire Strippers
These tools include extra features like crimpers, cutters, and bolt cutters. They save space in your toolbox.
Pros:
- Multi-purpose
- Good for field work
Cons:
- May be heavier
- Not as specialized
Comparison Table: Types Of Wire Strippers
Here’s a quick comparison to help you choose the right wire stripper for your needs:
| Type | Best For | Price | Key Features |
|---|---|---|---|
| Manual | General home use | Low | Simple, affordable |
| Self-adjusting | Frequent, varied jobs | Medium/High | Fast, easy, versatile |
| Precision | Small electronics | Medium | High control, gentle |
| All-in-One | On-the-go repairs | Medium | Multi-tool, space-saving |
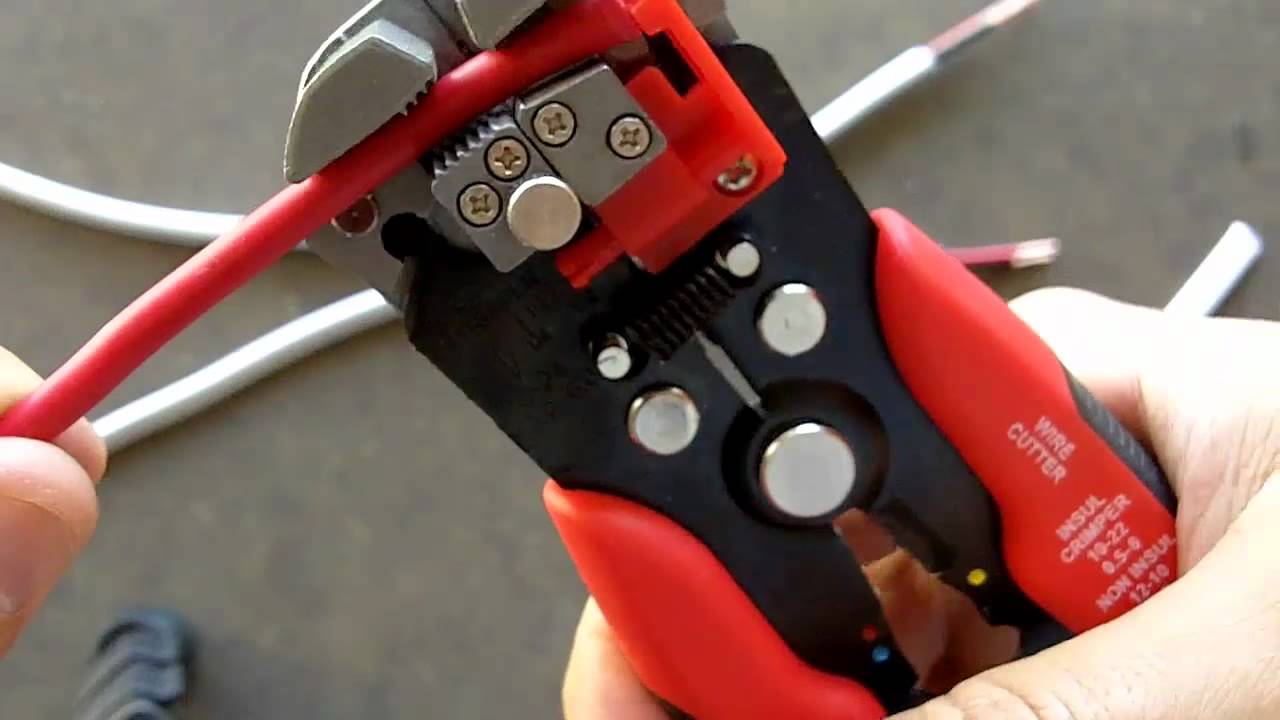
Parts Of A Wire Stripper
To use a wire stripper well, it helps to know its parts. Here are the basics:
- Handles: Where you grip the tool. Some have rubber covers for comfort.
- Cutting Jaws: The sharp, notched blades that strip the insulation.
- Adjustment Knob or Dial: Found on some automatic strippers to control tension.
- Crimping Area: On multi-tools, used for attaching connectors.
- Wire Gauge Markings: Numbers on the jaws showing the wire sizes each notch fits.
- Spring Mechanism: Helps the tool open after each use.
Understanding these parts will help you operate the tool confidently.
Choosing The Right Wire Stripper
Picking the right wire stripper is more important than most beginners realize. Using the wrong tool can damage wires, cause poor connections, or even lead to safety hazards.
Key Factors To Consider
- Wire Size Range: Check the tool covers the wire gauges you use most (for example, 10-22 AWG for home wiring).
- Type of Insulation: Some wires have thick or tough insulation—choose a model with sharp blades.
- Comfort: If you’ll strip many wires, look for cushioned handles.
- Precision: For electronics, a fine-tip or precision stripper is best.
- Build Quality: Choose durable steel jaws and a solid hinge.
- Extra Features: Multi-tools can be handy, but only if you’ll use the extra functions.
Mistakes To Avoid
- Choosing a tool that’s too big or too small for your wires.
- Ignoring handle comfort—tired hands lead to mistakes.
- Not checking the wire gauge markings; using the wrong size can nick or break the wire.
A common beginner mistake is buying the cheapest tool without checking if it fits their wire type. A good wire stripper can last years and makes your work much easier.
How To Prepare Before Stripping Wires
Before using a wire stripper, take a few minutes to prepare. This step is often skipped, but it can prevent problems later.
Safety First
- Turn off power: Always switch off the electricity before working with wires.
- Wear safety glasses: Pieces of insulation can fly off.
- Work in a well-lit area: You need to see the wire size and markings clearly.
- Keep tools dry: Water and electricity are a dangerous mix.
Select The Wire
Identify the wire gauge you are working with. Use a wire gauge tool or check the packaging. Knowing the correct size helps you pick the right notch on the stripper.
Inspect The Wire
Check for:
- Nicks or cuts in the insulation
- Burn marks (a sign of overheating)
- Corrosion on the metal conductor
Do not use damaged wires. Replace them before stripping.
Gather Other Tools
You might need:
- Wire cutters (if you need to cut the wire to length)
- Screwdrivers (for opening panels or devices)
- Multimeter (to check if power is off)
Preparation is key for both safety and success.
Step-by-step Guide: How To Use A Wire Stripper
Now, let’s walk through the actual process. The steps may look simple, but each one matters.
1. Measure The Amount To Strip
Decide how much insulation you need to remove. For outlets or switches, usually 1/2 inch (about 12 mm) is enough. Too much exposed wire can cause shorts; too little won’t connect well.
2. Select The Right Notch
Check the wire gauge markings on the stripper jaws. Find the notch that matches your wire’s size. If you’re unsure, start with a larger notch and test—using a notch that’s too small can cut the wire strands.
3. Insert The Wire
Place the wire into the correct notch so the cutting jaws are aligned with where you want to strip. Hold the wire firmly but do not bend it sharply.
4. Squeeze The Handles
Close the handles gently but firmly. The blades should bite into the insulation but not the metal wire. You may feel a slight “give” when the insulation is cut through.
5. Twist And Pull
For manual strippers: Slightly twist the tool to loosen the insulation, then pull the stripper towards the end of the wire. The insulation should slide off cleanly, exposing the metal.
For self-adjusting strippers: Squeeze the handles fully. The tool will grip, cut, and pull the insulation off in one motion.
6. Check The Result
Inspect the exposed wire:
- No nicks or cuts in the metal
- No leftover bits of insulation
- All wire strands are intact
If you see any damage, cut off the end and try again.
7. Repeat As Needed
Strip both ends of each wire if necessary. For multiple wires, work slowly at first to build confidence.
Example: Stripping A 14 Awg Wire
Suppose you want to strip a 14 AWG solid wire for home electrical work. You would:
- Find the “14” notch on your wire stripper
- Insert the wire, lining up 1/2 inch with the jaws
- Squeeze handles, twist slightly, pull insulation off
This simple process can be repeated for any wire, once you get the hang of it.
Common Mistakes And How To Avoid Them
Even experienced users make mistakes with wire strippers. Here are some frequent problems and tips to avoid them.
Cutting Into The Wire
Using the wrong notch or too much force can cut into the metal strands. This weakens the wire and can cause it to break or overheat.
Tip: Always use the correct notch. Practice on scrap wire until you get a feel for the tool.
Stripping Too Much Insulation
Exposing too much wire can lead to shorts or accidental contact.
Tip: Measure before stripping. Most electrical codes specify how much to expose.
Not Holding The Wire Firmly
If the wire moves during stripping, the insulation may not come off cleanly or you might nick the wire.
Tip: Hold the wire steady with one hand while operating the stripper with the other.
Leaving Bits Of Insulation
Some cheap strippers have dull blades, leaving little bits of insulation.
Tip: Invest in a quality tool and check the jaws for sharpness.
Not Checking For Damage
Sometimes the damage is hidden under the insulation.
Tip: Always inspect the exposed wire carefully after stripping.
Safety Tips For Using Wire Strippers
Wire strippers are generally safe, but electrical work always carries risks. Here are some safety tips:
- Never strip live wires: Always check with a voltage tester or multimeter first.
- Keep fingers clear: The blades are sharp and can cut skin.
- Wear eye protection: Small pieces of insulation can fly off.
- Work slowly: Rushing increases the chance of mistakes or injury.
- Use insulated tools: Especially if you’re working near live circuits (but always try to turn off power first).
Special Tips For Different Types Of Wire
Not all wires are the same. Here’s how to handle some common types:
Solid Vs. Stranded Wire
- Solid wire: One solid metal core. Easier to strip, but can break if bent too much.
- Stranded wire: Many thin strands twisted together. More flexible, but easier to nick.
Use gentle pressure on stranded wire to avoid cutting strands.
Large Gauge Wire
For thick wires (like 8 AWG or larger), you may need heavy-duty strippers or even a utility knife—but only if you have experience. Always check the maximum size your stripper can handle.
Small Electronics Wire
Use a precision stripper. Even a tiny nick can cause problems in electronics.
Heat-resistant Or Specialty Insulation
Some insulation is tough and can dull cheap strippers. Use a high-quality tool designed for these wires.
Maintaining Your Wire Stripper
A well-cared-for wire stripper will last for years. Here’s how to keep yours in top shape:
- Clean the blades: Wipe with a dry cloth after use. Sticky insulation can build up.
- Oil the hinge: A drop of light oil keeps the movement smooth.
- Sharpen or replace: If the jaws get dull, some models let you sharpen or replace them.
- Store dry: Prevent rust by keeping the tool dry and in a toolbox.
A rusty or sticky stripper can damage wires and make your work harder.

When To Replace Your Wire Stripper
Even the best tools wear out. Look for these signs:
- Blades are dull or chipped
- Tool no longer closes fully
- Wire gauge markings are unreadable
- Jaws don’t align
If you notice these problems, it’s time to get a new stripper. Using a worn-out tool can ruin wires and increase safety risks.
Comparing Popular Wire Stripper Brands
Brand matters when it comes to tools. Here’s a look at some popular brands and what makes them different.
| Brand | Price Range (USD) | Best For | Key Features |
|---|---|---|---|
| Klein Tools | $15–$30 | Professional electricians | Durable, precise, comfortable handles |
| IRWIN VISE-GRIP | $10–$25 | Home and DIY | Self-adjusting, affordable |
| Channellock | $10–$20 | General use | Strong steel, easy to use |
| Hakko | $15–$35 | Electronics work | Precision jaws, lightweight |
| Milwaukee | $20–$40 | Heavy-duty jobs | Extra features, rugged design |
Some brands offer lifetime warranties, which can be a sign of quality.

Advanced Tips For Wire Stripping
If you want to take your wire stripping skills to the next level, consider these advanced techniques:
Pre-tinning Stripped Wire
For electronics, you can pre-tin the stripped wire by melting a small amount of solder onto the bare strands. This makes connections stronger and helps prevent fraying.
Stripping Multiple Wires At Once
Some self-adjusting strippers can strip several wires of the same size at once. This is useful for wiring panels or making repeat connections.
Using A Wire Stop
A wire stop is a small adjustable tab found on some strippers. It lets you strip wires to the exact same length every time—great for professional-looking results.
Stripping Coaxial Or Shielded Cable
Specialty strippers are available for coaxial cables (used for TV, internet, etc. ). These cables have multiple layers, so use the right tool to avoid damage.
Testing Your Work
After stripping and connecting, always use a multimeter to check for good connections and no shorts. This is especially important in complex projects.
Real-world Example: Home Outlet Replacement
Let’s say you’re replacing a home electrical outlet. Here’s how using a wire stripper fits into the process:
- Turn off power at the breaker.
- Remove outlet cover and unscrew the old outlet.
- Check wires for damage.
- Cut and strip about 1/2 inch of insulation from each wire using the correct notch.
- Attach wires to the new outlet, tighten screws.
- Reassemble and test.
Using a wire stripper saves time and reduces the risk of damaging the wires, making your work neater and safer.
Wire Stripper Vs. Other Tools
Beginners sometimes wonder if they can use scissors, knives, or pliers to strip wires. Here’s a comparison:
| Tool | Safety | Speed | Risk of Damage | Recommended? |
|---|---|---|---|---|
| Wire Stripper | High | Fast | Low | Yes |
| Knife | Low | Slow | High | No |
| Scissors | Low | Slow | High | No |
| Pliers | Medium | Medium | Medium | No |
As you can see, a dedicated wire stripper is much safer and more efficient.
Where To Buy A Wire Stripper
Wire strippers are easy to find:
- Hardware stores
- Online retailers like Amazon or Home Depot
- Electronics stores for precision models
Prices range from a few dollars for basic manual strippers to over $40 for advanced or branded models. For most home users, a $10–$20 tool is more than enough.
Environmental And Legal Considerations
Electrical work must follow local codes and rules. Using the right tool—and stripping the correct length—helps you stay within regulations. In many countries, exposed wire length is specified for safety.
Tip: Always check your local electrical code if you’re doing work beyond simple repairs.
Properly stripped and connected wires last longer, waste less energy, and are safer for the environment and your home.
Two Insights Beginners Often Miss
- Wire Gauge Accuracy Matters: Many beginners guess the wire size or use the wrong notch. This leads to weak connections. Always double-check the wire gauge before stripping.
- Insulation Material Affects Technique: Not all insulation is the same. Some wires have soft, easy-to-strip coatings, while others are tough and may need a sharper or more specialized tool.
Understanding these points can make a big difference in your results.
Frequently Asked Questions
What Is The Most Common Mistake When Using A Wire Stripper?
The biggest mistake is using the wrong notch for the wire size. This can cut into the wire strands, weakening the connection and possibly causing overheating. Always check the wire gauge and use the correct notch.
Can I Use A Knife Instead Of A Wire Stripper?
While it is possible, it is not recommended. Knives are less precise, more dangerous, and much more likely to damage the wire. For safety and quality, always use a proper wire stripper.
How Often Should I Replace My Wire Stripper?
Replace your wire stripper if the blades become dull, chipped, or misaligned, or if the handles become loose. Most good-quality strippers last many years with normal use. Regular cleaning and oiling help extend life.
What If I Accidentally Cut Some Wire Strands?
If you cut a few strands in a stranded wire, cut off the damaged part and strip the wire again. Damaged strands reduce current capacity and can cause poor connections. Always inspect the stripped wire for nicks or missing strands.
Are There Different Wire Strippers For Different Jobs?
Yes. There are manual, self-adjusting, precision, and multi-tool wire strippers. For home electrical work, a standard manual or self-adjusting model is fine. For electronics, use a precision stripper. Specialty wires like coaxial cables need special strippers.
For more detailed technical information, you can visit the Wikipedia page on wire strippers.
Learning to use a wire stripper is a simple skill that pays off every time you work with wires. With the right tool, proper technique, and attention to detail, you can make safe, neat, and reliable electrical connections—whether you’re fixing a lamp or building a robot. Remember: measure twice, strip once, and always put safety first.