Measuring resistance with a multimeter is a useful skill, whether you’re a DIY enthusiast, a student, or a professional technician. Understanding resistance helps you check if a wire is broken, a resistor is working, or an appliance is in good shape.
Yet, many people find the process confusing. This guide will walk you through everything you need to know about measuring resistance with a multimeter. You’ll learn about the types of multimeters, the basics of resistance, step-by-step instructions, troubleshooting tips, safety considerations, and common mistakes to avoid.
By the end, you’ll feel confident using your multimeter for accurate resistance measurements.
What Is Resistance?
Resistance is a measure of how much an object opposes the flow of electric current. It’s like a narrow road that slows down cars—if the resistance is high, electricity has a harder time passing through. Resistance is measured in ohms (Ω).
In electrical circuits, resistance controls how much current flows for a given voltage. Resistors are special components designed to add resistance and control current. You’ll also find resistance in wires, heating elements, and nearly every electrical device.
Knowing the resistance helps you:
- Test if a resistor matches its value.
- Check for broken wires or connections.
- Diagnose issues in appliances or circuits.
Types Of Multimeters
Multimeters are devices that measure electrical values like voltage, current, and resistance. There are two main types:
Analog Multimeters
Analog multimeters use a needle that moves across a scale. They are less common today but still found in some workshops. They are simple but can be harder to read, especially for beginners.
Digital Multimeters (dmms)
Digital multimeters show values on a digital display. Most people use these now because they are more accurate and easier to read. Many models come with extra features, like measuring temperature or testing diodes.
Key Features To Compare
When choosing a multimeter, consider:
- Range of resistance measurement: Some can measure from 0.1Ω up to several megaohms (MΩ).
- Accuracy: Digital models are usually more precise.
- Auto-ranging: This feature lets the multimeter pick the best range for you.
- Build quality: A sturdy case and solid probes last longer.
Here’s a comparison of analog vs. digital multimeters:
| Feature | Analog Multimeter | Digital Multimeter |
|---|---|---|
| Display | Needle & Scale | Digital Screen |
| Accuracy | Lower | Higher |
| Ease of Use | Requires Skill | User Friendly |
| Cost | Usually Cheaper | Varies |
| Features | Basic | Advanced (auto-range, etc.) |
How Does A Multimeter Measure Resistance?
A multimeter measures resistance by sending a small current through the object and sensing how much current comes back. Based on this, it calculates the resistance and shows the value on the display.
Important: The component must not be connected to a live circuit. If there’s voltage present, the reading will be wrong and may even damage the multimeter.
The resistance function is usually marked with the Ω symbol on the dial.
Preparing To Measure Resistance
Before you start, there are some steps you should always follow for safety and accuracy.
- Turn off power: Make sure the circuit or device is not connected to any power source.
- Discharge capacitors: If you’re measuring inside a circuit, any capacitors should be discharged. They can store voltage and affect readings.
- Remove the component if possible: If you want a precise reading, take the component out of the circuit. Otherwise, other parts may affect the result.
Tools And Materials Needed
- A working multimeter
- Test leads (the wires/probes for your multimeter)
- The component or circuit to test
- If needed, small tools to disconnect parts

Step-by-step: Measuring Resistance With A Multimeter
Let’s break down the process into clear steps.
Step 1: Power Off Everything
Always switch off and unplug the device you are testing. If you skip this, you risk damaging your multimeter or getting a false reading.
Step 2: Select The Resistance Mode
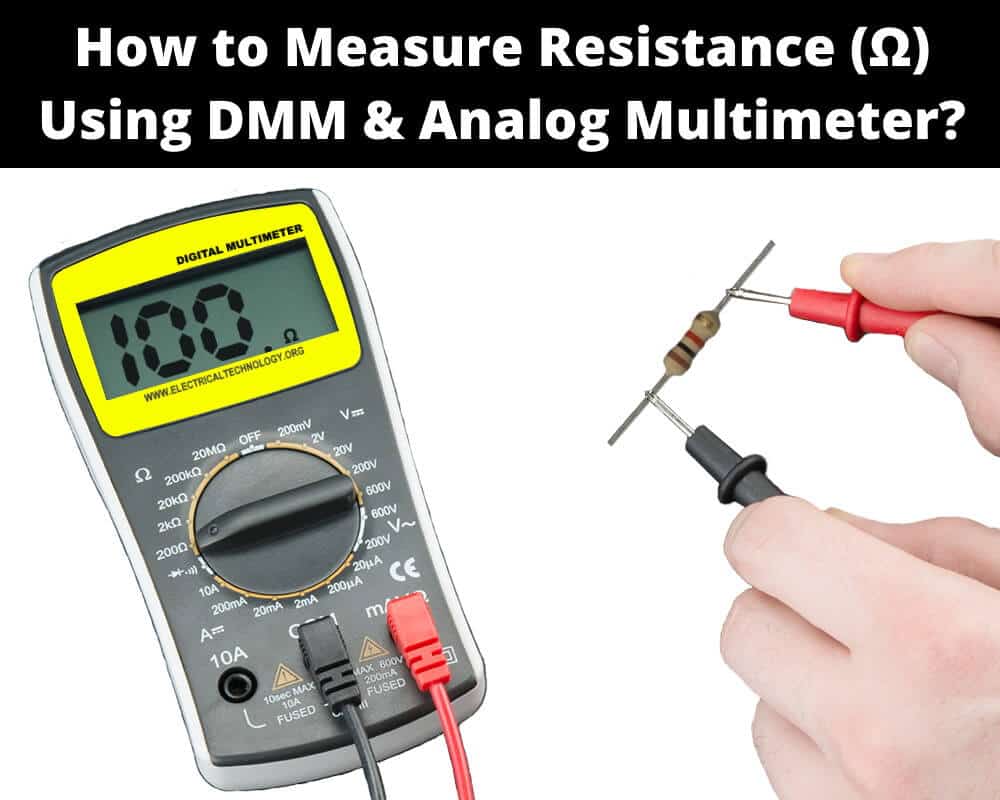
Set your multimeter’s dial to the Ω (ohms) symbol. On some multimeters, you may see several ranges (like 200Ω, 2kΩ, 20kΩ, etc.). If your multimeter is auto-ranging, just set it to the ohm mode.
Step 3: Connect Test Leads
Plug the black lead into the port labeled “COM” (common). The red lead goes into the port labeled with an ohm symbol (Ω) or “VΩ.”
Step 4: Zero The Multimeter (if Needed)
Some analog meters need to be zeroed. Touch the two leads together and adjust the “zero” knob until the display reads zero. Digital meters usually do this automatically.
Step 5: Measure The Resistance
Touch the two probes to each end of the component you want to measure. Make firm contact but don’t press too hard—especially with sensitive parts.
- For resistors, touch the metal ends (not the painted body).
- For wires, touch the exposed copper.
- For appliance parts, touch the two connection points.
Step 6: Read The Display
Wait a moment for the display to stabilize. The value shown is the resistance in ohms. If it reads “OL” or “1”, this means the resistance is too high for the range selected (open circuit). If it’s very low, you may see 0 or a small number.
Step 7: Interpret The Result
Compare the measured value to the expected value. For resistors, check the color code. For wires, it should be close to zero. For other components, refer to technical specs.
Example: If you measure a 1kΩ resistor and your multimeter shows 990Ω, this is normal. Resistors have a tolerance, often ±5%.
Common Multimeter Display Symbols
Sometimes, multimeters show special symbols. Here’s what they mean:
- OL or “1”: Overload/open circuit (resistance too high or not connected)
- 0 or near 0: Short circuit (very low resistance)
- MΩ, kΩ, Ω: Megaohms, kilo-ohms, ohms—different units
Measuring Resistance In Circuit Vs. Out Of Circuit
You can measure resistance in-circuit (while the part is still connected) or out of circuit (after removing the part).
In-circuit Measurement
- Pros: Faster, no need to remove parts.
- Cons: Other components may affect the reading. You may get a lower value than the true resistance.
Out-of-circuit Measurement
- Pros: Most accurate.
- Cons: Takes more time since you need to disconnect the part.
Tip: For critical measurements, always measure out of circuit.
Factors Affecting Accuracy
Some factors can change your readings:
- Dirty or corroded contacts: Can cause higher resistance.
- Body resistance: If you touch the probes or leads, your body may add resistance.
- Temperature: High temperatures can reduce resistance in some materials.
- Parasitic paths: In complex circuits, other paths may cause false readings.
Always clean contacts and avoid touching metal parts during measurement.
Practical Examples
Here are a few real-world examples:
Checking A Resistor
Suppose you have a resistor with color bands showing 470Ω. Set your meter to the 2kΩ range. Connect the probes to both ends. If your meter reads 465Ω, this is fine (within 5% tolerance).
Testing A Wire For Continuity
Set your meter to the lowest ohm setting. Touch one probe to each end of the wire. A reading near zero means the wire is good; a very high number or “OL” means it’s broken.
Measuring A Heating Element
For a 1200W, 230V heater, expected resistance is:
R = V² / P = (230 × 230) / 1200 ≈ 44Ω
If your reading is close, the element is healthy.
Resistance Ranges On Multimeters
Multimeters come with different resistance ranges. Knowing which range to use is important.
| Range Setting | Best For | Unit Displayed |
|---|---|---|
| 200Ω | Low-value resistors | Ohms (Ω) |
| 2kΩ | Resistors up to 2,000Ω | Kilo-ohms (kΩ) |
| 20kΩ | Medium value resistors | Kilo-ohms (kΩ) |
| 200kΩ | High-value resistors | Kilo-ohms (kΩ) |
| 2MΩ | Very high resistances | Mega-ohms (MΩ) |
If you’re unsure, start with the highest range and work down.
Common Mistakes To Avoid
Many beginners make small errors that lead to wrong readings or damage. Here’s what to watch for:
- Measuring resistance on a powered circuit: This can damage your multimeter and give false readings.
- Wrong range selection: If you select too low a range, you may see “OL.” Too high, and you lose resolution.
- Touching probe tips: Your body adds resistance; always hold the insulated part.
- Ignoring tolerance: Components like resistors have a specified tolerance. Don’t expect an exact number.
- Testing in-circuit without understanding parallel paths: Other components can change the reading.
Non-obvious tip: Some multimeters have a “REL” (relative) or “Δ” button. Use this to subtract test lead resistance for more accurate low-value measurements.
Safety Considerations
Measuring resistance is usually safe, but don’t get careless. Follow these rules:
- Never measure resistance on a live circuit.
- Check your multimeter’s condition before use—damaged leads can be dangerous.
- Use one hand if working inside large equipment to avoid current passing through your chest.
- Discharge capacitors before testing. High voltage can remain even after power is off.
- Store your multimeter safely after use to avoid damage.
Advanced Multimeter Features For Resistance
Modern multimeters come with advanced features to make resistance measurements easier:
Auto-ranging
With auto-ranging, you don’t need to select the range. The meter finds the best range for you. This reduces errors and speeds up testing.
Relative Measurement
The REL or relative mode lets you zero out test lead resistance. This is useful when measuring very low resistances, like wires or fuses.
Data Hold
Data hold locks the display so you can read it even after removing the probes. Handy in awkward positions.
Min/max Capture
Some meters record the highest and lowest values during a test. Useful for checking how resistance changes over time or with temperature.
Troubleshooting Bad Measurements
If your readings don’t make sense, try these steps:
- Check connections: Make sure probes are touching clean metal, not paint or insulation.
- Inspect leads: Broken or frayed leads can cause bad readings.
- Test your meter: Touch the leads together. You should read near zero.
- Change the range: If you see “OL” or “1,” try a higher range.
- Remove the component: For strange readings, disconnect the part and test again.
Non-obvious insight: If you consistently get readings much higher or lower than expected, try cleaning probe tips with alcohol. Dirt and oxidation can add unexpected resistance.
Real-world Application: Diagnosing A Faulty Appliance
Suppose your toaster isn’t working. Here’s how you’d use resistance measurement:
- Unplug the toaster and open the casing.
- Set your multimeter to the correct range (try 200Ω or 2kΩ).
- Test the heating element: Place probes on each end. A reading close to the calculated value (for example, 20–40Ω) means the element is good.
- Check the power cord: One probe on each plug blade—should read near zero.
- Test the switch: With the switch “on,” it should read zero; with “off,” it should be “OL.”
This method helps you find the faulty part quickly.
Understanding Multimeter Accuracy And Error
Multimeters have a specified accuracy, such as ±(1.0%+2). This means the reading can be off by 1% of the value plus 2 digits. For example, if you measure 1000Ω, your meter could display anywhere from 988Ω to 1012Ω.
How To Minimize Error
- Use the correct range for your expected value.
- Keep probe tips clean.
- Avoid measuring with wet hands or in humid conditions.
- Calibrate your meter regularly, especially for professional work.
Resistance Measurement Vs. Continuity Test
Many digital multimeters have a continuity test mode, usually with a beeping sound. This is a quick way to check if a wire or connection is good (very low resistance). While useful, it does not tell you the exact resistance value.
Use resistance measurement when you need a precise number, like checking a resistor or a sensor.
How To Measure High And Low Resistance
Low Resistance (<1ω)
Measuring very low resistance is tricky. The resistance of the test leads and even the contact points can add up. Use the REL mode if available, or subtract the test leads’ resistance by shorting them together and noting the value.
High Resistance (>1mω)
For high resistance, make sure the component and your hands are dry. Even small leaks can affect the reading. Avoid touching both probes with your fingers at the same time.
Multimeter Maintenance For Accurate Resistance Measurements
To keep your multimeter reliable:
- Replace batteries when the display dims.
- Store in a dry place to prevent moisture damage.
- Check leads for cracks and replace if worn.
- Clean contacts with isopropyl alcohol.
- Calibrate annually if you use the meter for important work.
Environmental Factors That Impact Resistance Measurement
Temperature
Most materials have a temperature coefficient. For instance, copper’s resistance increases as temperature rises. If you need a precise reading, measure at room temperature and avoid heat sources nearby.
Humidity
High humidity can cause leakage currents, especially for high resistance readings. Always test in a dry environment when possible.
Electromagnetic Interference
Strong electromagnetic fields can affect sensitive meters. If you’re getting unstable readings, move away from large electrical equipment.
Using A Multimeter For Special Resistance Tests
Testing Sensors
Many sensors, like thermistors or RTDs, change resistance with temperature. Use your multimeter to check if the sensor is working:
- Measure at room temperature.
- Apply heat or cold.
- Watch for resistance change according to specifications.
Checking Fuses
Set your meter to the lowest resistance range. Place probes on both ends of the fuse. A good fuse should show nearly zero. If it reads “OL,” the fuse is blown.
Why You Should Learn To Measure Resistance
Being able to measure resistance opens up many possibilities:
- Fixing appliances: Quickly find faulty wires or components.
- Building circuits: Verify resistor values and quality.
- Electrical safety: Check ground paths and connections.
- Testing sensors: Diagnose heating/cooling systems, automotive parts, and more.
Even if you’re not an electrician, this skill can save you time and money.
How To Choose The Right Multimeter For Resistance Measurement
When shopping for a multimeter, focus on:
- Accuracy and range: Pick a meter that covers the resistance values you need.
- Auto-ranging: Eases testing and reduces mistakes.
- Build quality: Solid case and safe probes.
- Brand reputation: Trusted brands like Fluke, UNI-T, or Extech are reliable.
Check reviews and specifications before buying. For more guidance, see the Wikipedia Multimeter page.
Practice Exercise: Try It Yourself
Grab a digital multimeter and a few resistors. Try these steps:
- Read the color code to know the resistor value.
- Measure the resistance with your multimeter.
- Compare the result to the expected value.
- Try measuring a wire, a fuse, and a heating element.
Notice how different items give different readings. Practice helps you build confidence.

Frequently Asked Questions
How Do I Know If My Multimeter Is Measuring Resistance Correctly?
Check by touching the two probe tips together. The reading should be close to zero ohms. You can also test a resistor with a known value. If your multimeter shows the expected value (within tolerance), it’s working fine.
Can I Measure Resistance In A Live Circuit?
No, you should never measure resistance in a live (powered) circuit. This can damage your multimeter and give false readings. Always disconnect power before testing.
Why Do I Get “ol” Or “1” On My Multimeter?
This means the resistance is above the selected range or there is no connection (open circuit). Try switching to a higher range or check if the component is properly connected.
What Is The Difference Between Resistance And Continuity Test?
A resistance test tells you the exact resistance value in ohms. A continuity test only checks if there is a path (very low resistance) and usually beeps if the circuit is closed. Use resistance for precise measurements.
Is It Safe To Measure Resistance On Any Component?
It’s safe as long as the component is not connected to power and doesn’t have stored voltage (like in capacitors). Always check that everything is off and discharged before testing.
Learning how to measure resistance with a multimeter is a valuable skill for anyone working with electronics or appliances. It’s not just about following steps—it’s about understanding what the numbers mean, and how to use them to solve real problems.
With practice and care, you’ll be able to troubleshoot, repair, and build with confidence. Whether you’re checking a simple wire or diagnosing a complex machine, your multimeter is a powerful tool in your hands.