Cutting a straight line with a circular saw can feel challenging, especially if you are new to power tools. Many people worry about making crooked cuts, damaging wood, or even injuring themselves. But with the right approach, you can achieve clean, straight cuts that look professional—every time.
Whether you’re building furniture, making home repairs, or starting a DIY project, mastering the circular saw will save you time and money. This guide will show you step by step how to cut straight with a circular saw, share mistakes to avoid, and provide tips for both beginners and experienced users.
Let’s make your next cut your best cut.
Why Cutting Straight Matters
A straight cut is essential for both the strength and appearance of any wood project. Crooked cuts can lead to gaps, weak joints, and wasted material. For example, if you’re building a bookshelf and the sides are not straight, the whole structure may be unstable. Even a small mistake can be difficult to fix later. That’s why learning to cut straight with a circular saw is a valuable skill for anyone working with wood.
Understanding Your Circular Saw
Before you start, it’s important to know the parts of your tool. A circular saw is a handheld power tool with a round, rotating blade. It’s designed for fast, straight cuts in wood, plywood, MDF, and even some plastics and metals (with the right blade). Let’s look at some key parts:
- Blade: The sharp, round part that does the cutting.
- Base plate (shoe): The flat metal part that rests on your material.
- Blade guard: Covers the blade for safety.
- Bevel adjustment: Lets you tilt the saw for angled cuts.
- Depth adjustment: Controls how deep the blade cuts.
Knowing how these parts work will help you get better results and stay safe.
Safety First: Preparing To Cut
Using a circular saw can be dangerous if you’re not careful. Here are some important safety steps:
- Wear safety glasses to protect your eyes from dust and debris.
- Use ear protection if you’re making many cuts.
- Check the blade: Make sure it’s sharp, clean, and properly installed.
- Unplug the saw (or remove the battery) before adjusting the blade.
- Secure your workpiece: Use clamps to hold the wood steady.
- Clear your workspace: Remove anything you might trip over.
A dull blade or loose workpiece is a common cause of accidents. Take a few minutes to set up safely, and you’ll work faster and with more confidence.
Essential Tools And Materials
To cut straight, you’ll need more than just a saw. Here’s what you should have ready:
- Circular saw
- Sharp blade (for the material you’re cutting)
- Measuring tape
- Pencil or marking tool
- Straightedge or guide (such as a level, ruler, or factory-made saw guide)
- Clamps (to hold the guide and wood in place)
- Sawhorses or a stable work surface
- Safety gear (glasses, hearing protection, dust mask)
Having the right tools will make the job easier and your cuts more accurate.
Choosing The Right Blade
Not all blades are the same. Using the correct blade is a key step for straight, clean cuts. Here’s a quick comparison:
| Blade Type | Best For | Tooth Count | Cut Quality |
|---|---|---|---|
| Framing Blade | Rough wood, construction | 18-24 | Fast, rough |
| Finish Blade | Plywood, trim | 40-60 | Smooth, clean |
| Plywood Blade | Thin plywood, laminates | 80+ | Very smooth |
For most straight cuts in wood, a finish blade is a good choice. It gives a balance between speed and smoothness. Check that your blade matches the size and type your saw requires.
Measuring And Marking Your Cut
Accurate cuts start with careful measuring and marking. Follow these steps:
- Measure twice, cut once: Double-check your measurements to avoid mistakes.
- Mark the cut line: Use a pencil and a straightedge (like a carpenter’s square or level) to draw a clear, straight line across the board.
- Extend the line: Make sure it goes all the way across, so you can see it from any angle.
- Mark the waste side: Draw an ‘X’ on the part you’ll throw away. This helps you remember which side to cut.
A common beginner mistake is to cut on the wrong side of the line, making your piece too short. Always cut on the waste side.
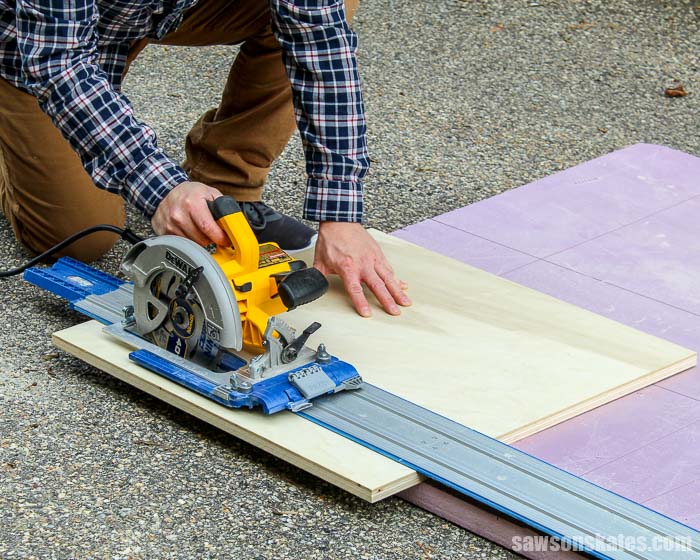
Using A Straightedge Or Guide
One of the best ways to cut straight with a circular saw is to use a guide. This can be a long level, a straight board, or a special saw guide. Here’s how to set it up:
- Line up the guide: Place your straightedge so that when the saw’s base plate rides along it, the blade will cut exactly on your line.
- Account for the offset: Most saws have a space between the edge of the base plate and the blade (usually about 1.5 inches). Measure this distance, and set your guide that far from the cut line.
- Clamp the guide: Use clamps to hold the guide firmly in place at both ends.
This technique is sometimes called a “fence” or “rip guide. ” It’s almost impossible to cut a perfectly straight line freehand, so using a guide is the secret to professional results.
The Step-by-step Cutting Process
Let’s break down the actual cutting process into clear steps.
1. Adjust The Blade Depth
Set the blade so it’s just a bit deeper than your material—about 1/8 to 1/4 inch below the bottom. Too deep, and you increase the risk of kickback and splinters.
2. Position Your Saw
Place the front of the base plate flat on the wood, with the blade just to the side of your cut line (on the waste side). Line up the notch or mark on your saw’s base plate with the cut line.
3. Start The Saw
Let the blade reach full speed before you begin moving forward. Starting too early can cause the blade to grab or wander off the line.
4. Guide The Saw Along The Guide
Keep gentle pressure against your straightedge or fence. Let the saw do the work—don’t force it. Watch the blade and the cut line as you move.
5. Complete The Cut
Move at a steady pace. Slow down near the end to avoid splintering. Let the cut-off piece fall away on its own—don’t try to catch it.
6. Power Off And Check
Release the trigger and wait for the blade to stop spinning before moving the saw. Check your cut for straightness and smoothness.
Tips For Extra Accuracy
Even small improvements can make your cuts straighter. Here are some tips that many beginners miss:
- Use painter’s tape along the cut line on plywood to reduce splintering.
- Support both sides of the material on sawhorses to prevent sagging.
- Keep the cord out of the way so it doesn’t snag and pull you off line.
- Check the base plate for squareness—if it’s bent, your saw will never cut straight.
- Let the blade finish spinning after the cut, instead of pulling the saw back while the blade is moving.
These small habits add up to better results.
Freehand Vs. Guided Cuts
Some people try to cut straight by following the line freehand, without a guide. This is very difficult, even for experienced carpenters. Here’s a comparison:
| Method | Pros | Cons |
|---|---|---|
| Freehand | Fast for rough cuts Good for demolition | Hard to get straight lines Risk of blade wandering |
| Guided | Very straight cuts Professional results | Slower setup Need extra tools (guide, clamps) |
For most projects, especially when looks matter, use a guide.
Using A Factory Edge As A Guide
If you don’t have a special saw guide, use the straight edge of a piece of plywood or MDF. These “factory edges” are cut very straight at the factory. Clamp this edge along your cut line, and run your saw’s base plate against it.
This is a reliable, low-cost method for straight cuts.
Making Long Cuts
Long cuts (like ripping an 8-foot plywood sheet) are extra challenging. Here’s how to make it easier:
- Use a longer guide: A long straightedge or specialized track keeps you on line.
- Support the entire sheet: Place sawhorses or foam insulation under the wood.
- Mark both ends of the line: Use a chalk line for extra-long cuts.
- Cut slowly and steadily: Don’t rush—long cuts need more control.
A common mistake is letting the wood bend or sag during a long cut, which causes the saw to bind or the cut to curve. Make sure your work is well-supported.
Dealing With Splintering And Tear-out
Splinters along the cut are a common problem, especially with plywood. To reduce splintering:
- Use a sharp, fine-tooth blade.
- Cut with the good side facing down (for a standard circular saw; for plunge or track saws, it may be the opposite).
- Apply painter’s tape over the cut line.
- Move slowly and let the blade do the work.
Some professionals also score the cut line with a utility knife before sawing. This cuts the wood fibers and makes a cleaner edge.
Avoiding Common Mistakes
Even careful users make mistakes. Here are some to watch out for:
- Forcing the saw: If you push too hard, the blade will wander.
- Not checking for nails or screws: Hitting metal will ruin your blade and could be dangerous.
- Cutting unsupported material: The wood can pinch the blade, causing kickback.
- Using a dull blade: This leads to ragged cuts and more effort.
- Ignoring the blade offset: If you forget to set your guide the right distance from the cut line, your cut will be off.
Double-check each step before cutting, and you’ll avoid these problems.

Advanced Guides: Track Saws And Edge Guides
For perfect cuts every time, consider using a track saw or a factory-made edge guide. Track saws ride in a special track for ultra-straight cuts, but they can be expensive. Many brands also offer metal guides that attach to your circular saw. These improve accuracy and are worth considering for frequent projects.
Making Repetitive Straight Cuts
If you need to cut many boards the same width, use a rip fence or make a simple jig. Set your fence once, and you can repeat the same cut over and over. This saves time and ensures consistency.
Cutting Different Materials
Circular saws can cut more than just wood. Here are a few examples:
- Plywood: Use a fine-tooth blade and tape to prevent splinters.
- MDF: Cuts easily, but creates lots of dust—use a mask.
- Plastic: Use a blade made for plastics and cut slowly to avoid melting.
- Metal: Only with the right blade (check your saw’s instructions), and always wear eye protection.
Always check your blade and saw are suitable for the material before cutting.
Fine-tuning Your Technique
As you gain experience, try these tips:
- Practice on scrap wood: This builds confidence and lets you test your setup.
- Use both hands: One on the saw, one steadying the base plate or holding the cord.
- Keep your eyes on the guide, not the blade: Trust your setup, not your instincts.
- Check for square: After your cut, use a square to check if you’re really cutting at 90 degrees.
Many beginners focus on speed. But professional-looking results come from careful setup and steady movement, not rushing.
Comparing Circular Saw Cutting Methods
Different projects require different methods. Let’s compare three popular ways to cut straight with a circular saw:
| Method | Best For | Tools Needed | Accuracy |
|---|---|---|---|
| Clamp-on Straightedge | General wood cuts | Straightedge, clamps | High |
| Factory Edge Guide | Plywood sheets | Scrap wood, clamps | Good |
| Track Saw System | Precision, long cuts | Track saw, track | Very high |
Choose the method that fits your project, budget, and experience.
When To Replace Your Circular Saw Blade
A dull or damaged blade won’t cut straight, no matter how careful you are. Signs you need a new blade include:
- Burning or smoking wood
- More effort needed to push the saw
- Rough, ragged edges
- Missing, chipped, or bent teeth
Replace your blade as soon as you notice any of these signs. Sharp blades are safer and give better results.

Cleaning And Maintaining Your Circular Saw
A well-maintained saw cuts straighter and lasts longer. Here’s how to keep yours in top shape:
- Clean after each use: Blow out dust and wipe down the base plate.
- Check for loose screws or bolts: Tighten as needed.
- Lubricate moving parts: Follow your saw’s manual.
- Store in a dry place: Prevents rust and corrosion.
Regular maintenance is often overlooked, but it makes a big difference.
Practicing For Perfect Results
No one cuts perfectly straight lines the first time. Practice on scrap wood before working on your actual project. Try different guides, speeds, and techniques. Over time, you’ll find what works best for you.
One non-obvious tip: Try standing in different positions relative to your saw. Some people find they cut straighter when standing slightly to one side, rather than directly behind the saw. Experiment and see what feels most natural.
Another advanced tip: If your saw has a laser guide, use it, but don’t rely on it completely. Lasers help, but physical guides are more accurate.
Troubleshooting: Why Are My Cuts Crooked?
If your cuts still aren’t straight, check for these issues:
- Bent base plate: Even a small bend can throw off your cut.
- Loose blade: Tighten the arbor nut.
- Improperly set guide: Double-check your measurements.
- Pushing too fast or slow: Find a steady speed.
- Weak or uneven support: The wood should not move during the cut.
Fixing these small problems can dramatically improve your results.
Improving Over Time
With regular use and attention to detail, cutting straight will become second nature. Save your best cuts as a reference for future projects. Learn from mistakes, and don’t be afraid to try new guides or techniques.
Many experts recommend reading manufacturer manuals and watching high-quality tutorial videos for extra tips. You can find many good resources, such as this one from Family Handyman.
With patience and practice, you’ll be cutting straight lines like a pro.
Frequently Asked Questions
How Do I Keep My Circular Saw From Wandering Off The Line?
Use a straightedge guide clamped to your workpiece. Always let the saw reach full speed before starting, and apply even pressure along the guide. Don’t force the saw—let the blade do the work. Check that the base plate is flat and not bent, as this can also cause the saw to wander.
Can I Use A Circular Saw To Cut Plywood Without Splintering?
Yes, use a fine-tooth blade (at least 40 teeth), and cut with the “good side” facing down. Applying painter’s tape over the cut line helps reduce splinters. Move the saw steadily and avoid forcing the blade. Scoring the cut line with a utility knife before cutting can also help.
What Is The Best Way To Support Large Sheets When Cutting?
Lay the sheet on sawhorses or a flat surface, with plenty of support on both sides of the cut. For very large sheets, use foam insulation underneath to support the whole piece and prevent the saw blade from hitting your workbench or floor.
How Do I Measure And Set The Correct Offset For My Guide?
Measure the distance from the saw blade to the edge of the base plate. Subtract half the blade’s thickness for extra accuracy. When clamping your guide, place it this exact distance from your cut line. Mark both ends of the board to ensure the guide is perfectly parallel to your cut.
When Should I Replace My Circular Saw Blade?
Replace your blade if you notice burning, rough or chipped edges, missing teeth, or if the saw feels harder to push through the wood. A sharp blade cuts straighter and safer. For regular users, check the blade every few weeks and keep a spare on hand.
Cutting straight with a circular saw is a skill anyone can learn. With careful setup, the right tools, and a little practice, your projects will look sharp and professional. Start with these steps, keep safety in mind, and enjoy the satisfaction of a perfect cut.