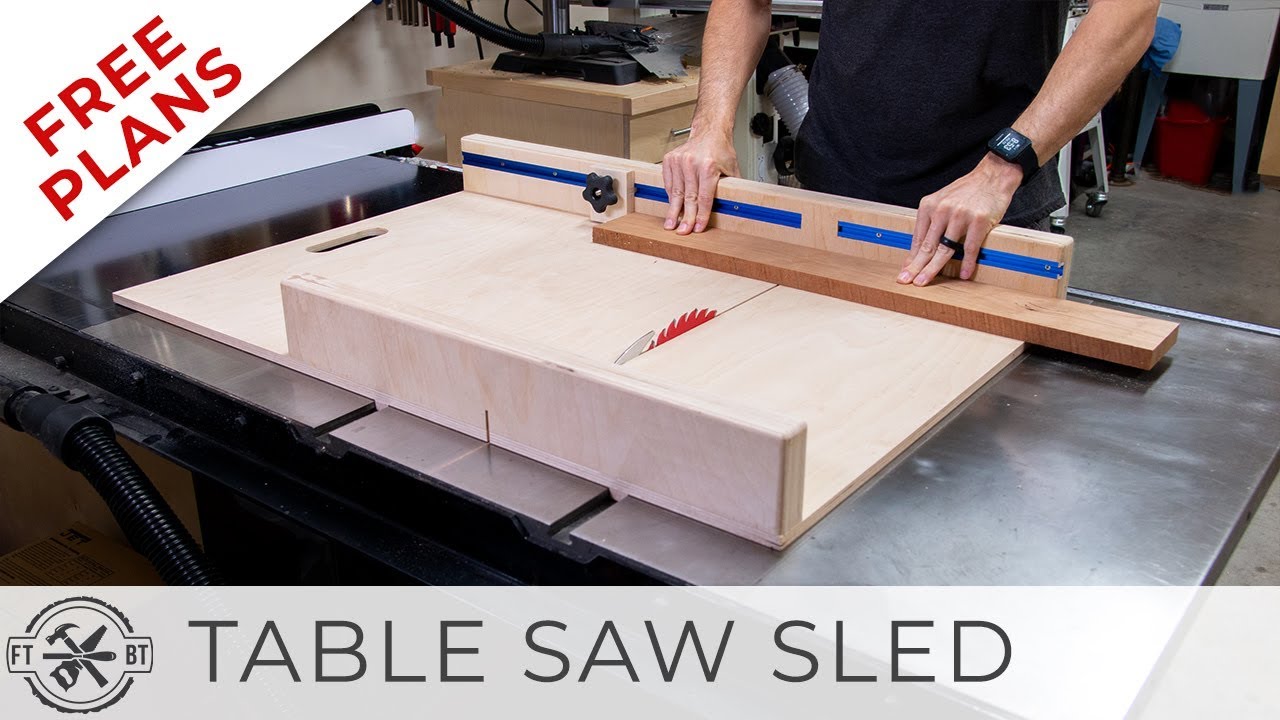
Building your own table saw sled is one of the smartest upgrades any woodworker—beginner or expert—can make for their workshop. A table saw sled, sometimes called a crosscut sled, gives you much better safety, accuracy, and repeatability compared to using the fence or miter gauge alone. Projects that used to feel risky or tricky, like cutting small pieces or making perfect 90-degree crosscuts, suddenly become easy and enjoyable. If you want cleaner cuts, better results, and a safer experience on your table saw, making a sled is a must.
Many people think building a sled is complex or only for pros. In fact, with basic tools, some plywood, and a little care, anyone can make a reliable sled that will last for years. This guide will walk you through every step of the process: planning, gathering materials, making precise cuts, assembling, and even tuning your sled for the best results. Along the way, you’ll learn tips that most first-timers miss, how to avoid mistakes, and how to customize your sled for different jobs. By the end, you’ll have a table saw sled that fits your needs and boosts your woodworking skills.
Why Use A Table Saw Sled?
A table saw sled is more than just a homemade accessory—it’s a major improvement for your workflow and safety. There are several reasons why experienced woodworkers rely on sleds for many cuts:
- Accuracy: The sled holds your workpiece square to the blade, so every cut is perfect—no more guessing.
- Safety: Your hands stay far from the blade, reducing the risk of accidents, especially with small or awkward pieces.
- Repeatability: You can make many pieces the exact same size, ideal for furniture or box-making.
- Versatility: Add stops, clamps, or hold-downs to your sled for even more advanced cuts.
Once you use a sled, you’ll notice the difference on almost every project. It’s a tool that makes you better, no matter your experience level.
Planning Your Table Saw Sled
Before you start cutting, it’s important to plan your sled so it fits your needs and your specific table saw. A little planning saves time and materials later.
What Size Should Your Sled Be?
Most woodworkers build their first sled to handle medium-sized boards and panels. A good starting point is:
- Base width: About 2/3 the width of your saw table (often 18–24 inches)
- Base depth: 12–18 inches from front to back
If you plan to cut larger panels, you can make a bigger sled. For small parts, consider a compact sled later.
Features To Consider
You can keep your first sled simple, but think about these helpful features:
- T-track slots for stop blocks or hold-downs
- Replaceable insert at the blade kerf, so you can swap it if it gets worn out
- Handles for easy movement and better control
- Safety shields to cover the blade exit
Add-ons can always be installed later. Start simple and upgrade as your skills grow.
Choosing Materials
The best sleds use stable, flat materials that won’t warp over time. Here’s what you’ll need:
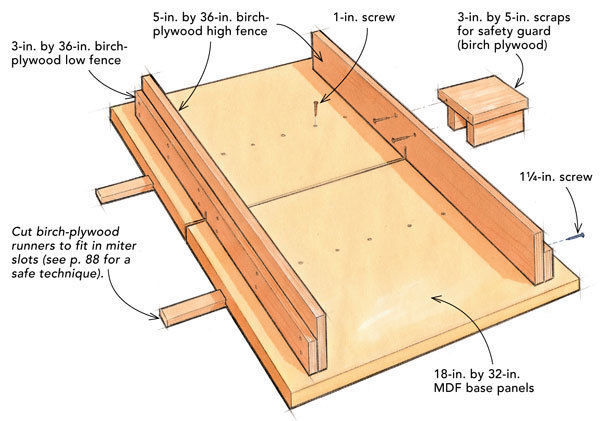
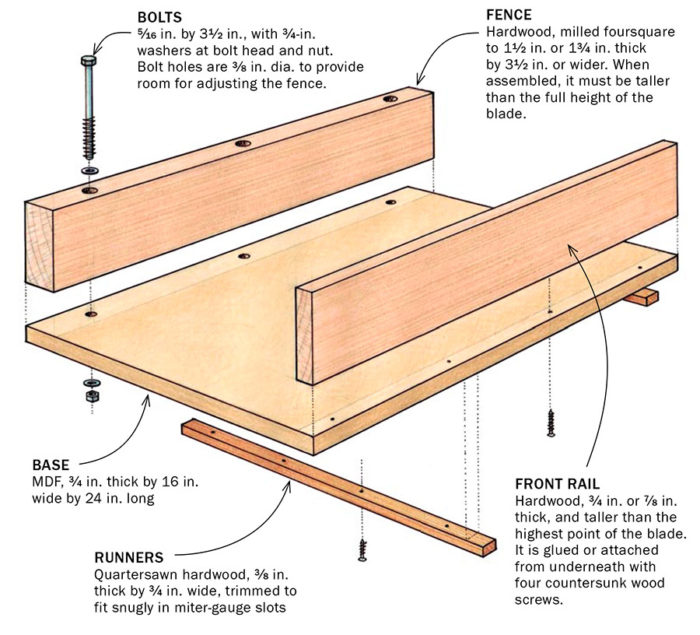
- Base: 1/2″ or 3/4″ plywood (birch or Baltic birch is best)
- Fences: Straight, stable hardwood or quality plywood
- Runners: Hardwood (like maple or oak), or plastic (UHMW is popular)
Avoid MDF for runners—it wears quickly. For the base, avoid warped or low-quality plywood. The accuracy of your sled depends on these choices.
Tools And Materials Needed
Gather everything before you start to keep the build smooth. Here’s a full list:
Tools
- Table saw (of course)
- Drill and drill bits
- Counter-sink bit (for flush screws)
- Clamps (bar or F-style)
- Square (machinist’s square or good carpenter’s square)
- Tape measure or ruler
- Screwdriver or impact driver
- Pencil or marking knife
- Sandpaper (120–220 grit)
- Wood glue
Materials
- Plywood base: 1/2″ or 3/4″ thick, about 18″ x 24″
- Front and rear fences: 2″ x 2″ hardwood or plywood, length = sled width
- Runners: 3/4″ wide x 3/8″ thick x length of your saw’s miter slots (usually 24–30″)
- Wood screws: 1 1/4″ to 1 1/2″
- Glue: Wood glue or CA glue
- Finish (optional): Paste wax or polyurethane for smoother sliding
Some woodworkers add T-track, knobs, or hold-down clamps, but these are optional for your first sled.
Step-by-step: How To Make A Table Saw Sled
Now let’s build your sled, step by step. Take your time—accuracy now means better cuts later.
1. Measure And Prepare The Runners
The runners fit into your saw’s miter slots and guide the sled. Accuracy here is critical.
- Measure your miter slots: Most are 3/4″ wide x 3/8″ deep, but check yours.
- Cut hardwood runners: Slightly wider than your slot, then sneak up on the fit with a hand plane or sandpaper. The runner should slide smoothly with no side-to-side wiggle.
- Test for fit: Place the runner in the slot. It should move easily, but not rock.
- Finish the runners: Apply paste wax for extra smooth movement.
Non-obvious tip: If your shop is humid, runners may swell. Test fit on a humid day or leave a tiny bit of room for expansion.
2. Attach Runners To The Base
Here’s where precision pays off.
- Place runners in the miter slots, flush with the table top.
- Lay the plywood base over the runners, aligning it square to the saw blade (don’t worry about exact squareness yet—just general alignment).
- Use a few coins or playing cards to raise the runners slightly above the slot, so they press against the sled base when you screw them.
- Clamp the base to the runners gently.
- From above, drill pilot holes and countersink for screws.
- Attach the runners with screws from the top.
Pro insight: Some builders use CA glue (super glue) and a little accelerator to “tack” the runners in place, then flip the base and screw them from below for extra security.
3. Trim The Sled Base
Now you’ll cut the base so it’s perfectly aligned with your saw blade.
- With the base and runners together, turn on the saw and slowly push the sled partway through the blade (about halfway).
- This will create a kerf (slot) right where your blade cuts. This kerf is your zero-clearance reference point for future cuts.
Safety note: Keep hands away from the blade, and move slowly.
4. Prepare And Attach The Fences
You’ll need two fences: a front fence (closest to you) and a rear fence (at the back). The rear fence needs to be perfectly square to the blade. The front fence mainly adds strength and keeps the sled together.
Cutting The Fences
- Use quality hardwood or good plywood.
- Make the rear fence tall enough to support your workpiece—typically 2–3″ high, 2–3″ thick.
- The front fence can be simpler, about 1″ x 2″.
Attaching The Rear Fence
- Place the rear fence on the base, about 1″ behind the blade kerf.
- To get it perfectly square, use the 5-cut method (explained below).
- Attach the fence with screws, drilling pilot holes and countersinking.
The 5-cut Method For Squaring
This is a clever way to make sure your fence is exactly 90 degrees to the blade:
- Take a large scrap panel (about 12″ x 12″).
- Place the panel against the rear fence and make a cut, then rotate the panel and make four more cuts, each time turning the panel 90 degrees.
- After the fifth cut, measure the width of the thin strip you cut off. If it’s the same thickness at both ends, your fence is square. If not, adjust the fence slightly and repeat.
Most beginners skip this step and end up with a sled that never cuts square! Taking a few extra minutes here saves hours of frustration.
Attaching The Front Fence
- Align the front fence, but squareness is not critical.
- Attach with screws and glue for strength.
5. Add Handles And Safety Features
For better control, attach a handle to the rear fence, centered above the blade kerf. Commercial handles are available, or use a scrap of hardwood. Some woodworkers add a small shield or block above the blade exit to protect your hands from the spinning blade.
6. Final Adjustments And Smoothing
- Sand all edges and corners for comfort.
- Wax the base and runners for a smooth glide.
- Test the sled with scrap wood to check for binding or rough movement.
If your sled sticks, check for sawdust in the miter slots or try a little more wax.
Customizing Your Table Saw Sled
Once you have the basic sled, you can add features to make your work even easier. Here are some popular upgrades:
Adding A Stop Block
A stop block lets you cut multiple pieces the exact same length. Mount a block of wood or a commercial stop to the rear fence, using a clamp or T-track.
Hold-down Clamps
Hold-down clamps keep your workpiece from shifting during the cut. These can be store-bought or homemade and mounted through T-track or with bolts.
Replaceable Zero-clearance Inserts
Some sleds use a removable insert at the blade kerf. This lets you replace the insert if it gets damaged or worn, keeping your cuts clean and supporting small pieces.
T-track For Versatility
Install aluminum T-track along the rear fence or base. This allows you to use different stops, clamps, and jigs as your projects demand.
Dust Collection
While not common on basic sleds, adding a dust guard or shroud over the blade area can help keep your workspace cleaner.
Common Mistakes And How To Avoid Them
Even experienced woodworkers make errors when building their first sled. Here are a few to watch for:
- Poor runner fit: If runners are too loose, the sled will be inaccurate. Too tight, and it won’t slide smoothly. Take time to get a perfect fit.
- Fence not square: If your rear fence isn’t 90 degrees to the blade, your sled can’t make accurate cuts. Always use the 5-cut method to square it.
- Using warped material: Warped plywood or fences will ruin your sled. Always check for flatness before assembly.
- Not securing runners well: Screws or glue must hold runners solidly. Loose runners can cause dangerous accidents.
- Skipping wax or finish: A little wax on the base and runners makes a big difference in how smoothly the sled moves.
Comparing Table Saw Sleds: Diy Vs. Commercial
You might wonder if you should buy a sled or make your own. Here’s how DIY and commercial sleds compare:
| Feature | DIY Sled | Commercial Sled |
|---|---|---|
| Cost | Low (under $50) | High ($100–$300+) |
| Custom Size | Fully customizable | Limited to standard sizes |
| Accuracy | Very high if built carefully | Very high |
| Upgrade Options | Easy to add features | Some models offer upgrades |
| Build Time | 2–4 hours | Ready out of box |
Most woodworkers find that a homemade sled gives better value, flexibility, and satisfaction.
Table Saw Sled Vs. Miter Gauge
Some people ask if a miter gauge can do the same job as a sled. There are important differences:
| Aspect | Table Saw Sled | Miter Gauge |
|---|---|---|
| Cut Length | Great for wide boards/panels | Limited by fence size |
| Support | Full base supports workpiece | Only fence supports |
| Safety | Hands far from blade | Hands closer to blade |
| Repeatability | Easy with stop blocks | Harder, needs extra jigs |
The sled offers clear advantages for many cuts.
Advanced Sled Designs
After you master the basic sled, you may want to try advanced versions for more complex cuts.
Double Miter Sled
This sled lets you cut perfect miters for picture frames and boxes. It uses two fences set at 45 degrees. Building one is a bit more complex, but it’s a huge upgrade for joinery.
Sleds For Dados And Rabbets
Some sleds have replaceable inserts that allow the use of dado blades or specialty cutters. If you make lots of joinery, this is a great next step.
Sliding Taper Sled
A taper sled allows you to cut angled tapers for legs or trim. This type of sled usually includes adjustable fences and stops.
Safety Tips For Using A Table Saw Sled
Safety should always come first in the shop. Here are key tips for safe sled use:
- Always keep hands behind the fence during cuts.
- Don’t force the sled—if it sticks, stop and fix the problem.
- Watch for blade exit: Know where the blade will exit the rear fence and keep hands clear.
- Use a blade guard if possible, or add a shield to the sled.
- Remove debris from runners before each use to keep the sled moving smoothly.
- Never cut pieces that are too small to secure—use hold-downs or a special jig for tiny parts.
- Inspect the sled regularly for damage or loose runners.
Maintenance And Longevity
A well-made sled will last years, but a little care goes a long way.
- Store flat: Hang the sled on a wall or lay it flat when not in use to prevent warping.
- Wax runners and base every few months.
- Check screws and glue joints for looseness.
- Replace worn inserts or runners as needed.
If you notice the sled is no longer cutting square, recheck the rear fence using the 5-cut method and adjust as needed.
Real-world Examples And Data
Woodworkers report dramatic improvements after switching to a sled. In a recent survey by Wood Magazine, 87% of respondents said their crosscut accuracy improved by at least 30% after building a sled. Professional shops routinely use several sleds for different jobs, proving their value even at the highest skill levels.
A typical DIY sled takes about 2–4 hours to build, costs less than $50, and lasts for years. Most commercial sleds cost $150–$300 and may not fit every saw perfectly.
For more on the science and safety of table saws, see this detailed guide on Wikipedia.
Frequently Asked Questions
How Accurate Can A Homemade Table Saw Sled Be?
A well-built sled, especially if you use the 5-cut method to square the fence, can be accurate to within 0. 001″—better than most commercial options. The key is taking your time with the fence and runners.
Can I Use Mdf For The Sled Base?
MDF is flat and cheap, but it’s heavy and can sag over time, especially in humid shops. For longevity and accuracy, birch plywood or Baltic birch plywood are better choices.
What If My Runners Get Stuck Or Swell In The Miter Slots?
Wood runners can expand in humidity. Sand them lightly or switch to plastic runners like UHMW. Always keep the slots clean and apply wax for smooth movement.
How Often Should I Check The Squareness Of My Sled?
Check the rear fence every few months, or anytime you notice cuts aren’t perfectly square. Use the 5-cut method for the most accurate results.
Is It Worth Adding T-track And Stops Right Away?
For your first sled, it’s smart to start simple. Build the sled, get used to it, and then add T-track or stops as you find the need. This keeps the build easy and lets you customize based on real projects.
Creating your own table saw sled is a rewarding project that pays off in every cut you make. Once you experience the confidence and quality it brings, you’ll wonder how you ever worked without one. Take your time, follow these steps, and enjoy safer, more accurate woodworking for years to come.