Cutting a dado with a router is a skill that opens many doors in woodworking. Whether you’re building shelves, cabinets, or boxes, a dado joint adds strength and makes your projects look professional. But for many beginners, the process seems confusing or intimidating. The good news? With the right steps, tools, and tips, anyone can cut smooth, accurate dadoes with a router—even if you don’t have years of experience.
In this guide, you’ll learn everything you need to know about cutting dadoes with a router. We’ll cover what a dado joint is, why it’s useful, how to set up your work, the tools and accessories you need, and step-by-step instructions for perfect cuts.
You’ll also find common mistakes to avoid, smart tips for better results, and answers to popular questions. If you want to build solid woodworking projects and enjoy the process, this guide will help you get there.
Understanding The Dado Joint
A dado is a simple groove cut across the grain of a board. It’s not just a random slot—it’s carefully sized to fit another piece of wood, usually the edge or end of a shelf or divider. The result is a strong, clean joint that supports weight and keeps parts aligned.
There are three main types of dadoes:
- Through dado: This groove runs all the way from one edge of the board to the other.
- Stopped dado: This groove stops before reaching one or both edges. It’s great for hidden joints.
- Rabbeted dado: This combines a dado and a rabbet, often for extra strength in cabinet construction.
Dadoes are especially popular in bookcases, cabinets, and drawer construction. The reason is simple: when you cut a groove for a shelf to fit into, the shelf can’t move or fall out. The glue surface is bigger, too, so the joint is much stronger than just screwing two boards together.
Why Use A Router For Cutting Dadoes?
There are several ways to cut dadoes. You can use a table saw with a dado blade, a hand saw and chisel, or a router. Each method has its pros and cons, but for most woodworkers, the router is the most flexible choice.
Routers offer:
- Precision: You can make clean, exact-width grooves.
- Versatility: Cut stopped or through dadoes, even in the middle of a large panel.
- Safety: Routers are less likely to kick back compared to table saws.
- Clean edges: The spinning bit leaves a smooth groove with less tear-out.
There’s another big advantage: with a router, you don’t need a big workshop or heavy machinery. Even if you’re working in a small space or on a portable bench, you can cut accurate dadoes with the right setup.
Essential Tools And Materials
Cutting a dado with a router doesn’t require expensive gear, but you do need a few key items for safe and accurate work.
- Router: A plunge router is ideal, but a fixed-base router also works. Power should be at least 1.5 HP for hardwoods.
- Router bits: The best choice is a straight bit or upcut spiral bit. For most bookshelf dadoes, a 3/4-inch bit matches the thickness of typical plywood or lumber.
- Guide or fence: To keep your cut straight, use a straightedge, shop-made guide, or a commercial router edge guide.
- Clamps: These hold the guide in place and keep your workpiece steady.
- Measuring tools: A tape measure, combination square, and marking knife or pencil.
- Dust mask and hearing protection: Routers are loud and make fine dust.
- Vacuum or dust collection: Optional, but makes cleanup easier.
Pro tip: Many beginners skip the guide and try to cut freehand. This almost always leads to wavy, uneven dadoes. A guide is essential for straight, professional-looking results.
Choosing The Right Router Bit
Not all router bits are the same. The bit you choose affects the width, depth, and quality of your dado. Here’s what you need to know:
- Straight bit: The most common choice. It has two or three straight cutting edges.
- Upcut spiral bit: This bit pulls chips up and out of the groove, leaving a clean bottom.
- Downcut spiral bit: Pushes chips down, reducing tear-out at the top edge.
Bit size matters too. For plywood shelves, a 3/4-inch bit is common, but plywood is often thinner than advertised (for example, 18mm or 23/32″ instead of 3/4″). If you want a perfect fit, use a plywood bit or make two passes with a smaller bit.
Sharpness is also key. A dull bit burns the wood and leaves rough edges. Always check your bit before starting.

Credit: www.popularwoodworking.com
How To Prepare Your Workpiece
The quality of your dado starts before you even pick up the router. Preparation ensures your cuts will be accurate and your joints will fit tightly.
- Check your boards: Make sure your boards are flat, dry, and free of major defects. Warped or twisted wood will not give good results.
- Mark your layout: Use a sharp pencil or marking knife to draw the edges of the dado. Mark both the start and end points, especially for stopped dadoes.
- Test fit: If you’re using plywood, measure the actual thickness. Don’t trust the label—plywood is often undersized.
- Clamp securely: Attach your workpiece to a bench or sturdy surface. Movement during routing leads to mistakes.
Here’s a simple example: If you’re building a bookshelf, measure the thickness of your shelf board. Mark the position of the dado on the side panel, making sure it’s square and at the correct height.
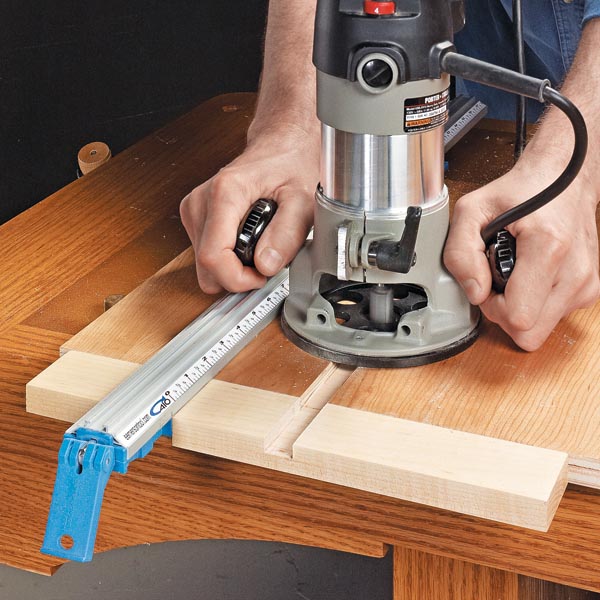
Setting Up A Router Guide
A router guide is the secret to straight, accurate dadoes. There are several ways to make one:
- Shop-made straightedge: A long, straight board clamped to your workpiece.
- Commercial edge guide: Attaches to the router and rides along the edge of your board.
- Track system: Like the ones sold by Festool or Kreg, for repeatable, precision cuts.
To set up your guide:
- Position the guide so the router bit will follow your layout line.
- Measure the distance from the router base edge to the bit. Add this to your layout line to find where to clamp the guide.
- Clamp the guide tightly at both ends.
- Double-check everything before routing.
Non-obvious insight: Always make a test cut on scrap wood with your guide setup. This helps you confirm the position is perfect and avoids surprises on your real workpiece.
Step-by-step Guide: Cutting A Dado With A Router
Let’s walk through the process, step by step, so you get clean, accurate results every time.
1. Mark The Dado Location
Draw the edges of your dado on the workpiece using a square. Mark which side is the “waste” (the part to remove). For stopped dadoes, mark the start and stop points clearly.
2. Set Up The Guide
Measure from the edge of your router base to the edge of the bit. Add this distance to your layout line, and clamp the straightedge in place. Double-check that the guide is square to the workpiece edge.
3. Set Bit Depth
Adjust your router to cut the dado to the correct depth. Most dadoes are about 1/3 the thickness of the board for strength. For a 3/4-inch side panel, a 1/4-inch deep dado is common.
4. Secure The Workpiece
Clamp your workpiece to a sturdy bench. Make sure it can’t shift during routing.
5. Start The Router
With the router off the workpiece, turn it on and let it reach full speed.
6. Make The Cut
Place the router base against the guide. Lower the bit into the wood (if using a plunge router) at the start of the dado. Push the router slowly and steadily along the guide, keeping even pressure.
For deeper dadoes, make multiple shallow passes. Each pass should remove no more than 1/8 inch of material. This gives a cleaner cut and protects your bit and router.
7. Finish The Ends
For stopped dadoes, you may need to square up the ends with a chisel, since router bits are round.
8. Test The Fit
After cutting, test-fit the shelf or divider. It should slide in with gentle pressure, not too loose or tight.
9. Clean Up
Vacuum the groove and check for any rough spots. Sand lightly if needed.
Non-obvious insight: If you want a truly snug fit, plane or sand the edge of your shelf piece to match the exact width of the dado. It’s easier to adjust the shelf than to recut the groove.
Making A Dado Wider Than Your Bit
Many times, your shelf or divider is wider than your router bit. For example, you have a 1/2-inch bit but need a 3/4-inch dado. Here’s how to do it:
- Set up your guide for the first pass, cutting one edge of the groove.
- Make the first cut as usual.
- Shift the guide the exact amount needed (difference between bit and dado width).
- Make the second pass, overlapping the first cut.
- Clean up the bottom of the dado if needed.
Tip: Use the actual shelf piece as a spacer to set the guide for the second pass. This ensures a perfect fit.
Cutting Stopped Dadoes With A Router
Stopped dadoes are grooves that don’t run all the way across the board. They’re common in cabinets, so the groove isn’t visible from the front.
Here’s how to cut a stopped dado with a router:
- Mark both the start and stop points on your workpiece.
- Clamp your guide as usual.
- Lower the bit into the wood at the start mark, not before.
- Move the router to the stop mark, then lift it out.
- Square the ends with a chisel, since the router leaves rounded ends.
This method takes a bit of practice but gives a clean, professional look.
Using A Template Or Jig For Repeated Dadoes
If you’re making multiple shelves or cabinets, a template or jig saves time and ensures consistency. You can buy commercial dado jigs, but many woodworkers build their own from plywood or MDF.
How a jig works:
- The jig registers off the edge of the board.
- It has a slot for the router to follow, sized for your bit.
- Clamp the jig, drop in the router, and make your cut.
For repeated shelves at the same height, a jig is much faster than measuring and setting up each one separately.
How To Avoid Tear-out And Burning
Even with a sharp bit and careful setup, it’s possible to get rough edges or burn marks. Here’s how to avoid them:
- Use sharp bits: Dull bits burn wood and leave rough surfaces.
- Take shallow passes: Don’t try to cut the full depth at once.
- Move the router steadily: Too slow causes burning, too fast causes tear-out.
- Use the right bit speed: Hardwoods need slower speeds; softwoods can be cut faster.
- Back up the end: For through dadoes, clamp a scrap board at the exit end. This supports the fibers and reduces tear-out.
Extra tip: If you see smoke or feel the wood getting hot, stop and check your bit. Let it cool, and clean off any pitch or resin.
Comparing Router To Table Saw For Dadoes
Many woodworkers wonder if they should use a table saw or a router for dadoes. Here’s a quick comparison:
| Feature | Router | Table Saw |
|---|---|---|
| Portability | Very portable | Stationary |
| Safety | Lower kickback risk | More kickback risk |
| Through Dadoes | Yes | Yes |
| Stopped Dadoes | Easy | More difficult |
| Dado Width Adjustment | Easy with multiple passes | Needs special blades |
| Edge Tear-Out | Less common | More common |
For most home woodworkers, the router is safer and more versatile, especially for stopped dadoes and working on large panels.
Real-world Example: Building A Bookshelf With Dadoes
Let’s look at how you’d use router-cut dadoes in a simple bookshelf project.
Design: A basic bookshelf with two sides, three shelves, and a top and bottom.
Steps:
- Measure the thickness of your shelves (let’s say 3/4-inch plywood).
- Mark dado locations on the inside of both side panels. Make sure the heights match exactly.
- Set up your router with a 3/4-inch straight bit (or use two passes for exact fit).
- Use a guide to cut each dado, about 1/4-inch deep.
- Test-fit each shelf. Adjust with a plane or sandpaper if too tight.
- Glue and clamp the shelves in the dadoes for extra strength.
Result: The shelves are locked in place, won’t sag, and look clean and professional. No visible screws or hardware.
Common Mistakes And How To Fix Them
Every woodworker makes mistakes, but knowing what to watch for helps you avoid them.
- Wandering cuts: Usually caused by freehand routing or a loose guide. Always clamp your guide securely.
- Wrong depth: Double-check your router depth setting on scrap before cutting your real workpiece.
- Loose joints: Plywood is often undersized. Make a test cut and adjust your bit or guide for a snug fit.
- Tear-out at edges: Back up the exit edge with a scrap board, or use a downcut bit for delicate veneers.
- Burn marks: Move the router steadily, use sharp bits, and take multiple passes for deep cuts.
Fixes: If your dado is too wide, glue a thin shim into the groove and re-cut. If too narrow, plane or sand the shelf edge for a perfect fit.

Safety Tips When Routing Dadoes
Routers are powerful tools, but with a few safety habits, you can avoid accidents.
- Wear hearing and eye protection. Routers are loud and throw chips.
- Use a dust mask. Fine dust is harmful if breathed.
- Keep hands clear of the bit, especially when starting or stopping.
- Check your setup before turning on the router.
- Unplug the router before changing bits or making adjustments.
- Secure your workpiece. Never try to rout a moving board.
Important: Never reach under the router base when the tool is plugged in.
Advanced Techniques: Using A Router Table
If you have a router table, you can cut dadoes even more easily for small boards or repeat cuts.
Router table advantages:
- The workpiece moves, the router stays still.
- Fence and stops make repeated cuts accurate.
- Good for smaller pieces that are hard to clamp on a bench.
But for large panels, a handheld router with a straightedge is still the best method.
Choosing The Best Router For Dadoes
If you’re buying your first router, here are the features that matter most for dado work:
| Feature | Why It Matters |
|---|---|
| Plunge base | Lets you start cuts away from the edge |
| Variable speed | Adjust for different bit sizes and woods |
| At least 1.5 HP | Plenty of power for hardwoods and deep cuts |
| Good dust collection | Keeps your work area clean |
| Soft start | Safer and less jarring |
| Comfortable handles | Reduces fatigue during long cuts |
Many top brands like Bosch, Makita, and DeWalt offer routers with these features.
How To Maintain Your Router And Bits
Tool maintenance is often overlooked by beginners, but it’s essential for great results.
- Clean your router regularly: Dust buildup can affect switches, bearings, and plunge mechanisms.
- Sharpen or replace bits: Dull bits cause burning and rough cuts. Clean off resin or pitch after each use.
- Check cord and plugs: Damaged cords are a safety hazard.
- Lubricate moving parts: Especially on plunge routers, for smooth action.
A well-maintained router will last for many years and always give the best results.
When To Use Glue In Dado Joints
A common question: Should you glue shelves into dadoes, or just rely on the fit?
- For most furniture, glue is recommended. It fills tiny gaps and makes the joint stronger.
- For parts that may need to be taken apart (like adjustable shelves), skip the glue.
- Use a good wood glue, spread thinly in the groove, and clamp until dry.
Non-obvious insight: Too much glue can cause the shelf to “hydraulically” push back out of the dado. Apply glue to both the groove and the shelf edge, but don’t overdo it.
Troubleshooting: What If Your Dado Is Too Loose Or Tight?
Not every dado fits perfectly on the first try. Here’s how to fix common fit problems:
- Too tight: Sand or plane the shelf edge slightly. Don’t force it, or the side panel could split.
- Too loose: Glue a thin strip (shim) of veneer or hardwood into the groove, let it dry, then recut or sand to fit.
- Gaps at the edges: Make sure your router guide was square to the board. Gaps often mean the guide slipped or the router base rocked during the cut.
Always test fit before gluing up your project.
Environmental And Health Considerations
Routing creates fine dust, especially with plywood and MDF. These materials often contain glues and resins that are harmful to breathe. Always use a dust mask or respirator, and work in a well-ventilated area.
Consider connecting your router to a shop vacuum for better dust control. Some routers come with dust ports for this purpose.
Woodworking can be enjoyable and safe with these simple precautions.
Helpful Resources For Further Learning
If you want to dive deeper, there are many books, online videos, and courses about router techniques and joinery. One excellent resource is the Wikipedia page on woodworking joints, which gives a broad overview of different joint types and their uses.
Frequently Asked Questions
What Is The Best Bit For Cutting Dadoes With A Router?
A straight bit or upcut spiral bit is best for most dadoes. For plywood, use a bit that matches the actual thickness, or make two passes with a slightly smaller bit for a perfect fit.
Can I Cut Dadoes In Plywood With A Router?
Yes, a router is excellent for plywood dadoes. Just measure the true thickness of the plywood (often less than the label) and adjust your bit or make two passes for a snug fit.
How Deep Should A Dado Be?
A good rule is one-third the thickness of the board. For a 3/4-inch side panel, a 1/4-inch deep dado is strong and easy to cut.
Do I Need A Plunge Router To Cut Dadoes?
A plunge router makes stopped dadoes easier, but you can also use a fixed-base router for through dadoes. For the most flexibility, a plunge base is helpful.
How Do I Prevent Tear-out When Routing Dadoes?
Use a sharp bit, take shallow passes, and back up the exit edge with a scrap board. For delicate veneers, a downcut spiral bit helps reduce tear-out.
Cutting a dado with a router is a skill that gets better with practice. With the right setup, careful measurements, and attention to detail, you’ll be making strong, beautiful joints that last for years. Whether you’re building your first bookshelf or your tenth set of cabinets, the dado joint is a tool you’ll use again and again.
Happy woodworking!