Sharpening router bits is a task that often gets ignored in many workshops. Most people either keep using dull bits or buy new ones when cutting gets rough. But a sharp router bit is essential for clean cuts, safe operation, and long tool life. Knowing how to sharpen router bits yourself can save you money, improve your woodworking, and extend the life of your tools. This guide will walk you through every step of sharpening router bits, discuss tools and techniques, highlight common mistakes, and answer questions many beginners have.
Whether you are a hobbyist or a professional, sharpening router bits is a skill worth learning. It’s not as complicated as it might seem, and the tools required are usually affordable. By the end of this article, you’ll have the confidence and knowledge to get your bits cutting like new again.
Why Router Bit Sharpness Matters
When router bits become dull, they cause poor-quality cuts. You may notice burn marks, rough edges, or even chipping in the material. Dull bits also force your router to work harder, which can overheat the motor and increase the risk of kickback—a safety hazard. Keeping your router bits sharp is as important as keeping saw blades sharp.
A sharp bit results in:
- Smoother cuts: Less sanding and finishing work.
- Cleaner edges: Reduces splintering and tear-out, especially on plywood or hardwood.
- Safer operation: Less resistance means better control and reduced risk of accidents.
- Longer tool life: Removes less material with each use, so bits last longer.
Types Of Router Bits And Their Sharpening Needs
Router bits come in many styles and materials. Understanding their differences helps you choose the right sharpening method.
| Bit Type | Material | Sharpening Difficulty | Common Use |
|---|---|---|---|
| Straight Bit | High-Speed Steel (HSS) or Carbide-tipped | Easy | Grooves, dados, rabbets |
| Flush Trim Bit | Carbide-tipped | Moderate | Template work, edge trimming |
| Round-Over Bit | Carbide-tipped | Moderate | Softening edges |
| V-Groove Bit | Carbide-tipped | Challenging | Decorative grooves |
| Profile Bit (ogee, cove, etc.) | Carbide-tipped | Challenging | Edge profiles |
High-Speed Steel (HSS) bits are easier to sharpen but wear out faster. Carbide-tipped bits stay sharp longer but require diamond tools for sharpening.

Recognizing When Router Bits Need Sharpening
Many beginners keep using bits past their prime because they don’t know what to look for. Here are clear signs a router bit needs sharpening:
- Burn marks on wood, even at moderate speeds.
- Rough or chipped edges along the cut.
- Increased resistance while routing.
- Visible dullness or chips on the cutting edge.
- Unusual sounds—the router whines or strains more than usual.
A simple test: Lightly touch the edge with your fingernail. If it slides smoothly without catching, it’s likely dull.
Tools And Materials For Sharpening Router Bits
You do not need a full machine shop to sharpen router bits. Here are the most effective tools:
- Diamond needle files: Perfect for carbide-tipped bits. Their small size fits into tight curves and profiles.
- Fine-grit diamond sharpening cards: Good for straight or flat edges.
- Ceramic stones or files: Suitable for HSS bits, but not hard enough for carbide.
- Magnifying glass: To inspect the edge for chips or wear.
- Cloth and cleaning solvent: Remove resin build-up before sharpening.
- Safety glasses and gloves: Protect your eyes and hands from metal filings.
You do not need to buy all these at once. For most home users, a set of diamond needle files and a diamond card will cover most jobs.
Preparing For Sharpening
Before you begin, it’s important to clean the bit thoroughly. Resin, pitch, and sawdust can hide the true condition of the edge and make sharpening less effective.
- Apply a bit and blade cleaner or a mixture of household cleaner and water.
- Use a small brush or an old toothbrush to scrub away debris.
- Dry the bit completely to prevent rust.
Never try to sharpen a dirty bit—it will shorten the file’s life and may damage the bit.
Step-by-step Guide To Sharpening Router Bits
Sharpening a router bit is not as intimidating as it seems. With patience and the right tools, you can restore a bit’s edge in about 10–15 minutes.
Step 1: Secure The Bit
Hold the router bit securely. You can use a small vise or a bit holder. Make sure not to clamp the cutting edge directly, as this may damage it. Wrapping the bit in a soft cloth before clamping can help prevent scratches.
Step 2: Inspect The Cutting Edges
Use your magnifying glass to check for chips, nicks, or uneven wear. If the bit has deep chips or missing sections, it may be beyond repair.
Step 3: Identify The Sharpening Surface
For most router bits, you only sharpen the flat faces (also called the “land”) behind the cutting edge. Do not file the curved or beveled edge—this will change the bit’s profile and ruin its accuracy.
Step 4: Select Your Sharpening Tool
For carbide bits, use a diamond file or card. For HSS bits, a ceramic or fine oil stone may work.
Step 5: Sharpen The Flat Face
Hold your sharpening tool flat against the land and use light, even strokes. Move the file in one direction only—do not saw back and forth. Usually, 8–10 strokes are enough for each cutting edge.
Tips:
- Apply gentle pressure to avoid removing too much material.
- Keep the angle flat; do not tilt the file.
- Count your strokes to keep both edges even.
Step 6: Repeat For All Cutting Edges
Most bits have two cutting edges, but some larger bits may have three or more. Sharpen each edge the same number of times.
Step 7: Check Your Progress
After sharpening, look at the edge under a magnifying glass. It should be shiny and free of nicks. Gently touch the edge with your fingernail—it should catch slightly.
Step 8: Clean And Test
Wipe the bit with a clean cloth to remove filings. If possible, test the bit on a piece of scrap wood. The cut should be smooth and require less effort than before.

Special Tips For Different Router Bit Types
Not all router bits are created equal. Some need extra care or a modified approach.
Sharpening Straight Bits
These are the simplest to sharpen. Focus on the flat land behind each cutting edge. Avoid touching the sides or changing the bit’s diameter.
Sharpening Round-over And Cove Bits
These bits have a curved profile. Use a fine diamond needle file that matches the curve. Be careful not to file the bearing or change the bit’s shape.
Sharpening Flush Trim Bits
Flush trim bits often have a bearing at the tip. Never file the bearing. Only sharpen the flat faces on the cutting edge.
Sharpening V-groove And Decorative Bits
These bits are difficult to sharpen by hand because of their complex shapes. Use the smallest file that fits the profile, and work slowly. If the bit is badly worn, it may need professional sharpening.
When To Sharpen Vs. Replace
Not all bits are worth saving. Here’s a quick guide:
| Condition | Sharpen | Replace |
|---|---|---|
| Minor dullness, no chips | ✔️ | |
| Small chips on edge | ✔️ (if chips are shallow) | |
| Deep chips or missing carbide | ✔️ | |
| Bent or broken shank | ✔️ | |
| Burnt or blue from overheating | ✔️ | |
| Profile worn or changed shape | ✔️ |
If in doubt, inspect the bit closely. Attempting to sharpen a bit with missing carbide can make it dangerous to use.
Common Mistakes When Sharpening Router Bits
Even experienced woodworkers make errors that can ruin a bit or make it unsafe. Avoid these pitfalls:
- Filing the wrong surface: Only sharpen the flat land, not the beveled edge.
- Changing the bit’s shape: Removing too much material alters the profile and cutting diameter.
- Using the wrong tool: Carbide bits need diamond files; oil stones won’t work.
- Sharpening dirty bits: Dirt and resin clog files and cause uneven sharpening.
- Applying too much pressure: This can crack carbide or gouge the edge.
- Not checking for balance: Uneven sharpening causes vibration and poor cuts.
A non-obvious insight: Over-sharpening is just as bad as under-sharpening. Removing too much material reduces the life of your bit and may make it unsafe.
Advanced Sharpening Tips
Once you are comfortable with the basics, these advanced tips can help you get a professional-level edge.
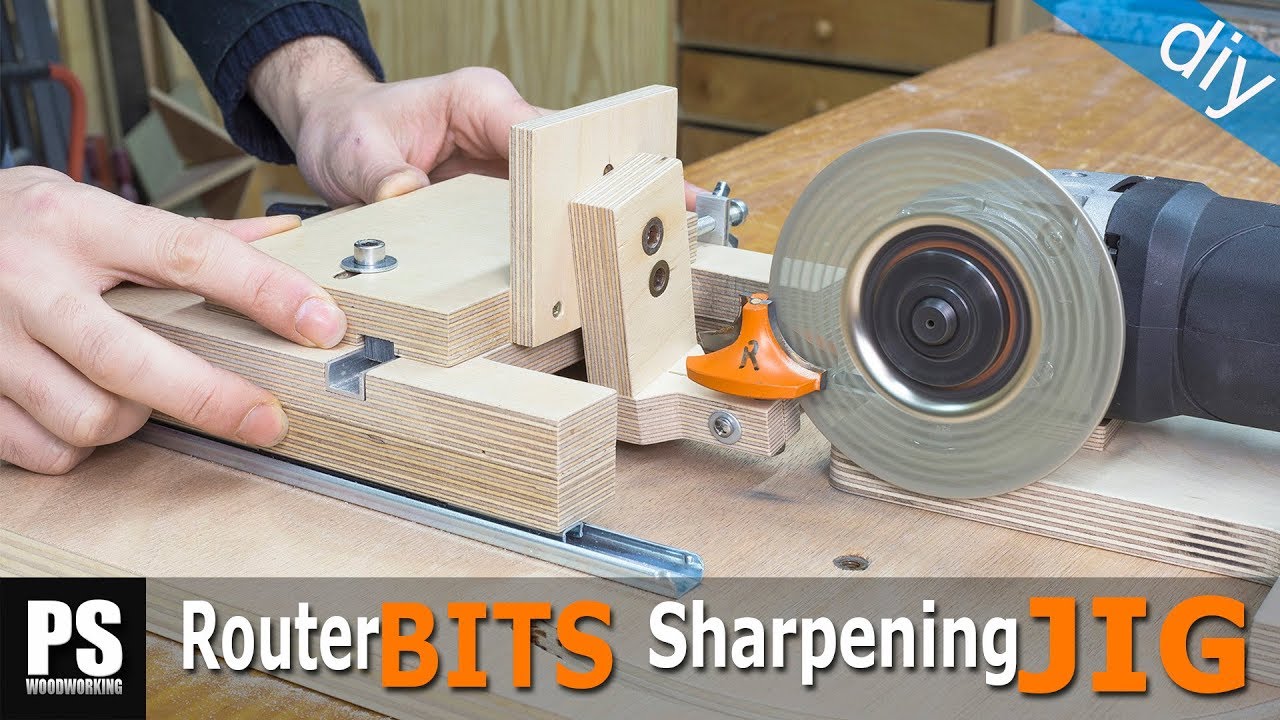
Use A Honing Guide
Some woodworkers make a simple jig or use a honing guide to hold the file at the perfect angle. This ensures a consistent edge every time.
Lubricate The File
A drop of water or light oil on the diamond file helps remove metal filings and keeps the file cutting smoothly. Wipe clean after use to prevent rust.
Mark The Edge
Before sharpening, use a black marker to color the edge you plan to file. As you file, the marker disappears where you are sharpening. This helps you see your progress and avoid over-filing one area.
Maintain A Routine
Sharpen router bits after every big project, or when you notice the first sign of dullness. Regular light sharpening is better than waiting for the bit to get completely dull.
Diy Vs. Professional Sharpening Services
You might wonder if it’s better to sharpen bits at home or send them to a professional. Here’s a quick comparison:
| Factor | DIY Sharpening | Professional Service |
|---|---|---|
| Cost | Low (after buying tools) | Medium to high per bit |
| Time | Immediate | Several days to weeks |
| Result quality | Good (with practice) | Excellent, like new |
| Bit complexity | Simple to moderate bits | All types, including complex profiles |
| Learning curve | Moderate | None for user |
For expensive or complex bits, professional sharpening is sometimes the best choice. For standard straight or flush trim bits, home sharpening is usually sufficient.
Safety Tips For Sharpening Router Bits
Safety is often forgotten when sharpening small tools. Follow these tips for a safe experience:
- Wear safety glasses: Tiny metal filings can fly up during sharpening.
- Use gloves: Protects from cuts when handling sharp bits.
- Clamp bits securely: Prevents slips and possible injury.
- Work in a well-lit area: Makes it easier to see edges and avoid mistakes.
- Keep sharpening tools clean: Dirty files or stones can slip or scratch.
Remember, a sharp bit is safer to use, but only if you handle it with care.
Cleaning And Maintenance After Sharpening
Sharpening is just one part of router bit care. Cleaning and proper storage extend the life of your bits.
- Clean bits after use: Prevents resin build-up and rust.
- Lubricate lightly: A drop of oil helps prevent rust, especially on steel shanks.
- Store bits in a case: Protects edges from damage and keeps bits organized.
- Inspect bearings: If your bit has a bearing, check for smooth rotation and add a drop of oil if needed.
A little extra care can double or triple the lifespan of your router bits.
Sharpening Router Bits: Real-world Examples
To understand how sharpening makes a difference, consider these real-world cases:
Case 1: After sharpening a straight bit used for dados, one woodworker noticed a 20% reduction in routing time and almost no burn marks, even on maple.
Case 2: A hobbyist sharpened a round-over bit that was leaving rough edges. After sharpening, the bit produced a glass-smooth profile, saving 15 minutes per board on sanding.
Case 3: A professional shop kept all flush trim bits sharp. As a result, template work was faster, with less chance of chipping expensive hardwood veneers.
These examples show that sharpening is not just about saving money—it improves your work quality and efficiency.
How Often Should You Sharpen Router Bits?
There’s no single answer, but here are some guidelines:
- After every major project: Especially if routing hardwood or abrasive plywood.
- When you notice more resistance: If the router feels like it’s working harder, stop and sharpen.
- If you see burn marks: This is an early sign of dullness.
- Every 5–10 hours of use: For average home use, this is a good benchmark.
Waiting until a bit is very dull makes sharpening harder and removes more material.
Environmental And Cost Benefits Of Sharpening
Sharpening router bits is not just good for your wallet—it’s good for the environment. Each year, thousands of worn-out bits end up in landfills. By sharpening, you reduce waste and the need for new resources.
Cost Savings Example: If you sharpen a $30 carbide bit three times before replacing it, you save about $60 per bit over time. Multiply this by your bit collection, and the savings add up quickly.
Choosing The Right Sharpening Tools
With so many files and stones on the market, how do you choose? Focus on:
- Grit size: Fine or extra-fine grit (600–1200) is best for router bits.
- Shape: Needle files can reach into tight profiles.
- Material: Diamond is required for carbide; ceramic or oil stones are for HSS.
- Size: Smaller tools give more control.
Avoid cheap, low-quality files—they wear out quickly and can damage your bits.
Router Bit Sharpening: Myths And Misconceptions
Many beginners believe myths that stop them from sharpening bits themselves:
- “Carbide bits can’t be sharpened at home.”
Fact: You can sharpen the flat face with a diamond file for several cycles before needing professional service.
- “Sharpening will ruin the bit’s balance.”
Fact: If you use even strokes and count them, balance is maintained.
- “Only the tip needs sharpening.”
Fact: The entire cutting edge must be sharp for smooth results.
- “Special equipment is needed.”
Fact: Most home users need only a diamond file and a steady hand.
Understanding these truths can give you the confidence to try sharpening yourself.
Frequently Asked Questions
How Do I Know When My Router Bit Needs Sharpening?
Look for rough cuts, burn marks, or extra resistance while routing. You can also check the edge with your fingernail—a sharp bit will feel slightly “grippy,” while a dull bit slides smoothly.
Can I Sharpen Router Bits With A Bench Grinder?
No. Bench grinders remove too much material too quickly and can overheat and damage the carbide. Always use hand files or diamond cards for precise control.
Is It Safe To Use A Bit After Sharpening?
Yes, as long as you sharpen only the flat land and maintain the bit’s balance. Inspect the edge for chips or cracks before use. If the bit is damaged, replace it.
How Many Times Can I Sharpen A Router Bit?
Most bits can be sharpened 3–5 times before they become too small or lose their profile. Carbide bits last longer than HSS bits.
Where Can I Learn More About Router Bit Care?
You can find more information at trusted woodworking sites such as Wood Magazine.
Sharpening router bits is a skill that pays off with smoother work, safer operation, and longer tool life. With a little practice and the right tools, you’ll wonder why you ever put up with dull bits. Take time to care for your router bits, and your woodworking will reach a new level.