Sharpening a circular saw blade may seem like a job for a professional, but with the right guidance, anyone can do it safely and effectively at home. A sharp saw blade is key to clean cuts, less strain on your saw, and safer operation.
Over time, even the best blades lose their edge. Dull teeth can burn wood, cause rough cuts, or even create dangerous kickbacks. If you notice your saw struggling or leaving burn marks, it’s time to take action.
Learning how to sharpen a circular saw blade can save money, extend the life of your tools, and give you better results on every project. This detailed guide walks you through every step of the process, from understanding your blade type to the final finishing touches.
Along the way, you’ll discover practical tips, common mistakes to avoid, and insights most beginners overlook. Whether you’re a weekend DIYer or a woodworking enthusiast, this guide will help you keep your blades in top condition without stress or confusion.
Understanding Your Circular Saw Blade
Before you begin sharpening, it’s vital to know your blade’s specifics. Not all circular saw blades are the same, and sharpening methods can vary.
Blade Material
Most circular saw blades are made from high-speed steel (HSS) or carbide-tipped steel. HSS blades are common in older or budget saws, while carbide-tipped blades dominate modern woodworking due to their durability and longer life. Carbide tips require special attention because they are harder than steel and need diamond files or wheels to sharpen.
Tooth Count And Geometry
Blades come in various tooth counts—from 18 teeth (for fast, rough cuts) to 80 or more (for fine work). The tooth shape also matters. The most common styles include:
- Alternate Top Bevel (ATB): For cross-cutting wood, with teeth angled left and right.
- Flat Top Grind (FTG): For ripping wood along the grain, with flat teeth.
- Triple Chip Grind (TCG): For cutting hard materials like laminate or plastics.
Understanding your blade’s tooth shape helps you choose the right sharpening approach and tools.
When To Sharpen Vs. Replace
A blade can be sharpened multiple times, but sometimes replacement is better. Here’s how to decide:
- Sharpen if: The blade is dull, but the teeth are intact and not missing large chunks.
- Replace if: Teeth are broken, seriously chipped, or if the blade is warped or cracked.
A good rule: If more than 20% of the teeth are damaged or missing, replacement is usually safer and more cost-effective.
Tools And Materials Needed
Gathering the right tools before starting makes the process smoother and safer. Here’s what you’ll need:
- Blade removal tool (wrench or Allen key, depending on your saw)
- Permanent marker (to mark your starting tooth)
- Small diamond file or sharpening stone (for carbide blades)
- Triangular file (for steel blades)
- Blade holder or jig (to secure the blade)
- Safety gloves and goggles
- Compressed air or a soft brush (for cleaning)
- Lubricant (optional, for smoother filing)
- Workbench with clamp (to keep things steady)
While you can sharpen some blades by hand, a blade sharpening machine or jig gives more consistent results, especially for carbide-tipped models. If you plan to sharpen often, investing in a good jig is worth it.
Preparing For Sharpening
Preparation is not just about safety; it also ensures your sharpening work is accurate and efficient.
Removing The Blade
Always unplug your saw before starting. Most saws have a blade lock button. Press this, then use the wrench to loosen and remove the blade. If your saw doesn’t have a lock, carefully hold the blade with a thick glove or a piece of wood.
Cleaning The Blade
Dirt, resin, and pitch can hide dullness or damage. Clean your blade using a mixture of warm water and mild detergent or a dedicated saw blade cleaner. Scrub with a soft brush, rinse, and dry thoroughly.
Inspecting For Damage
Hold the blade up to the light. Look for missing, cracked, or chipped teeth. Check for warping by laying the blade flat on a table. If it wobbles or rocks, it’s time to replace, not sharpen.
Marking The Starting Point
Use a permanent marker to mark your starting tooth. This prevents you from sharpening the same tooth twice or missing any teeth.
Methods For Sharpening Circular Saw Blades
There are several ways to sharpen a circular saw blade, each with its pros and cons.
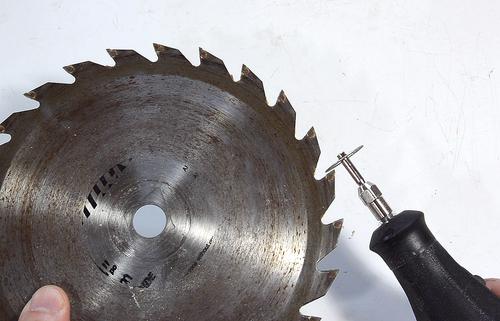
Hand Filing
Best for occasional sharpening and for steel blades. Here’s how to do it:
- Secure the blade: Clamp it to your workbench or mount it in a blade holder.
- File each tooth: Use a triangular file for steel blades, or a diamond file for carbide tips. Keep the file at the same angle as the original tooth face (usually 15–20 degrees).
- Count your strokes: Use the same number of strokes per tooth for even sharpness.
- Check your progress: After every few teeth, run your finger gently along the edge (wear gloves). You should feel a sharper point but no burrs.
Pro Tip: Most beginners apply too much pressure. Light, consistent strokes are better. If you press too hard, you risk removing too much material or changing the tooth shape.
Using A Blade Sharpening Jig
A sharpening jig holds the blade steady and guides your file at the correct angle. This tool is especially useful for beginners or anyone who wants professional results without a machine.
- Mount the blade in the jig: Follow the manufacturer’s instructions.
- Set the file angle: Match the tooth angle—usually printed on the blade or in your saw’s manual.
- Sharpen each tooth: Slide the file back and forth, maintaining the same angle.
- Advance to the next tooth: Rotate the blade and repeat.
Non-Obvious Insight: Most people only file the front face of each tooth. However, lightly touching up the top edge can also improve cutting performance—just don’t overdo it.
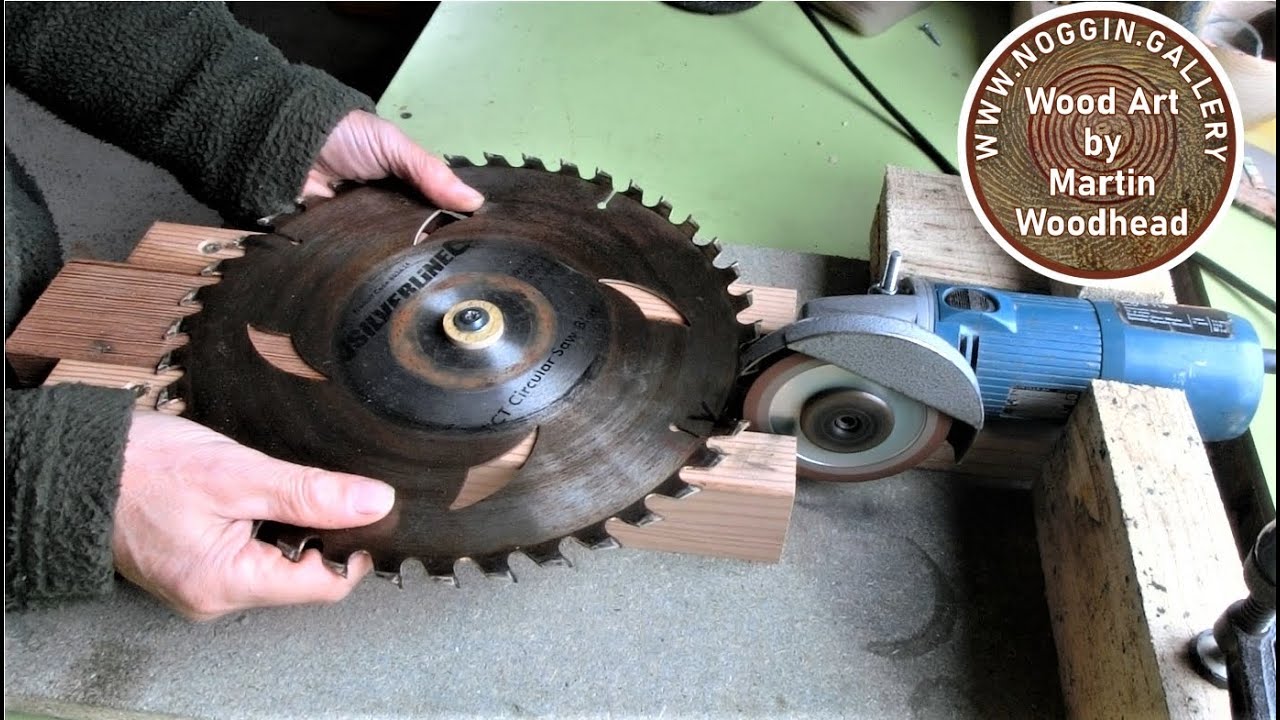
Using A Bench Grinder Or Sharpening Machine
For frequent sharpening or carbide-tipped blades, a bench grinder with a diamond wheel is the fastest method.
- Set up the machine: Adjust the rest to match the tooth angle.
- Wear eye and ear protection: Grinders are loud and can throw sparks.
- Lightly touch each tooth: Press the tooth to the wheel for 1–2 seconds. Don’t overheat the tooth, as this can damage the metal.
- Check for evenness: After sharpening, all teeth should be the same height and shape.
Caution: Using a grinder requires a steady hand. If you’re unsure, practice on an old blade first or consider a sharpening service.
Professional Sharpening Services
If you have expensive carbide blades or want perfect results, many hardware stores and tool shops offer sharpening for a fee. This can cost $10–$20 per blade, but is often cheaper than buying new blades. It’s also a good option if you don’t have the tools or confidence to sharpen at home.
Step-by-step Guide To Sharpening A Circular Saw Blade
Now, let’s walk through a complete sharpening session, using a hand file and jig—the most common method for home users.
1. Set Up Your Workspace
Choose a well-lit area with a sturdy table or workbench. Gather your tools and put on safety gear—gloves and goggles are a must.
2. Remove And Clean The Blade
Unplug the saw. Remove the blade using your saw’s wrench. Clean off all dirt and resin using a brush and cleaner. Dry thoroughly to prevent rust.
3. Inspect The Blade
Look for broken, missing, or heavily chipped teeth. If more than a few teeth are damaged, replace the blade. If the blade is warped, do not sharpen.
4. Secure The Blade
Clamp the blade to your workbench or mount it in a sharpening jig. Make sure it’s steady—movement can cause uneven sharpening or injury.
5. Mark The Starting Tooth
Use a marker to color one tooth. This helps you keep track of your progress.
6. Sharpen Each Tooth
- For steel blades: Use a triangular file.
- For carbide-tipped blades: Use a diamond file.
Hold the file at the same angle as the original tooth face (usually 15–20 degrees). File each tooth with the same number of strokes—3 to 5 is typical. Only remove as much material as needed to restore the edge.
7. Check Tooth Height
After sharpening, compare the teeth. They should all be the same height. If some are lower, you may have over-filed. Uneven teeth can cause rough cuts or vibration.
8. Lightly Touch The Top Edge
With some blades, a quick pass along the top (flat) edge of each tooth removes tiny burrs and improves sharpness. Do this gently—over-filing here can ruin the blade.
9. Clean And Reinstall
Wipe the blade with a dry cloth. Blow away any filings with compressed air. Reinstall the blade, tighten it securely, and check that it spins freely.
10. Test Your Blade
Make a few test cuts in scrap wood. The blade should cut smoothly, with little resistance. If it burns or splinters, recheck your sharpening angle and technique.
Practical Tips For Getting The Best Results
- Sharpen before you’re desperate: Dull blades damage wood and are harder to sharpen well.
- Keep your files clean: Dirty files are less effective and can scratch carbide teeth.
- Use gentle pressure: Let the file or grinder do the work.
- Don’t skip cleaning: Resin and pitch can hide damage and make sharpening uneven.
- Store blades properly: After sharpening, keep blades dry and in a blade case or wrapped in paper to prevent dulling.
Comparing Sharpening Methods
Choosing the right method depends on your blade type, experience, and how often you sharpen.
| Method | Best For | Skill Level | Cost | Results |
|---|---|---|---|---|
| Hand Filing | Steel blades, Occasional use | Beginner | Low | Good |
| Jig with File | Carbide/Steel, Frequent use | Intermediate | Medium | Very Good |
| Bench Grinder/Machine | Carbide, Heavy use | Advanced | High | Excellent |
| Professional Service | Expensive blades, Best results | Any | Per blade | Professional |
Common Mistakes To Avoid
Sharpening looks simple, but many beginners make errors that can ruin a blade or make cutting worse. Here are key mistakes and how to avoid them:
Filing At The Wrong Angle
Each tooth is designed for a specific angle. Filing at the wrong angle can cause rough cuts, burning, or rapid dulling. Always match the original tooth angle.
Over-filing
Too many strokes can remove too much material, lowering the tooth height. This leads to uneven cuts and blade vibration. Count your strokes and check tooth height as you go.
Neglecting The Top Edge
Many people only sharpen the front face. Gently filing the top can improve sharpness, but do not overdo it.
Forgetting To Clean First
Resin and pitch can clog files and cause uneven sharpening. Always clean the blade before you begin.
Not Marking The Starting Tooth
It’s easy to lose track of your progress. Mark your starting point to avoid sharpening the same tooth twice or missing some teeth.
Ignoring Safety
Files can slip, and blades can be sharp even when dull. Always wear gloves and goggles, and keep your hands clear of sharp edges.
How Often Should You Sharpen A Circular Saw Blade?
The frequency depends on what you cut and how often you use your saw. Here’s a helpful guideline:
| Material Cut | Usage Frequency | Sharpening Interval |
|---|---|---|
| Softwood | Occasional | Every 6-12 months |
| Softwood | Daily/Heavy | Every 1-2 months |
| Hardwood | Occasional | Every 3-6 months |
| Hardwood | Daily/Heavy | Every 3-4 weeks |
| Plywood/MDF | Any | Every 1-2 months |
| Laminate/Plastics | Any | Every 2-4 weeks |
If you notice burn marks, more resistance, or rougher cuts before these intervals, sharpen sooner.
Signs Your Blade Needs Sharpening
Don’t wait until your blade is completely dull. Watch for these warning signs:
- Burn marks on wood
- Chipped or ragged edges on cuts
- Saw struggles or makes loud noises
- More effort needed to push the saw
- Increased tear-out or splintering
- Visible dullness or rounded teeth
Ignoring these signs can lead to poor-quality work and even dangerous situations.
Safety Precautions
Sharpening is not risk-free. Take these steps to protect yourself and your tools:
- Unplug your saw before removing the blade.
- Wear gloves—blades are still sharp.
- Use goggles—filings and chips can fly.
- Clamp the blade—never hold it in your hand while sharpening.
- Keep your work area clean to prevent slips or accidents.
- Check for cracks—never sharpen a cracked blade.
When To Replace Instead Of Sharpening
Even the best blades reach the end of their life. Here’s when you should buy a new blade:
- Missing or broken teeth: If several teeth are gone or badly damaged.
- Cracks in the blade: These can cause the blade to break apart at high speed.
- Blade is warped: A bent blade cannot be safely or effectively sharpened.
- Teeth are too small: After multiple sharpenings, the teeth may become too short for safe use.
A good quality blade can be sharpened 3–5 times before it needs to be replaced. Higher-end carbide blades may last even longer with proper care.
Storing And Caring For Blades After Sharpening
Proper storage extends the sharpness and life of your saw blades:
- Store blades vertically on a pegboard or in a blade case.
- Keep them dry—moisture causes rust.
- Wrap in paper to prevent teeth from banging together.
- Avoid stacking blades without protection.
- Label sharp blades so you know which ones are ready to use.
Expert Insights: Advanced Tips Most Miss
Many guides stop at basic sharpening, but here are two advanced tips often overlooked:
- Micro-beveling the Teeth: Adding a tiny secondary bevel (1–2 degrees more than the main angle) can improve cut quality in hardwoods and reduce blade wear. This requires careful filing and is best for experienced users.
- Balancing the Blade: After sharpening, check that the blade is balanced by hanging it on a nail through the center hole. If it tips to one side, more material was removed from that side. An unbalanced blade can cause vibration and rough cuts.
These steps aren’t mandatory, but they can make a real difference for demanding projects or frequent users.
Environmental And Cost Benefits Of Sharpening Your Own Blades
Sharpening at home is not just about saving money. It also reduces waste, since you can use each blade for years instead of replacing it every few months. Over time, a $50 carbide blade sharpened five times saves you up to $200 compared to buying new blades each time.
Plus, sharpening reduces the environmental impact of manufacturing and shipping new blades.
Trusted Resources For Further Learning
If you want to dive deeper, many woodworking forums and tool manufacturers offer videos and guides. The Wikipedia Circular Saw page gives an excellent overview of saw blade types and uses.
Frequently Asked Questions
How Do I Know If My Circular Saw Blade Is Too Dull To Sharpen?
If your blade has missing teeth, large chips, or cracks, it’s safer to replace it. Blades with small nicks or dull edges can be sharpened, but if more than 20% of the teeth are damaged, sharpening is not recommended.
Can I Sharpen A Carbide-tipped Blade With A Regular File?
No. Carbide is much harder than steel. You need a diamond file or a sharpening machine with a diamond wheel. Using a steel file will not work and may damage the blade.
Is It Worth Buying A Sharpening Jig For Home Use?
If you sharpen blades often, a sharpening jig is a good investment. It helps you maintain the correct angle and get consistent results. For occasional users, hand filing is fine, but a jig gives more professional results.
How Many Times Can I Sharpen A Circular Saw Blade?
Most blades can be sharpened 3–5 times before the teeth become too small. High-quality carbide blades may last longer. Always check the tooth size and blade condition before each sharpening.
What Should I Do If My Blade Makes Noise Or Vibrates After Sharpening?
Noise or vibration usually means the blade is out of balance or the teeth are uneven. Check that all teeth are the same height and the blade is not warped. If the problem continues, consider professional sharpening or replacement.
Keeping your circular saw blade sharp makes every cut smoother, safer, and more accurate. With careful attention to detail and the tips above, you’ll extend the life of your blades and improve every project. Remember, sharpening is a skill—each time you do it, you’ll get better and more confident.
Happy sawing!