Pegboards are simple, but powerful tools for organizing, displaying, and storing items in homes, workshops, offices, and even retail spaces. If you’ve ever felt frustrated searching for lost tools or supplies, pegboard can be your best friend. With the right setup and some creative ideas, you can transform a messy area into a space that’s both practical and pleasing to the eye.
Many people see pegboard as just a bunch of holes on a board. But once you know how to use it, you’ll realize it’s a flexible system that can adapt to almost any need. Let’s explore everything you need to know—from selecting the right board and tools to installing, organizing, and even decorating with pegboard.
Along the way, you’ll discover tips most beginners miss, and learn how pegboard can make your daily life smoother.
What Is A Pegboard?
A pegboard is a flat board with evenly spaced holes. These holes allow you to insert hooks, shelves, bins, and other accessories. Pegboards are usually made from materials like wood, metal, or plastic.
You’ll find pegboards in garages, kitchens, craft rooms, and even offices. They are popular because they are:
- Easy to install
- Highly customizable
- Great for saving space
Pegboard systems are not just about holding tools—they help you see everything at a glance. This means less time searching and more time doing.
Types Of Pegboard
Choosing the right type of pegboard is key to getting the most from your setup. Here are the most common options and how they compare:
| Type | Material | Strength | Best Use | Cost |
|---|---|---|---|---|
| Hardboard | Compressed wood | Medium | Home, light tools | Low |
| Metal | Steel or aluminum | High | Workshops, heavy tools | High |
| Plastic | Polypropylene, ABS | Medium | Kitchens, crafts | Medium |
Hardboard Pegboard
This is the classic brown board you see in many garages. It’s affordable and easy to cut, but not very strong. It’s best for lightweight storage.
Metal Pegboard
Metal pegboards are sturdy and resistant to warping. They can handle heavy tools and last for years. They’re ideal for professional workshops or garages.
Plastic Pegboard
Plastic pegboards are lightweight and resistant to water. They’re good for kitchens, bathrooms, or craft rooms, where moisture can be an issue. They often come in different colors, adding a decorative touch.
Key insight: Many beginners choose hardboard because it’s cheap, but for heavy items, it’s better to invest in metal or reinforced plastic.
Where To Use Pegboard
Pegboards are not just for workshops. Here are some practical places to use them:
- Garage or Workshop – For organizing tools, cords, and hardware.
- Kitchen – Hang utensils, pots, and spices for easy access.
- Craft Room – Store scissors, ribbons, and art supplies neatly.
- Home Office – Keep office supplies, headphones, and cables visible.
- Entryway or Mudroom – Hang keys, bags, and jackets for quick grab-and-go.
- Closet – Organize accessories, belts, or jewelry.
- Retail Store – Display merchandise in a flexible way.
Non-obvious insight: Pegboard works great inside cabinets or closet doors—saving space and keeping things out of sight.
How To Choose The Right Pegboard
Choosing the right pegboard depends on what you want to store, where you’ll install it, and your budget.
Consider The Weight
- For light items (kitchen tools, craft supplies): Hardboard or plastic works fine.
- For heavy items (power tools, hammers): Metal or reinforced plastic is safer.
Size Matters
Measure your space before buying. Pegboard comes in standard sizes (like 2×4 feet or 4×8 feet), but you can cut it to fit.
Hole Size
Most pegboards have 1/8″ or 1/4″ holes. The larger holes are for heavier hooks and accessories. Make sure your hooks match the hole size.
Accessories Compatibility
Not all hooks fit all boards. Check that your accessories and pegboard are compatible—this is a common beginner mistake.
Style And Color
Pegboards now come in different colors and finishes. For kitchens or visible areas, choose a style that matches your décor.
Tools And Accessories For Pegboard
The real magic of pegboard comes from its accessories. Here’s what you’ll need to set up a pegboard system:
Basic Tools For Installation
- Drill (with bits)
- Level for straight installation
- Tape measure
- Screws and wall anchors
- Stud finder (for heavy loads)
Common Pegboard Accessories
| Accessory | Use | Best For |
|---|---|---|
| Hooks | Hanging tools, utensils | General purpose |
| Baskets | Holding small items | Crafts, kitchen |
| Shelves | Flat storage | Books, bins |
| Bins/Cups | Loose items | Hardware, art supplies |
| Magnetic strips | Metal tools | Workshops |
| Mounts/Brackets | Special equipment | Drills, tape guns |
Practical tip: Buy a starter kit of hooks and accessories, then add more as you discover your needs.
Planning Your Pegboard Layout
Before installing, it’s smart to plan your layout. This saves time and avoids unnecessary holes in your wall.
Step 1: Gather Items
Lay out everything you want to store on the pegboard. Group similar items together.
Step 2: Trace And Arrange
On the floor or a large table, arrange your items as you’d like them to hang. This helps you see how much space you’ll need.
Step 3: Mark Hook Locations
For items that need special hooks or mounts, mark their positions. Consider height and reach—place the most-used items at eye level.
Step 4: Adjust For Growth
Leave extra space for future items. Pegboards are flexible, but planning ahead avoids crowding.
Beginner mistake: Placing hooks too close together. Leave room for your hands to grab items easily.
/how-to-hang-a-pegboard-5214870-hero-01-45e4392f1f2046ab86a6aeb896dc21c2.jpg)
Credit: www.thespruce.com
How To Install Pegboard
Installation is simple, but a few details make a big difference in safety and durability.
Step 1: Choose The Right Wall
Pegboards work best on open walls, but can also go inside cabinets or doors. Avoid areas with pipes or hidden wires.
Step 2: Find Wall Studs
For heavy loads, mount your pegboard to wall studs. Use a stud finder to locate them.
Step 3: Create A Gap Behind The Board
Pegboard hooks need space to go into the holes. Attach furring strips (thin wood strips) behind the board to create a 1/2 inch gap from the wall.
Step 4: Cut To Size (if Needed)
Use a saw to trim the board to fit your space. Wear safety glasses and cut slowly.
Step 5: Attach The Pegboard
- Hold the board in place.
- Drill through both the pegboard and the furring strips into the wall.
- Insert screws into studs or wall anchors.
Step 6: Add Accessories
Once the board is secure, add your hooks, shelves, and bins according to your plan.
Pro tip: Use washers with screws to avoid damaging the pegboard holes.
Organizing With Pegboard: Best Practices
A well-organized pegboard is about more than just hanging things. Here’s how to keep your system neat and functional:
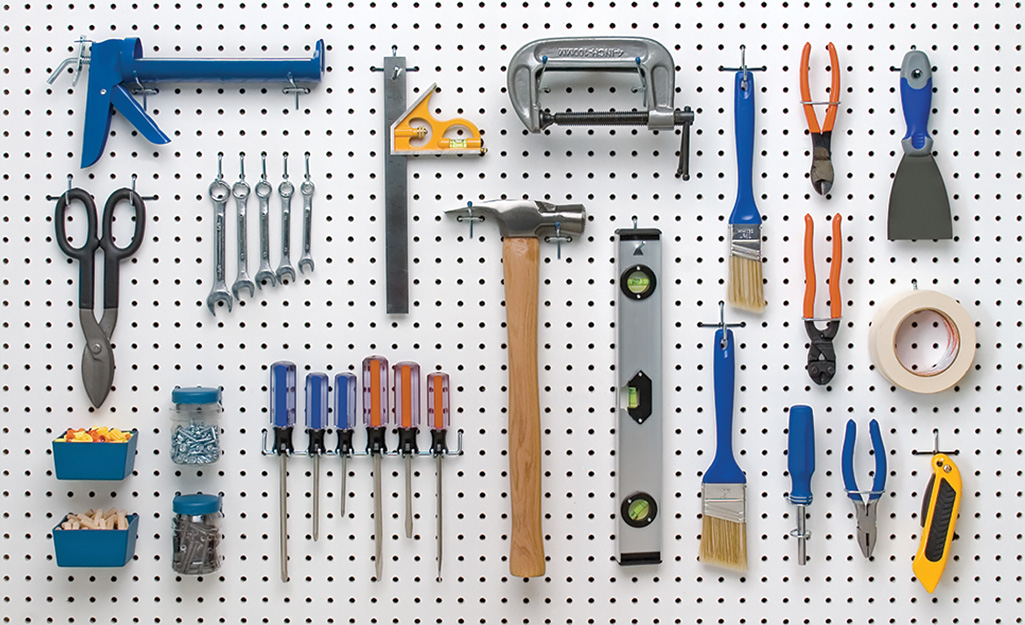
Group By Function
Keep similar items together. For example, hang all screwdrivers in one area, pliers in another. This speeds up finding what you need.
Use Labels
Labels help everyone in your home or workspace know where things belong. You can stick labels on the pegboard or on the shelves and bins.
Mix Vertical And Horizontal Storage
Some tools (like wrenches) fit better vertically, while others (like tape rolls) hang better horizontally. Try both to see what works best.
Keep Essentials At Eye Level
Place your most-used items where you can reach them easily. Less-used items can go higher or lower.
Don’t Overload
Too many items can make your pegboard look messy and make it harder to grab things. If you run out of space, consider adding a second board.
Non-obvious insight: Rotate items seasonally. For example, put gardening tools up front in spring, and move winter gear forward when needed.
Creative Pegboard Ideas For Every Room
Pegboard isn’t just for tools. Here are creative ways to use pegboard in different spaces:
Kitchen
- Hang pots, pans, and utensils for a chef’s look.
- Use small shelves for spices or cookbooks.
- Attach hooks for measuring cups and towels.
Office
- Store scissors, pens, headphones, and cables.
- Mount small shelves for notebooks or planners.
- Hang a calendar or whiteboard.
Bedroom
- Display jewelry, sunglasses, or hats.
- Add small baskets for makeup or hair products.
- Hang photos or art for a personal touch.
Laundry Room
- Hang cleaning brushes, spray bottles, and clothespins.
- Use bins for lost socks or sewing supplies.
Kids’ Room
- Store art supplies, toys, or backpacks.
- Let kids decorate their own pegboard with colorful accessories.
Garage/workshop
- Organize every tool in its own spot.
- Add magnetic strips for metal tools.
- Use deep hooks for extension cords or hoses.
Creative tip: Paint your pegboard before installing. Patterns or bright colors can make it a feature wall.
Maintaining And Updating Your Pegboard
A pegboard system only works if you keep it tidy. Here’s how to maintain and update your setup:
Regular Cleaning
Dust can gather behind and on your pegboard. Wipe it down every few weeks to keep it looking fresh.
Review And Rearrange
Every few months, check if your layout still works. Move items as your needs change.
Replace Worn Accessories
Hooks and baskets can bend or break over time. Replace them before they fail.
Expand As Needed
If your board gets crowded, add a second one or use a larger size. Pegboard is easy to scale up.
Advanced tip: Use clear bins for small items. This keeps them visible and easy to find.
Pegboard Safety Tips
While pegboards are safe, some simple precautions help avoid accidents:
- Make sure heavy items are over studs or anchors.
- Do not overload hooks—check the weight rating.
- Keep sharp tools pointed down or with covers.
- Check for loose hooks or accessories often.
Using Pegboard For Business
Pegboards are popular in retail stores because they let you display products in a flexible way. You can also use them in offices or studios to keep supplies organized.
Retail Displays
- Change layouts quickly for new sales or seasons.
- Hang signs or price tags easily.
- Use shelves for featured products.
Office Or Studio
- Store supplies within arm’s reach.
- Keep cables and chargers tangle-free.
- Create a “command center” with calendars and notes.
Non-obvious insight: In retail, pegboard walls help track inventory—if a hook is empty, it’s time to restock.
Comparing Pegboard To Other Storage Systems
Pegboard is not the only wall storage system. Here’s how it compares to other common solutions:
| Feature | Pegboard | Slatwall | Shelving |
|---|---|---|---|
| Flexibility | High | Medium | Low |
| Cost | Low-Medium | High | Medium |
| Ease of Install | Easy | Medium | Medium |
| Weight Capacity | Medium-High | High | High |
| Visibility | Very Good | Good | Fair |
Key takeaway: Pegboard is best when you want a flexible, visible, and affordable system.
Common Pegboard Mistakes And How To Avoid Them
Even simple systems have pitfalls. Here are mistakes beginners often make:
- Not using furring strips – Without space behind the board, hooks won’t fit properly.
- Overloading hooks – Check weight limits before hanging heavy items.
- Mixing incompatible accessories – Not all hooks fit all boards. Buy matching sets.
- Poor layout planning – Rushing to hang items leads to wasted space.
- Neglecting maintenance – Dust and clutter can build up.
Expert tip: When in doubt, start small. You can always expand your pegboard later.
Credit: www.homedepot.com
Environmental Impact And Sustainability
Pegboards can be an eco-friendly choice if you pick the right materials.
- Wood pegboards: Made from renewable materials but avoid those with toxic glue.
- Metal pegboards: Long-lasting and recyclable.
- Plastic pegboards: Choose recycled or recyclable plastics.
If you ever want to remove your pegboard, reuse it in another room or donate it instead of throwing it away.
Resources For Pegboard Inspiration
If you want ideas or step-by-step guides, check out hardware store websites, DIY blogs, or community forums. For a detailed overview of pegboard types and uses, see the Wikipedia entry on Pegboard.

Credit: vintagepagedesigns.com
Frequently Asked Questions
How Much Weight Can A Pegboard Hold?
The weight capacity depends on the material and installation. Metal pegboards can hold up to 100 lbs if installed into studs. Hardboard usually supports less—about 20-30 lbs per section. Always check the manufacturer’s guide and never overload a single hook.
Can I Paint Or Decorate My Pegboard?
Yes, you can paint pegboard with latex or spray paint. Make sure to clean and prime the surface first. You can also add wallpaper, decals, or washi tape for a custom look. Just don’t block the holes.
What If My Walls Are Concrete Or Brick?
You can still install pegboard on concrete or brick walls. Use masonry anchors and screws. Furring strips are even more important on uneven surfaces. A hammer drill makes installation easier.
Are There Alternatives To Standard Hooks?
Yes, there are many pegboard accessories beyond basic hooks. Try shelves, baskets, magnetic strips, or specialty mounts for drills, tape, and more. Some companies make modular bins that snap into place.
How Do I Keep Hooks From Falling Out?
If hooks slip out, try using locking hooks or rubber sleeves. For standard hooks, bend the end slightly with pliers or use zip ties to secure them. Some people add a dab of hot glue for extra grip.
Pegboards are simple, but their impact on organization is huge. With the right setup and a bit of planning, you’ll keep your space tidy and efficient for years to come. Whether you’re a DIY beginner or a seasoned organizer, pegboard adapts to your needs and style—making it a smart choice for every home or workspace.