When you use a band saw—whether for woodworking, metalworking, or even in butchery—the blade is the heart of the tool. The right blade size means safe, clean, and efficient cuts. But how do you actually measure a band saw blade? Many beginners think it’s as simple as grabbing a tape measure, but there’s more to it. Getting the measurement wrong can waste money, lead to poor cuts, or even damage your saw. If you want to get the most from your band saw, knowing how to measure blades correctly is essential. This guide will walk you through everything you need to know—no steps skipped, no confusion left behind.
Why Band Saw Blade Measurement Matters
Measuring a band saw blade is not just about fitting it onto the wheels. The right measurement affects:
- Cutting accuracy: The correct blade length ensures the blade tracks well and cuts straight.
- Safety: A blade too tight or too loose can jump off the wheels, risking injury.
- Blade life: The right tension reduces stress, making blades last longer.
- Machine health: The right blade prevents extra wear on wheels and bearings.
Many users replace blades based only on packaging or guesses. But, saws can change over time, wheels wear, and sometimes you don’t have the old blade as a reference. Learning to measure properly is a skill that pays off every time you use your saw.
Basic Band Saw Blade Terminology
Before you measure, you need to know some common terms:
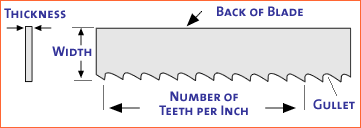
- Blade length: The total length (circumference) of the blade loop.
- Blade width: The distance from the tooth tip to the back edge.
- Thickness (gauge): How thick the blade material is.
- Tooth pitch (TPI): Teeth per inch, important for the material and type of cut.
When measuring, it’s mostly about blade length. But width and thickness also play a role in fit and performance.
Tools You Need For Measuring
You don’t need expensive gadgets. Here’s what helps:
- Flexible tape measure: Cloth or fiberglass is best, so it curves easily.
- Flat surface: A large table or floor space.
- Marker: For making reference points.
- Calculator: For quick math, especially if you use formulas.
- String or wire: Optional, for measuring around the wheels.
Some band saws have a blade length label inside the cabinet, but it’s wise to verify it yourself—especially with older machines.
Main Methods To Measure Band Saw Blades
There are several ways to measure a band saw blade, depending on what you have available. Let’s look at each method in detail.
1. Measuring The Old Blade
If you still have your old blade, this is the simplest method.
Steps:
- Lay the blade flat on a large surface. Be careful—band saw blades are sharp. Wear gloves if possible.
- Stretch the blade into a straight line.
- Use a flexible tape measure to measure from end to end.
Tips:
- If the blade is broken, just measure both pieces and add the lengths.
- Don’t use a stiff ruler, as it won’t follow the curve of the blade.
Non-obvious insight: Some old blades may stretch after years of use. If you’re using a well-worn blade, the measurement might be slightly longer than the original. When in doubt, check your saw’s manual for the recommended length.
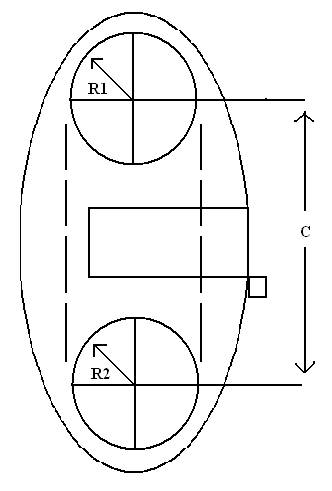
2. Measuring The Saw’s Wheel Centers
What if you don’t have the old blade? There’s a formula for that. You’ll need to measure the distance between the centers of the upper and lower wheels, plus the wheel diameters.
Formula:
Blade Length = (2 × Center Distance) + (1. 57 × Wheel Diameter)
Where:
- Center Distance = Distance between centers of top and bottom wheels (in inches or mm)
- Wheel Diameter = Diameter of one wheel (inches or mm)
Steps:
- Open your band saw so you can see both wheels.
- Use a tape measure to find the distance from the center of the top wheel to the center of the bottom wheel.
- Measure the diameter of one wheel (edge to edge, passing through the center).
- Plug the numbers into the formula above.
Example:
If the wheels are 14 inches in diameter and 18 inches apart (center to center):
Blade Length = (2 × 18) + (1.57 × 14)
Blade Length = 36 + 21.98
Blade Length ≈ 57.98 Inches
So, you’d need a blade about 58 inches long.
Non-obvious insight: This method assumes the blade tension adjustment is in the middle of its range. If your saw’s tensioner is maxed out or fully relaxed, the actual blade needed can be a little shorter or longer. Always aim for the middle of the adjustment range for best results.
3. Using A String Or Wire
This method is handy if you don’t want to do math or can’t measure the old blade.
Steps:
- Make sure the saw is unplugged and the blade is removed.
- Place a piece of string or flexible wire around the path the blade would follow—over the wheels, through the guides.
- Mark where the string overlaps.
- Lay the string flat and measure the marked length.
Tip:
- Pull the string snug but not too tight, to mimic the blade’s tension.
This method is reliable, especially for older or custom saws.
4. Manufacturer’s Manual Or Plate
Many band saws have a sticker, plate, or manual listing the correct blade size. This can save time, but double-check if your saw is old or the wheels have been replaced.
Warning:
- Manuals sometimes list a range (e.g., 70-72 inches). Choose a length that fits with the tensioner in a neutral position.
5. Online Calculators
Some websites offer band saw blade calculators where you enter your measurements. This is handy for those who prefer not to use formulas. Make sure the calculator uses the same units (inches or mm) as your measurements.
Credit: ellissaw.com
Measuring Blade Width And Thickness
Length is the most important measurement, but width and thickness matter for performance and safety.
Blade Width
- Measured from the tip of the teeth to the back edge.
- Wider blades are better for straight cuts; narrow blades are for curves and tight turns.
- Check your saw’s specs for the maximum and minimum blade width it can handle.
Blade Thickness
- Thicker blades are stronger but require bigger wheels.
- Thin blades are flexible and work well on small wheels.
- Using a blade that’s too thick for your saw can cause cracking or breakage.
Pro tip: Always check both width and thickness before ordering new blades, especially if you plan to cut thick or hard materials.
Common Band Saw Blade Sizes
Band saws come in many sizes. Here’s a quick look at some typical lengths and their common uses:
| Blade Length (inches) | Common Saw Size | Typical Use |
|---|---|---|
| 56 1/8″ | Benchtop saws | Hobby, light woodworking |
| 72″ | Small floor saws | DIY, crafts |
| 93 1/2″ | 14″ saws | General wood and metal work |
| 105″ | Large floor saws | Heavy-duty cutting |
| Custom sizes | Specialty saws | Unique applications |
If your saw uses a custom size, always measure before ordering a replacement.
Measuring Blades For Special Applications
Not all band saws are the same. Some are designed for metal, others for wood, meat, or even plastics.
Metal Cutting Saws
- Usually need thicker, stronger blades.
- Measure length as normal, but check width and thickness ratings.
Meat Cutting Band Saws
- Usually use narrow, thin blades.
- Sanitation is important; always clean before measuring.
Resawing (cutting Thick Boards)
- Requires wide, thick blades for stability.
- Always check your saw’s maximum blade width.
Portable Band Saws
- Used in metal fabrication, plumbing, etc.
- Blades are short (often 32–44 inches), but the same measuring rules apply.
Measuring Band Saw Blades For Tension And Tracking
A blade that fits but cannot be tensioned correctly is useless. Here’s what to check after installing a new blade:
- Tension adjustment: The blade should reach the correct tension with the tensioner near the middle of its range.
- Tracking: The blade should stay centered on the wheels.
- Guide fit: The blade should pass through the guides smoothly, with no sideways play.
If the blade is too short, the wheels cannot be brought together enough. If it’s too long, you can’t add enough tension and the blade may slip or jump.
How To Record Your Measurements For Future Blades
After you find the correct blade length, write it down. Keep a record in your shop or on your phone. Many users forget and have to measure again each time.
Pro tip:
- Use a permanent marker to write the blade length inside the saw’s cabinet.
- Keep a note of the blade widths and thicknesses you prefer for different jobs.
Real-world Examples And Troubleshooting
Let’s look at some situations you might encounter.
Example 1: No Blade, No Manual
You buy a used saw. The blade is missing, and there’s no manual.
- Measure the center-to-center distance between wheels and the wheel diameter.
- Use the formula to calculate the blade length.
Example 2: Old Blade Keeps Jumping Off
You install a blade that matches the manual, but it won’t stay on the wheels.
- Check if the wheels or tires are worn (can add to the diameter).
- If so, measure the actual wheel diameter and recalculate.
Example 3: Blade Won’t Tension
You buy a blade based on your old one, but it won’t tension up.
- Old blades can stretch.
- Always measure the wheel centers and diameter for a fresh check.
Example 4: Custom Blade For Curved Cuts
You want to cut tight curves, so you buy a narrow blade.
- Narrow blades can be a little more flexible on length, but still check the tensioner range.
Common Mistakes To Avoid
Even experienced users make measurement mistakes. Here are some to watch out for:
- Measuring with the blade still on the saw: This can give a wrong reading due to tension.
- Ignoring blade stretch: Used blades can be longer than new ones.
- Guessing based on similar saws: Always measure your actual saw.
- Not checking width/thickness compatibility: Some saws have limits on how wide or thick a blade they can take.
- Ordering before checking tension range: A blade that is too long or short cannot be properly tensioned.
How Blade Length, Width, And Thickness Affect Performance
Each measurement matters. Here’s a comparison for quick reference:
| Blade Length | Blade Width | Blade Thickness | Effect on Cutting |
|---|---|---|---|
| Fits saw’s wheels | Wider for straight, narrow for curves | Thicker for strength, thinner for small wheels | Accuracy, type of cut, blade life |

Credit: www.youtube.com
Choosing The Right Blade After Measuring
Once you know your blade size, you still need to pick the right tooth pitch (TPI), material, and width for your job.
- Low TPI (3–6): Fast, rough cuts in wood.
- High TPI (10–18): Smooth, fine cuts in metal or plastic.
- Bi-metal blades: Last longer when cutting hard metals.
- Carbon steel: Good for wood and soft metals.
Don’t focus only on size—match the blade to your material and cut style.
How To Avoid Injury When Measuring
Band saw blades are sharp. Here’s how to stay safe:
- Always unplug the saw before removing or measuring blades.
- Wear gloves when handling blades.
- Lay blades flat; never try to stretch them while they’re coiled.
- Keep your hands away from tooth edges when measuring.
Fact: Most band saw injuries happen during blade changes, not cutting. Take your time.
Storing And Handling Measured Blades
After measuring, handle and store blades safely:
- Coil blades carefully, securing with a tie.
- Store in a dry place, away from humidity to prevent rust.
- Label each blade with its length, width, and TPI for easy future use.
Measuring Blades For Non-standard Saws
Some band saws are custom-built or vintage. If you can’t find specs:
- Use the string method for the most accurate measurement.
- Measure both wheels for diameter if they are different (rare, but possible).
If you’re restoring an old saw, always check for worn or replaced parts that might affect blade length.
Credit: dev.detroitbandsaw.com
Quick Comparison: Measuring Methods At A Glance
For easy reference, here’s a summary of the main methods:
| Method | Tools Needed | Best For | Accuracy |
|---|---|---|---|
| Old Blade | Flexible tape | Replacing similar blade | Very high |
| Wheel Centers Formula | Tape, calculator | No blade/manual | High |
| String/Wire | String, tape | Any saw | Very high |
| Manual/Plate | None | Newer saws | Medium (verify) |
| Online Calculator | Device, data | Quick checks | High (if inputs are correct) |
Where To Find More Information
If you want deep technical details or specs for specific saw brands, check the manufacturer’s website or trusted sources like Wikipedia.
Frequently Asked Questions
How Do I Know If I Measured My Band Saw Blade Correctly?
Double-check your measurements using at least two different methods (for example, both the string method and the wheel center formula). If both numbers match or are very close, you’ve measured accurately. Always test the new blade with the tensioner before making cuts.
Can I Use A Slightly Longer Or Shorter Blade Than Recommended?
A blade that is a half-inch longer or shorter may still fit, but tensioning may be difficult. Ideally, use the exact recommended length. If you must use a different size, make sure the blade can be properly tensioned and tracks correctly before use.
Is Blade Width Or Thickness More Important For Safety?
Both matter, but blade width mostly affects cut style (straight vs. curved), while thickness affects the blade’s strength and the minimum wheel diameter. Never use a blade that’s too thick for your saw’s wheels, as it could break.
How Often Should I Re-measure My Band Saw Blade Size?
If you change wheels, tires, or do major repairs, measure again. Otherwise, once you know your saw’s correct size, you can keep using it unless you notice fit issues.
What Should I Do If My Saw Uses A Custom Blade Size?
Use the string or wire method to measure the exact length needed. Order a custom blade from a reputable supplier, giving them your exact measurements for length, width, and thickness.
Band saw blade measurement is not as simple as it looks, but with the right methods, anyone can do it confidently. By understanding and applying these techniques, you’ll save time, money, and frustration—while enjoying safer and better results every time you use your saw.