Most people use drill bits regularly but rarely think about their sharpness—until the bit struggles to cut, squeals, or burns the wood or metal. Dull drill bits slow you down, make your work harder, and can even damage your tools or materials. The good news? You don’t need to throw them away. With the right technique and a little patience, you can sharpen drill bits and bring them back to life, saving both money and time.
Many beginners hesitate to sharpen their bits, thinking it’s a job only for professionals. But with a clear step-by-step approach, it’s a skill anyone can learn. In this guide, you’ll discover how to sharpen drill bits using several methods, understand why sharpness matters, and get practical tips to keep your bits in top condition for years.
Even if you’ve never sharpened a drill bit before, you’ll feel confident by the end of this article.
Why Sharp Drill Bits Matter
A sharp drill bit does much more than cut quickly. It helps you work safely, reduces the risk of damage, and gives a clean, accurate hole. Dull bits, on the other hand, tend to heat up, wander off the mark, and can even cause your drill motor to overwork or burn out.
Sharp bits:
- Require less pressure to cut
- Produce cleaner holes with less splintering or burrs
- Last longer because they don’t overheat as easily
- Reduce wear and tear on your drill
Professional woodworkers and machinists know that a sharp bit is the difference between a smooth project and a frustrating one.
How To Tell If Your Drill Bit Needs Sharpening
Sometimes it’s obvious—a drill bit refuses to cut, squeals, or smokes. But often, dullness sneaks up. Here are clear signs your bit needs attention:
- Slow cutting: If you need to press harder, your bit is dull.
- Rough holes: Jagged edges or splintered wood signal a blunt edge.
- Overheating: Bit turns blue or you see smoke; this means friction is too high.
- Chipped or rounded tip: Check the tip for visible wear or chips.
- Bit wanders: Instead of drilling straight, the bit slides across the surface.
It’s best to sharpen bits as soon as you notice these issues. Waiting too long can ruin the bit permanently.
Credit: www.youtube.com
Types Of Drill Bits And Their Sharpening Needs
Not all drill bits are the same. The most common types are:
- Twist bits: Used for wood, plastic, and metal. Most home users have these.
- Brad point bits: Designed for wood. Have a sharp center tip.
- Masonry bits: For concrete and brick. Tip is usually tungsten carbide.
- Spade bits: Flat, wide bits for wood.
- Forstner bits: For flat-bottom holes in wood.
- Auger bits: Deep holes in wood, with spiral body.
Twist bits are the most commonly sharpened at home. Some bits, like masonry or carbide-tipped, need special tools or replacement. Check the packaging or manufacturer’s website before sharpening specialty bits.
Tools Needed To Sharpen Drill Bits
To sharpen drill bits, you don’t need a full workshop. The basic tools are:
- Bench grinder: Most popular method. Fast and effective.
- Drill bit sharpening jig: Holds the bit at the correct angle.
- Diamond file: For hand-sharpening or touch-ups.
- Drill doctor: A specialized sharpening machine.
- Safety goggles and gloves: Protection from sparks and sharp edges.
- Permanent marker: To mark the edge you’re grinding.
Each tool has its pros and cons. For most people, a bench grinder is the best starting point. For more accuracy, especially on expensive bits, a sharpening jig or Drill Doctor can be a good investment.
Key Angles And Terms: What Makes A Drill Bit Sharp?
Before you start, it’s important to know the parts of a drill bit and what makes it sharp. Here are the main terms:
- Chisel edge: The very tip of the bit, where the two cutting edges meet.
- Cutting lips: The two main edges that do the cutting.
- Relief angle: The angle behind the cutting edge, which allows chips to clear.
- Point angle: The angle formed at the tip, usually 118° for general bits and 135° for harder materials.
If the angles are wrong, the bit won’t cut well. For most home projects, getting close to the standard angle is enough. Precision matters more for fine metalwork.
Here’s a quick comparison of typical point angles:
| Material | Recommended Point Angle | Notes |
|---|---|---|
| General purpose (wood, plastic, soft metal) | 118° | Most common household bits |
| Stainless steel, hard metal | 135° | Reduces walking, improves durability |
| Masonry | 135°–140° | Carbide-tipped, rarely resharpened by hand |
Preparing To Sharpen: Safety And Setup
Sharpening creates sparks and fine metal dust. Always put safety first:
- Wear safety goggles to protect your eyes.
- Use gloves to prevent cuts, but avoid loose-fitting gloves around spinning tools.
- Clamp the grinder or sharpening device securely.
- Work in a well-lit, clean area.
- Keep water nearby for cooling the bit.
Before you start, inspect the bit for cracks or severe damage. If it’s bent or deeply chipped, replacement is safer.
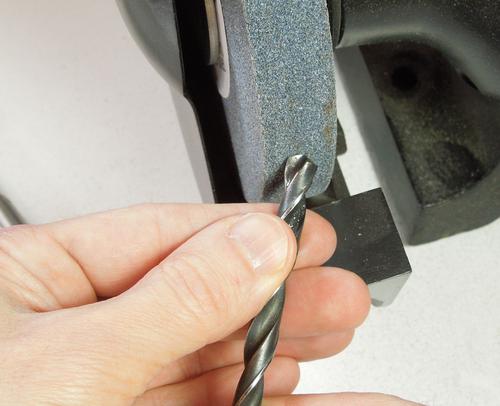
How To Sharpen Drill Bits With A Bench Grinder
This is the most common method and works for most twist bits. It takes practice, but with these steps, you’ll get good results.
Step 1: Mark The Cutting Edge
Use a permanent marker to color the cutting edge you plan to grind. This helps you see how much metal you’re removing and keeps the angles even.
Step 2: Set The Grinder
Make sure the grinder wheel is clean and not worn out. Use a fine or medium grit (60–80 grit is ideal). Adjust the tool rest so it sits just below the center of the wheel.
Step 3: Hold The Bit At The Correct Angle
Grip the bit firmly, with the cutting edge facing up. The standard point angle is 118°, so hold the bit at about a 60° angle to the wheel. You want the cutting edge parallel to the wheel’s face.
Step 4: Grind The First Cutting Edge
Press the bit gently against the wheel. Move it smoothly up and down, keeping the angle steady. Don’t overheat the bit—grind for just 2–3 seconds, then dip the bit in water to cool. Overheating can ruin the temper of the steel.
Step 5: Grind The Second Cutting Edge
Rotate the bit 180°, and repeat the process on the other edge. Try to keep both sides even. Check that the two lips are the same length and angle—this is key for balanced drilling.
Step 6: Check Your Work
Look down the tip. Both cutting lips should be the same length and angle. The chisel edge should be centered. If not, adjust by grinding a bit more from the longer edge.
Step 7: Test The Bit
Drill into a piece of scrap wood or metal. If the bit cuts easily and straight, you’re done. If it wanders or cuts slowly, adjust again.
Common Mistakes To Avoid
- Grinding too much: Removes too much metal, shortens bit life.
- Overheating: Causes blue discoloration, weakens the tip.
- Uneven lips: Leads to wandering or larger holes.
- Wrong angle: Tip won’t cut efficiently.
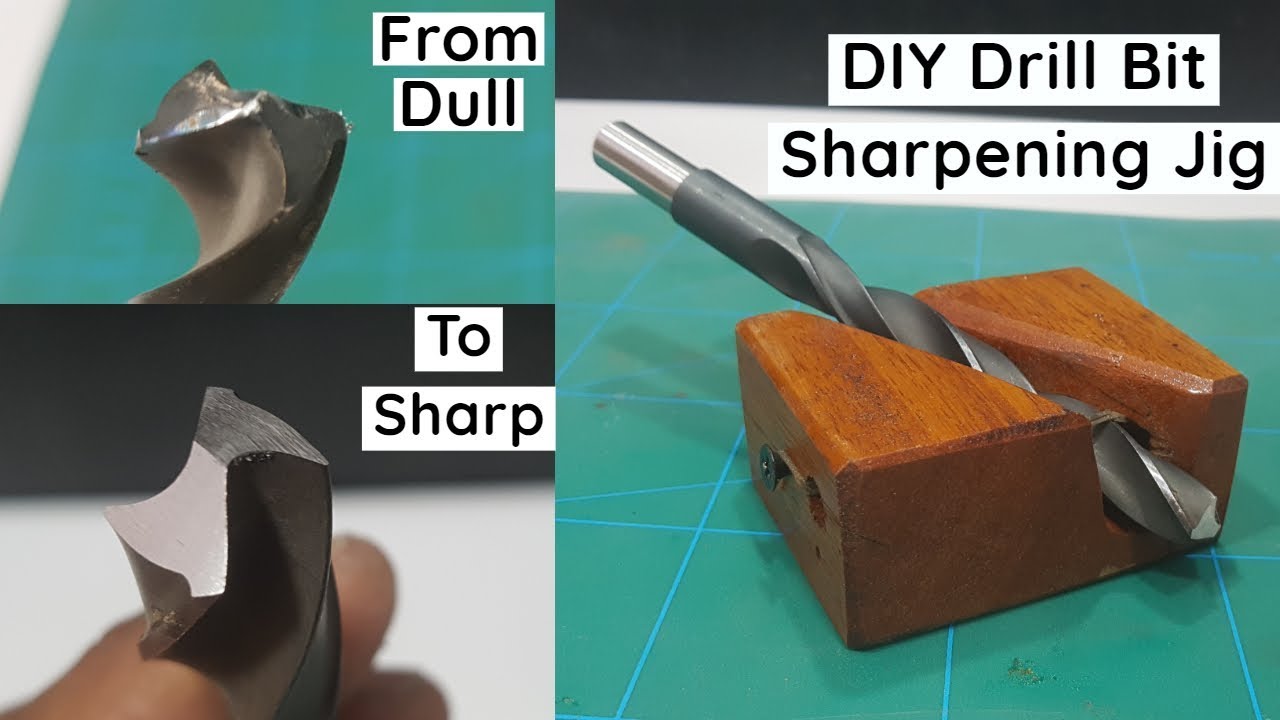
Using A Drill Bit Sharpening Jig
A sharpening jig holds the bit at the correct angle and makes the process easier, especially for beginners. You can buy jigs to attach to a bench grinder or use a specialized device like the Drill Doctor.
How To Use A Basic Sharpening Jig
- Insert the drill bit into the jig and tighten the clamp.
- Adjust the jig to the correct angle (118° or 135°, depending on your bit).
- Place the jig against the grinding wheel.
- Rotate the jig slowly, letting the wheel contact the bit evenly.
- Check both cutting edges for evenness.
- Remove, cool, and test as described above.
Jigs cost more than just using a grinder, but they give more consistent results—especially for small or expensive bits.
Sharpening By Hand With A Diamond File
For small bits (under 3mm) or touch-ups, a diamond file is gentle and precise. This method is slower but works when you can’t use a grinder.
- Secure the bit in a vise.
- Use the diamond file to follow the existing cutting edge angle.
- File both lips evenly, checking often.
- Test after a few strokes—don’t over-file.
This method is also good for brad point or specialty bits, where a grinder might remove too much metal.
Using A Drill Doctor Or Similar Machine
A Drill Doctor is a popular home sharpening tool. It uses a guided system to ensure correct angles and symmetry.
- Insert the bit in the chuck.
- Align using the built-in guide.
- Insert the chuck into the sharpening port.
- Rotate the chuck several times.
- Remove, check, and test.
The main advantage is repeatability. Even beginners can get a professional edge with little skill.
Credit: woodgears.ca
Sharpening Other Types Of Drill Bits
Brad Point Bits
Brad point bits have a sharp center tip. Sharpen only the outside cutting edges and the spurs, using a small file. Avoid grinding the center point unless absolutely necessary.
Spade Bits
Spade bits can be sharpened with a flat file. Stroke along the flat cutting edge and the pointed tip. Keep both sides even for balanced holes.
Masonry Bits
Masonry bits have a carbide tip. Sharpen gently with a diamond file or a green (silicon carbide) grinding wheel. Do not overheat or apply heavy pressure—carbide is brittle.
Forstner And Auger Bits
These require specialty files and careful hand work. Sharpen the rim and cutting edges, but avoid changing the geometry. If you’re not sure, it’s often better to replace these bits.
How Often Should You Sharpen Drill Bits?
There’s no fixed schedule. Frequency depends on:
- Type of material drilled (harder materials dull bits faster)
- Drill speed and pressure used
- Quality of the bit
As a rule of thumb, inspect your bits every 5–10 uses. For metalworking, check after every project. Sharpen as soon as you notice dullness; waiting makes sharpening harder and shortens bit life.
Extending The Life Of Drill Bits
To keep bits sharp and working well:
- Use the right bit for the material. Don’t use wood bits on metal.
- Drill at the correct speed. Too fast causes overheating.
- Apply cutting fluid when drilling metal.
- Let the bit do the work. Don’t force it.
- Store bits properly. Keep them in a case, away from moisture.
- Clean after use. Remove chips and dust.
A small investment in care saves you money and hassle over time.
When To Replace Instead Of Sharpen
Not all bits are worth saving. Replace your bit if:
- The bit is bent or cracked.
- The tip is severely chipped or burned.
- The shank is twisted.
- Specialty bits (like carbide-tipped) are broken.
Sometimes, sharpening is more trouble than it’s worth, especially for very cheap bits.

Credit: www.youtube.com
Comparing Sharpening Methods: Pros And Cons
Here’s a summary to help you choose the best method for your needs:
| Method | Skill Level Needed | Best For | Drawbacks |
|---|---|---|---|
| Bench Grinder | Intermediate | Most twist bits | Takes practice, risk of overheating |
| Sharpening Jig | Beginner | Accurate angles, consistent results | Extra cost, setup required |
| Diamond File | Beginner | Small bits, touch-ups | Slow, less suitable for large bits |
| Drill Doctor | Beginner | Home or pro users, repeatable results | Cost, limited to standard shapes |
Practical Tips For Best Results
- Practice on old or cheap bits before sharpening your favorites.
- Keep a steady hand and use gentle pressure.
- If unsure about the angle, use a protractor or template.
- Always cool the bit in water to avoid ruining the temper.
- Mark the edge you’re sharpening to track your progress.
- Don’t try to fix a bit that’s severely damaged—replace it instead.
Non-obvious Insights Beginners Miss
- Symmetry matters more than angle precision. If both cutting lips are the same length and angle, the bit will drill straight—even if your angle is not exactly 118° or 135°. Uneven lips cause the bit to wander or drill oversized holes.
- Overheating destroys the bit’s temper. Blue discoloration means the steel has lost its hardness. Even if the edge feels sharp, it will dull quickly. Take your time, cool often, and never grind for more than a few seconds at a time.
Common Myths About Sharpening Drill Bits
- “You need expensive machines.” In reality, a simple bench grinder or even a file can restore most bits.
- “Sharpened bits never work as well as new.” Properly sharpened bits often cut better than new ones, since you can tune them to your preferred angle.
- “Only professionals can do it.” With practice and patience, anyone can get good results.
Troubleshooting Problems After Sharpening
If your bit still isn’t drilling well, check for:
- Uneven lips: Regrind to balance both sides.
- Wrong point angle: Adjust your grinding angle.
- Dull chisel edge: Sharpen the very tip.
- Burned tip: If blue, the bit may be ruined—try again or replace.
Testing on scrap material helps you spot problems before starting your real project.
Professional Vs. Diy Sharpening
For high-value bits or specialty shapes, consider professional sharpening. Machine shops use precision grinders and can restore complex bits like step drills or reamers. For everyday twist bits, DIY sharpening is usually more than enough.
Environmental And Cost Benefits
Sharpening bits means less waste. Most drill bits can be sharpened 5–10 times before they’re too short to use. This keeps metal out of landfills and reduces your tool costs.
A set of good bits can last for years with regular sharpening—compare that to the cost of buying new bits every few months.
Where To Learn More
For those wanting to see the process in action, online videos and tutorials are helpful. The Wikipedia page on drill bits offers a detailed overview of types and sharpening angles: Drill Bit – Wikipedia.
Frequently Asked Questions
How Do I Know Which Point Angle My Drill Bit Needs?
Most general-purpose bits use a 118° angle. For harder materials like stainless steel, use a 135° angle. You can measure with a protractor or check the manufacturer’s specs. If in doubt, the 118° angle works for most home projects.
Can I Sharpen Masonry Or Carbide-tipped Bits?
You can sharpen masonry bits with a diamond file or a green grinding wheel, but only lightly. Carbide tips are brittle and hard to grind. For heavy wear or broken tips, replacement is usually better.
How Many Times Can I Sharpen A Drill Bit Before Replacing It?
Most quality drill bits can be sharpened 5 to 10 times. As long as the bit isn’t too short to fit in your drill chuck, and the flutes are intact, you can keep sharpening.
Is It Worth Buying A Drill Bit Sharpening Machine?
If you use drill bits often or want precise angles, a Drill Doctor or similar machine can be a good investment. For occasional use, a bench grinder and jig are usually enough.
What If My Drill Bit Keeps Getting Dull Quickly After Sharpening?
This usually means you’re overheating the bit during grinding, which ruins the hardness (temper) of the steel. Grind gently, cool often in water, and avoid pressing too hard.
By learning to sharpen your own drill bits, you’ll save money, avoid frustration, and get better results in all your drilling projects. With practice, this skill becomes quick and easy—a valuable addition to any DIY toolkit.