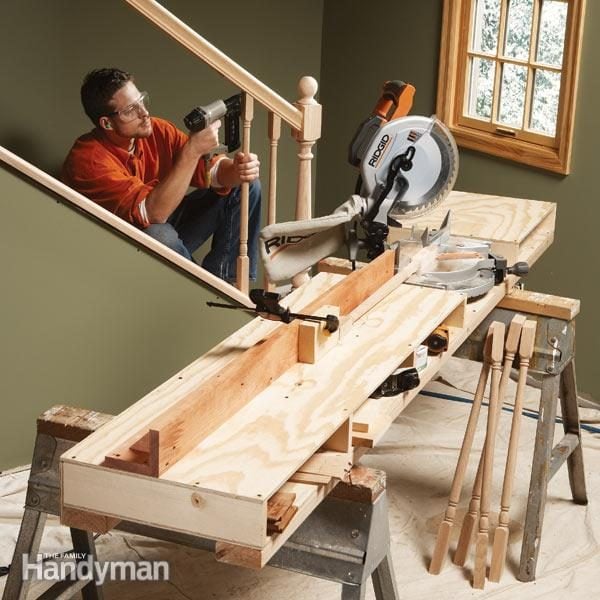
Building your own miter saw table is one of the smartest upgrades you can make to your woodworking space. A good table transforms your miter saw from a simple cutting tool into a precision workstation. It makes repeated cuts easier, safer, and much more accurate.
Even if you have a small garage or workshop, a custom table can save you time and frustration. Many woodworkers start with their saw balanced on a pair of sawhorses or a basic bench, but soon find they need better support, dust control, and reliable stops for repeat cuts.
This guide walks you through everything you need to build your own miter saw table. Whether you are a hobbyist or a professional, you’ll find practical steps, helpful tips, and real-world advice. By the end, you’ll know exactly how to plan, build, and customize a table that fits your space and needs.
Why Build A Miter Saw Table?
Most miter saws work fine on their own, but a table makes a huge difference. Here’s why:
- Improved accuracy: Long boards stay level, leading to cleaner, straighter cuts.
- Repeatable cuts: Stops and fences let you cut the same length over and over.
- Better support: Materials won’t sag or tip, reducing the risk of mistakes or injury.
- Organization: Built-in shelves or storage keep tools close and your workspace tidy.
- Dust collection: Some tables help contain sawdust, making cleanup easier.
Store-bought stands exist, but they often lack customization and can be expensive. A DIY table can be built for less money and tailored to your exact requirements.
Planning Your Miter Saw Table
Before picking up a saw or drill, careful planning is key. Here’s what to think about:
Measure Your Workspace
First, decide where the table will go. Measure the area, including wall space, doorways, and any obstacles. This helps you avoid making a table that’s too large or awkward to use.
Tip: Leave enough space around the table for long boards and comfortable movement.
Choose The Table Size
The table should be long enough to support the wood on both sides of the saw. For most users, a total length of 8 to 10 feet is ideal. Height is usually between 34 and 36 inches—close to standard workbench height.
Common table widths:
- 18 to 24 inches: Good for most miter saws and shops
Miter Saw Placement
The saw usually sits in the center, with the table surface matching the height of the saw’s base. This allows materials to slide smoothly from one side to the other.
Pro insight: Not all saws have the same base height. Measure yours carefully. If you plan to replace your saw in the future, design the table so you can adjust the height of the saw platform.
Storage And Features
Think about your habits and tools. Do you need drawers? A spot for clamps? A shelf for scrap wood? Adding storage now saves time later.
Mobility Vs. Fixed
If your workspace is small, consider adding locking casters for mobility. A fixed table is more stable but less flexible if you need to move it.
Sketch Your Design
A simple hand drawing is enough. Mark dimensions, saw placement, and any extra features.
Tools And Materials You’ll Need
Building a miter saw table does not require fancy tools. Most people already own what’s needed.
Essential Tools
- Circular saw or table saw (for cutting plywood)
- Drill/driver and bits
- Tape measure
- Square (speed square or framing square)
- Clamps
- Level
- Pencil
- Screwdriver
- Jigsaw (for detailed cuts, optional)
- Socket wrench (for casters, if used)
Materials
Here’s a typical shopping list for a basic miter saw table:
- 3/4-inch plywood (for the top and shelves)
- 2×4 lumber (for the frame and legs)
- Wood screws (2.5 to 3 inches long)
- Wood glue (optional, for extra strength)
- Casters (four, if making a mobile table)
- Drawer slides, handles, and hardware (for storage features)
- Edge banding (for a smooth finish, optional)
- Sandpaper (120 and 220 grit)
- Paint or finish (for protection, optional)
Building The Table Frame
The frame is the backbone of your miter saw table. Get this right, and the rest will be much easier.
Cutting The Frame
Use 2x4s for the main structure. Cut four pieces to the length of your table (front and back), and four pieces for the width (sides).
Assembling The Rectangle
Arrange the pieces into a rectangle on a flat surface. Check for square corners using your speed square. Attach the corners using 2. 5- or 3-inch wood screws. Pre-drill holes to prevent splitting.
Non-obvious insight: Double-check the frame is flat before tightening all screws. A warped frame leads to an uneven table top.
Adding Legs
Cut four 2x4s to your chosen table height, subtracting the thickness of the table top (usually 3/4 inch). Attach one leg at each corner using screws through the frame.
For extra strength, add diagonal braces between the legs and frame.
Attaching The Table Top
Place your plywood top on the frame. The top should be flush with the frame edges. Screw it down securely. If you want a smoother edge, use edge banding or sand the corners.
Making The Saw Platform
The saw platform needs to be lower than the main table top, matching the height of your saw’s base. Measure the distance from your saw’s base to the table surface. Cut a piece of plywood to fit between the table sides, then attach it to cleats screwed to the frame.
Check the alignment: The top of the saw platform should be exactly level with the table top. Adjust as needed before attaching the platform permanently.
Strengthening The Frame
For longer tables (over 6 feet), add a center support underneath to prevent sagging. Use a 2×4 running lengthwise, attached to the middle of the frame.
Building The Fence And Stop Block System
A fence helps you cut straight, accurate pieces. Adding a stop block lets you make many cuts of the same length quickly.
Making The Fence
Cut a straight piece of 1×4 or 1×6 lumber the length of your table. Attach it to the back edge of the table, making sure it’s perfectly square to the saw blade.
Pro tip: Leave a small gap behind the saw so you can slide the fence forward or backward if needed.
Adding The Stop Block
A stop block is a simple piece of wood that clamps to the fence at a measured distance from the blade. Slide your workpiece against the stop, and every cut will be the same length.
For more advanced setups, use a T-track and sliding stop block for quick adjustments.
Fence Comparison
Here’s a quick comparison of common fence materials:
| Material | Pros | Cons |
|---|---|---|
| 1×4 Pine | Cheap, easy to find | May warp over time |
| Hardwood (Oak, Maple) | Stays straighter, smoother surface | More expensive |
| Aluminum T-track | Accepts clamps and stops, precise | Higher cost, needs special fasteners |
Creating Storage And Organization Features
A great miter saw table does more than just hold your saw. With a few smart additions, you can keep your workspace cleaner and more efficient.
Shelves
Add a lower shelf between the legs for storing tools, scrap wood, or even a shop vacuum. Use 3/4-inch plywood for strength.
Drawers
Drawers can hold measuring tapes, pencils, blades, and other small tools. Install simple plywood boxes on drawer slides under the table top.
Tool Holders
Mount hooks or magnetic strips on the sides to keep your most-used tools within arm’s reach.
Power Strip
Attach a power strip to the side of the table. This makes plugging in your saw and other tools quick and safe.
Integrating Dust Collection
Sawdust is a big issue with miter saws. A good dust collection setup keeps your shop cleaner and your lungs safer.
Basic Dust Collection
For a simple solution, place a shop vacuum hose behind the saw blade. Cut a hole in the table behind the saw and insert the hose so it catches falling dust.
Advanced Dust Hoods
Build a box or hood around the back of the saw with plywood or plastic panels. Attach a vacuum hose to the back of the hood. This captures more dust and directs it away from your workspace.
Dust Collection Options Comparison
| Method | Cost | Effectiveness | Complexity |
|---|---|---|---|
| Shop vacuum only | Low | Fair | Easy |
| Dust hood + vacuum | Medium | Good | Medium |
| Full dust system | High | Excellent | Hard |
Non-obvious tip: Even the best dust collection won’t catch everything. Wear a dust mask or respirator when making a lot of cuts.
Mobility And Flexibility Features
Many home workshops are small or shared spaces, so being able to move your table is a big plus.
Adding Casters
Install locking casters on each leg. Make sure they are rated for the weight of your saw, table, and any stored tools.
Example: For a 200-pound table, use casters rated for at least 75 pounds each for safety.
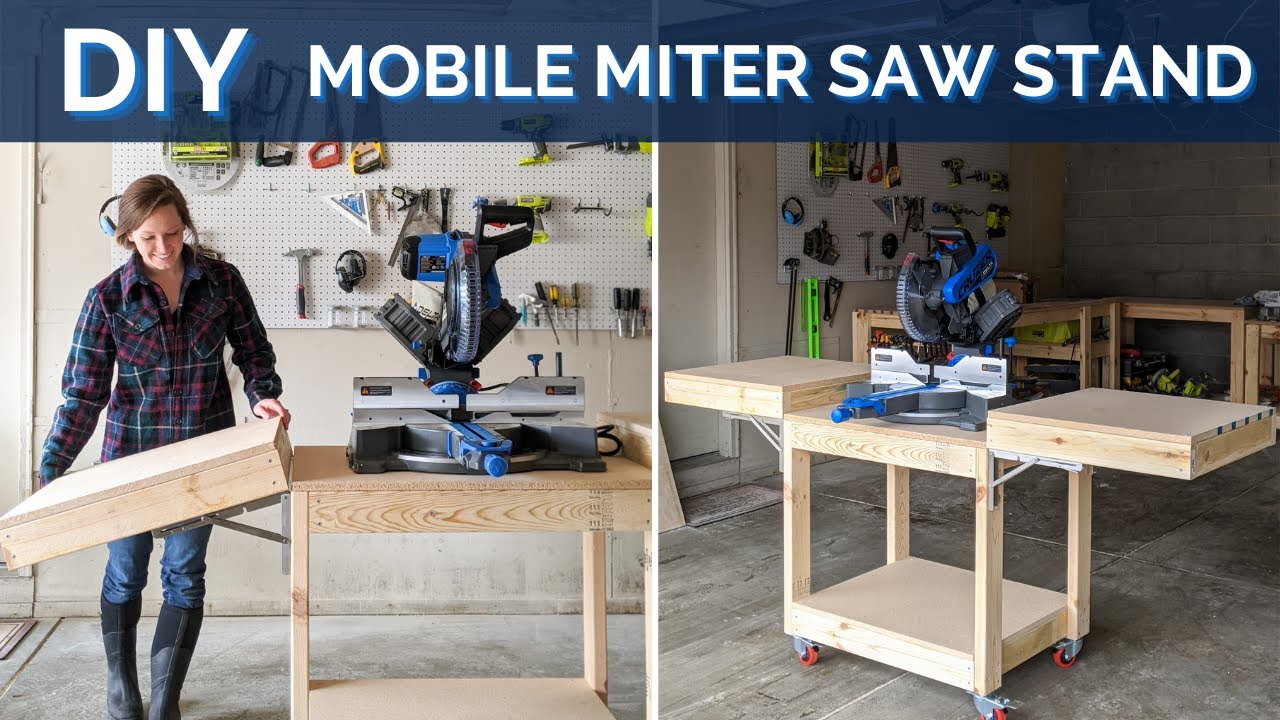
Folding Or Modular Design
Some builders add fold-down wings or removable sections to save space. Use sturdy hinges and locking supports so the table stays stable during use.
Adjustable Saw Platform
If you plan to upgrade your saw in the future, consider making the saw platform adjustable. Use shims or a removable insert so you can match the new saw’s base height to the table.
Step-by-step Building Instructions
Let’s put all the planning into action. Here’s a basic step-by-step process to build a standard miter saw table.
Step 1: Build The Frame
- Cut 2x4s for the front, back, and sides.
- Screw together to form a rectangle.
- Check for square corners.
Step 2: Add The Legs
- Cut four 2x4s to the correct height.
- Attach at each corner with screws.
- Add diagonal braces for strength.
Step 3: Install The Table Top
- Cut 3/4-inch plywood to size.
- Place on the frame, flush with the edges.
- Secure with screws.
Step 4: Create The Saw Platform
- Measure the height of your miter saw’s base.
- Cut a piece of plywood for the platform.
- Mount it between the table sides on cleats.
- Adjust until perfectly level with the table top.
Step 5: Attach The Fence
- Cut a straight 1×4 or 1×6 for the fence.
- Screw it to the back edge of the table, square to the blade.
- Check alignment with a long straightedge.
Step 6: Build Storage Features
- Add a lower shelf between the legs.
- Build and install drawers under the table top if desired.
- Attach tool holders and power strip.
Step 7: Add Dust Collection
- Cut a hole behind the saw for a vacuum hose.
- Build a dust hood if desired.
- Test dust collection before finalizing the setup.
Step 8: Install Mobility Features
- Screw locking casters to the bottom of each leg.
- Test movement and stability.
Practical tip: As you assemble, keep checking for level and square at each stage. Small errors early on can grow bigger by the end.
Customizing Your Miter Saw Table
Every woodworker’s needs are different. Here are some useful customizations you might consider:
Fold-down Extensions
If you cut very long boards, add folding wings to each side of the table. Use heavy-duty hinges and a locking support to hold them up.
T-track System
Install a T-track in the fence or table surface. This lets you add adjustable stops, clamps, and jigs for more precise work.
Replaceable Inserts
Cut a removable section of the saw platform under the blade. When it gets worn or chewed up by the blade, you can swap in a new piece instead of rebuilding the whole table.
Integrated Ruler Or Tape
Mount a metal tape measure along the fence. This helps set stops quickly and reduces measuring mistakes.
Led Lighting
Attach a small LED light strip above the saw area for better visibility, especially in dim shops.
Safety Tips And Best Practices
Your miter saw table should make your work safer, not riskier. Keep these safety points in mind:
- Secure the saw to the platform so it doesn’t move during use.
- Keep the area free from clutter and cords.
- Use push sticks or clamps for small pieces.
- Don’t place your hands near the blade path.
- Check that the table and saw are level before cutting.
- Wear eye and ear protection at all times.
Common Mistakes To Avoid
Even experienced builders can make these errors:
- Incorrect saw platform height: If the platform is too high or low, boards won’t sit flat and your cuts will be off.
- Weak frame: Using too few screws or weak joints leads to wobble or sagging.
- Ignoring dust control: Sawdust piles up quickly, making your shop messy and unsafe.
- No allowance for saw upgrades: If you swap to a bigger saw later, you may have to rebuild the table.
- Overcomplicating the design: Extra features are great, but start simple. Add upgrades later as you use the table.
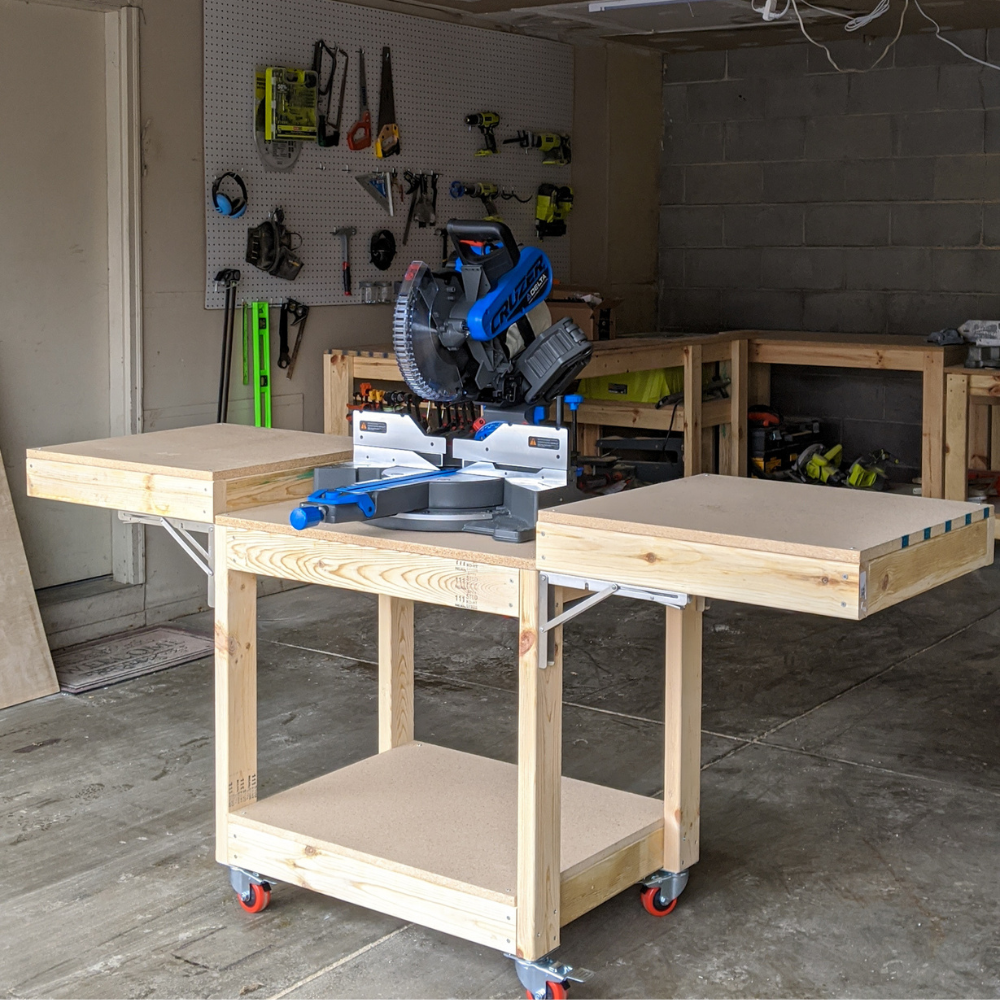
Example Miter Saw Table Design
Here’s an example layout for a home workshop:
- Total table length: 8 feet (saw centered at 4 feet)
- Table width: 22 inches
- Height: 35 inches
- Saw platform: 24 inches wide, recessed to match saw base height
- Fence: 1×4 oak, full length
- Two drawers on one side, shelf underneath
- Four heavy-duty locking casters
- Dust hood behind saw, connected to a shop vacuum
- Power strip on right side
- Fold-down extension wing on the left
Maintenance And Upkeep
Once your table is built, a few quick tasks keep it working well:
- Check screws and bolts every few months for tightness.
- Clean sawdust from drawers, shelves, and under the saw regularly.
- Replace worn inserts or fence faces when they show deep cuts.
- Refinish the top if it starts to splinter or absorb spills.
Pro tip: A little paste wax rubbed on the table top helps boards slide smoothly, reducing effort and scratches.
Cost And Time Estimates
For a basic miter saw table, most people spend:
- Materials: $100–$300 (more for premium wood or features)
- Time: 6–12 hours for a basic build, spread over a weekend
Adding drawers, dust hoods, or folding wings can increase both cost and build time.
Should You Buy Or Build?
If you have the tools and some experience, building is almost always cheaper and more flexible. Store-bought stands usually cost $150–$400 and may not fit your saw or space perfectly.
Example: A homemade table with plywood and 2x4s costs about $150, but offers more storage and support than most commercial options.
If you want inspiration, check out this Wood Magazine guide for creative designs and upgrades.
Frequently Asked Questions
How Do I Make Sure My Miter Saw Table Is Level?
Use a long carpenter’s level to check both the table top and the saw platform. Adjust the legs or add shims under the feet until everything is flat and level.
What Is The Ideal Height For A Miter Saw Table?
Most tables are 34 to 36 inches high, similar to a standard workbench. Adjust based on your height and comfort. The key is that the saw’s base matches the table surface.
Can I Use Mdf Instead Of Plywood For The Table Top?
Yes, MDF is smooth and stable, but it is heavier and less resistant to moisture than plywood. If your shop is dry and the table won’t get wet, MDF is fine.
Do I Need To Bolt My Miter Saw To The Table?
It’s highly recommended. Bolting your saw to the platform keeps it from moving, which makes your cuts safer and more accurate.
What If I Upgrade To A Larger Saw Later?
Design your saw platform to be removable or adjustable. Use screws instead of glue, and allow space to shift the platform up or down for a new saw’s base height.
Building a miter saw table is a project that pays off every time you use your saw. With the right planning and a few thoughtful upgrades, you’ll have a workstation that makes your woodworking faster, safer, and more enjoyable. Whether you keep it simple or add every feature, your custom table will quickly become the heart of your workshop.