Keeping your lawn mower running smoothly depends on a healthy battery, but many owners feel unsure about how to charge it properly. A simple mistake—like using the wrong charger or connecting cables incorrectly—can damage your battery or shorten its life.
Learning to charge a lawn mower battery correctly saves time, money, and frustration. Let’s walk through everything you need to know, step by step, with practical tips and expert insights that go beyond the basics.
Understanding Lawn Mower Batteries
Before charging, it’s important to know what kind of battery your mower uses. Most walk-behind and ride-on lawn mowers use a lead-acid battery, similar to what’s found in cars. Some newer models use lithium-ion batteries, especially cordless electric mowers.
Understanding your battery type is more than a technical detail—it affects every part of battery care, from charging to storage. For example, if you own an older mower, chances are high you’ll have a lead-acid battery. Meanwhile, battery-powered or cordless mowers made in the last decade are shifting toward lithium-ion, valued for their lighter weight and quick charge times.
Types Of Lawn Mower Batteries
- Lead-Acid Batteries: These are usually 12 volts and come in two varieties—flooded (wet cell) and sealed (AGM or gel cell). Flooded batteries need occasional checking of water levels, while sealed batteries are maintenance-free. Flooded types are most common in ride-on mowers, and you’ll recognize them by removable caps.
- Lithium-Ion Batteries: Lightweight, fast-charging, and long-lasting. They need special chargers and are typically found in battery-powered electric mowers. These batteries are sealed, maintenance-free, and often have built-in safety circuits to prevent overcharging.
Battery Voltage And Capacity
Most lawn mowers use 12V batteries, but some smaller models may have 6V batteries. The amp-hour (Ah) rating tells you how much energy the battery stores. A typical ride-on mower battery is 12V, 28-35Ah. Higher Ah means the battery can run longer between charges.
It’s important not to confuse voltage and capacity. Voltage must match the charger, but capacity (Ah) affects how long charging takes. For instance, a 12V, 35Ah battery will run a larger mower or power accessories like lights or electric starters.
How Battery Type Affects Charging
Charging methods differ. Lead-acid batteries can handle trickle charging but are sensitive to overcharging. Lithium-ion batteries require smart chargers to prevent overheating or fire risks.
A key difference: lead-acid batteries can tolerate being partially discharged, but lithium-ion batteries last longer if recharged before they drop too low. Also, if you use the wrong charger—especially for lithium-ion—you risk damaging internal safety systems or even causing a fire. Always double-check what your battery needs before plugging in.
Tools And Equipment Needed For Charging
Charging your lawn mower battery safely and efficiently requires a few key tools.
- Battery charger (matching your battery type and voltage)
- Protective gloves and glasses
- Wrenches (for removing battery terminals, usually 10mm or 13mm)
- Wire brush or terminal cleaner
- Multimeter (for checking voltage before and after charging)
- Clean rag
- Baking soda and water (for cleaning corrosion)
Having these tools ready helps prevent accidents and ensures a proper charge.
Don’t overlook the importance of a multimeter. Many owners skip this, but checking battery voltage before and after charging helps spot deeper issues—such as a battery that won’t hold charge, or a charger that isn’t working. A wire brush or terminal cleaner is also essential: dirty terminals cause weak connections and slow charging, even if everything else is right.
Credit: manlybattery.com
Safety Precautions Before Charging
Charging batteries involves electricity and sometimes acid, so safety is crucial.
- Charge in a well-ventilated area. Batteries can emit hydrogen gas, which is flammable.
- Wear protective gloves and glasses. Acid splashes and sparks are possible.
- Keep sparks and flames away. Never smoke near the battery.
- Disconnect the battery from the mower. This avoids damaging sensitive electronics.
- Clean the battery terminals. Corrosion can cause poor connections.
Neglecting these steps can lead to injury or damage. Don’t rush—take a few extra minutes to prepare.
One detail many people miss: batteries can still hold a charge even when the mower is off. Accidentally touching both terminals with a metal tool can cause a dangerous short. Always remove jewelry like rings or bracelets before working with batteries, as these can accidentally bridge terminals.
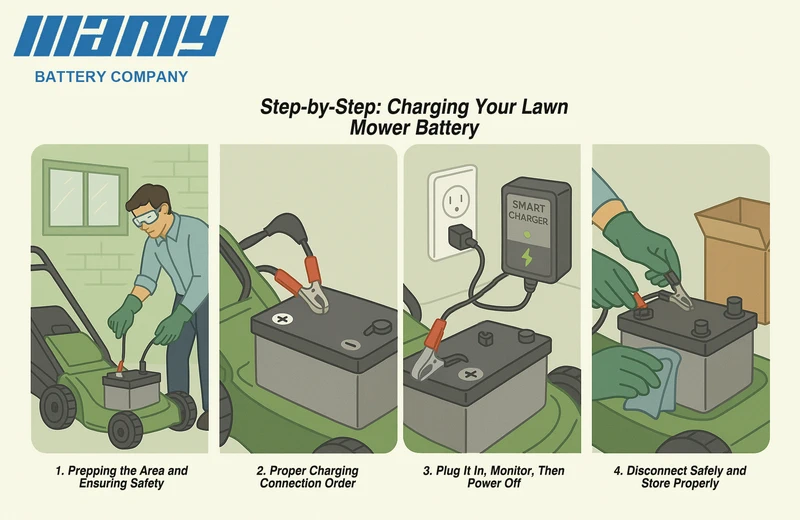
Step-by-step: How To Charge A Lawn Mower Battery
Charging a battery is simple if you follow each step carefully. Here’s how to do it right.
1. Locate The Battery
Most riding mowers have the battery under the seat or hood. Push mowers with batteries usually place them near the handle or motor. Check your mower’s manual if unsure.
Some modern mowers have easy-access battery compartments, but older models may require removing panels or even the mower deck to reach the battery. Take your time—forcing access can break clips or wires.
2. Disconnect The Battery
Turn off the mower and remove the key. For lead-acid batteries, disconnect the negative terminal (black, “-”) first, then the positive terminal (red, “+”). This avoids shorts.
For lithium-ion batteries, follow the manufacturer’s instructions for safe removal.
If the terminals are stuck, gently wiggle the cable connectors. Do not pry on the battery posts—these can break or loosen, causing leaks.
3. Inspect And Clean The Battery
Check for cracks or leaks. If you see white or blue powder, that’s corrosion. Clean it with a mixture of baking soda and water using a brush. Dry with a rag.
Cracks or bulges are signs of internal damage—such batteries should be replaced, not recharged. Cleaning corrosion is more than cosmetic: even a thin layer can reduce charging efficiency by as much as 30%. After cleaning, check that the clamps fit tightly on the terminals.
4. Check The Battery’s Voltage
Use a multimeter to test the voltage. A healthy 12V lead-acid battery should read 12.6–12.8V when fully charged. If it’s below 12.2V, it needs charging.
If your battery reads below 10V, it may be deeply discharged or damaged. In this case, charge slowly and check the voltage again after an hour—if it doesn’t rise, the battery may be beyond recovery.
5. Set Up The Charger
Select a charger that matches your battery’s voltage and type.
- For lead-acid: Use a trickle charger or a smart charger with a 2-10 amp setting.
- For lithium-ion: Use the charger supplied by the manufacturer.
Place the charger on a stable, dry surface away from the battery.
Never use a car charger on lithium-ion batteries unless the manufacturer says it’s safe. If your charger has a “maintenance” or “float” mode, enable it—this mode keeps the battery topped up without overcharging.
6. Connect The Charger
Attach the positive (red) clamp to the battery’s positive terminal first. Then, attach the negative (black) clamp to the negative terminal.
If the battery is still in the mower, connect the negative clamp to an unpainted metal part of the mower’s frame—away from the battery. This prevents sparks near the battery.
If your charger has reverse polarity protection, it will beep or flash if you mix up the clamps. Double-check the connections before switching on.
7. Plug In And Start Charging
Plug the charger into an outlet. Switch it on. Set it to the correct voltage and amperage.
- Slow charging (2 amps) is safer and better for battery life, but takes longer (8-12 hours for a full charge).
- Fast charging (10 amps) is quicker (2-4 hours), but can shorten battery life if used often.
If you’re unsure, always use the lowest amp setting. Patience pays off with better long-term battery performance.
8. Monitor The Charging Process
Most modern chargers have indicators showing charging status. Don’t leave the battery unattended for long periods. Check for overheating—if the battery gets hot, stop charging.
Some chargers automatically switch to maintenance mode when the battery is full. If you’re using a manual charger, set a timer as a reminder to check progress. Overcharging can cause batteries to vent gas or bulge.
9. Disconnect Safely
Turn off and unplug the charger. Remove the negative clamp first, then the positive. Reconnect the battery to the mower, positive terminal first.
Tighten the cable clamps securely, but do not overtighten—overtightening can damage the battery posts.
10. Test The Battery
Use your multimeter to check the voltage again. For a 12V lead-acid battery, it should read at least 12. 6V. Start the mower to confirm the battery is working.
If the mower turns over slowly, or not at all, recheck all connections and the battery voltage. Sometimes, even after charging, an old battery won’t deliver enough power under load.
Charging A Lawn Mower Battery Without A Charger
Sometimes, you might not have the original charger. Is it possible to charge the battery another way? The answer is yes, but with caution.
Using A Car Charger
A car battery charger can work for 12V lawn mower batteries. Set it to the lowest amperage (2 amps) and follow the same safety steps.
Not all car chargers are suitable for small batteries—some can’t be adjusted below 6 amps. Using a high amp setting risks overheating or damaging your lawn mower battery. Always check the manual.
Jump-starting From A Car
This method is only for emergencies. Use jumper cables, but do not run the car engine. Connect cables as you would with cars—red to positive, black to negative. Let the mower battery charge for a few minutes, then try starting.
If the mower starts, disconnect the cables in the reverse order. Do not let the mower run for long to “charge” the battery—small alternators in mowers are not designed for fast charging.
Solar Chargers
Solar battery chargers are available for small batteries. These are slow but useful if you have no electrical outlet nearby.
Solar chargers are best as a maintenance tool, not for recharging a dead battery. They usually deliver less than 1 amp and need several sunny days to recharge a low battery.
Important: Never use a charger that doesn’t match your battery’s voltage. Overcharging or undercharging can damage the battery.
How Long Should You Charge A Lawn Mower Battery?
Charging time depends on the battery’s capacity and the charger’s output. Here’s a quick comparison:
| Battery Type | Charger Output | Typical Charge Time |
|---|---|---|
| Lead-Acid (12V, 28Ah) | 2 Amps | 10-14 hours |
| Lead-Acid (12V, 28Ah) | 10 Amps | 2-3 hours |
| Lithium-Ion (40V, 5Ah) | Manufacturer Charger | 1-2 hours |
Never rush the process with a high-amp charger unless you’re in a hurry. Slow charging is best for battery health.
If you’re unsure how long to charge, calculate by dividing the battery’s amp-hour rating by the charger’s amp setting. For example, a 35Ah battery charged at 2 amps takes about 17 hours (35 ÷ 2 = 17. 5). Always check the battery every few hours during charging.
Common Problems When Charging Lawn Mower Batteries
Sometimes, charging doesn’t go as planned. Here are issues you may encounter:
Battery Won’t Hold A Charge
If your battery discharges quickly or won’t charge fully, it’s probably old or damaged. Most lead-acid batteries last 3-5 years. Replace if needed.
A battery that loses charge overnight—even after charging—often has an internal short. Testing with a multimeter can confirm this, but replacement is usually the only fix.
Charger Shows “fault” Or “error”
This could mean the battery is too discharged or sulfated. Try charging at a low amp rate for several hours. If the error persists, the battery may be dead.
Some smart chargers have a “desulfation” mode—this pulses voltage to break up lead sulfate. It can sometimes revive batteries, but isn’t a guaranteed fix.
Excessive Corrosion
Corrosion on terminals can prevent charging. Clean terminals thoroughly, and apply a thin layer of petroleum jelly to prevent future build-up.
Repeated corrosion could mean a leaky battery or overcharging. Check fluid levels if possible, and ensure the charger shuts off when full.
Swollen Or Leaking Battery
A swollen battery is unsafe. Do not attempt to charge it—replace immediately.
Swelling is usually caused by overcharging or internal failure. Handle with care—acid leaks can cause burns.
Clicking Or Humming Sounds
Sounds during charging may mean a short circuit or internal battery damage. Unplug the charger and inspect the battery.
If you hear bubbling, check if the battery is overheating. In rare cases, bubbling can be normal for flooded lead-acid batteries near full charge, but it should never be violent or accompanied by strong smells.
Tips For Extending Lawn Mower Battery Life
Charging correctly is just one part of battery care. Here are expert tips for getting the most from your mower battery:
- Charge after every use. Don’t let the battery fully discharge.
- Store batteries in a cool, dry place during winter.
- Disconnect the battery if storing the mower for long periods.
- Clean terminals regularly to prevent power loss.
- Use a battery maintainer (trickle charger) for long-term storage.
- Avoid overcharging. Smart chargers help prevent this.
- Check fluid levels (for flooded lead-acid batteries) every few months.
- Replace batteries every 3–5 years or when performance drops.
Many users don’t realize that partial charging (not reaching full charge) can reduce battery life. Try to allow a full charge cycle whenever possible.
Another detail often missed: heat shortens battery life. Storing your battery in a shed or garage exposed to summer heat can reduce its lifespan by a year or more. Choose a shaded, well-ventilated spot for off-season storage.
Comparing Different Lawn Mower Battery Chargers
Choosing the right charger can make a big difference in battery performance and lifespan.
| Charger Type | Best For | Pros | Cons |
|---|---|---|---|
| Manual Charger | Experienced users | Affordable, simple | Risk of overcharging |
| Automatic (Smart) Charger | All users | Prevents overcharge, safe | More expensive |
| Trickle Charger | Long-term storage | Keeps battery charged, low amps | Slow charging |
| Lithium-Ion Charger | Lithium batteries | Fast, safe for Li-ion | Must match battery brand |
A common beginner mistake is using a car battery charger with a high amp setting. This can overheat and damage a small mower battery.
Also, if you own multiple batteries, investing in a smart charger with an automatic shut-off and maintenance mode will pay for itself by preventing overcharging and extending battery life.
Seasonal Battery Storage And Charging
Proper storage during the off-season is key to battery health.
Storing Lead-acid Batteries
- Charge fully before storage
- Remove battery from the mower and store in a cool, dry place
- Attach to a battery maintainer if possible
- Check voltage monthly and recharge if it drops below 12.4V
If you’re storing batteries on a concrete floor, place a wooden board underneath. This prevents moisture from draining the battery over time, a detail many miss.
Storing Lithium-ion Batteries
- Charge to about 60-70% (not full)
- Store in a dry, cool location (never below freezing)
- Avoid leaving on the charger for months
Storing lithium-ion batteries at full charge for long periods speeds up capacity loss. If you can, store them at the recommended 60-70% charge and in their original case or box.
These steps prevent battery failure when you need your mower in the spring.
Signs Your Lawn Mower Battery Needs Replacement
Even with perfect care, every battery has a limited lifespan. Look for these signals:
- Mower starts slowly or not at all
- Battery won’t hold a charge after repeated charging
- Visible swelling, leaks, or damage
- Voltage reading drops below 12V after charging (for 12V batteries)
If you notice a rotten egg smell around the battery, this is a sign of leaking gas—replace the battery immediately. Testing with a multimeter after charging is the best way to confirm when it’s time for a new battery.
Replacing a failing battery is safer and often more cost-effective than constant recharging.
Mistakes To Avoid When Charging A Lawn Mower Battery
Many users make small errors that can cost them a battery. Here’s what to watch out for:
- Using the wrong charger (wrong voltage or type)
- Reversing the clamps (connecting positive to negative)
- Charging in a closed space (risk of gas buildup)
- Skipping terminal cleaning
- Charging a frozen battery (can cause it to explode)
- Not monitoring charging progress
A less-known mistake is charging a battery left in a discharged state for weeks. Sulfation builds up and can permanently reduce battery capacity.
Another common error: stacking items on top of batteries during storage. This can short out the terminals or damage the case, especially with lead-acid types.

Credit: www.wikihow.com
Lawn Mower Battery Maintenance Schedule
To keep your battery in top shape, follow this sample maintenance schedule:
| Task | Frequency | Details |
|---|---|---|
| Clean terminals | Every 2 months | Remove corrosion, tighten connections |
| Check voltage | Monthly | Use a multimeter |
| Charge battery | After each use or monthly in storage | Use proper charger |
| Check fluid level (lead-acid) | Every 3 months | Add distilled water if low |
| Replace battery | Every 3–5 years | When performance drops |
Many owners skip this routine, but regular care adds years to your battery’s life.
If you store your mower outside, check the battery more often—rain and humidity speed up corrosion and self-discharge.
Environmental Impact And Recycling
Batteries contain materials that can harm the environment if not disposed of properly. Lead-acid batteries are 99% recyclable. Many auto parts stores and recycling centers accept old mower batteries.
Never throw batteries in the trash. Recycling helps recover valuable materials and protects the environment. For more information on battery recycling, check resources like the U.S. EPA.
Lithium-ion batteries also need special recycling. Do not put them in household recycling bins. Contact local waste management or electronics stores for safe disposal options.

Credit: www.autozone.com
Frequently Asked Questions
How Do I Know If My Lawn Mower Battery Is Fully Charged?
Use a multimeter. A 12V lead-acid battery should read between 12.6 and 12.8 volts when fully charged. Many automatic chargers also have an indicator light or display that turns green or says “fully charged.”
If you notice the charger’s indicator never switches to “full,” your battery may be sulfated or damaged.
Can I Leave My Lawn Mower Battery On The Charger Overnight?
It depends on the charger. Smart chargers automatically stop when the battery is full, so overnight charging is safe. Manual chargers can overcharge and damage the battery if left on too long.
If unsure, check your charger’s instructions. For long-term storage, use a maintainer, not a regular charger.
What Happens If I Use The Wrong Charger For My Lawn Mower Battery?
Using the wrong voltage or charger type can overheat, damage, or even destroy your battery. Always match the charger to your battery’s voltage and chemistry (lead-acid or lithium-ion).
Damage from mismatched charging may not show up right away but will shorten the battery’s life.
How Often Should I Replace My Lawn Mower Battery?
Most lead-acid batteries last 3–5 years with good care. Lithium-ion batteries may last longer. Replace the battery if it won’t hold a charge, is swollen, or shows signs of leaking.
If you use your mower heavily, check battery health each season.
Is It Safe To Jump-start A Lawn Mower Battery With A Car?
You can jump-start a 12V mower battery with a car, but do not run the car’s engine during the process. Only use this in emergencies, as repeated jump-starting can reduce the battery’s lifespan.
A well-charged battery means your mower is always ready to tackle the yard. Proper charging isn’t just about plugging in—it’s about safety, choosing the right tools, and regular maintenance. Now, with these steps and tips, you can keep your lawn mower battery healthy season after season.