Cutting dovetail joints by hand is a skill admired by woodworkers everywhere. But using a router to cut dovetail joints makes the process faster, more accurate, and accessible even for beginners. Whether you want to build drawers, boxes, or fine furniture, learning how to cut dovetail joints with a router can open a new world of woodworking. This guide explains every step, shares tips from real experience, and highlights mistakes to avoid. If you want strong, beautiful joints with less frustration, you’re in the right place.
What Is A Dovetail Joint?
A dovetail joint is a classic woodworking connection where two pieces of wood join at right angles. The end of one board has wedge-shaped cuts (tails), and the other has matching slots (pins). When these fit together, the joint is strong and resists pulling apart. Dovetails are often used in drawer construction, jewelry boxes, and cabinets because they are both beautiful and durable.
There are several types of dovetail joints:
- Through dovetail: Both pins and tails are visible.
- Half-blind dovetail: Pins are hidden from the front, often used in drawers.
- Sliding dovetail: One piece slides into a groove on the other.
- Secret mitered dovetail: Almost invisible from the outside, used for fine boxes.
Cutting these by hand takes patience and skill. Using a router with a dovetail jig makes it much easier and more consistent.
Why Use A Router For Dovetails?
Hand-cutting dovetails is traditional, but it takes a lot of practice to get clean, tight joints. Routers, especially when used with a dovetail jig, provide several clear advantages:
- Speed: You can cut multiple joints in minutes, not hours.
- Consistency: Each joint matches the last, critical for projects with many drawers or boxes.
- Strength: Router-cut dovetails are just as strong as hand-cut ones, if not stronger, due to precise fit.
- Accessibility: Beginners can get great results quickly without years of hand tool training.
However, using a router is not foolproof. You must set up your tools and materials carefully. Small mistakes can lead to loose joints or tear-out. Learning the correct process is key.
Credit: woodgears.ca
Essential Tools And Materials
Before you start, you need the right tools. Here’s what’s required:
- Router: A mid-sized plunge or fixed-base router (1.5–2 horsepower) is ideal.
- Dovetail jig: This holds your workpieces and guides the router. Popular brands include Leigh, Porter-Cable, and Rockler.
- Dovetail router bit: Usually comes with the jig. Most common is a 14-degree angle, 1/2-inch shank.
- Straight router bit: Sometimes needed for half-blind or variable dovetails.
- Collet and guide bushing: The guide bushing rides in the jig’s template, controlling the router’s path.
- Clamps: To secure the jig and workpieces.
- Measuring tools: Tape measure, combination square, and marking gauge.
- Pencil: For marking baselines and reference points.
- Workbench or sturdy table: Needed for stability.
- Eye and ear protection: Routers are loud and throw chips.
- Vacuum or dust mask: Dovetail routing creates a lot of fine dust.
Pro tip: Not all router bits or jigs are universal. Always check that your bit, guide bushing, and jig template are compatible.
Understanding Dovetail Jigs And Templates
A dovetail jig is the key to cutting precise joints with a router. It holds your wood pieces at the right angle and guides the router using a pattern or template.
There are two main types of dovetail jigs:
- Fixed-template jigs: The pattern is built-in. Good for standard joints.
- Adjustable jigs: You can change spacing, joint width, and style for more custom work.
A typical dovetail jig has:
- Template: Guides the router bit for pins and tails.
- Clamps: Secure the wood pieces.
- Stops: Ensure repeatable placement.
- Fingers: On some jigs, these guide the bit for each joint.
When using the jig, you often cut both pieces (pins and tails) in one setup, especially with through dovetails. For half-blind dovetails, you usually cut one piece at a time.
Comparison Of Fixed Vs. Adjustable Dovetail Jigs
Here’s a quick look at the main differences:
| Feature | Fixed-Template Jig | Adjustable Jig |
|---|---|---|
| Cost | Lower | Higher |
| Setup Time | Faster | Slower |
| Flexibility | Limited | High |
| Best For | Beginners, simple projects | Advanced users, custom work |
Insight: Adjustable jigs offer creative freedom but require careful calibration. Beginners often get better results from fixed jigs at first.
Preparing Your Workpieces
Success with router-cut dovetails starts long before you plug in the tool. Preparation is everything. Here are the key steps:
- Choose the right wood: Hardwoods like maple, cherry, and oak hold crisp details. Softwoods are easier to cut but can splinter. Avoid plywood; its layers may not hold up.
- Mill your boards flat and square: Joints only fit if the ends are perfectly square and both pieces are the same thickness. Use a planer and jointer if possible.
- Mark your pieces: Label inside and outside faces, front and back. This avoids confusion during setup.
- Cut to final length and width: Once joined, you won’t be able to trim the boards easily.
- Lay out your joint: Decide which piece will have the pins and which the tails. Mark a baseline about 1/8″ from the edge to avoid cutting too deep.
Non-obvious tip: Boards must be exactly the same thickness. Even a tiny difference (1/32″) can make joints loose or uneven.
Setting Up The Router And Jig
Setting up is the most important—and often most confusing—part of the process. Take your time here; small errors multiply during routing.
Step 1: Install The Router Bit And Guide Bushing
- Unplug the router. Install the dovetail bit securely in the collet.
- Attach the guide bushing to the baseplate, making sure it matches the jig template.
- Set the router’s depth stop. For through dovetails, set the bit to cut just slightly deeper than the board thickness.
Step 2: Adjust The Jig
- Place the jig on your workbench and clamp it down securely.
- Insert the boards into the jig per the instructions (usually, ends are flush with the template).
- Use the jig’s stops and guides to set the spacing and position of each joint.
- Double-check that both boards are tight and flush to the template.
Step 3: Test-cut On Scrap
Before cutting your real parts, use scrap wood of the same thickness to test the setup. This is critical. Adjust the bit depth and jig alignment as needed.
Pro tip: Even experienced woodworkers sometimes need 2–3 test cuts to get a perfect fit.
:max_bytes(150000):strip_icc()/101831145-235bda85ea904faf831206039a481495.jpg)
Credit: www.woodmagazine.com
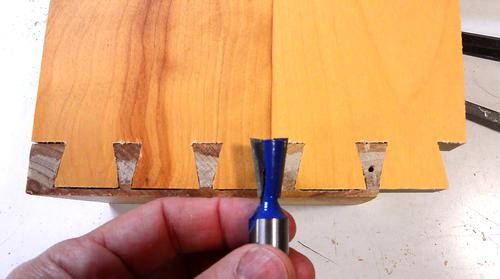
Cutting Through Dovetail Joints With A Router
Through dovetails are a popular choice for visible, strong corner joints. Here’s how to cut them with a router and jig.
Step 1: Secure The Workpieces
Insert the two boards to be joined (one for pins, one for tails) into the jig. The ends should be flush with the front of the jig. Tighten all clamps firmly.
Step 2: Set The Router Depth
Set the bit depth to just over the thickness of your boards. For example, if your boards are 3/4″ thick, set the bit to cut about 13/16″. This ensures a full cut-through.
Step 3: Route The Tails And Pins
- Turn on the router. Hold it firmly with both hands.
- Start at one end of the template and let the guide bushing ride smoothly in the template slots.
- Move the router in a slow, steady motion. Never force it; let the bit do the work.
- Route all the way along each slot (finger) in the template.
- When finished, turn off the router and wait for the bit to stop before lifting it away.
Step 4: Remove And Test Fit
Take the boards out of the jig and try to fit them together. The fit should be snug but not forced. If too tight, adjust the bit depth slightly shallower and try again. If too loose, increase depth slightly.
Insight: Tear-out (wood splintering at the exit) is common. To avoid this, place a sacrificial scrap board behind your workpiece in the jig.
Cutting Half-blind Dovetail Joints With A Router
Half-blind dovetails are used when you want the joint hidden from the front—like the front of a drawer box.
Step 1: Set Up The Jig For Half-blind
Adjust the jig and template for half-blind mode (check your jig’s instructions). Usually, only the front board (drawer front) and side board (drawer side) are clamped in the jig.
Step 2: Adjust Bit Depth
Set the router bit depth so the tails cut into the drawer front, but not all the way through. Usually, this means cutting about 2/3 of the way into the thickness.
Step 3: Route The Joints
- Start the router and let the guide bushing follow the template slots.
- Make several shallow passes rather than one deep cut. This reduces tear-out and burning.
- Complete all tails and pins, then turn off the router.
Step 4: Test And Adjust
Remove the boards and test fit. The joint should be tight with no gaps. If the fit is too loose or too tight, adjust the bit depth or jig spacing.
Non-obvious tip: Fine adjustments can be made by moving the template forward or backward. Sometimes just 1/32″ makes a big difference in fit.
Using Variable-spacing Dovetail Jigs
Some advanced jigs allow you to set custom spacing for the pins and tails. This lets you create unique joints that don’t look like they came from a machine.
How It Works
- Move the template fingers to your desired spacing.
- Clamp the boards as usual.
- Rout out the pins and tails, following the new pattern.
Insight: Variable spacing adds a hand-made look. However, it requires careful layout and testing.
Common Mistakes And How To Avoid Them
Cutting dovetail joints with a router can be straightforward, but beginners often make these mistakes:
- Wrong bit depth: Too deep or too shallow ruins the fit. Always test on scrap.
- Boards not flush in the jig: Causes misaligned joints. Double-check before routing.
- Forcing the router: Leads to burning or tear-out. Go slowly and let the bit do the work.
- Skipping test cuts: Even experts test first. Never skip this step.
- Using dull bits: A sharp bit gives clean cuts. Replace or sharpen as needed.
- Not securing the jig: A moving jig leads to disaster. Always clamp it down tight.
Non-obvious insight: Temperature and humidity can change wood dimensions slightly. If your workshop is much warmer or wetter than where the furniture will be used, leave joints just a hair loose to allow for movement.
Finishing The Joint
After routing and fitting your dovetails, there are a few final steps to ensure a perfect result.
Step 1: Dry Fit
Before adding glue, assemble the joint dry (no glue) to check fit and alignment. Tap the joint together with a rubber mallet if needed.
Step 2: Glue-up
- Apply a thin layer of wood glue to the pins and tails.
- Assemble the joint and clamp it gently. Don’t over-tighten, as this can squeeze out all the glue or damage the wood.
- Wipe away any excess glue with a damp cloth.
Step 3: Sand And Finish
- After the glue dries (usually 30–60 minutes), sand the joint area flush.
- Fill any small gaps with wood filler if needed.
- Apply your chosen finish: Oil, varnish, or paint.
Pro tip: Always finish with the grain of the wood for the smoothest look.
When To Use Router-cut Dovetails (and When Not To)
Router-cut dovetails are ideal for:
- Drawers: Fast, repeatable, and strong.
- Boxes: For gifts, keepsakes, or jewelry.
- Cabinet carcasses: Where strength is critical.
But sometimes, hand-cut dovetails are better:
- Fine furniture: Where a truly hand-made look is needed.
- Tiny boxes: Routers may be too aggressive.
- Irregular or curved pieces: Jigs may not fit.
Insight: Many professionals use a mix—router for utility joints, hand-cut for visible showpieces.

Credit: www.youtube.com
Comparison: Hand-cut Vs. Router-cut Dovetail Joints
To help you decide which method is best for your project, here’s a side-by-side comparison:
| Feature | Hand-Cut Dovetails | Router-Cut Dovetails |
|---|---|---|
| Speed | Slow | Fast |
| Consistency | Varies | High |
| Skill Level Needed | High | Beginner to advanced |
| Appearance | Hand-crafted | Machine-like (unless variable spacing) |
| Best For | Fine joinery, restoration | Production, furniture, drawers |
Real-world Example: Building A Drawer Box
Let’s say you want to build a simple drawer box for a cabinet. Here’s how you might use router-cut dovetails:
- Cut all four sides to size and label inside/outside faces.
- Clamp the front and side in the dovetail jig for half-blind dovetails.
- Route the pins and tails with the router set to the correct depth.
- Repeat for the other side.
- Dry fit the box to check for gaps or misalignment.
- Glue and clamp the assembly, then add the drawer bottom.
Example detail: Using a 14-degree, 1/2″ dovetail bit, you can cut standard 3/4″ thick hardwood sides for a drawer in about 10 minutes, compared to 30–60 minutes by hand.
Safety Tips When Cutting Dovetails With A Router
Routers are powerful and can be dangerous if not used carefully.
- Wear eye and ear protection: Chips fly fast, and routers are loud.
- Keep hands away from the bit: Use push blocks or handles when possible.
- Always unplug before changing bits: Never trust the switch alone.
- Secure your work: A moving board or jig is a recipe for injury.
- Don’t force the tool: Let the router and bit do the cutting.
Non-obvious insight: Wear a dust mask or connect a shop vacuum to your router. Fine wood dust can be harmful over time, especially with hardwoods like oak or walnut.
Maintenance Of Router Bits And Jigs
To keep your joints clean and safe, maintain your tools:
- Clean router bits after each use. Resin buildup makes them dull.
- Sharpen or replace bits when you see burning or rough cuts.
- Check jig parts and clamps for wear and tightness.
- Lubricate moving parts on the jig occasionally with a light machine oil.
Pro tip: Store bits in a holder to protect their edges. Even a small nick can cause rough cuts.
Advanced Tips For Perfect Dovetails
Once you’re comfortable with basic dovetail routing, try these advanced ideas:
- Use contrasting woods for pins and tails for a dramatic look.
- Try variable-spaced joints for a more natural, hand-cut appearance.
- Cut stopped dovetails (not all the way through) for box lids or casework.
- Make sample joints in different woods to understand how each behaves.
Non-obvious insight: For large projects, mark every board with a unique symbol (triangle or letter) to keep orientation clear. It’s easy to mix up parts during repeated cuts.
Frequently Asked Questions
What Is The Best Router Bit Angle For Dovetail Joints?
Most dovetail router bits have a 14-degree angle, which works well for most hardwoods and softwoods. Some jigs use 8 or 12-degree bits for a finer look or thinner materials. Always use the angle recommended by your jig’s instructions.
Can I Cut Dovetail Joints Without A Jig?
It’s possible, but very difficult to get accurate, repeatable results. A jig holds your boards steady and guides the router for precise pins and tails. If you want perfect fits and fast production, a jig is highly recommended.
What Is The Difference Between Through And Half-blind Dovetails?
Through dovetails have pins and tails visible on both boards—great for boxes and visible corners. Half-blind dovetails hide the pins from the front, so only the tails show—commonly used in drawer fronts.
How Do I Fix A Loose Dovetail Joint?
If your joint is slightly loose, you can use a thicker glue or add thin wood shims to the tails or pins. For best results, always test on scrap and adjust your jig or router depth to avoid loose joints in the first place.
What Is A Good Dovetail Jig For Beginners?
Popular choices for beginners include the Porter-Cable 4216 and the Rockler dovetail jig. They offer easy setup and good instructions. For more versatility, the Leigh D4R is excellent, though more expensive. You can read more about these on Wikipedia.
Cutting dovetail joints with a router is one of the best ways to combine speed, strength, and beauty in woodworking. With the right setup, a little patience, and practice on scrap, you’ll be making professional-quality joints in no time. Remember: careful setup, good tools, and attention to detail are the secrets to perfect dovetails. Happy woodworking!