Cutting plexiglass can seem like a challenge, especially if you want clean, smooth edges without cracks or chips. Many people worry about ruining their sheet or wasting material. The good news is, with the right tools and steps, you can cut plexiglass accurately at home—even if you’re not a professional. One of the most useful tools for this is a jigsaw. This power tool lets you cut straight lines, curves, and even complex shapes, giving you much more flexibility than simple hand tools.
In this article, you’ll learn everything you need to know about how to cut plexiglass with a jigsaw. We’ll cover preparation, tool choices, safety tips, and step-by-step instructions. You’ll also discover helpful tricks most beginners miss, including how to avoid melting the edges or making rough cuts. Whether you’re making windows, signs, picture frames, or anything else, this guide will help you get professional-looking results with less stress and fewer mistakes.
Understanding Plexiglass
Before you start cutting, it’s important to understand what plexiglass is and how it behaves. Plexiglass, also called acrylic sheet or acrylic glass, is a plastic material that’s clearer and lighter than real glass. It’s used for many projects because it’s strong, shatter-resistant, and easy to shape. However, it can crack or melt if handled incorrectly.
Plexiglass comes in different thicknesses, usually from 1/16 inch (about 1. 5 mm) to over 1 inch (25 mm). Thinner sheets are easier to cut, but thicker pieces need careful handling. Plexiglass can also have different finishes, like clear, frosted, or colored, but the cutting process is almost the same for all types.
A common mistake is treating plexiglass like regular glass or wood. For example, using the wrong blade or moving too fast can make the plastic melt, causing rough or jagged edges. By learning the right method, you can avoid these problems and get a clean finish.
Why Use A Jigsaw For Cutting Plexiglass?
You might wonder why a jigsaw is a good choice for cutting plexiglass. Jigsaws are handheld power tools with a straight, up-and-down moving blade. This makes them perfect for cutting not just straight lines, but also curves and circles. Here’s why a jigsaw stands out:
- Versatility: You can cut shapes, corners, and curves that hand cutters or table saws can’t handle.
- Control: The speed control on most jigsaws helps avoid overheating and melting.
- Portability: Jigsaws are easy to carry and use almost anywhere.
- Affordable: Compared to specialized saws, jigsaws are usually less expensive and widely available.
But there’s a catch: you need the right blade and technique. A standard wood or metal blade can chip or melt the plexiglass. Choosing the right blade and using steady, careful movements is key.
Tools And Materials You’ll Need
Gathering the right tools and materials before you start will save time and reduce mistakes. Here’s a checklist:
- Jigsaw: Corded or cordless, with adjustable speed if possible.
- Jigsaw blade for plastics: Look for a fine-tooth blade labeled for acrylic, plastic, or laminate. Avoid large, aggressive teeth.
- Plexiglass sheet: The size and thickness you need for your project.
- Clamps: To hold the plexiglass securely on your work surface.
- Work table or sawhorses: To support the sheet while cutting.
- Masking tape or painter’s tape: To mark lines and protect the surface.
- Straightedge or ruler: For drawing straight lines.
- Pencil or non-permanent marker: For marking your cuts.
- Safety glasses: To protect your eyes from chips.
- Dust mask: Plexiglass dust is not good to breathe.
- Gloves: To protect your hands from sharp edges.
- Sandpaper (220–320 grit): For smoothing cut edges.
- Vacuum or brush: For cleaning up dust and chips.
Optional but helpful:
- Hearing protection: Jigsaws can be loud.
- Drop cloth: To catch dust and chips.
- Spray bottle with water: To cool the blade and reduce melting.
Choosing The Right Jigsaw Blade
The blade you use is the most important part of the process. Using the wrong one can ruin your plexiglass and make the cut look rough. Here’s what to look for in a blade:
| Blade Type | Teeth Per Inch (TPI) | Best For | Notes |
|---|---|---|---|
| Acrylic/Plastic blade | 10–14 | Plexiglass, acrylic sheets | Smooth, chip-free cuts |
| Metal blade | 21–24 | Thin plastic, metal sheets | Can work but may heat up quickly |
| Wood blade | 6–8 | Wood only | Too aggressive for plexiglass |
Key tip: Look for blades with “reverse teeth” or “downward-cutting” teeth. These help reduce chipping on the top surface, giving you a cleaner finish.
Preparing Your Plexiglass For Cutting
Good preparation is half the work. Follow these steps before you start your jigsaw:
- Leave the protective film on: Plexiglass usually comes with a thin plastic film. This protects the surface from scratches. Only remove it after you finish cutting.
- Mark your cut lines clearly: Use a ruler and pencil or marker to draw your cutting line. For straight cuts, use a long straightedge.
- Apply masking tape: Cover the cut line with masking tape. Draw your line on top of the tape. This reduces chipping and helps the blade move smoothly.
- Secure the plexiglass: Place the sheet on a flat table or across sawhorses. Use clamps to hold it in place. The sheet should not move during cutting.
- Support both sides of the cut: Make sure both sides of the cut line are supported, especially with large or thin pieces. This prevents cracking.
Non-obvious insight: If you cut a large sheet, overhanging edges can vibrate and crack. Always support the sheet as close to the cut line as possible.
Safety Tips For Cutting Plexiglass
Safety should never be skipped. Plexiglass can crack, send chips flying, or create fine dust. Here’s how to protect yourself:
- Wear safety glasses: Plexiglass chips are sharp and can hurt your eyes.
- Use a dust mask: Cutting creates fine plastic dust that’s not healthy to breathe.
- Wear gloves: The edges of cut plexiglass can be razor-sharp.
- Clamp securely: A moving sheet is dangerous and leads to mistakes.
- Check your workspace: Remove anything you might trip over or bump into.
- Work slowly and steadily: Rushing creates heat and cracks.
- Ventilate the area: Plexiglass dust and smell can build up in closed spaces.
Extra tip: Keep a spray bottle of water nearby. If you see smoke or feel the blade getting hot, spray a light mist on the cut to cool things down.
Credit: www.youtube.com
Step-by-step Guide: How To Cut Plexiglass With A Jigsaw
Ready to make your cut? Follow these steps for the best results.
Step 1: Set Up Your Workspace
Choose a flat, stable surface with good lighting. Place your plexiglass on the table or sawhorses. Make sure your power cord (if using a corded jigsaw) won’t get in your way.
Clamp the plexiglass down so it doesn’t move. Double-check that nothing is under your cut line that could damage your blade or the table.
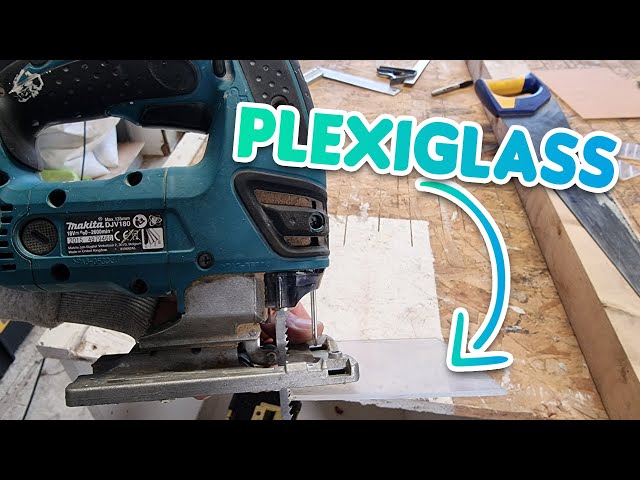
Step 2: Install The Correct Jigsaw Blade
Unplug the jigsaw before changing blades. Insert your fine-tooth blade for plastic, making sure it’s secure. If your jigsaw has speed settings, set it to a medium or slow speed.
Pro tip: Blades with smaller teeth and less aggressive shapes give a smoother cut and less heat.
Step 3: Mark And Tape Your Cut Line
Draw your cut line with a straightedge and pencil or marker. Cover the line with masking tape, then redraw the line on top of the tape. This step is important for a clean edge.
If you’re cutting a curve or circle, use a template or draw freehand, then tape over the line. For circles, a compass or a round object as a guide helps.
Step 4: Start The Cut Slowly
Place the jigsaw base flat on the plexiglass, with the blade just off the edge of the sheet. Start the saw before touching the plexiglass, then gently guide the blade onto the material.
Let the blade do the work. Don’t force the saw through the plexiglass—this creates heat and can melt or crack the edge.
Step 5: Guide The Jigsaw Along The Line
Move the jigsaw steadily along your cut line. Keep both hands on the tool for control. Watch the blade, not just the shoe (base) of the saw.
If the blade starts to bind or you see melting, stop and let things cool. You can spray a little water or take a short break.
Important: If you’re cutting a curve, turn the jigsaw slowly. For tight curves, make a series of small straight cuts, then smooth the edge later.
Step 6: Finish The Cut And Check The Edge
When you reach the end, let the blade come to a stop before lifting the jigsaw away. Unclamp the plexiglass and inspect the edge.
If you see rough or melted spots, don’t worry. Most cuts need a little sanding to look perfect.
Step 7: Sand And Smooth The Edge
Use fine sandpaper (220–320 grit) to smooth the edge. Wrap the sandpaper around a small block for flat edges, or use your fingers for curves. Sand lightly until the edge is smooth to the touch.
For a glossy finish, you can use even finer sandpaper (400–600 grit) or a plastic polish.
Quick tip: Always sand in one direction, not back and forth. This avoids scratches.
Common Problems And How To Fix Them
Even with care, things can go wrong. Here’s how to handle common problems:
| Problem | Possible Cause | Solution |
|---|---|---|
| Chipped edge | Wrong blade, moving too fast | Switch to a fine-tooth blade, slow down |
| Melted edge | Blade too hot, too slow | Increase speed slightly, use water spray |
| Cracking | Sheet not supported, clamps too tight | Support both sides, loosen clamps a little |
| Wavy cut | Pushing too hard, old blade | Use steady pressure, change blade |
| Uneven surface | Dirty shoe, rough tape | Clean jigsaw base, use fresh tape |
Hidden insight: Many beginners blame the plexiglass for cracking, but it’s often due to poor support or using clamps too tightly. Always check your setup before blaming the material.

Credit: www.wikihow.com
Advanced Techniques For Better Results
If you want to make more complicated shapes or get an ultra-smooth finish, try these advanced tips:
- Drill starter holes for inside cuts: If you need to cut a shape out of the middle of the plexiglass, drill a hole large enough for the jigsaw blade to fit inside your cut line.
- Use guides for perfectly straight lines: Clamp a straightedge as a fence for the jigsaw to follow. This works like a rail and keeps your cut perfectly straight.
- Double up tape for extra protection: If your sheet is thin or expensive, use two layers of masking tape for even less chipping.
- Cool the blade with air: A small fan blowing across your work can help keep the blade cool and reduce melting.
- Test on scrap first: Always try your setup on a spare piece of plexiglass before cutting your final piece. This lets you adjust speed and technique without risk.
Expert tip: For perfect corners, cut slightly outside your line, then sand to the exact size. This avoids over-cutting and gives a more accurate fit.
Comparing Cutting Methods: Jigsaw Vs. Other Tools
You might wonder if a jigsaw is really the best tool for your job. Here’s how it compares to other common methods:
| Tool | Best For | Pros | Cons |
|---|---|---|---|
| Jigsaw | Curves, shapes, medium/large sheets | Flexible, affordable, easy to use | Can melt edges if too slow |
| Scoring knife | Straight cuts, thin sheets (<1/8″) | Very clean edge, quiet, cheap | Limited to straight lines, hard for thick sheets |
| Table saw | Long, straight cuts, thick sheets | Fast, precise for big jobs | Not for curves, more dangerous |
| Laser cutter | Intricate shapes, clean edges | Very precise, no sanding needed | Expensive, not for home use |
Jigsaw is the best choice for most DIY users, especially for curves and shapes. For very thin sheets or only straight lines, a scoring knife might be easier.
How To Avoid Cracking And Melting
Two of the biggest problems when cutting plexiglass are cracking and melting. Here’s how to prevent each one:
Preventing Cracks
- Don’t overtighten clamps: Too much pressure cracks the sheet.
- Support the sheet well: Especially near the cut.
- Go slow near edges and corners: These are the weakest points.
- Let the blade do the work: Forcing the cut increases the risk.
Avoiding Melting
- Use the right speed: Too slow creates friction and heat.
- Keep the blade moving: Pause if you smell burning.
- Cool with water spray or airflow: This lowers the temperature.
- Check the blade’s sharpness: Dull blades heat up quickly.
Hidden insight: Many people think a slower blade is always better, but in plexiglass, too slow causes melting. Find a middle speed that cuts quickly but smoothly.
Cleaning Up After Cutting
Once your cut is done, you’ll have some dust, tape, and perhaps a little static on your plexiglass. Here’s how to finish the job:
- Peel off the protective film: Do this after sanding, to avoid scratching the surface.
- Wipe with a damp cloth: Remove dust and chips.
- Use anti-static spray: Plexiglass attracts dust. A light anti-static spray or a wipe with a dryer sheet helps keep it clean.
- Polish the edge (optional): For a glass-like edge, use a plastic polish or a buffing wheel.
Pro tip: Never use ammonia-based cleaners (like some window sprays), as they can damage plexiglass. Use only cleaners made for plastic.

Credit: www.wikihow.com
Real-world Examples
Let’s look at a few practical projects where cutting plexiglass with a jigsaw makes sense:
- Replacing a broken window: Measure the opening, cut plexiglass to size, sand edges, and install.
- Custom signs: Trace your design, cut with the jigsaw, then polish the edge.
- Picture frames: Cut to fit your frame exactly, with clean, smooth edges.
- Protective barriers: For shops or offices, cut large sheets for sneeze guards or partitions.
Each of these projects benefits from the jigsaw’s ability to cut curves and shapes, not just straight lines.
Care And Maintenance Of Your Jigsaw
To keep your jigsaw working well for future projects, follow these tips:
- Clean the tool after use: Remove dust and chips from the blade and motor vents.
- Check and replace blades: A dull blade makes rough cuts.
- Lubricate moving parts: Follow the manufacturer’s instructions for oiling.
- Store in a dry place: Plexiglass dust can attract moisture and cause rust.
By taking care of your tools, you’ll get many years of good use and better results on your projects.
When To Replace Your Jigsaw Blade
A sharp blade is key to a clean cut. Here’s how to know when to switch:
- The blade feels dull or slow, even at the same speed.
- You see more melting or chipping than before.
- The blade is bent or missing teeth.
- The cut line is not straight, even with careful guidance.
Don’t try to “get by” with a bad blade—new blades are cheap compared to ruined plexiglass.
Environmental And Health Considerations
Cutting plexiglass creates dust and small plastic pieces. Here’s how to stay safe and reduce waste:
- Collect dust with a vacuum: Don’t sweep it into the air.
- Wear a mask: Especially if you cut a lot of plexiglass.
- Recycle scraps: Check if your local recycling accepts acrylic plastic.
- Dispose of blades safely: Wrap old blades before throwing away.
For more on plastic recycling and safety, you can check the EPA’s advice.
Frequently Asked Questions
What Thickness Of Plexiglass Can A Jigsaw Cut?
Most jigsaws can cut plexiglass up to about 1/2 inch (12 mm) thick with the right blade. For thicker sheets, go slowly and use a new, sharp blade. For sheets thicker than 1/2 inch, a table saw or circular saw might give better results.
Can I Cut Plexiglass Without Cracking It?
Yes. To avoid cracks, support the sheet well, use a fine-tooth blade, and don’t force the cut. Always clamp loosely and avoid overtightening. Use masking tape over the cut line for extra protection.
Why Does My Plexiglass Melt When I Cut It With A Jigsaw?
Melting usually happens when the blade moves too slowly, is too dull, or has large teeth. Increase the speed slightly, use a fine blade, and spray a light mist of water to cool the cut.
Is It Better To Cut Plexiglass With The Protective Film On Or Off?
Always leave the protective film on while cutting. It protects against scratches and chips. Only remove it after you finish sanding and cleaning the edges.
Can I Use A Wood Blade To Cut Plexiglass?
It’s not recommended. Wood blades have large teeth that chip and crack plexiglass. Always use a blade made for plastic or acrylic, with fine teeth and a smooth edge.
Cutting plexiglass with a jigsaw may sound tricky at first, but with the right tools and careful steps, you’ll get great results. Remember to choose the right blade, support your sheet well, and work patiently. Small details like masking tape and edge sanding can make a big difference in your final project. With a bit of practice, you’ll soon be making clean, professional-looking cuts for windows, signs, or any DIY project. If you want even more tips or official advice, check out the manufacturer’s guides or the Wikipedia article on acrylic glass. Happy cutting!