Drilling into tile is a skill that can save you time, money, and frustration during home improvement projects. Whether you’re mounting shelves in the bathroom, installing a towel rack, or hanging art in your kitchen, knowing how to drill into tile without cracking or damaging it is essential.
Many people fear this task, thinking they will break expensive tiles or make unsightly holes. The good news is, with the right tools, techniques, and preparation, you can confidently drill into tile and get professional results—even if you’re a beginner.
This guide will walk you through everything you need to know. You’ll learn about the different types of tiles, which tools to use, step-by-step instructions, and expert tips that most beginners miss. By the end, you’ll be ready to tackle your next tiling project with ease and avoid the most common mistakes.
Understanding Tile Types
Before you start, it’s important to know what kind of tile you have. Different tiles need different approaches. The hardness and thickness of your tile will affect how you drill and which tools you need.
Common Tile Materials
1. Ceramic
Ceramic tiles are popular and widely used in kitchens and bathrooms. They are made from clay and fired in a kiln. Ceramic tiles are softer compared to other types, which makes them easier to drill.
2. Porcelain
Porcelain is a type of ceramic, but it’s denser and less porous. Porcelain tiles are very hard and durable, making them more challenging to drill.
3. Stone (marble, Granite, Slate, Etc.)
Natural stone tiles are beautiful and unique. They can be thick and very hard, especially granite. Drilling into stone tiles takes patience and the right tools.
4. Glass Tile
Glass tiles are often used for backsplashes and decorative walls. They are fragile and crack easily, so extra care is needed.
Why Tile Type Matters
Each tile type has its own challenges. For example, a standard masonry drill bit works for ceramic, but not for porcelain or stone. Knowing your tile type helps you choose the right drill bit and technique, reducing the risk of damage.
Tools And Materials You Will Need
Having the right equipment is half the battle. Here’s what you need for a safe and clean job:
- Electric drill (variable speed is best)
- Drill bits for tile (carbide-tipped for ceramic, diamond-tipped for porcelain/stone/glass)
- Masking tape or painter’s tape
- Marker or pencil
- Safety goggles
- Dust mask
- Spray bottle with water (for cooling)
- Hammer and nail (for marking, optional)
- Vacuum or brush (for cleaning debris)
- Wall plugs/anchors and screws (for mounting)
- Level (to ensure straight holes)
If you’re drilling into a wall behind the tile, you may also need a stud finder to avoid wires or pipes.
Choosing The Right Drill Bit
One of the most important steps is selecting the correct drill bit for your tile. Using the wrong bit will make the job harder and may ruin the tile.
| Tile Type | Recommended Drill Bit | Notes |
|---|---|---|
| Ceramic | Carbide-tipped masonry bit | Affordable, good for soft tiles |
| Porcelain | Diamond-tipped drill bit | Needed for hard, dense tiles |
| Stone (Marble, Granite) | Diamond-tipped drill bit | Prevents cracks in thick stone |
| Glass | Diamond-tipped or glass/tile bit | Low pressure and cooling required |
Diamond-tipped bits are more expensive, but they last longer and work on most tile types.
Preparing To Drill: Safety And Planning
Rushing into drilling can cause costly mistakes. Take a few minutes to prepare for best results.
Safety First
Always wear safety goggles to protect your eyes from flying chips. A dust mask is smart, especially when drilling into stone or porcelain, as fine dust can be harmful. If you’re drilling on a wall, check for electrical wires or pipes behind the tile using a stud finder.
Planning The Hole
Mark the exact spot where you want to drill. Use a pencil or marker that’s easy to see. Remember, tile is slippery, and the drill bit can wander. To prevent this, place a piece of masking tape over the spot and mark on the tape. The tape gives your drill bit extra grip and keeps it from sliding.
Avoiding Tile Edges And Grout Lines
Drilling too close to the edge of a tile or into a grout line increases the risk of cracking. Aim to drill at least 1.5 cm (about 0.6 inches) away from the edge. Stay within the main body of the tile for best results.

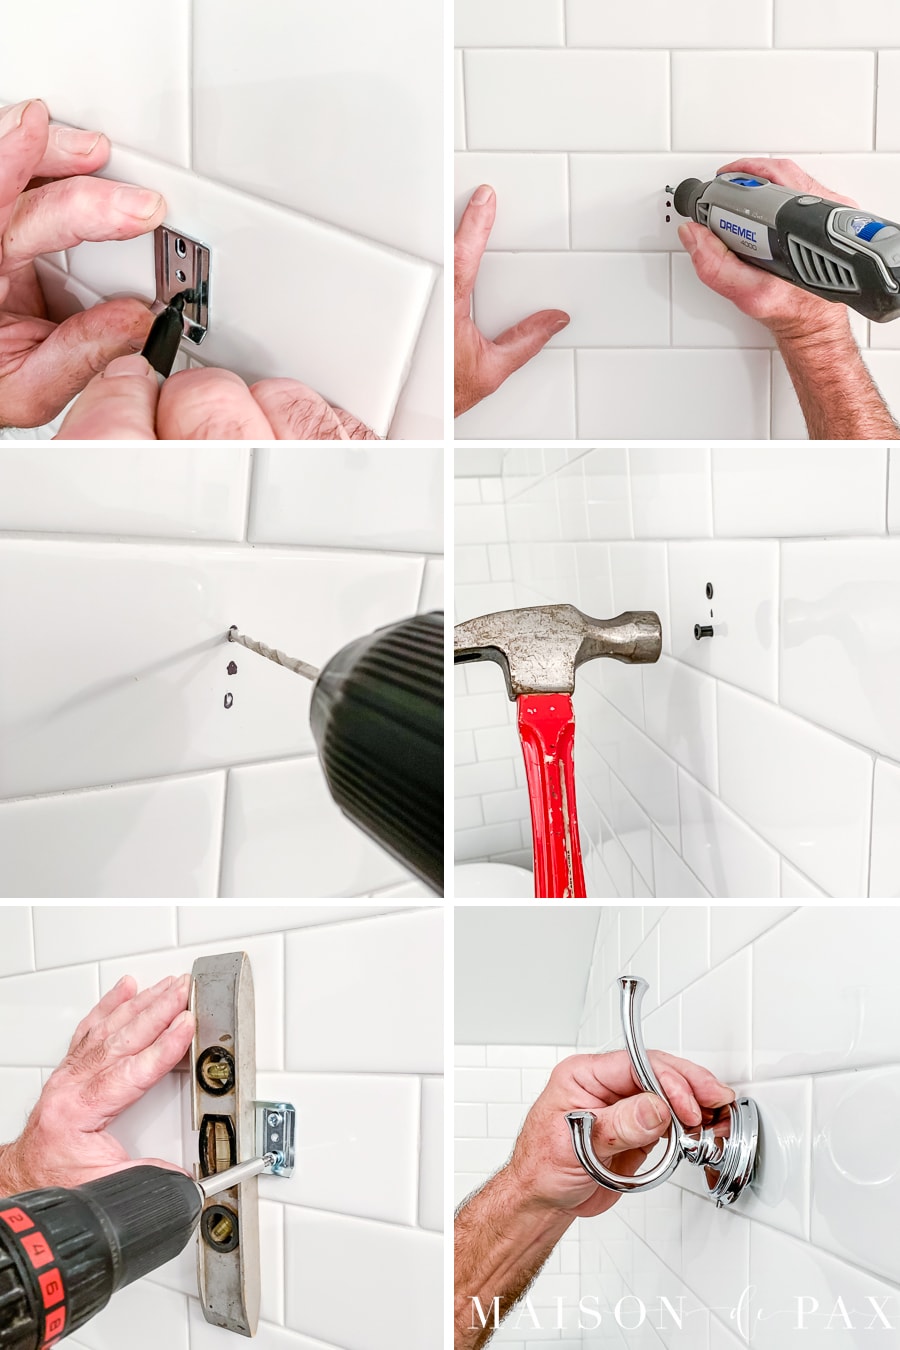
Step-by-step: How To Drill Into Tile
Now let’s go through the process step by step. Take your time, and don’t rush—patience is key.
1. Select And Fit The Correct Drill Bit
Choose the correct drill bit for your tile type. Insert it into your electric drill and tighten securely.
2. Mark The Drilling Spot
Use a pencil to mark the spot. Place a small piece of masking tape over the mark and redraw it on the tape. The tape will help prevent bit slippage.
3. Set Drill To Low Speed
Set your drill to the lowest speed setting. High speed can overheat the bit and crack the tile.
4. Start Drilling Gently
Hold the drill at a 90-degree angle to the tile. Start drilling gently, letting the bit score the surface. Apply only light pressure and let the drill do the work.
5. Use Water For Cooling
Drilling generates heat, especially with hard tiles. Have a spray bottle or a small cup of water nearby. Spray or pour a bit of water onto the drill bit as you work. This cools both the bit and the tile, which helps prevent cracks.
6. Increase Pressure Slowly
Once the bit has made a small indentation, you can increase pressure a little. Do not force the drill—steady, gentle pressure is safer and more effective.
7. Drill Through The Tile
Continue drilling until you feel the bit pass through the tile. You may notice a slight drop in resistance. If you need to drill into the wall behind the tile, switch to a standard masonry bit for the wall material (brick, drywall, etc.).
8. Clean Up
Remove any dust with a vacuum or brush. Peel off the tape. Insert a wall plug or anchor, and your hole is ready for mounting.
Special Techniques For Different Tile Types
Not all tiles are the same. Some need extra care or a slightly different approach.
Drilling Porcelain Tiles
Porcelain is much harder than regular ceramic, so you must use a diamond-tipped drill bit. Cooling is essential—keep the bit wet at all times to avoid overheating and early wear. Porcelain also takes longer to drill, so patience is even more important. Avoid using a hammer drill setting, as this can shatter porcelain.
Drilling Glass Tiles
Glass tiles crack easily. Use a diamond-tipped or glass/tile drill bit and very light pressure. Always start with a small pilot hole before widening it. Keeping the area wet is critical—consider placing a damp sponge under the tile to provide constant cooling.
Drilling Stone Tiles
Natural stone tiles like marble or granite are tough. Use only high-quality diamond-tipped bits and plenty of water for cooling. Take frequent breaks to let the bit cool down. Stone tiles can be expensive to replace, so double-check your measurements before drilling.
Drilling Over Existing Holes Or Damaged Areas
If you need to drill near a crack or an old hole, reinforce the area with extra masking tape and use a fresh drill bit. Move slightly away from the old damage if possible.
Mounting And Anchoring In Tile
Once you’ve drilled your hole, you must use the right hardware for a secure fit.
Wall Plugs And Anchors
Most mounting jobs require wall plugs or anchors. These spread out the force and prevent screws from pulling out or damaging the tile.
| Plug/Anchor Type | Best For | Notes |
|---|---|---|
| Plastic wall plug | Light shelves, towel racks | Common and easy to use |
| Toggle bolt | Heavy loads, thick walls | Spreads weight over large area |
| Metal anchor | Medium to heavy loads | Strong, but needs larger hole |
| Expansion anchor | Medium loads | Expands inside wall cavity |
The right anchor depends on the weight of what you’re mounting and the wall behind the tile.
Installing Screws
Once the plug or anchor is in place, insert your screw. Tighten slowly and avoid over-tightening, as this can crack the tile.
Common Mistakes (and How To Avoid Them)
Even experienced DIYers make mistakes when drilling into tile. Here are the most common problems, and how to avoid them:
1. Using The Wrong Drill Bit
Always use a bit designed for your tile type. For example, a regular masonry bit will not work on porcelain.
2. Drilling At High Speed
High speed creates heat and cracks. Low speed is safer.
3. Skipping Cooling
Not cooling the bit can cause tiles to crack and bits to wear out fast.
4. Not Using Tape
Without tape, the bit can slip and scratch the tile.
5. Drilling Too Close To The Edge
This often leads to chips or cracks. Stay at least 1. 5 cm from the edge.
6. Not Checking Behind The Tile
Drilling into a water pipe or wire is dangerous. Always check first.
7. Forcing The Drill
Let the drill do the work. Forcing it can break the tile or the drill bit.
8. Using The Hammer Setting
Hammer drills can shatter tile. Always use the regular drill mode.
Advanced Tips And Insights
Some techniques can make your drilling easier, safer, and more professional.
Start With A Small Pilot Hole
For thick or hard tiles, start with a small pilot hole using a 3-4 mm bit. Then, switch to a larger bit for the final hole size. This reduces stress on the tile.
Use A Guide For Precision
If you need many holes in a straight line, use a drilling guide or a wooden template. This keeps your holes even and prevents mistakes.
Keep Your Bit Sharp
A dull drill bit can overheat and cause cracks. Replace bits regularly, especially when working with porcelain or stone.
Wet Sponge Technique
For glass or porcelain, place a wet sponge under the drill spot. This keeps the area cool and catches dust.
Vacuum Attachment
Some drills have a vacuum attachment to collect dust as you drill. This keeps your workspace clean and improves visibility.
Test On A Spare Tile
If possible, practice on a spare tile before drilling your actual wall. This helps you get a feel for the process and adjust technique.
Use The Right Pressure
A key insight: too much pressure is a common beginner mistake. Gentle, steady pressure is always better. If you feel resistance, stop and let the bit cool.
Know When To Call A Pro
If you’re drilling into expensive stone, very large tiles, or in a high-risk area (near electrical or water), it may be worth consulting a professional. Mistakes in these situations can be costly.
Cleaning Up After Drilling
Drilling into tile creates dust and small chips. Cleaning up is important for both safety and appearance.
- Use a vacuum to collect dust right after drilling
- Wipe the area with a damp cloth to remove fine residue
- Inspect the hole for cracks or chips before mounting hardware
If you chipped the tile edge, you can sometimes smooth it with a fine sandpaper or a tile file.
Real-world Examples
Example 1: Installing A Bathroom Towel Rack
Maria wanted to install a towel rack on her ceramic-tiled bathroom wall. She marked the spots, used masking tape, and drilled slowly with a carbide-tipped bit. By keeping the bit cool with a spray bottle, she made clean holes without cracks.
She used plastic wall plugs and stainless steel screws. The result was a sturdy towel rack and no visible damage.
Example 2: Mounting Shelves On A Porcelain Kitchen Backsplash
John needed to mount small shelves on his porcelain tile backsplash. He tried with a masonry bit but quickly realized it wouldn’t cut. He switched to a diamond-tipped bit, added a wet sponge for cooling, and drilled slowly. By starting with a pilot hole, he avoided chipping and made two perfect holes for wall anchors.
Drilling Into Tile: Data And Statistics
Drilling into tile is a common DIY task. According to a 2022 home improvement survey, over 68% of homeowners have attempted to mount something on tiled surfaces. Of those, nearly 40% reported cracking at least one tile due to improper technique or tools.
The most common causes of tile damage were:
- Using the wrong drill bit (52%)
- Drilling too fast (25%)
- Not cooling the bit (15%)
- Drilling too close to tile edges (8%)
These numbers show that careful planning and correct tools make a big difference.
Environmental And Cost Considerations
Damaging tile during drilling not only increases cost (tile replacement, labor), but also creates waste. Replacing just one tile can cost $15–$50 or more depending on type and labor. By using the right technique, you avoid extra expenses and reduce material waste.
If you plan to drill often, investing in a diamond-tipped drill bit can save you money long-term. For example, a good quality bit costs around $10–$20, but can last through dozens of holes in porcelain or stone.

Frequently Asked Questions
What Is The Best Drill Bit For Porcelain Tiles?
The best drill bit for porcelain tiles is a diamond-tipped drill bit. Porcelain is very hard and dense, and regular masonry bits will not work. A diamond-tipped bit can cut smoothly without cracking the tile.
Can I Use A Regular Drill For Tile, Or Do I Need A Special One?
A standard electric drill works for tile, as long as it has variable speed and you use the correct drill bit. Avoid using the hammer drill setting, as it may damage the tile.
How Do I Stop The Drill Bit From Slipping On The Tile?
Place a piece of masking tape over the drilling spot before you start. The tape gives the drill bit extra grip and prevents it from sliding on the smooth tile surface.
What Should I Do If The Tile Cracks While Drilling?
If the tile cracks, stop immediately. Remove any loose pieces and check if the crack is minor or major. For small cracks, you can continue and cover with hardware. For major cracks, you may need to replace the tile.
Is It Safe To Drill Into Tiles In Wet Areas, Like Bathrooms?
Yes, it is safe if you take precautions. Always check for water pipes or wires behind the tile with a stud finder. Use proper anchors, and seal around holes if needed to prevent moisture from seeping in.
Final Thoughts
Drilling into tile is not as scary as it seems. With the right preparation, tools, and technique, anyone can do it—without cracked tiles or frustration. Remember to:
- Identify your tile type
- Choose the correct drill bit
- Use masking tape and mark carefully
- Drill slowly and keep things cool
- Use proper anchors for mounting
The extra time you spend planning and working carefully will always pay off. For more detailed information about tile drilling and safe DIY practices, you can visit Family Handyman.