Hammering in tight spaces can feel impossible. Your hand can’t fit. The hammer barely moves. Each swing risks a smashed finger or a dented wall. Many people avoid these jobs or try risky shortcuts, making mistakes that can ruin a project or even cause injury.
But with the right methods and tools, you can hammer nails or fasteners almost anywhere—between studs, behind pipes, inside narrow frames, or under cabinets. This guide will show you how to hammer in tight spaces with confidence, giving you practical techniques, smart tool choices, and expert tips.
Whether you’re a beginner or an experienced DIYer, you’ll find solutions for almost every awkward spot.
Why Hammering In Tight Spaces Is Challenging
Tight spaces create several problems for hammering:
- Limited swing space: You can’t move the hammer in a full arc.
- Poor visibility: Shadows or obstacles make it hard to see the nail.
- Awkward angles: The nail is often at a bad angle or hidden behind something.
- Risk of damage: It’s easy to miss and hit the surrounding area.
- Hand fatigue: Awkward positions make your hand and wrist tired quickly.
Most people try to use a standard hammer and hope for the best. But this usually leads to bent nails, damaged surfaces, and frustration. Understanding these challenges is the first step to overcoming them.
Essential Tools For Hammering In Tight Spaces
The right tools make a huge difference. Some are designed for confined areas, while others can be adapted for small spaces.
1. Short-handled Hammers
A stubby hammer or trim hammer has a much shorter handle than normal. This makes it easier to swing in cramped areas. These hammers are often lighter, so you have less power, but more control.
- Typical handle length: 6–10 inches
- Head weight: 7–12 oz
2. Claw Hammers With Curved Claws
A standard claw hammer with a more curved claw can reach behind obstacles to pull nails or adjust position. The curved design is especially useful if you need to remove or reposition nails in corners.
3. Tack And Upholstery Hammers
These are small, lightweight hammers used for delicate or small fasteners. The small face helps you aim more precisely in tight spots.
4. Magnetic Nail Holders
These tools hold the nail in place so you don’t need your fingers near the striking area. Some hammers have a built-in magnetic slot. There are also standalone holders for reaching into deep or narrow spots.
5. Nail Sets And Punches
A nail set is a small steel rod used to drive the head of a nail below the wood surface. In tight areas, you can start the nail with a hammer, then finish driving it with a nail set and lighter taps.
6. Right-angle Hammers
A right-angle hammer looks like a small hammerhead mounted at 90 degrees to a short handle. This lets you strike from the side instead of swinging up and down.
7. Specialty Mallets
Rubber or plastic mallets with short handles are sometimes used when you need softer blows, for example, assembling furniture in a small space.
8. Extension Nail Drivers
These tools let you start a nail with a hammer, then finish it by striking the end of the driver, which transmits force to the nail head in hard-to-reach areas.
9. Mini Sledgehammers
In rare cases where you need extra power in a short swing, a mini sledgehammer with a 6–10 inch handle can help.
10. Power Nailers
Pneumatic or battery-powered nail guns can drive nails in places a hammer simply cannot reach. Some models are designed for tight corners or narrow gaps.
11. Specialty Pliers
Needle-nose or locking pliers can hold nails in place when your fingers won’t fit. This is especially useful for small brads or finish nails.
Insight: Many beginners overlook the usefulness of a magnetic nail holder or nail set. These tools can be the difference between frustration and success in tight spaces.

Preparing The Workspace
Before you start hammering, take a few minutes to prepare:
- Clear the area of dust, debris, or anything that could interfere.
- Plan your approach: Know exactly where the nail should go and what angle is best.
- Check for hidden obstacles: Pipes, wires, or fasteners behind the surface can cause problems.
- Mark the spot clearly with a pencil or marker.
- Gather all needed tools before you begin. You don’t want to be halfway through and realize you need a different hammer.
Techniques For Hammering In Tight Spaces
Experience teaches that there is no single “best way” for all situations. But these proven methods will help you work smarter, not harder.
Using A Short-handled Hammer
Short-handled hammers are the go-to tool for cramped spots. Hold the hammer near the end of the handle for better control. Take short, controlled swings, focusing on accuracy instead of power. If possible, start the nail by hand or with a few gentle taps.
Example: When installing trim behind a toilet, a stubby hammer allows you to drive finishing nails without hitting the plumbing.
Starting Nails With A Magnetic Holder
Place the nail in the magnetic slot, then position the hammer head and nail at the target spot. Give a gentle tap to set the nail. Once the nail is started, remove the holder (if needed) and continue hammering.
Tip: Magnetic holders are extremely useful for overhead work or where fingers can’t fit.
Driving Nails With A Nail Set
- Start the nail with your hammer, as far as space allows.
- When the hammer can’t swing further, place the nail set on the nail head.
- Strike the end of the nail set with your hammer. The force transfers to the nail, driving it deeper.
- Repeat until the nail is flush or below the surface.
This method lets you finish driving nails even when you can’t reach the head directly.
Using Needle-nose Pliers
Hold the nail in the jaws of the pliers, positioning it exactly where you want to start. Tap the nail gently to set it. Once the nail is started, remove the pliers and continue hammering.
Non-obvious insight: Needle-nose pliers can also help straighten bent nails in tight areas, where fingers would be too big.
Striking At An Angle
If you can’t hit the nail head squarely, strike at a slight angle. This is less efficient, but sometimes necessary. Be extra careful to avoid bending the nail. Use lighter, faster taps instead of heavy blows.
Right-angle Hammer Technique
Hold the short handle and swing the head sideways, using the 90-degree angle to strike the nail. This allows you to drive nails behind pipes, inside frames, or in other hard-to-reach places.
Extension Nail Drivers
Start the nail as usual. When the hammer can’t reach, place the extension driver on the nail head. Strike the end of the driver with your hammer. The force travels down the driver to finish setting the nail.
Using A Power Nailer
Select a compact or angled nail gun, designed for small spaces. Hold the nose of the tool firmly against the work surface, aim, and fire. Always check the manufacturer’s safety instructions and use protective gear.
Example: Installing baseboard in a closet corner is fast and easy with a battery-powered brad nailer.
Tapping With A Mallet
For delicate surfaces or when you need softer blows, a rubber mallet is safer than a steel hammer. Use short, controlled taps. This is ideal for assembling furniture inside cabinets or other confined spaces.
How To Choose The Right Tool For Each Situation
Selecting the best tool depends on the space, the material, and the type of fastener.
| Situation | Best Tool | Why |
|---|---|---|
| Behind a pipe | Right-angle hammer or nail set | Allows sideways or indirect striking |
| Inside a narrow cabinet | Stubby hammer or magnetic holder | Short handle and precise control |
| High, overhead spot | Magnetic holder or power nailer | Safer, keeps fingers away |
| Finishing trim | Nail set and small hammer | Prevents damage to wood |
Tip: For nails longer than 2 inches, start by hand, then use a nail set or extension driver. For small brads, a magnetic holder is the safest choice.
Step-by-step Guide: Hammering In A Tight Space
Let’s go through a real-world example—nailing trim inside a narrow closet.
- Select your tools: Stubby hammer, magnetic nail holder, nail set, needle-nose pliers.
- Mark the nail location: Use a pencil for accuracy.
- Hold the nail: Use a magnetic holder or pliers to position the nail.
- Start the nail: Tap gently with the stubby hammer.
- Switch tools if needed: If the handle can’t swing, use a nail set to finish.
- Check your work: Make sure the nail is straight and flush.
- Repair any dings: Use wood filler if you accidentally dent the trim.
Insight: Many people try to hammer with the side of the hammer head. This works in an emergency but can damage the tool and surface. Always use the face of the hammer or switch to a nail set.
Mistakes To Avoid When Hammering In Tight Spaces
Even experienced DIYers make errors in tight spots. Here’s what to watch for:
- Using the wrong hammer: Standard hammers are too long for confined areas.
- Not using a holder: Trying to start small nails with fingers can lead to injury.
- Swinging too hard: Heavy blows in small spaces often result in bent nails or broken material.
- Ignoring nearby surfaces: It’s easy to hit the wall, pipe, or trim by mistake.
- Not checking for hidden hazards: Accidentally driving a nail into a wire or pipe can be dangerous and expensive.
- Forgetting to pre-drill: For hardwood or delicate surfaces, always drill a pilot hole first.
Pro tip: If the nail keeps bending, try a slightly larger nail or a sharper-pointed nail. Weak nails are more likely to bend when struck at an angle.
Safety Tips For Confined Hammering
Safety is often overlooked in small jobs. But the risk of injury is higher when your hands are close to the action or your vision is blocked.
- Wear safety glasses: Protect your eyes from flying debris.
- Use gloves: Thin gloves can protect fingers without reducing grip.
- Keep your other hand clear: Use holders or pliers, not your fingers.
- Check tool condition: Make sure hammer heads are tight and not cracked.
- Work slowly: Rushing increases the chance of mistakes and injuries.
When To Use A Power Tool Instead
Some jobs are simply too awkward for any hammer. A power nailer can save time and prevent damage. Use a battery-powered or pneumatic nailer for:
- Nailing into corners where no hammer can reach
- Fastening overhead or under floorboards
- Driving many nails quickly in a confined space
Drawback: Power nailers cost more and require setup, but they are worth it for repeated or difficult tasks.
Alternatives To Hammering In Tight Spaces
Sometimes, another fastening method is better. Consider these options:
Adhesive Fasteners
Strong construction adhesives can join trim or lightweight materials without nails. This avoids the need for hammering in tight areas.
Screws With Right-angle Drivers
Self-tapping screws and a right-angle screwdriver let you fasten parts where a hammer won’t fit. This is slower but gives a very secure hold.
Specialty Hardware
For cabinets or furniture, special brackets or clips can replace nails. These are designed for assembly in tight spots.
Professional Tips For Perfect Results
From years of experience, here are some secrets the pros use:
- Pre-bend the nail slightly: For awkward angles, a small bend at the tip helps drive the nail in straight.
- Use masking tape: Place tape over the target spot to reduce splitting and help guide the nail.
- Wax the nail: Rubbing the nail with wax or soap makes it drive easier, especially in hardwoods.
- Light tapping is better: Do not try to “force” the nail; gentle, repeated taps give more control.
- Keep a small mirror nearby: This lets you see around corners or behind obstructions to check your work.
Comparing Hammering Methods In Tight Spaces
It helps to see how different tools and methods stack up for common jobs.
| Method | Space Required | Skill Level | Risk of Damage | Common Uses |
|---|---|---|---|---|
| Stubby hammer | Small | Easy | Low | Trim, furniture, repairs |
| Nail set | Very small | Medium | Very low | Finishing work, tight corners |
| Right-angle hammer | Minimal | Medium | Low | Behind pipes, frames |
| Power nailer | Small to medium | Easy | Low | Quick fastening, repetitive work |
| Adhesive fastener | None | Easy | Very low | Trim, lightweight materials |
Real-world Examples: Hammering In Tight Spaces
Under Kitchen Cabinets
When installing a kickboard or trim under cabinets, space is very limited. A stubby hammer or magnetic holder is essential. Mark your nail locations before sliding the trim into place. Start each nail, then use a nail set to finish.
Between Wall Studs
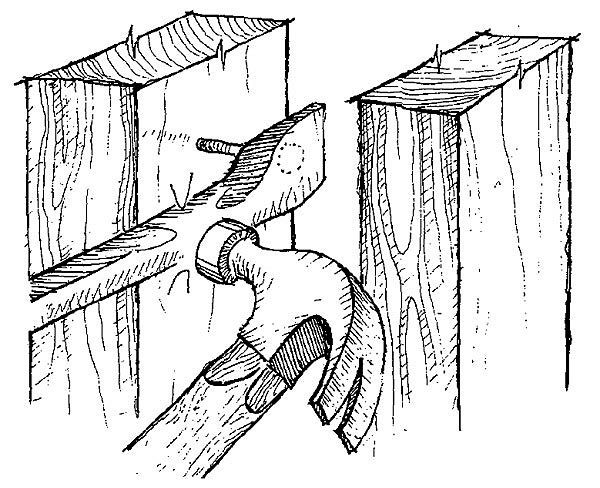
Running electrical wires or fixing insulation sometimes requires nailing between closely spaced studs. Use a right-angle hammer or an extension nail driver. Always check for hidden wires before hammering.
Inside Furniture Frames
Furniture repairs often call for nailing inside a small frame. Use needle-nose pliers to hold the nail and a lightweight hammer. If the wood is hard, pre-drill a small hole to prevent splitting.
Tight Corners For Baseboards
Baseboards in closet corners or behind radiators are tough. A battery-powered brad nailer or a nail set is usually the best choice. Move slowly and check your alignment often.
Overhead Joists
When working overhead, a magnetic holder reduces the risk of dropping nails. If the space is too small, a right-angle hammer may help. Wear safety glasses to protect against falling debris.
How To Fix Mistakes
Mistakes happen, even to professionals. Here’s how to fix common problems:
- Bent nail: Use needle-nose pliers to straighten, or pull it out and start again.
- Dented wood: Fill dents with wood filler, let dry, then sand smooth.
- Missed target: If the nail goes in at the wrong angle, pull it out and fill the hole.
- Split wood: Stop hammering, apply glue, clamp until dry, and start over with a new nail, using a pilot hole.
Non-obvious insight: Wood filler can also be used to hide nail holes in finished trim, making repairs almost invisible.
Advanced Tips For Experts
If you do this kind of work often, consider customizing your tools:
- Cut down a standard hammer handle for a custom fit in your toolbox.
- Attach a small flashlight to your hammer or wrist for better visibility.
- Make your own extension driver from a steel rod.
- Sharpen nail points with a file for easier starts in hardwood.
Experts often collect several specialty hammers and holders. Over time, you’ll learn which works best for each type of job.
Frequently Asked Questions
What’s The Best Hammer For Tight Spaces?
A stubby hammer or a trim hammer is usually best. They have short handles and are easier to control in small areas. For very tight spots, a right-angle hammer or a nail set can help you finish the job safely.
How Can I Avoid Bending Nails In Small Spaces?
Use lighter, more controlled taps. Start with a sharp-pointed nail and, if possible, drill a small pilot hole. If the nail keeps bending, try a slightly thicker or shorter nail.
Are Power Nailers Safe For Tight Spaces?
Yes, if used properly. Always follow the manufacturer’s safety instructions, keep your hands clear, and wear safety glasses. Power nailers are especially helpful for corners and repetitive tasks.
Can I Hammer Sideways In A Tight Spot?
Yes, with a right-angle hammer or by carefully tapping with the side of the hammer head. However, using the side of a normal hammer can damage the tool, so use a nail set or a driver if possible.
Where Can I Find Specialty Tools For Tight-space Hammering?
Most hardware stores carry stubby hammers, nail sets, and magnetic holders. For more unique tools, check online retailers or specialty tool shops. For more information, visit This Old House.
Final Thoughts
Hammering in tight spaces is a skill that improves with practice and the right tools. Don’t be afraid to try new methods or invest in a specialty hammer—you’ll save time, avoid frustration, and achieve cleaner results. Remember, safety comes first, and patience is your best friend in confined areas.
The next time you face a tough-to-reach nailing job, you’ll know exactly what to do and which tool to grab. Happy hammering!