Hanging a pegboard on a concrete wall can transform any garage, basement, or workspace. With a well-installed pegboard, you unlock efficient organization, easy tool access, and a cleaner environment. However, the process is not as simple as screwing a board into wood.
Concrete is tougher and unforgiving, but with the right method and tools, you can make your pegboard both secure and long-lasting. Many beginners worry about drilling into concrete, choosing the wrong hardware, or ending up with a wobbly board. This guide will walk you through every step, from choosing your materials to final safety checks.
Along the way, you’ll find tips only experienced DIYers know and practical advice for avoiding common mistakes.
Why Hang Pegboard On A Concrete Wall?
Concrete walls are common in garages, basements, and utility rooms, where storage is often needed most. Unlike drywall, concrete provides exceptional support for heavy items—if you use the proper anchors and installation method. The main reasons people choose to hang a pegboard on concrete include:
- Maximizing vertical storage: Pegboards help organize tools, craft supplies, or cleaning equipment without taking up floor space.
- Durability: Concrete is stronger than drywall, so your pegboard can hold more weight when properly anchored.
- Aesthetic improvement: A well-placed pegboard tidies up cluttered spaces, making them more inviting and efficient.
Some people worry that concrete is too hard or risky for DIY projects. In reality, the right tools and planning make the job straightforward even for those with limited experience.
Tools And Materials Needed
Gathering the correct materials and tools before you start makes the entire process smoother. Here’s what you’ll need:
Essential Tools
- Hammer drill: Standard drills struggle with concrete. A hammer drill makes holes quickly and safely.
- Masonry drill bits: These are designed for drilling into concrete and won’t burn out like wood or metal bits.
- Screwdriver (manual or powered): For driving screws into anchors.
- Tape measure: For precise measurements.
- Pencil or chalk: To mark drilling locations.
- Level: Ensures your pegboard hangs straight.
- Safety glasses: Protects your eyes from concrete dust.
- Dust mask: Prevents inhalation of fine particles.
- Vacuum or brush: For cleaning up dust after drilling.
Hardware And Fasteners
- Concrete anchors: Expansion anchors or sleeve anchors work best. Their size depends on the pegboard’s weight and size.
- Screws: Should match anchor size and be long enough to pass through pegboard and furring strip (if used) into the anchor.
- Washers: Distribute pressure and prevent pegboard damage.
Pegboard And Mounting Materials
- Pegboard panel: Common sizes are 2×4 feet or 4×8 feet. Consider thickness for heavier loads.
- Furring strips (optional but recommended): Wooden strips (usually 1×2 inches) create a gap between the wall and pegboard so pegs fit properly.
Common Pegboard Sizes
| Pegboard Size (feet) | Best For | Max Load (approx.) |
|---|---|---|
| 2×4 | Small tool areas | 30 lbs |
| 4×4 | Medium workshops | 50 lbs |
| 4×8 | Large garages | 80 lbs |
Pro tip: Beginners often forget furring strips. Without them, you can’t insert or move hooks, as the pegboard will sit flush against the wall.
Planning Your Pegboard Layout
Taking time to plan your layout avoids frustration later. Here’s what you should do before you drill:
- Choose the location: Find a spot with enough wall space and easy access. Avoid areas with water pipes or electrical lines.
- Measure the wall: Use a tape measure to ensure your pegboard will fit. Mark the top and bottom edges with a pencil.
- Mark anchor points: Plan for at least four anchor points for a 2×4 foot board, six or more for larger boards.
- Consider the gap: If using furring strips, mark their placement as well. Space them evenly for stability.
Insight: Most people only plan for the pegboard size, not for what will hang on it. Lay out your largest tools or items on the floor in front of the wall to see if everything will fit as you imagine.
Preparing The Concrete Wall
Concrete can be dusty, oily, or uneven. Preparing the surface helps anchors grip well and ensures your pegboard hangs flat.
Steps For Wall Preparation
- Clean the wall: Remove dust, dirt, or grease with a stiff brush or vacuum.
- Check for moisture: Concrete can absorb water. If the wall feels damp, use a dehumidifier or wait for it to dry.
- Inspect for cracks: Small cracks are usually fine, but avoid installing anchors in large cracks or crumbling areas.
Non-obvious tip: If the wall is very rough, consider patching high spots with concrete patch so the pegboard doesn’t rock back and forth.
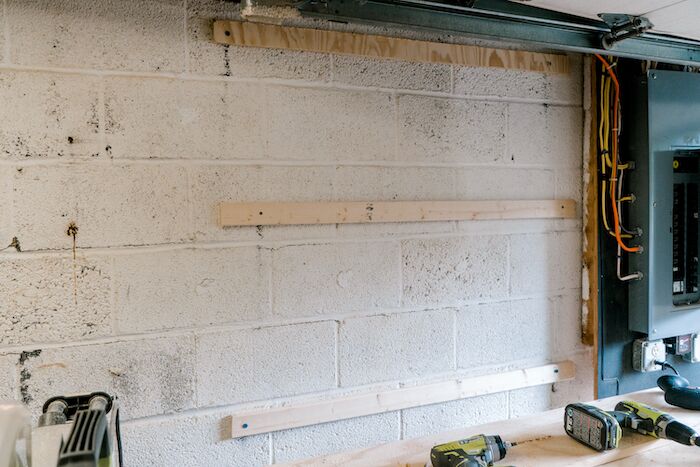
Installing Furring Strips (optional But Strongly Recommended)
Furring strips are thin wooden boards attached to the concrete before the pegboard. They create a gap so hooks and pegs can be inserted and moved.
Why Use Furring Strips?
- Prevents pegboard damage: Peg hooks need space behind the board.
- Adds stability: Distributes weight over a larger area.
- Easier installation: Wood is easier to screw into than concrete.
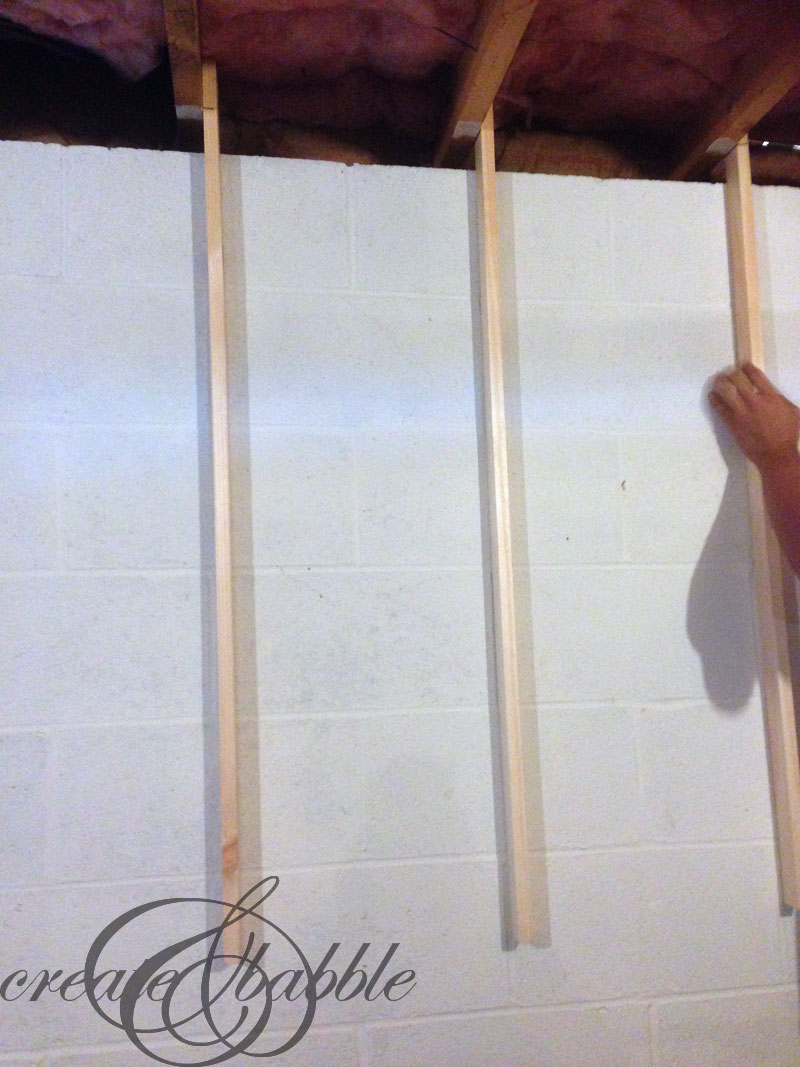
How To Install Furring Strips
- Cut strips to length: Use a saw to match the length of your pegboard.
- Mark locations: Place one strip at the top, one at the bottom, and one in the center for boards taller than 3 feet.
- Drill holes in strips: Pre-drill holes through the strips for screws. This makes it easier to attach to concrete.
- Hold strip against wall: Use a level to ensure it’s straight.
- Mark wall through holes: With the strip in place, mark the wall for anchor locations.
- Drill into concrete: Use a hammer drill and masonry bit slightly smaller than your anchors.
- Insert anchors: Tap them gently into the holes.
- Attach strips: Screw through the furring strip into the anchor, making sure the strip is tight to the wall.
Note: Do not overtighten screws, or you may split the furring strip.
Drilling Into Concrete: Safety And Technique
Drilling into concrete can be intimidating, but with the right approach, it’s safe and manageable.
Steps For Drilling
- Wear safety gear: Always use eye protection and a dust mask.
- Select drill bit: Match the bit size to your anchor.
- Mark your drill depth: Place a piece of tape on the bit to show how deep to drill.
- Start drilling: Begin at a low speed to create a guide hole, then increase speed. Keep steady pressure but do not force the drill.
- Clear dust: Pull the bit out occasionally to remove debris. A vacuum helps keep holes clean.
- Check hole depth: Make sure the hole is deep enough for the anchor.
Expert tip: Many new DIYers push too hard, causing the bit to overheat. Let the hammer drill do the work.
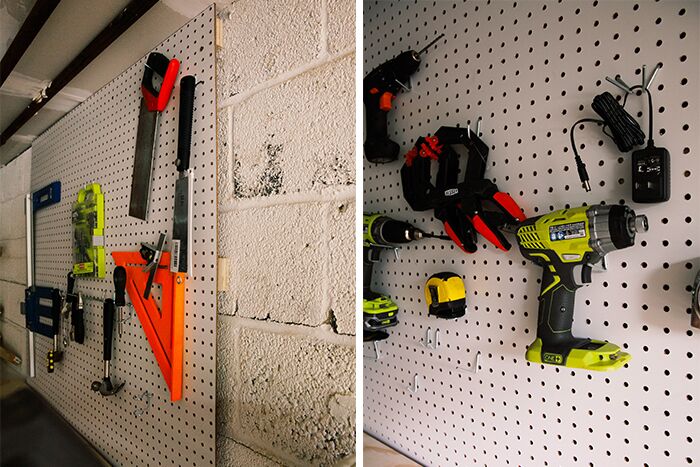
Attaching The Pegboard To The Wall
Once your furring strips (or direct anchors) are in place, it’s time to mount the pegboard.
Mounting Steps
- Position the pegboard: With help, hold the pegboard up to the furring strips or wall. Double-check alignment with a level.
- Mark screw locations: Aim for the center of the furring strips or directly over anchors.
- Drill pilot holes: Use a wood bit if attaching to furring strips, masonry bit for direct-to-concrete.
- Add washers to screws: Washers spread out the pressure and prevent the pegboard from cracking around the screw.
- Drive in screws: Tighten until snug, but do not overtighten. The board should be secure but not warped.
Hidden insight: If your pegboard feels loose after attaching, check that screws are going into solid furring strips or properly set anchors—not just into the pegboard itself.
Checking For Stability And Adjustments
Your pegboard should not move, rattle, or bow out from the wall.
- Press on different areas: The board should not flex.
- Check all screws: Tighten any that feel loose.
- Hang a few tools: Test with heavier items first, and watch for any sign of shifting.
Advanced tip: For extra-heavy loads, use additional anchors or a second row of furring strips behind the main weight zones.
Common Mistakes And How To Avoid Them
Many first-time installers run into predictable problems. Here’s what to watch out for:
- Skipping furring strips: Causes hooks to not fit and may break your pegboard.
- Using the wrong anchors: Plastic drywall anchors will pull out of concrete. Use masonry-specific types.
- Misaligning holes: Always measure and mark carefully. A crooked pegboard is hard to fix.
- Drilling too shallow: Anchors will not hold if holes are not deep enough.
- Not cleaning dust from holes: Dust prevents anchors from gripping. Use a vacuum or squeeze bulb.
- Overtightening screws: Can crack the pegboard or strip the anchor.
- Ignoring wall moisture: Wet concrete weakens anchor grip and can damage the pegboard over time.
Types Of Anchors For Concrete Walls
Selecting the right anchor is key to a strong installation. Here’s a comparison of common options:
| Anchor Type | Strength | Ease of Use | Best For |
|---|---|---|---|
| Expansion anchor | High | Medium | Heavy pegboards |
| Sleeve anchor | Very High | Hard | Extra-heavy loads |
| Tapered plastic anchor | Medium | Easy | Light pegboards |
Pro tip: For most home projects, expansion anchors (sometimes called wedge anchors) are the best mix of strength and simplicity.
Pegboard Material Choices
Not all pegboards are created equal. Your choice affects durability, cost, and appearance.
Main Types
- Masonite (hardboard): Most common. Affordable, but can absorb moisture and sag if overloaded.
- Metal: Strongest option. Resists warping and holds heavy tools, but is more expensive.
- Plastic: Lightweight and moisture-resistant, but may not support very heavy items.
Pegboard Comparison
| Material | Strength | Cost | Moisture Resistance |
|---|---|---|---|
| Masonite | Medium | Low | Low |
| Metal | High | High | High |
| Plastic | Low-Medium | Medium | High |
Insight: If your wall is prone to dampness (like many basements), choose metal or plastic over hardboard for longer life.
Safety Precautions
Working with concrete and power tools requires attention to safety.
- Wear eye protection: Concrete chips can fly during drilling.
- Use a dust mask: Concrete dust is harmful if inhaled.
- Check for hidden wires or pipes: Use a stud finder or ask the building manager before drilling.
- Keep workspace clear: Remove tripping hazards and keep the area well-lit.
- Don’t rush: Mistakes happen more easily when you hurry.
Maintenance Tips After Installation
Pegboards are low-maintenance, but a few habits will help them last longer and stay useful.
- Clean regularly: Dust can build up behind and on the board. Use a vacuum or damp cloth.
- Check anchors yearly: Make sure screws are still tight and anchors have not loosened.
- Repaint if needed: For masonite pegboards, a coat of paint can protect against moisture and wear.
- Don’t overload: Spread heavy tools out to prevent warping or anchor failure.
- Reorganize as needs change: Pegboards are flexible. Move hooks and shelves as your storage needs grow.
Upgrades And Customizations
After your board is up, you can make it even more useful with a few extras:
- Lighting: Install LED strips above or around the pegboard for better visibility.
- Custom hooks and bins: Specialized hooks hold drills, wrenches, and more. Bins store small parts.
- Labels: Mark tool outlines or use labels for easy organization.
- Magnetic strips: Great for holding bits, screws, or small metal tools.
- Paint or decorative finishes: Match your pegboard to the room’s style.
Uncommon idea: For added durability, seal the edges of hardboard pegboard with clear wood sealer to prevent swelling in damp locations.
Troubleshooting Common Problems
Even with careful planning, you might run into issues. Here’s how to solve the most common ones:
Pegboard Feels Loose
- Check that all anchors are fully expanded in the wall.
- Add extra screws in the middle sections if necessary.
Hooks Don’t Fit
- Pegboard may be flush with the wall. Remove and add furring strips.
- Some hooks are for thicker boards; check compatibility.
Board Sags In The Middle
- Add another furring strip or anchor in the center.
- Reduce weight in that area.
Crumbling Holes
- Remove the anchor and fill with concrete repair material. Redrill after it cures.
Anchor Pulls Out
- Use a larger anchor or switch to a heavier-duty type like a sleeve anchor.
When To Get Professional Help
Most people can install a pegboard on concrete themselves with patience and the right tools. However, consider hiring a professional if:
- You do not own or cannot borrow a hammer drill.
- The wall shows signs of serious moisture or structural damage.
- You are unsure where pipes or wires may be hidden.
- The pegboard will support very heavy or expensive equipment.
A pro can ensure the job is done safely and to code, and may finish faster than a DIY approach.
Where To Learn More
If you want to dive deeper into choosing hardware or understanding wall anchors, reliable resources like the Wall anchor Wikipedia page offer a wealth of detail.
Frequently Asked Questions
What Size Anchors Do I Need For A Pegboard On Concrete?
For most standard pegboards (2×4 to 4×8 feet), 1/4-inch expansion anchors are strong enough. For very large or heavy-duty boards, consider 3/8-inch anchors. Always match anchor size to the weight you plan to hang.
Can I Attach A Pegboard Directly To Concrete Without Furring Strips?
Yes, but it’s not recommended. Without furring strips, peg hooks won’t fit properly and the board may crack under stress. Furring strips create the needed gap for hooks and add stability.
What Is The Best Type Of Pegboard For Damp Concrete Walls?
Metal or plastic pegboards are best for damp areas. Masonite (hardboard) absorbs moisture and may warp or mold over time. Metal is strongest and lasts longest.
How Do I Know If I’ve Drilled Deep Enough For The Anchor?
Measure the anchor length and place a piece of tape on the drill bit to mark the depth. Drill until the tape reaches the wall. Most anchors require holes at least 1.5 to 2 inches deep.
Is It Safe To Drill Into Any Concrete Wall?
It’s safe if you check for hidden pipes or wires first. Use a stud finder with wire detection or consult building plans. Avoid drilling near electrical outlets or water lines.
Hanging a pegboard on a concrete wall takes planning, the right tools, and a bit of patience, but the results are worth it. With this guide, you have everything needed for a strong, safe, and practical installation. Enjoy your new organized space!