Installing rivets is a common task for anyone working with metal, leather, plastic, or even fabric. Usually, people use a rivet gun for this job. But what if you don’t have one? Maybe your tool broke, or you just need to finish a quick repair at home. Don’t worry—there are reliable ways to install rivets without a rivet gun. You just need some basic tools, some careful technique, and a little patience. In this guide, you’ll learn everything you need to know to complete the job safely and securely, even as a beginner.
Let’s explore why you might need to install rivets by hand, what methods work best, which tools to use, and how to avoid common mistakes. By the end, you’ll have the confidence to use rivets in your next DIY project, repair, or craft—even if you never pick up a rivet gun.
Why Install Rivets Without A Rivet Gun?
Most people discover alternative rivet installation methods because they don’t own a rivet gun. But sometimes, even professionals use manual methods for special projects. Here are some common reasons:
- Tool access: You don’t have a rivet gun, and buying one is not practical for a small project.
- Tight spaces: A rivet gun may not fit in small or awkward areas.
- Control: Manual methods let you work slowly and check your progress.
- Learning: Understanding manual installation helps you appreciate how rivets work.
Surprisingly, manual methods are not only for emergencies. They can be useful in crafting, jewelry making, or when working with delicate materials. If you understand how to do this, you’re more flexible and resourceful as a maker.
Understanding Rivets: Types And Where They’re Used
Before you try installing rivets by hand, it’s important to know what a rivet is and how it works. A rivet is a short metal pin or bolt with a head on one end. It’s inserted through holes in two or more pieces of material, and then the tail end is deformed so it holds everything tightly together.
Main Types Of Rivets
| Rivet Type | Typical Use | Install Without Gun? |
|---|---|---|
| Solid Rivet | Aircraft, metalwork, leather | Yes |
| Pop (Blind) Rivet | Sheet metal, repairs | Difficult |
| Split Rivet | Leather, crafts | Yes |
| Tubular Rivet | Belts, bags, shoes | Yes |
| Drive Rivet | Construction, signs | Yes |
Most hand-installation methods work best with solid, split, or tubular rivets. Pop rivets (the ones most people use with a rivet gun) are harder to set by hand, but it’s possible with creative tricks.
Common Applications For Hand-installed Rivets
- Leather work: Bags, belts, shoes, harnesses.
- Small metal repairs: Gutters, brackets, thin sheet metal.
- Craft projects: Jewelry, scrapbooking, model building.
- Plastic and fabric: When sewing or glue isn’t strong enough.
Knowing the right type of rivet for your material helps you choose the best installation method.
Tools And Supplies You’ll Need
You don’t need fancy equipment to install rivets by hand, but a few basic tools make the job easier and neater. Here’s what you’ll need for most projects:
- Hammer: Preferably a small ball-peen or tack hammer.
- Center punch or nail set: To help shape the rivet head.
- Anvil or metal block: A hard, flat surface to work against.
- Drill and bits: To make the right-sized hole for your rivet.
- Pliers: Useful for holding small rivets in place.
- Backup washers: For soft materials or bigger holes.
- Safety glasses and gloves: Protect your eyes and hands.
For certain rivets, you might also need:
- Hand-held setter tool: For tubular or leather rivets.
- Small chisel or flathead screwdriver: To split and flatten certain rivets.
Having the right tools means your rivets will be strong and look professional—even without a gun.
How To Select The Right Rivet For Manual Installation
Not every rivet is a good choice for hand-setting. Here’s how to pick the right one for your project:
- Material: Aluminum and brass are softer and easier to deform than steel.
- Diameter: Thicker rivets are harder to set by hand; use smaller diameters (3/32”–1/8”) if possible.
- Length: The rivet should be about 1.5 times the thickness of the materials you’re joining.
- Head style: Flat or round heads are easier to work with manually.
Check the packaging and read reviews if you’re buying online. Some rivets are sold specifically for “hand setting”—especially in leather or craft stores.
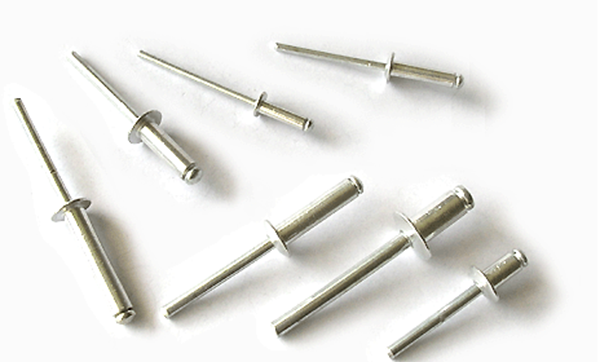
Credit: www.yukerivet.com
Step-by-step Methods To Install Rivets Without A Rivet Gun
There are several ways to set rivets by hand, depending on the type of rivet and material. Here are the most effective and safe techniques.
1. Setting Solid Rivets With A Hammer And Anvil
Solid rivets are classic and strong. Here’s how you can install them without a gun:
- Mark and drill holes: Use a drill bit the same size as the rivet. Make sure the holes in both pieces line up perfectly.
- Insert the rivet: Push the rivet through both pieces. The head should be on the visible side.
- Place on anvil: Lay the head of the rivet on a hard, flat surface (anvil or metal block).
- Back up with a washer (if needed): For thin or soft material, place a washer over the end.
- Hammer the tail: Use a ball-peen hammer to gently tap the tail of the rivet. Start with light taps to flare it out.
- Round or flatten the tail: Continue hammering in a circular motion. The goal is to mushroom the end so it’s wider than the hole.
- Check tightness: The materials should be held firmly together.
Pro tip: Practice on scrap material first. This helps you learn how hard to hit and what a good “set” looks like.
2. Installing Split Rivets (for Leather And Soft Materials)
Split rivets are designed for softer materials and are very beginner-friendly.
- Make a hole: Use a hole punch or awl for leather or fabric.
- Insert the rivet: Push the split legs through the hole.
- Spread the legs: Use a small screwdriver or knife to bend the split legs outward.
- Flatten the legs: Use the hammer to gently tap the legs flat against the back of the material.
Split rivets are not for heavy-duty use but work great for crafts and leatherwork.
3. Setting Tubular Rivets Manually
Tubular rivets are hollow at one end and are common in belts, straps, and bags.
- Punch holes: The hole should be just big enough for the rivet barrel.
- Insert the rivet and cap: Push the rivet through the material and place the cap (if included) on the other side.
- Place on anvil: Set the head against the hard surface.
- Peen the tube: Use a hand setter or a rounded punch to roll out the tube’s edge.
- Finish with hammer: Tap gently until the tube flares and holds the material.
If you don’t have a setter, a rounded nail set or even a ball bearing can help roll out the edge.
4. Using Pop Rivets Without A Gun
Pop rivets (blind rivets) are tricky without the right tool, but it’s possible for small projects.
- Drill holes: Standard size for your pop rivet.
- Insert the rivet: Place the rivet as usual.
- Grab the mandrel: Use locking pliers to grip the mandrel (the long pin sticking out).
- Tap with a hammer: While pulling with the pliers, lightly tap the rivet head with a hammer. The mandrel should snap off, setting the rivet.
- Smooth the surface: File down any sharp bits.
Note: This method is less reliable than using a gun, but it works for light-duty tasks.
5. Alternative: Using A Bolt And Nut
If you don’t have any rivets, you can mimic their function with a small bolt and nut.
- Drill holes: Slightly bigger than the bolt’s diameter.
- Insert bolt and nut: Tighten until snug.
- Peen the end (optional): For a permanent fix, hammer the bolt’s end to deform the threads, making it hard to remove.
This approach is useful in emergencies or for temporary repairs.
Key Tips For Successful Manual Riveting
Manual riveting is simple, but a few tricks can make your results much better:
- Choose the right surface: Use a heavy, stable anvil or block. Soft wood can absorb the hammer’s force and give a weak set.
- Use washers: For thin or soft materials, washers spread the force and prevent pull-through.
- Keep holes tight: The fit between the rivet and hole should be snug, not loose.
- Hammer gently: Start with soft taps and increase as needed.
- Check both sides: Make sure the rivet head and tail both look secure.
Non-obvious insight: When working with painted or decorative materials, cover the rivet head with masking tape to prevent scratches during hammering.
Common Mistakes To Avoid
Many beginners make the same errors when installing rivets by hand. Avoid these to get professional-looking results:
- Oversized holes: If the hole is too big, the rivet will not hold tightly.
- Too much force: Hitting too hard can bend or break the rivet.
- Wrong rivet length: Too short and it won’t hold; too long and it will look messy or bend.
- Skipping washers: Especially important with soft materials.
- Not supporting the head: If the head isn’t backed by a hard surface, it can flatten or deform.
Taking your time and double-checking your work will help you avoid these problems.
Comparing Manual Riveting Methods
To help you choose the best technique, here’s a comparison of the most common manual rivet installation methods:
| Method | Best For | Strength | Skill Level Needed |
|---|---|---|---|
| Hammer & Anvil | Metal, leather, heavy-duty | High | Moderate |
| Manual Setter | Tubular rivets, crafts | Medium | Beginner |
| Split Rivet Method | Leather, fabric | Low | Beginner |
| Pop Rivet with Pliers | Sheet metal repairs | Medium | Advanced |
| Bolt & Nut Alternative | Temporary fix | Medium | Beginner |
Choose the method that fits your material, tools, and the strength you need.
_1684991337.jpg)
Credit: www.fastenere.com
Safety Precautions When Installing Rivets By Hand
Manual riveting is generally safe, but small mistakes can cause injury. Protect yourself by following these rules:
- Wear safety glasses: Metal chips and broken tools can fly.
- Use gloves: Protect your hands from sharp edges and hammer slips.
- Clamp your work: Secure the pieces so they don’t move.
- Work on a stable surface: Avoid wobbly or uneven workspaces.
- Check your tools: Make sure your hammer and punches are in good condition.
Non-obvious insight: If working with small parts, use tweezers or pliers to hold them while hammering. This keeps your fingers safe.
Practical Examples And Project Ideas
Manual riveting works for more than just repairs. Here are some practical projects you can try:
1. Repairing A Leather Belt
A belt hole can tear, or the buckle may come loose. Use a tubular or solid rivet:
- Punch a new hole.
- Insert a rivet and cap.
- Hammer gently on a metal block.
The belt will be as strong as new.
2. Fixing A Metal Bracket
Got A Loose Metal Bracket On A Tool Or Frame?
- Drill matching holes.
- Use a solid rivet and hammer/anvil method.
- Flatten the tail for a strong hold.
No need for a new bracket or special tools.
3. Making A Diy Keychain
Want a custom keychain? Use split rivets for leather or plastic:
- Cut shapes from scrap leather.
- Use split rivets to join them.
- Add a ring for keys.
Simple, strong, and personal.
4. Repairing A Plastic Bin
Plastic bins often crack at the handle. You can reinforce them with washers and rivets:
- Drill small holes on both sides of the crack.
- Use a washer on each side with a tubular rivet.
- Hammer the tail gently.
This extends the life of the bin and prevents more cracking.
5. Attaching A Patch To Fabric
For heavy patches (like on work jeans), sewing isn’t always enough:
- Punch holes through the patch and fabric.
- Insert small tubular rivets.
- Hammer flat on the inside.
The patch will stay on, even after many washes.
How To Remove Rivets Without Damaging Your Project
Sometimes you need to take out a rivet—maybe you made a mistake, or you want to replace a part. Here’s how to do it safely:
- Drill out the rivet: Use a drill bit slightly smaller than the rivet head. Drill slowly until the head comes off.
- Punch out the shank: Use a punch or nail set to push the rest of the rivet through the hole.
- File rough edges: Smooth any sharp metal left behind.
For split or tubular rivets, you can also use small pliers to bend back the tail before removing.
When Should You Buy A Rivet Gun?
While manual methods work well, a rivet gun has big advantages for frequent or large projects:
- Faster installation: A gun sets rivets in seconds.
- Consistent results: Each rivet is set to the same depth and strength.
- Less hand fatigue: No repeated hammering.
- Works with blind rivets: Only way to easily install pop rivets.
If you start doing many repairs or build larger projects, investing in a rivet gun makes sense. For occasional jobs, manual methods are more than enough.
Environmental Impact: Why Manual Riveting Matters
Manual riveting uses less energy and creates less noise than power tools. For small or home-based projects, this is a greener choice. Also, if you reuse old rivets, bolts, or washers, you reduce waste.
Non-obvious insight: Many crafters and repairers prefer manual methods because they’re more “hands-on.” This lets you control every step and often leads to less material waste.
Troubleshooting: What To Do If Your Rivet Doesn’t Hold
If your rivet feels loose or the pieces still move, here’s how to fix it:
- Check hole size: If it’s too big, try a larger rivet or add a washer.
- Re-hammer the tail: Sometimes another tap or two tightens the set.
- Replace the rivet: If the rivet bent or broke, remove it and try again.
- Switch methods: For very soft or brittle materials, try a bolt and nut instead.
Quality control is important. Don’t accept a weak rivet—redo it until it’s strong.

Credit: www.youtube.com
Where To Find Rivets And Tools
You can buy rivets and basic tools at most hardware stores, craft shops, or online marketplaces. For specialty rivets (like leather or jewelry), check dedicated suppliers. Look for reviews and guides to help you choose the right size and type.
For more information on rivet types and standards, you can visit the Wikipedia page on rivets.
Frequently Asked Questions
How Do I Know What Size Rivet To Use?
Choose a rivet with a diameter that matches your hole size closely. The length should be about 1. 5 times the total thickness of the materials you’re joining. For thin materials, smaller rivets (like 3/32” or 1/8”) are easier to install by hand.
Can I Use A Regular Hammer Instead Of A Ball-peen Hammer?
Yes, you can use any small hammer, but a ball-peen hammer works best because its rounded end helps shape the rivet tail. If you use a regular hammer, go slowly and use light taps to avoid flattening or damaging the rivet head.
Is It Possible To Set Stainless Steel Rivets By Hand?
Stainless steel is very hard, so it’s difficult to install these rivets without a tool. If you must use them, choose the smallest size possible and work slowly. For most hand projects, aluminum or brass is a better choice.
What Can I Do If My Rivet Keeps Bending Or Breaking?
This usually happens if your hammer blows are too hard, or if the hole is too tight or misaligned. Try drilling a new, clean hole and use gentle, controlled taps. Also, check that your backing surface is stable and flat.
Are There Alternatives To Rivets For Joining Materials?
Yes. For temporary or removable joints, use small bolts and nuts. For crafts, you might use glue, stitches, or snaps. But rivets are often the strongest and most permanent option for metal, leather, and plastic.
Mastering manual rivet installation gives you more freedom and confidence in your repairs and creations. Whether you’re fixing a broken strap, building a custom gadget, or just want to learn a new skill, you now have the knowledge to get started—no rivet gun required.
With practice and care, your results will be strong, neat, and long-lasting.