Building a pegboard can transform any wall into a smart, organized space. Whether you want to tidy up your garage, kitchen, craft room, or office, a pegboard gives you flexibility and style. You don’t need to be a professional carpenter to make a pegboard that looks great and works well.
With the right steps, some patience, and a few simple tools, you can create a custom pegboard that fits your needs and your space.
Many people think making a pegboard is complex or expensive. The truth is, a DIY pegboard is one of the simplest and most rewarding home projects. It’s also adaptable: you can build a small board for keys or a large one for heavy tools. You can paint it, add shelves, or even use hooks to hang baskets. With a bit of planning and the right guide, you’ll have a pegboard that makes your daily life easier.
This guide explains how to make a pegboard from start to finish. You’ll find advice for choosing materials, step-by-step instructions, and real-world tips that save time and prevent mistakes. Whether you’re a beginner or have some DIY experience, you’ll discover how to make a pegboard that’s strong, safe, and looks great on your wall.
Understanding Pegboards And Their Benefits
Pegboards are flat boards with regular rows of holes. You hang hooks, shelves, or baskets in these holes to store things. The simple design hides a lot of flexibility.
Why Use A Pegboard?
- Organization: Pegboards help keep tools, kitchen items, or craft supplies visible and easy to reach.
- Customizable: You can move hooks and shelves any time, so your storage adapts as your needs change.
- Space-Saving: Pegboards use vertical wall space, freeing up counters and drawers.
- Style: With different colors and shapes, pegboards can match your room’s look.
Real-world Examples
A garage pegboard can hold hammers, screwdrivers, and pliers. In a kitchen, you can hang spatulas, pans, and measuring spoons. Crafters use them for scissors, ribbons, and glue. Offices use them for keys, cables, and notes.
Surprising Advantages
Some beginners don’t realize that pegboards are great for renters. If you hang it with a French cleat or removable strips, you can take it down without big wall damage. Also, pegboards can be reused in new rooms and for new purposes—just change the hooks and layout.
Choosing The Right Materials
Before you begin, you need to pick the right materials. The main parts are the board itself, mounting hardware, and accessories like hooks and shelves.
Types Of Pegboard Material
There are three main types, each with pros and cons:
| Material | Strength | Cost | Best For |
|---|---|---|---|
| Hardboard (Masonite) | Medium | Low | Light tools, crafts |
| Metal | High | High | Heavy tools, garages |
| Plywood | Medium-High | Medium | Custom designs, painted boards |
Hardboard is the most common for home use because it’s affordable and easy to cut. Metal pegboards are best for heavy items but cost more. Plywood works well if you want a custom size or painted board.
Pegboard Hole Spacing
Standard pegboards have holes spaced 1 inch apart, with each hole about 1/4 inch in diameter. This fits most hooks and accessories. Double-check your accessories before buying or drilling your own.
Size
Measure your wall space. For most home uses, a 2’ x 4’ (60 cm x 120 cm) pegboard fits well above a workbench or desk. In kitchens or small spaces, 2’ x 2’ (60 cm x 60 cm) is popular.
Accessories
- Hooks: Different sizes for tools, utensils, or keys.
- Baskets: For small or loose items.
- Shelves: To hold larger objects.
- Bins: For screws, pens, or craft supplies.
Quality accessories matter. Cheaper hooks may bend or fall out. It’s better to buy a starter pack and add more over time.
Tools And Supplies You’ll Need
Gather all your supplies before starting. This prevents last-minute trips and keeps your project smooth.
Essential Tools
- Drill (with bits)
- Screwdriver
- Stud finder
- Level
- Measuring tape
- Pencil
- Saw (if cutting board to size)
- Sandpaper (for smoothing edges)
- Paint and brush (optional)
Supplies
- Pegboard sheet (hardboard, metal, or plywood)
- Wooden furring strips (for wall mounting)
- Screws and wall anchors
- Hooks, shelves, and baskets
- Washers (for extra support)
- Mounting hardware (French cleat or brackets, if preferred)
Two Useful Tips
- If you plan to hang heavy items, get longer screws and strong wall anchors.
- If mounting on drywall with no studs, use toggle bolts for safety.
Planning Your Pegboard Design
Before you drill a hole or hang your board, it’s smart to plan. This helps avoid mistakes and makes sure the board fits your needs.
Measure Twice, Cut Once
Use your measuring tape to mark the wall where you want the pegboard. Leave room above and below for hooks and baskets.
If you’re cutting your own pegboard, mark the size on the board clearly. Always double-check measurements.
Layout Ideas
Lay out your tools or items on the floor as you want them on the board. Take a photo for reference. This helps you see what fits and where to add shelves or bins.
Mark The Wall
Use a level to draw a straight line on the wall where the top edge will go. Mark the spots for screws and furring strips.
Two Planning Insights
- Beginners often forget to leave space for wider items (like hammers or pans). Plan your hook spacing with the largest tools in mind.
- It’s easier to move hooks on a pegboard than to move the whole board, so don’t worry about a “perfect” layout—flexibility is the point!
Step-by-step Guide: How To Make A Pegboard
Now you’re ready to build. Follow these steps for a safe, sturdy, and professional-looking pegboard.
Step 1: Cut The Pegboard To Size
If your board is too large, use a saw to cut it to your chosen size. Sand the edges with sandpaper until smooth. This prevents splinters and gives a cleaner look.
Step 2: Paint Or Finish (optional)
If you want a colored or waterproof pegboard, paint it now. Use a primer for better coverage. Let it dry fully before moving on. Many people skip this, but a painted board can brighten a room and protect against moisture.
Step 3: Prepare The Wall
Use a stud finder to locate wall studs. Mark them with a pencil. If there are no studs where you want to hang the board, you’ll need wall anchors.
Step 4: Attach Furring Strips
Pegboards need to sit away from the wall so hooks can go through. Use wooden furring strips (thin pieces of wood) behind the board.
- Cut strips to fit the top and bottom of your pegboard.
- Attach strips to the wall using screws into the studs. If no studs, use wall anchors.
- Make sure strips are level and flat.
Step 5: Mount The Pegboard
Hold the pegboard up to the wall, with the furring strips behind it.
- Drill holes through the pegboard and strips into the wall.
- Secure with screws and washers for extra support.
- Start with the corners, then add more screws along the edges and center for stability.
Step 6: Install Accessories
Once the board is up, add your hooks, shelves, and baskets. Arrange them as planned. Test each hook with the weight of your heaviest items.
Step 7: Organize And Enjoy
Hang your tools, kitchen items, or crafts. Adjust hooks or add new ones as your needs change. Take pride in your new organized space!
Comparing Mounting Methods
There are several ways to mount a pegboard, each with pros and cons. Here’s a comparison to help you choose:
| Mounting Method | Pros | Cons | Best For |
|---|---|---|---|
| Furring Strips | Strong, low cost | Permanent, needs tools | Garages, heavy loads |
| French Cleat | Removable, supports weight | Extra materials needed | Renters, flexibility |
| Direct to Studs | Simple, fast | No space for hooks to go through | Light use, quick jobs |
| Adhesive Strips | No wall damage | Not for heavy items | Renters, light items |
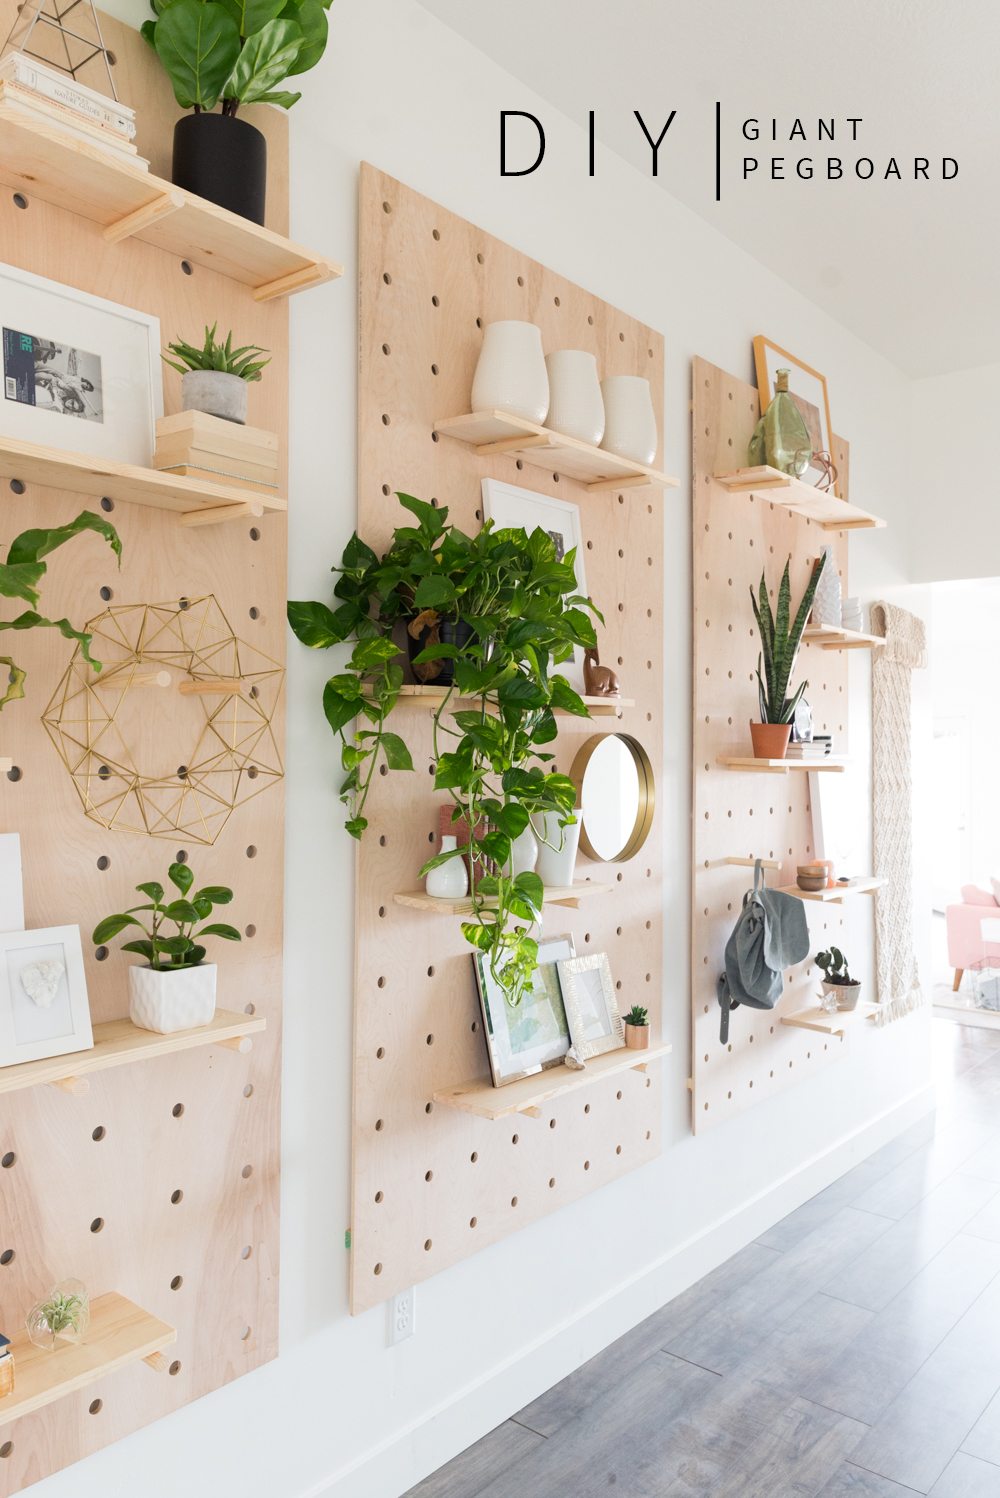
Customizing Your Pegboard
Pegboards are not just practical—they can be stylish and unique. Here’s how to make yours stand out.
Paint And Patterns
Use bold colors or geometric designs to match your room. Some people paint the board one color and the wall behind another for contrast.
Labels And Outlines
Use tape or paint pens to draw outlines around tools. This helps you see what goes where and spot missing items quickly.
Add Lighting
Small LED strips or puck lights above the pegboard make it easier to see and use, especially in garages or workshops.
Mix Accessories
Combine metal hooks, wooden shelves, and plastic bins. This makes your pegboard work for everything from heavy hammers to delicate craft supplies.
Make It Mobile
Mount small boards on rolling carts for a portable storage system.
Hidden Storage
Add a hinged pegboard “door” to hide shelves or a safe behind the board.
Advanced Insight
Most beginners don’t realize you can mount a pegboard on a door, inside a cabinet, or even as a headboard in a bedroom. Think creatively about where to use your new storage solution.
Safety And Weight Limits
A pegboard is only as strong as its mounting. Here’s how to keep your setup safe:
- For heavy tools, use metal pegboard and strong anchors.
- Don’t overload a single hook. Spread weight across several hooks.
- Check screws and anchors every few months to ensure they’re tight.
- Use washers to keep screws from pulling through the pegboard.
Did you know? A standard hardboard pegboard can hold about 50 pounds (22 kg) if mounted well, but metal pegboards can hold up to 200 pounds (90 kg) or more.
Maintenance And Upgrades
Pegboards are low-maintenance, but a few habits keep them looking and working well.
- Wipe with a damp cloth to remove dust.
- Check hooks for bending or wear.
- Rearrange as your storage needs change.
- Repaint or seal if used in humid areas.
If you outgrow your board, you can add a second one or swap in new accessories.
Cost Breakdown
Making a pegboard is usually much cheaper than buying a fancy storage system. Here’s a rough estimate for a standard 2’ x 4’ hardboard pegboard setup:
| Item | Average Cost (USD) |
|---|---|
| Pegboard sheet | $15 – $25 |
| Furring strips | $5 – $10 |
| Screws, anchors | $5 |
| Paint (optional) | $8 |
| Hooks, accessories | $10 – $30 |
| Total | $43 – $78 |
Compare this to wall cabinets or custom storage, which can cost several hundred dollars. Pegboards are a great value.
Common Mistakes To Avoid
Even simple projects have pitfalls. Here’s what to watch out for:
- Not spacing the board from the wall: Hooks need room to go through; always use furring strips or spacers.
- Using weak anchors: Heavy items can pull a pegboard off drywall if not anchored well.
- Overloading hooks: Spread weight and use multiple hooks for large tools.
- Skipping the plan: Measure and lay out your design before drilling.
- Buying the wrong accessories: Not all hooks fit all pegboards. Check hole size and spacing first.
Real-life Examples Of Pegboard Uses
Garage Tool Wall
A large 4’ x 8’ metal pegboard can hold drills, saws, and wrenches. People often add magnetic strips for drill bits and bins for screws.
Kitchen Organization
A painted pegboard above the counter holds pots, pans, spatulas, and even recipe cards. Hooks and small shelves keep everything off the counter.
Craft Room Storage
Artists use pegboards for scissors, ribbons, glue guns, and paint. By adding small shelves and bins, they keep supplies sorted and easy to find.
Office Command Center
A small pegboard near a desk can hold keys, cables, headphones, and notes. Some people add a small whiteboard or corkboard to the setup.
Kids’ Room
Pegboards help organize toys, art supplies, and hats. Use colorful bins and labels to make it fun for children to put things back.

Sustainability And Eco-friendly Options
If you care about the environment, you can make your pegboard project greener:
- Use recycled plywood or reclaimed wood.
- Choose water-based paint and finishes.
- Reuse hooks and accessories from old boards or thrift stores.
- When moving or redecorating, repurpose the board in a new room.
Pro Tip: Don’t throw away old pegboards. Cut them into smaller panels for drawers, closets, or sheds.
Advanced Pegboard Projects
After making your first basic pegboard, you might want to try something more advanced:
- Add a fold-down work table to your pegboard wall.
- Install a charging station for tools or devices.
- Combine several pegboards for a full-wall storage solution.
- Integrate a chalkboard panel for notes and lists.
These ideas require a bit more planning but can turn your storage wall into a real feature.
Frequently Asked Questions
What Type Of Pegboard Is Best For Heavy Tools?
Metal pegboards are the best choice for heavy tools because they are very strong and resist bending. If you use hardboard or plywood, make sure to use strong wall anchors and spread heavy items over several hooks.
Can I Hang A Pegboard Without Drilling Holes In The Wall?
Yes, you can use removable adhesive strips or a French cleat system if you want to avoid drilling. However, these methods are best for light items. For heavy use, drilling into studs is safest.
How Do I Keep Hooks From Falling Out Of The Pegboard?
Some hooks come with small plastic locks or clips that hold them in place. You can also use zip ties or short pieces of wire to secure hooks. For a better fit, buy high-quality accessories made for your pegboard’s hole size.
Is It Safe To Use A Pegboard In Humid Areas Like Bathrooms?
Yes, but you should use metal pegboard or sealed plywood to prevent warping or mold. Avoid hardboard in wet places, as it can swell and lose strength. Always use rust-resistant hooks and accessories.
Where Can I Find Pegboard Accessories And Inspiration?
You can find hooks, baskets, and shelves at most hardware stores, or online. For creative ideas and layouts, websites like Home Depot offer project guides and photos.
A homemade pegboard is a simple, smart way to get organized. With careful planning, the right materials, and a bit of creativity, you can build a pegboard that fits your style and makes your life easier. From the garage to the kitchen, your wall can become one of the most useful spots in your home.
Start with a small board and let your ideas grow—your perfect storage solution is just a pegboard away.