Making box joints with a router can transform simple woodworking projects into strong, beautiful creations. If you want to build boxes, drawers, or storage chests that stand the test of time, box joints offer both durability and visual appeal. Many woodworkers fear box joints are too difficult or require special tools.
In fact, with the right setup and approach, you can create clean, accurate box joints using a router—even as a beginner.
Let’s walk through everything you need to know, from understanding the basics of box joints, choosing the right router setup, and building a reliable jig, to troubleshooting and finishing tips. By the end, you’ll be ready to make perfect box joints for your next project.
What Are Box Joints And Why Use Them?
A box joint (also called a finger joint) is a woodworking joint where square pins and slots interlock at the corners of two boards. These alternating “fingers” create a large glue surface, making the joint much stronger than a simple butt joint.
Benefits of box joints:
- Excellent mechanical strength due to lots of glue area
- Decorative appearance, especially with contrasting woods
- Easy to align during assembly
- Useful for boxes, drawers, bins, and cabinetry
Many professionals prefer box joints for drawer construction because they resist pulling apart, even under heavy use. For beginners, box joints are easier to make than dovetails but still look impressive.
Tools And Materials Needed
To create precise box joints with a router, you’ll need a few key tools and materials. Here’s what you’ll need:
Essential Tools
- Router: A plunge or fixed-base router is suitable. Power rating of at least 1.5 HP recommended for clean cuts.
- Router Table (optional but helpful): Provides support and safety, especially for small parts.
- Straight Bit: Choose a high-quality straight router bit. Common sizes are 1/4”, 3/8”, or 1/2”.
- Router Jig: A box joint jig is essential for accuracy. You can buy one or build your own.
- Clamps: Secure your workpiece and jig for safety.
- Measuring Tools: Calipers, rulers, and squares for precise layout.
- Push Blocks or Sticks: Keeps hands away from the bit.
Materials
- Wood Boards: Flat, straight boards. Hardwoods like maple, oak, or walnut give crisp joints. Softwoods work but may tear out.
- Glue: Wood glue for assembly.
- Sandpaper: For final smoothing.
- Finishing Supplies: Oil, lacquer, or polyurethane as desired.
Example: Minimum Setup For Small Box Joints
| Tool/Material | Recommended Specification |
|---|---|
| Router | 1.5 HP, variable speed |
| Router bit | 1/4” straight carbide |
| Board thickness | 1/2” or 3/4” |
| Jig material | 3/4” plywood or MDF |
| Clamps | 2 or more F-style clamps |
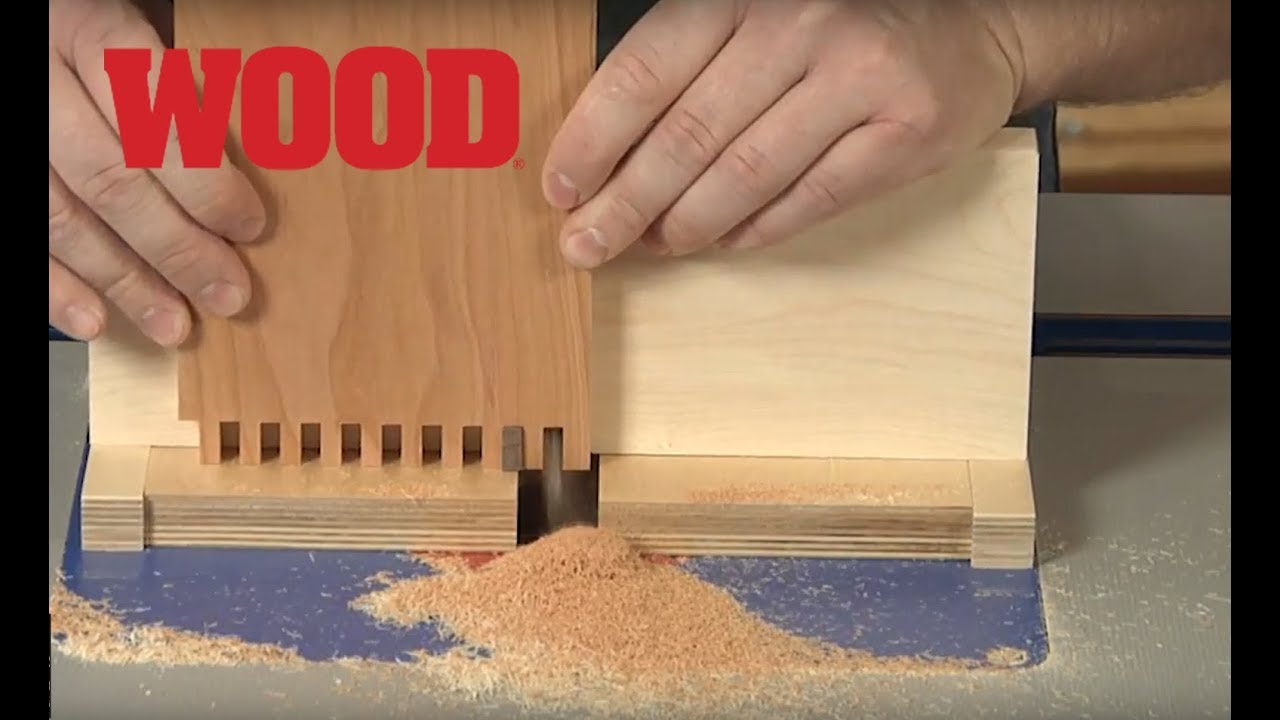
Credit: www.youtube.com
Understanding The Router And Bit Selection
Choosing the right router and bit is critical for clean box joints. Let’s clarify what matters most.
Router Types
A fixed-base router is steady and works well for box joints. A plunge router can also work but is less common for this task since you want consistent depth.
Router table setups are popular because they offer more control and safety. However, you can clamp your router under a sturdy surface to create a simple table if needed.
Router Bit Selection
- Straight bits are best for box joints. The bit width determines the finger size.
- For most boxes, a 1/4” or 3/8” bit is ideal. Use 1/2” if you want larger, more dramatic fingers.
- Use a carbide-tipped bit for clean cuts and long life.
Comparison: Straight Bit Sizes For Box Joints
| Bit Size | Typical Use | Suitable Board Thickness | Finger Appearance |
|---|---|---|---|
| 1/4” | Small boxes, drawers | 1/2”–3/4” | Fine, delicate fingers |
| 3/8” | Medium boxes, tool chests | 3/4”–1” | Balanced strength/looks |
| 1/2” | Large chests, bins | 1” or more | Bold, strong fingers |
Bit Quality And Maintenance
A sharp, clean bit prevents burning and tear-out. Dull bits lead to rough joints and extra sanding. Always check for chips and replace damaged bits.
Pro tip: Clean resin buildup from your bits regularly. Sticky bits cut poorly and heat up faster.
How Box Joint Jigs Work
A box joint jig is the secret weapon for making repeatable, accurate joints. This device guides your workpiece across the router bit at precise intervals, creating perfectly matching fingers.
Basic Jig Design
Most router box joint jigs use a key or pin that fits into the slot you just cut. After each cut, you move your board so the previous slot fits over the key, then make the next cut. This keeps the spacing exact.
Store-bought Vs. Diy Jigs
- Commercial jigs: Usually adjustable for finger size, easy to set up, but more expensive.
- DIY jigs: Cheap, customizable, and teach you a lot about the process.
A simple homemade jig uses a fence with a key and a base to support your work. You can build one in less than an hour with scrap plywood.
Quick Comparison: Store-bought Vs Diy Box Joint Jigs
| Feature | Store-Bought Jig | DIY Jig |
|---|---|---|
| Cost | High ($60–$200) | Low (under $20) |
| Setup Time | Fast | Moderate |
| Adjustability | Often easy | Customizable |
| Learning Value | Low | High |
How To Build A Simple Router Box Joint Jig
Constructing your own jig gives you control and flexibility. Here’s a step-by-step guide to building a basic box joint jig for your router table.
Materials Needed
- 3/4” plywood or MDF (base, fence, key)
- Wood glue and screws
- Measuring tape, square, pencil
- Clamps
Steps To Build The Jig
- Cut the Base: Make a base about 6–8” wide and 16–20” long. This will slide along the router table or workbench.
- Attach the Fence: Screw a vertical fence to the base, about 3–4” tall.
- Make the Key: Cut a strip of wood the same width as your router bit (e.g., 1/4”). This is your indexing key.
- Mount the Key: Attach the key to the fence, exactly one bit width away from the centerline of your router bit.
- Add Safety Features: Sand sharp edges, and add handles or push blocks.
- Test Fit: Run a test piece through the jig to check alignment and spacing.
Tips For Accuracy
- Double-check that the key is exactly the same width as your router bit.
- Align the key precisely with the bit’s edge, not the center.
- Clamp the jig securely during use.
Non-obvious Insight
Most beginners forget that any play in the key or fence causes sloppy joints. Take extra time on this step—accuracy here saves hours of frustration later.
Laying Out And Marking Your Workpieces
Precise layout is crucial for box joints. Poor marking leads to misaligned fingers and ugly corners.
How To Mark The Boards
- Label your parts (e.g., “front,” “side”) clearly.
- Mark the inside and outside faces. Box joints are cut with the outside face against the jig.
- Draw a reference line on the end grain. This helps align the board with the jig’s key for the first cut.
Setting The Starting Position
To get perfect alignment, one board should start with the end flush against the key, and its mating piece should start with the first finger offset by one finger width. This is the most common mistake for beginners—cutting both boards identically leads to joints that do not fit.
Pro tip: Stack both ends together and mark them as “A” and “B.” Always start “A” with the key, and “B” offset by one finger.
Making The Cuts: Step-by-step Process
Here’s how to cut box joints using your router and jig.
1. Set Router Bit Height
Adjust the bit to match your board thickness. The bit should be just slightly deeper than the thickness, so the fingers stand a hair proud—this makes sanding flush easier.
2. Secure The Jig And Workpiece
Clamp the jig to the router table or workbench. Use push blocks or handles for safety.
3. Make The First Cut
- Place the first board (outside face against the jig) with its end flush to the key.
- Hold the workpiece firmly against the fence.
- Turn on the router, and slowly push the jig (with board) over the bit to make the first slot.
- Pull back, turn off router.
4. Index For Next Cut
- Move the board so the just-cut slot fits over the key.
- Make the next cut. Repeat until the end of the board.
5. Cut The Mating Piece
- For the second board, start with it offset by one finger width (the bit/key width).
- Repeat the cutting process, indexing after each cut.
6. Test The Fit
Dry-fit the joints. The fingers should go together with light hand pressure. If too tight, sand lightly. If too loose, check for play in the jig.
7. Repeat For All Sides
Continue until all corners are cut.
Common Problems And How To Fix Them
Even experienced woodworkers sometimes face problems with box joints. Here’s how to solve the most common issues.
1. Fingers Too Loose
Causes: Key is too small, bit is undersized, or fence is not square.
Fix: Make a new key to match the bit exactly. Check the fence with a square.
2. Fingers Too Tight
Causes: Key is too wide, bit is oversized, or glue squeeze-out.
Fix: Lightly sand the fingers, or use a slightly smaller key. Clean up any glue squeeze-out during assembly.
3. Misaligned Joints
Causes: Both boards started at the same position, or inconsistent indexing.
Fix: Always offset the mating piece by one finger width. Mark your starting positions.
4. Tear-out And Rough Edges
Causes: Dull bit, poor-quality wood, or cutting too fast.
Fix: Use sharp bits, slow down feed rate, and back up the cut with scrap wood if needed.
5. Gaps At The Corners
Causes: Board ends not square, jig not clamped securely.
Fix: Square the ends on a miter saw or shooting board. Tighten all clamps before cutting.
Non-obvious Insight
Humidity can cause wood to swell or shrink, affecting fit. Test fit your joints in the same environment where you’ll glue them.
Assembly And Gluing Tips
When your box joints fit well, it’s time for assembly. This step is often trickier than it appears.
Preparing For Glue-up
- Dry-fit all pieces before adding glue.
- Prepare clamps and cauls (flat boards) to protect the wood from clamp marks.
- Keep a damp rag handy to wipe excess glue.
Gluing Process
- Apply a thin layer of wood glue to both sides of each finger.
- Assemble the box, pushing the corners together evenly.
- Clamp gently—too much pressure can crush the fingers and squeeze out too much glue.
- Check for square using a carpenter’s square or by measuring diagonals.
- Wipe off glue squeeze-out before it dries.
Sanding And Finishing
When the glue is dry, sand the corners flush. Start with 80–100 grit, working up to 180–220 grit.
Finish as desired—oil, polyurethane, or lacquer all work well. Contrasting woods and end-grain patterns really “pop” with a clear finish.
Pro Assembly Tip
Don’t rush. Wood glue sets quickly, so plan your steps and work efficiently. Practice assembly without glue if you’re nervous.
Advanced Techniques And Ideas
Once you master basic box joints, you can explore more advanced options.
Decorative Box Joints
Try using two different woods for the fingers and the rest of the box for a bold visual effect. For example, walnut fingers in a maple box look stunning.
Variable Finger Widths
Mix wide and narrow fingers for a unique look. This requires custom jig keys and careful layout but creates a signature style.
Tapered Or Rounded Fingers
Use a round-over bit or chisel corners for a softer look. Tapered fingers are possible but more challenging with a router.
Using A Router Table Fence
If your router table has a precision fence, you can make box joints without a jig. Mark positions carefully and move the fence for each cut. This method is slower but works for odd sizes.
Credit: www.rockler.com
Safety Precautions When Making Box Joints With A Router
Safety should always be your first priority in the workshop. Routers can remove wood—and flesh—very quickly.
Key Safety Tips
- Always wear eye and hearing protection.
- Use push blocks or handles to keep hands away from the bit.
- Check that all clamps and jigs are secure before turning on the router.
- Keep the workspace clean and free of distractions.
- Never reach over the spinning bit.
- Unplug the router when changing bits or adjusting the jig.
Non-obvious Safety Tip
Don’t wear gloves while routing—loose material can get caught in the bit. Bare, clean hands give the best control.
How Box Joints Compare To Other Joints
It’s helpful to know where box joints fit among other woodworking joints.
| Joint Type | Strength | Appearance | Skill Level | Common Uses |
|---|---|---|---|---|
| Box Joint | High | Decorative | Beginner–Intermediate | Boxes, drawers |
| Dovetail | Very High | Elegant | Advanced | Furniture, heirloom boxes |
| Rabbet | Medium | Plain | Beginner | Cabinets, simple boxes |
| Butt Joint | Low | Invisible | Beginner | Framing, quick builds |
Box joints are a great balance of strength, looks, and ease of construction—especially when made with a router.

Credit: www.kiwiworkshop.com
Common Beginner Mistakes To Avoid
- Cutting both boards identically: Always offset the mating piece.
- Using a dull or wrong-size bit: Test your bit and key with scrap first.
- Ignoring jig accuracy: Even a tiny error in key or fence makes ugly joints.
- Forgetting to label parts: Mark inside/outside and left/right for consistency.
- Skipping test cuts: Always test on scrap wood before your real project.
Many beginners also forget to check router speed. Too fast can burn wood; too slow causes tear-out. Adjust speed for your bit size and material.
Real-world Example: Making A Small Keepsake Box
Let’s apply what we’ve learned to a real project—building a 6” x 4” x 3” keepsake box with box joints.
Materials
- 1/2” thick maple for sides (four pieces, 6” x 3” and 4” x 3”)
- 1/4” straight bit
- DIY router jig
Steps
- Cut all four sides to size, with ends perfectly square.
- Mark inside/outside faces and label each piece.
- Build and calibrate the router jig for 1/4” fingers.
- Cut box joints on all ends, offsetting pairs as described.
- Dry fit and sand lightly for a snug fit.
- Glue up, clamp, and check for square.
- Sand corners flush and apply finish.
With care and patience, this box will look professional and last for decades.
Troubleshooting Unusual Problems
Sometimes, you’ll face less common issues:
- Router bit chatters: Check for loose collet or bent bit.
- Boards splinter on exit: Clamp a scrap “backer” board behind your work.
- Bit burns wood: Slow down feed rate, clean the bit, or reduce router speed.
- Joints fit when dry, but are tight after gluing: Slight wood swelling from glue is normal—sand fingers a bit looser next time.
Practical Tips For Perfect Box Joints
- Use harder woods for sharper, crisper fingers.
- Slightly overcut finger length, then sand flush after glue-up for seamless corners.
- Clamp boards together when making multiple boxes for consistent cuts.
- Take your time setting up the jig—the extra 10 minutes save hours of rework.
- Practice on scrap before working on your real project.
Where To Learn More
Box joints are just the beginning of router joinery. Explore more techniques, jigs, and project ideas from trusted sources like Wood Magazine.
Frequently Asked Questions
What Size Router Bit Is Best For Box Joints?
The best size depends on your project. For small boxes, a 1/4” straight bit gives fine, delicate fingers. For larger boxes or drawers, a 3/8” or 1/2” bit adds strength and a bold look. Always match your bit width to your board thickness and desired appearance.
Can I Make Box Joints Without A Router Table?
Yes, you can clamp a router upside down under a sturdy surface to make a simple table, or use a handheld router with a carefully built jig. However, a router table offers better safety and control, especially for small pieces.
How Do I Prevent Tear-out When Cutting Box Joints?
Use a sharp, carbide-tipped bit and feed the wood slowly. Place a scrap “backer” board behind your workpiece to support the fibers as the bit exits, which helps prevent splintering. Also, always cut with the outside face against the jig.
Why Don’t My Box Joints Fit Together?
Most often, this is due to inaccurate jig construction (key or fence not matching bit) or not offsetting the mating piece by one finger width. Double-check all measurements and always test on scrap before cutting your project wood.
How Strong Are Box Joints Compared To Dovetails?
Box joints are very strong, thanks to the large glue surface. While dovetails are considered the strongest for pulling forces, box joints are nearly as good for most boxes and drawers. Both joints are much stronger than simple butt or rabbet joints.
Making box joints with a router is a rewarding skill that opens up many woodworking possibilities. With patience, care, and the right setup, you’ll achieve clean, strong, and beautiful joints for all your future projects.