Testing a capacitor with a multimeter might sound technical, but it’s a skill that can save you money and time. Capacitors are in almost every electronic device, from air conditioners to televisions. When they fail, devices might not work at all or behave strangely.
Learning to check a capacitor at home can help you quickly find the problem, understand if a replacement is needed, and prevent bigger issues. Even if you are new to electronics, this guide will walk you through everything, step by step, using simple language and easy-to-follow instructions.
You’ll learn why capacitors matter, when and why to test them, what tools you need, and all the safety steps required. We’ll discuss different testing methods, tips for accurate results, and common mistakes to avoid. By the end, you’ll have the confidence and knowledge to check almost any capacitor using a standard digital or analog multimeter.
We’ll also cover some non-obvious insights that even beginners often miss.
What Is A Capacitor And Why Test It?
A capacitor is a small component that stores and releases electrical energy. Think of it like a tiny battery, but it works much faster and is used for short-term energy storage. Capacitors are found in power supplies, motors, radios, and many household gadgets. Their main jobs are to smooth out voltage, filter signals, and help start electric motors.
When a capacitor goes bad, your device might:
- Not turn on
- Make buzzing or clicking noises
- Have power issues or flicker
- Work irregularly or overheat
Testing a capacitor helps you:
- Pinpoint faults without guessing
- Avoid unnecessary replacements
- Repair devices safely and cheaply
- Prevent possible damage to other parts
Types Of Capacitors You Might Test
Not all capacitors are the same. Understanding the type helps you choose the right test method and settings on your multimeter.
| Type | Common Use | Appearance | Polarity |
|---|---|---|---|
| Electrolytic | Power supplies, audio equipment | Cylinder, marked with +/- | Polarized |
| Ceramic | Motherboards, filters | Small disk, no +/- | Non-polarized |
| Film | Motors, lighting | Box or oval | Usually non-polarized |
| Tantalum | Phones, compact devices | Small drop, marked with + | Polarized |
Knowing the type matters because:
- Polarized capacitors (like electrolytic and tantalum) must be tested with the right lead orientation.
- Non-polarized capacitors (like ceramic and film) can be tested in either direction.

Credit: www.youtube.com
When Should You Test A Capacitor?
Testing a capacitor isn’t always the first thing to do, but there are clear signs that it’s necessary:
- Device not working: If your fan, AC, or TV won’t start, the capacitor might be faulty.
- Strange noises: Buzzing, humming, or clicking can signal capacitor problems.
- Physical damage: Bulging, leaking, or burnt capacitors need immediate checking.
- Aging electronics: Devices older than five years often have capacitor wear.
- Intermittent operation: If something works sometimes and fails at other times, a weak capacitor could be the cause.
Experienced repair technicians also test capacitors as part of regular maintenance, especially in high-power equipment.
Tools And Equipment Needed
Testing a capacitor doesn’t require expensive gear. Here’s what you’ll need:
- Digital multimeter: Most common tool, preferably with a capacitance (μF or nF) setting.
- Analog multimeter: Useful for simple pass/fail checks.
- Alligator clips: For hands-free, stable connection.
- Insulated screwdriver: For discharging capacitors safely.
- Safety gloves and glasses: For protection.
- Needle-nose pliers: For removing capacitors from circuit boards if needed.
A modern digital multimeter with a capacitance mode is ideal, but even the most basic multimeter can perform simple checks.
Safety Precautions Before Testing
Capacitors can store dangerous energy, even when unplugged. Before touching or testing, always follow these safety steps:
- Power off and unplug: Ensure the device is not connected to any power source.
- Discharge the capacitor: Use an insulated screwdriver to short the leads of the capacitor (especially for large or high-voltage types). Never use your fingers.
- Wear safety gear: Gloves and glasses protect you from accidental shocks or sparks.
- Check for damage: Do not test capacitors that are leaking, burnt, or cracked—replace them instead.
- Work in a dry area: Moisture can increase the risk of shock.
Many beginners forget to discharge capacitors, which can result in a painful and sometimes dangerous shock. Always double-check before testing.
Understanding Multimeter Settings
A multimeter can measure different things: voltage, current, resistance, and sometimes capacitance. For capacitor testing, you’ll use these settings:
- Capacitance (μF/nF): Directly measures the value of a capacitor.
- Resistance (Ω): Used for simple tests when no capacitance mode is available.
- Continuity: Checks if current can flow through (not always useful for capacitors).
Here’s a quick guide for digital multimeter symbols:
| Symbol | Meaning | When to Use |
|---|---|---|
| μF or nF | Capacitance mode | For direct value measurement |
| Ω | Resistance/Ohms mode | For basic health check |
| •))) | Continuity | Rarely for capacitors |
| V | Voltage | To check for charge before discharge |
Tip: If your multimeter has an auto-range feature, let it choose the correct range for you.

Credit: www.fluke.com
Step-by-step Guide: How To Test A Capacitor With A Multimeter
There are several ways to test a capacitor, depending on your multimeter type and what you want to check. Below are the most reliable methods.
Testing With A Digital Multimeter (capacitance Mode)
- Remove the capacitor from the circuit if possible. In-circuit testing may give false readings due to other connected parts.
- Discharge the capacitor safely.
- Set the multimeter to capacitance mode (μF or nF).
- Connect the probes: Red to the positive lead (longer leg or marked +), black to the negative (shorter leg or marked -). For non-polarized, direction doesn’t matter.
- Read the display: The number should be close to the value printed on the capacitor (e.g., 10 μF).
- Compare values: A small difference (±10-20%) is usually OK. A large difference means the capacitor is weak or failed.
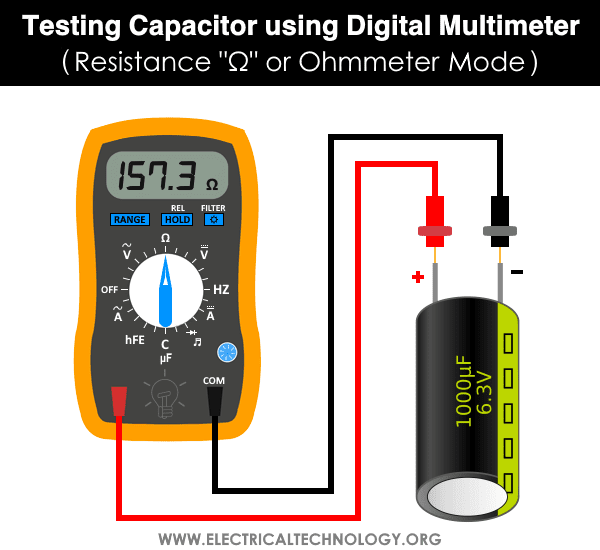
Testing With A Digital Multimeter (resistance Mode)
If your multimeter lacks capacitance mode, use the resistance setting.
- Set the multimeter to a high resistance range (e.g., 2MΩ).
- Connect probes to the capacitor’s leads.
- Watch the display:
- For a good capacitor: The reading starts low, then rises steadily towards infinity (OL). This shows the capacitor is charging.
- For a shorted capacitor: Reading stays at zero (0 Ω).
- For an open capacitor: Reading stays at infinity (OL) and doesn’t move.
Note: This method works best with electrolytic capacitors. It’s less reliable for small ceramic types.
Testing With An Analog Multimeter
Analog meters use a moving needle, which shows charging action more clearly.
- Set the meter to a high resistance range.
- Connect the probes to the capacitor.
- Watch the needle:
- For a good capacitor: Needle quickly moves right, then slowly drifts back left as the capacitor charges.
- For a bad capacitor: Needle stays still (open) or swings fully to zero and stays (short).
In-circuit Testing (quick Checks)
Some multimeters allow in-circuit testing, but results can be less accurate due to parallel parts.
- Use a capacitance tester if possible.
- If using resistance mode, expect lower readings because of other paths in the circuit.
Practical Example
Let’s say you have a 25V, 1000 μF electrolytic capacitor from a power supply.
- Discharge it fully.
- Remove it from the board.
- Set your digital multimeter to μF.
- Attach probes (red to +, black to -).
- The display shows “990 μF.” That’s within -1% of its rating—this capacitor is good.
If it showed “100 μF” or “OL,” the capacitor is faulty and should be replaced.
How To Interpret Test Results
The numbers on your multimeter tell a story about the health of the capacitor. But what do these results mean?
Reading Capacitance Values
- Within ±10–20% of the rated value: Still good.
- Below 80% of rated value: Weak, may cause device problems.
- Zero or near-zero: Shorted, definitely bad.
- No reading/OL: Open, also bad.
Resistance Test Results
- Rising resistance to infinity: Good.
- Stuck at zero: Shorted.
- No movement (always OL): Open.
Visual Inspection
Even if the readings seem fine, always check for:
- Bulging or leaking: Replace immediately.
- Burn marks or discoloration: Replace.
Common Mistakes And How To Avoid Them
Many beginners make simple mistakes that lead to wrong results or even damage. Here’s what to watch out for:
- Not discharging the capacitor: Can shock you or damage your meter.
- Testing in-circuit: Other components can affect readings.
- Wrong multimeter setting: Using voltage or current mode can damage the multimeter or capacitor.
- Reversing probe polarity: Important for polarized capacitors.
- Not checking the meter’s battery: Weak batteries can give false readings.
A non-obvious tip: Some capacitors, especially in power supplies, can hold a charge for hours. Always wait a few minutes after unplugging, then discharge.
Capacitance Vs. Esr: What’s The Difference?
Most multimeters only check capacitance (the main value, in μF or nF). But another hidden problem is ESR (Equivalent Series Resistance). High ESR means the capacitor may pass a basic test but still cause issues, especially in power circuits.
| Test | Checks | What It Means |
|---|---|---|
| Capacitance | Storage ability | Is it still in range? |
| ESR | Internal resistance | Does it pass current efficiently? |
To check ESR, you need a special ESR meter (not found on most multimeters). If you suspect problems after a good capacitance test, consider ESR testing or replace the capacitor if it’s cheap.
Tips For Accurate Capacitor Testing
Getting the right result is not just about following steps. Here are some expert tips:
- Always remove the capacitor for the most accurate test.
- Clean the leads: Dirt or corrosion can cause false results.
- Test at room temperature: Extreme cold or heat changes readings.
- Use the correct range on manual meters: Too low or high can miss problems.
- Compare with a known good capacitor: If unsure, check a similar, working part to see what a “good” reading looks like.
One more insight: Some ceramic capacitors can “self-heal” minor faults, showing good in one test and bad in another. If a device is unreliable, try replacing suspicious capacitors even if the readings seem okay.
When To Replace Vs. When To Retest
Not every failed test means the capacitor must go straight to the trash. Sometimes, poor readings are caused by:
- Dirty or loose connections
- Other faulty components on the board
- Wrong meter setting
If you get a bad reading, try:
- Cleaning the leads and testing again
- Swapping meter batteries
- Testing a similar, new capacitor to confirm the meter works
But if a capacitor is:
- Leaking
- Bulging
- Burnt
- Way out of spec
…replace it immediately. Don’t risk your device or safety.
Credit: www.electricaltechnology.org
Testing Capacitors In Appliances: Special Cases
Some appliances have unique capacitor types or setups. Here’s what to know:
Air Conditioner Or Refrigerator Start Capacitors
- Often large, cylindrical
- Must be fully discharged (they can hold charge for a long time)
- Use alligator clips for safety
- Always check for swelling or oil leaks
Motor Run Capacitors
- Used in fans, pumps, or compressors
- Slightly more tolerant to value changes, but replace if more than 15% off
Surface-mount Capacitors
- Tiny, found on computer boards
- Hard to test in-circuit; removal is usually required
- Use fine probes or tweezers for connection
How To Safely Discharge A Capacitor
Discharging is a critical safety step. Here’s a safe and reliable method:
- Turn off power and unplug the device.
- Hold the insulated handle of a screwdriver.
- Place the tip on one capacitor lead and touch the shaft to the other lead. Hold for a few seconds.
- For large or high-voltage types, use a resistor (e.g., 10kΩ, 2W) to slowly drain the charge by connecting across the leads for 10–20 seconds.
- Check with your multimeter (voltage mode) to ensure the voltage is near zero before handling.
Never discharge with your bare hands or metallic objects that can spark.
How To Test A Capacitor Without Removing It (in-circuit)
Sometimes, removing a capacitor is difficult or risky. While not as accurate, you can try these tips:
- Use a multimeter with a dedicated in-circuit test mode (rare).
- For resistance tests, expect readings to be lower due to parallel paths.
- Look for obvious shorts (very low resistance).
- If in doubt, and if the capacitor is cheap, replace it as a precaution.
Many professionals keep spare capacitors for this reason—sometimes, replacement is faster than testing in-circuit.
Advanced Testing With Special Tools
Some faults only show up under real working conditions. Here’s what more advanced users might try:
- ESR meter: Measures the internal resistance, catching hidden faults.
- LCR meter: Checks inductance (L), capacitance (C), and resistance (R) at different frequencies.
- Oscilloscope: For very technical users, can show real-time behavior.
For beginners, stick with a digital multimeter until you get comfortable.
Troubleshooting: If Your Multimeter Gives Strange Readings
Sometimes, your multimeter might show odd numbers or not respond at all. Here’s what to do:
- Check meter batteries: Weak power causes errors.
- Reset the meter: Turn off, wait, and turn back on.
- Test a known good capacitor: Confirms the meter works.
- Inspect leads and probes: Loose or corroded connections can cause trouble.
- Try another test mode: Switching from capacitance to resistance can help spot stubborn faults.
If nothing works, your multimeter might need calibration or repair.
Important Real-world Tips
- Keep a logbook: Write down your test results for future reference, especially if you’re fixing multiple devices.
- Label your capacitors: If you remove several, mark their positions to avoid confusion during reassembly.
- Store spare capacitors in a dry, cool place. Humidity and heat shorten their life.
- Double-check values: Capacitors can have similar shapes but very different ratings. Always match the replacement exactly.
Environmental And Safety Considerations
Discard old or damaged capacitors responsibly. Some, especially older ones, can contain hazardous materials.
- Do not burn: Release of toxic fumes is possible.
- Take to an electronics recycling center for safe disposal.
- Never open a capacitor: The chemicals inside can be dangerous.
For more on capacitor safety and disposal, see Wikipedia.
Frequently Asked Questions
What Does “ol” Mean On My Multimeter When Testing A Capacitor?
“OL” stands for Open Loop or Over Limit. If you see this while testing a capacitor in capacitance mode, it usually means the capacitor is open (broken inside) or the value is too high for your meter’s range. In resistance mode, “OL” means the capacitor is not charging or is open.
Can I Test A Capacitor While It’s Still In The Circuit?
Yes, but with limits. Other components connected in parallel can affect your readings, making the result less accurate. For the best results, always test capacitors out of the circuit whenever possible.
What Happens If I Connect The Probes The Wrong Way On A Polarized Capacitor?
For basic tests, reversing the probes will not damage the capacitor, but the readings may be incorrect. Always follow the correct polarity: red to positive, black to negative. For non-polarized capacitors, direction doesn’t matter.
Is It Dangerous To Test A Capacitor?
It can be if the capacitor is not properly discharged. Capacitors, especially large ones, can store a dangerous charge even when the device is unplugged. Always discharge before testing and wear safety gear.
My Multimeter Does Not Have A Capacitance Mode. Can I Still Test Capacitors?
Yes, you can use the resistance mode for a basic health check, especially on larger electrolytic capacitors. Watch for the charging behavior. If you need to know the exact value, you’ll need a meter with capacitance measurement or a dedicated capacitor tester.
Testing a capacitor with a multimeter is a practical skill that anyone can learn, and it can make troubleshooting electronics much easier. Follow the steps, stay safe, and with a little practice, you’ll feel confident handling most capacitor problems in your home or workshop.