Testing a motor with a multimeter is a valuable skill for anyone working with electrical devices, machinery, or vehicles. Whether you are a hobbyist, technician, or just trying to fix a household appliance, knowing how to use a multimeter to check the health of a motor can save time, money, and even prevent accidents. Many motors fail silently—sometimes they hum, stall, or stop completely. The root cause could be a broken wire, faulty winding, burnt insulation, or issues with the connections. Using a multimeter gives you a clear way to find out what’s wrong.
This guide will walk you through everything you need to know about testing different types of motors with a multimeter. You will learn how to prepare, what readings to expect, common mistakes, and how to interpret your results. Whether you are dealing with a small DC motor in a toy or a large AC induction motor in industrial equipment, this article will help you approach the task with confidence.
Understanding Motors And Why Testing Matters
Motors convert electrical energy into mechanical movement. They are found everywhere: fans, pumps, compressors, washing machines, and cars. The most common types you’ll encounter are DC motors, single-phase AC motors, and three-phase AC motors. Each one has unique features and testing steps.
Testing matters because a faulty motor can cause bigger problems. For example, a shorted winding in an air conditioner motor can trip circuit breakers, create excess heat, or even cause fires. Early detection means you can repair or replace before things get worse.
Testing with a multimeter also helps confirm if the problem is the motor or something else in the system. This avoids unnecessary replacements and pinpoints the issue quickly.
Essential Tools And Preparation
Before you start, gather the right tools. The most important is a digital multimeter (DMM) or a reliable analog multimeter. Modern digital models are easier to read and often more accurate. Here’s what else you’ll need:
- Insulated screwdriver
- Protective gloves
- Safety goggles
- Motor wiring diagram (if available)
- Notebook and pen for recording measurements
Safety is crucial. Always disconnect the motor from power before testing. Double-check with your multimeter in voltage mode to ensure no power is present. Motors can store energy, especially large capacitors in AC motors, so give them time to discharge.
Key Motor Types And Their Wiring
Not all motors are the same. Here are the main types you might test:
- DC motors: Found in toys, car fans, robotics, and battery-powered devices. They have two terminals: positive and negative.
- Single-phase AC motors: Used in washing machines, fans, and air conditioners. They usually have three to five wires: main winding, start winding, and sometimes a capacitor.
- Three-phase AC motors: Common in industry and larger equipment. They have three main terminals labeled U, V, and W.
Knowing your motor type helps you understand which readings to expect and where to connect your multimeter.
How A Multimeter Works For Motor Testing
A multimeter can measure resistance, voltage, continuity, and sometimes capacitance. For motor testing, you’ll mostly use the resistance (ohms, Ω) and continuity modes.
- Resistance checks for broken wires or short circuits in windings.
- Continuity mode beeps if there’s a complete path for current.
- Voltage mode checks if the power is present or if a coil is generating voltage (for advanced tests).
Digital multimeters display values as numbers, while analog ones use a needle. Both work, but digital is less likely to confuse beginners.

Credit: www.youtube.com
Step-by-step: Testing A Dc Motor
Let’s start with the simplest motor: the DC motor.
1. Identifying Motor Terminals
Most DC motors have two terminals. Sometimes, these are marked “+” and “–”, or just as two solder points.
2. Resistance Test
Set your multimeter to the ohms (Ω) range. Touch one probe to each terminal.
- A low resistance (typically 1–50 Ω for small motors) means the winding is intact.
- If you see infinite resistance (OL or open line), the winding is broken.
- If you see zero or very low resistance (close to 0 Ω), there may be a short circuit inside.
Example:
You test a small toy motor and get 12 Ω. This is healthy. If you get OL, the motor is open (broken wire inside).
3. Continuity Test
Some multimeters have a continuity mode (beep function). Use this to check for an open circuit.
- Beep: The winding is continuous.
- No beep: The wire is broken.
4. Case-to-terminal Test
Now, check for shorts to the motor’s case. Place one probe on a terminal, and the other on the metal body.
- OL or no beep: Good insulation.
- Beep or low resistance: The winding is shorting to the case—this is bad and unsafe.
5. Spinning Test
For small DC motors, you can spin the shaft by hand while watching the multimeter in voltage mode. If the motor generates voltage, the coils are working as a generator.
Testing Single-phase Ac Motors
These motors are in many household appliances.
1. Identifying Terminals And Windings
You’ll usually find three to five wires. Common labels are:
- C (Common)
- S (Start winding)
- R (Run winding)
If there’s a capacitor, you’ll see extra wires to it.
2. Resistance Test
Set your multimeter to ohms. Test:
- C to S: Start winding resistance
- C to R: Run winding resistance
- S to R: Combined resistance (should equal C-S + C-R)
For most motors, start winding has higher resistance than the run winding.
Example Data:
| Test Points | Expected Resistance (Ohms) |
|---|---|
| C to S | 10–30 Ω |
| C to R | 3–10 Ω |
| S to R | 13–40 Ω |
If any pair reads OL, that winding is broken. If you get 0 Ω, there is a short.
3. Continuity And Case Tests
Repeat the continuity and case-to-terminal tests as with DC motors. Motor windings should not beep when tested against the metal case.
4. Capacitor Check
Many single-phase motors use a start capacitor. If your multimeter has a capacitance setting, test between the two capacitor wires. Compare the reading to the capacitor’s label (e.g., 20 μF ± 10%). Replace if out of range.
5. Common Faults
- Burnt smell or discoloration: Overheating and likely shorted windings.
- No reading or infinite resistance: Open winding.
- Low resistance between winding and case: Insulation breakdown.
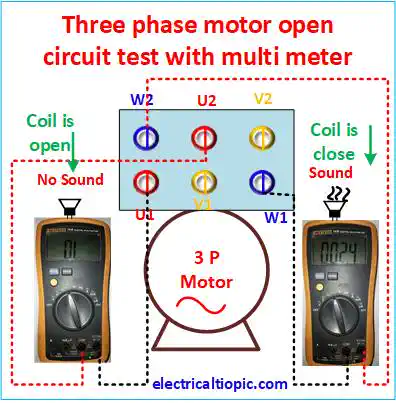
Testing Three-phase Ac Motors
These are larger motors in industry, pumps, and compressors.
1. Terminal Identification
You’ll see three large terminals, often labeled U, V, W. Each connects to one phase.
2. Resistance Test Across Phases
Set your multimeter to a low ohm range. Test:
- U to V
- V to W
- W to U
All three readings should be nearly identical (typically less than 1 Ω for large motors).
Example Data:
| Test Points | Expected Resistance (Ohms) |
|---|---|
| U to V | 0.5–2 Ω |
| V to W | 0.5–2 Ω |
| W to U | 0.5–2 Ω |
If one reading is much higher or lower, the winding is damaged.
3. Insulation Test (to Ground)
Place one probe on a terminal, and the other on the motor frame (ground). All should read OL or very high resistance (over 1 megaohm). If not, the motor is unsafe to use.
4. Phase-to-phase Balance
If all three resistances are similar, the windings are likely healthy. If not, expect uneven torque or vibration if you power the motor.
5. Advanced: Megohmmeter Test
Industrial maintenance teams may use a megohmmeter (“megger”) for insulation testing at high voltage. For basic checks, a multimeter is enough, but a megger gives better safety data.
Common Problems Found With Multimeter Testing
Testing motors with a multimeter can reveal several faults:
- Open winding: Shows as OL or infinite resistance.
- Shorted winding: Shows as 0 Ω or unusually low resistance.
- Short to case: Resistance between terminal and case is low.
- Imbalanced phases: For three-phase motors, resistance values differ more than 10%.
- Faulty capacitor: Out-of-range capacitance on single-phase motors.
Spotting these problems early prevents bigger, costlier failures.
Mistakes To Avoid When Testing Motors
Even skilled people sometimes make errors. Here are mistakes to watch out for:
- Testing with power on: Always disconnect power first.
- Wrong multimeter range: Use the lowest ohm range for windings.
- Not zeroing the meter: Analog meters need zeroing for accuracy.
- Ignoring all wires: Some motors have hidden leads or internal connections.
- Not comparing phases: For three-phase motors, always check all combinations.
- Missing insulation faults: Always check from windings to case.
- Assuming all motors are the same: Check the data sheet for correct values.
Real-world Examples
Let’s look at situations where multimeter testing revealed the actual problem:
- Washing machine not spinning: Resistance test showed OL between run and common—open winding.
- Industrial fan humming but not turning: All three-phase resistances were 0.6 Ω except one at 2.5 Ω—partial short.
- Air conditioner blowing fuse: Short between start winding and motor case detected.
Comparing Analog And Digital Multimeters For Motor Testing
Choosing the right multimeter can make testing easier and more accurate. Here’s a quick comparison:
| Feature | Analog Multimeter | Digital Multimeter |
|---|---|---|
| Readability | Needs practice (needle) | Easy (numeric display) |
| Accuracy | Lower | Higher |
| Continuity Beep | No | Yes (most models) |
| Battery Usage | Low | Moderate |
| Cost | Usually less expensive | Wide price range |
Most users prefer digital multimeters for their clear display and extra features.
Special Case: Testing Motors With Built-in Electronics
Some modern motors—like brushless DC motors or inverter-driven AC motors—have built-in electronic circuits. Testing these with a regular multimeter can be tricky, as the electronics may affect readings.
- Always check the manual for special testing instructions.
- Some circuits block DC, making resistance readings unreliable.
- If you suspect a motor controller fault, test the motor separately if possible.
Credit: electricaltopic.com
Advanced Testing: Interpreting Unusual Readings
Sometimes, the readings are not clearly “good” or “bad.” Here’s what to do:
- Slightly higher resistance: Could mean corrosion in wires or connectors.
- Resistance fluctuates: Try cleaning terminals and repeat.
- All readings seem OK, but motor still fails: Mechanical problems (like jammed bearings) may be the cause—multimeter won’t detect these.
A key tip: write down all readings and compare with the manufacturer’s data sheet if available.
Tips For Beginners Testing Motors
If you are just starting, here are two insights most people miss:
- Always test all possible combinations: For three-phase motors, test all pairs (U–V, V–W, W–U). For single-phase, check every wire.
- Test insulation, not just windings: Even if winding resistances are good, a short to the case is dangerous and can cause electric shocks.
Another beginner mistake is skipping the capacitor test on single-phase AC motors. A faulty capacitor can mimic a bad winding, so always check it too.
What To Do After Testing
Once you have your readings:
- If all readings are correct, reassemble and test the motor under power.
- If you find a fault (open, short, or ground), repair or replace the motor.
- Clean terminals and connections before final assembly.
- If unsure, consult a technician or the motor’s data sheet.
When To Seek Professional Help
If you find:
- Low resistance to the case
- All windings look fine but motor overheats or vibrates
- Unusual smells, burning, or melted parts
Do not attempt to power the motor. These are signs of dangerous faults. Professional repair or replacement is the safest option.

Credit: www.youtube.com
Helpful Resources And Further Reading
For more detailed information, the Wikipedia Multimeter Guide provides an excellent overview of multimeter types and functions.
Frequently Asked Questions
What Is The Safest Way To Test A Motor With A Multimeter?
Always disconnect the motor from all power sources before testing. Wear protective gloves and goggles. Double-check with your multimeter in voltage mode to confirm there is no live voltage before you touch any wires or terminals.
How Can I Tell If A Motor Winding Is Shorted?
A shorted winding shows very low resistance (close to 0 Ω) between terminals that should have higher values. Compare your readings to expected values or the manufacturer’s data sheet. If all windings are nearly zero or much lower than normal, a short circuit is likely.
Can A Multimeter Test The Motor’s Capacitor?
Yes, if your multimeter has a capacitance setting (symbol: μF), you can check motor capacitors. Disconnect one side of the capacitor, set your meter to capacitance, and compare the reading to the label. Replace the capacitor if it’s far outside the rated value.
What Should I Do If I Get Different Resistance Readings For Each Phase On A Three-phase Motor?
This indicates a possible fault in one of the windings. The resistances should be nearly equal. A large difference suggests a partial short, open circuit, or damaged wire. Do not run the motor until it’s repaired or checked by a professional.
Why Does My Motor Test Fine With A Multimeter But Still Not Work?
If all electrical tests pass but the motor still doesn’t run, check for mechanical issues such as jammed bearings, broken shafts, or blocked rotors. Also, make sure the power supply and controller circuits are working. Sometimes, faults outside the motor cause the problem.
Testing a motor with a multimeter is a practical skill that pays off across many fields—from home repairs to industrial maintenance. With care, clear steps, and attention to detail, you can find most electrical faults before they cause bigger trouble.
Always put safety first, take notes, and consult the data sheet when in doubt. With practice, you’ll become confident in diagnosing and solving motor problems efficiently.