Learning how to use a MIG welder can open many doors, whether you want to fix your car, build metal furniture, or start a small workshop. MIG welding is considered one of the easiest ways to join metal, and it’s popular among both hobbyists and professionals.
But while the basics are simple, good technique and safety are essential. If you’re just starting, you may feel confused by the equipment, settings, and steps. Don’t worry—by the end of this guide, you’ll know exactly what to do, what to avoid, and how to get your first weld looking strong and clean.
What Is A Mig Welder?
A MIG welder uses electricity and a wire electrode to join metals together. The full name is Metal Inert Gas welding, but it’s also called GMAW (Gas Metal Arc Welding). The main advantage is that the process is semi-automatic. The welding gun feeds wire and gas at the same time, making it easier to create long, continuous welds.
This type of welder is popular for several reasons:
- It works on many metals like steel, stainless steel, and aluminum.
- The process is fast and produces clean-looking welds.
- It’s easier to learn compared to stick or TIG welding.
How Mig Welding Works
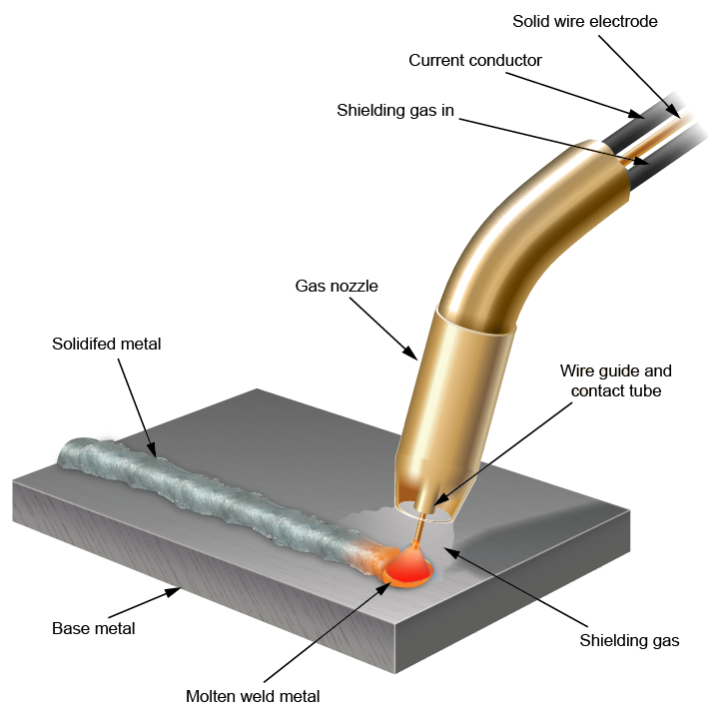
When you press the trigger on the MIG gun, the machine does three things at once:
- Feeds wire through the gun, which melts to become the filler metal.
- Creates an electric arc between the wire and the base metal, causing both to melt and join together.
- Releases shielding gas to protect the molten metal from air, which can cause weak welds.
A simple way to think of it is like a hot glue gun, but for metal.
Main Parts Of A Mig Welder
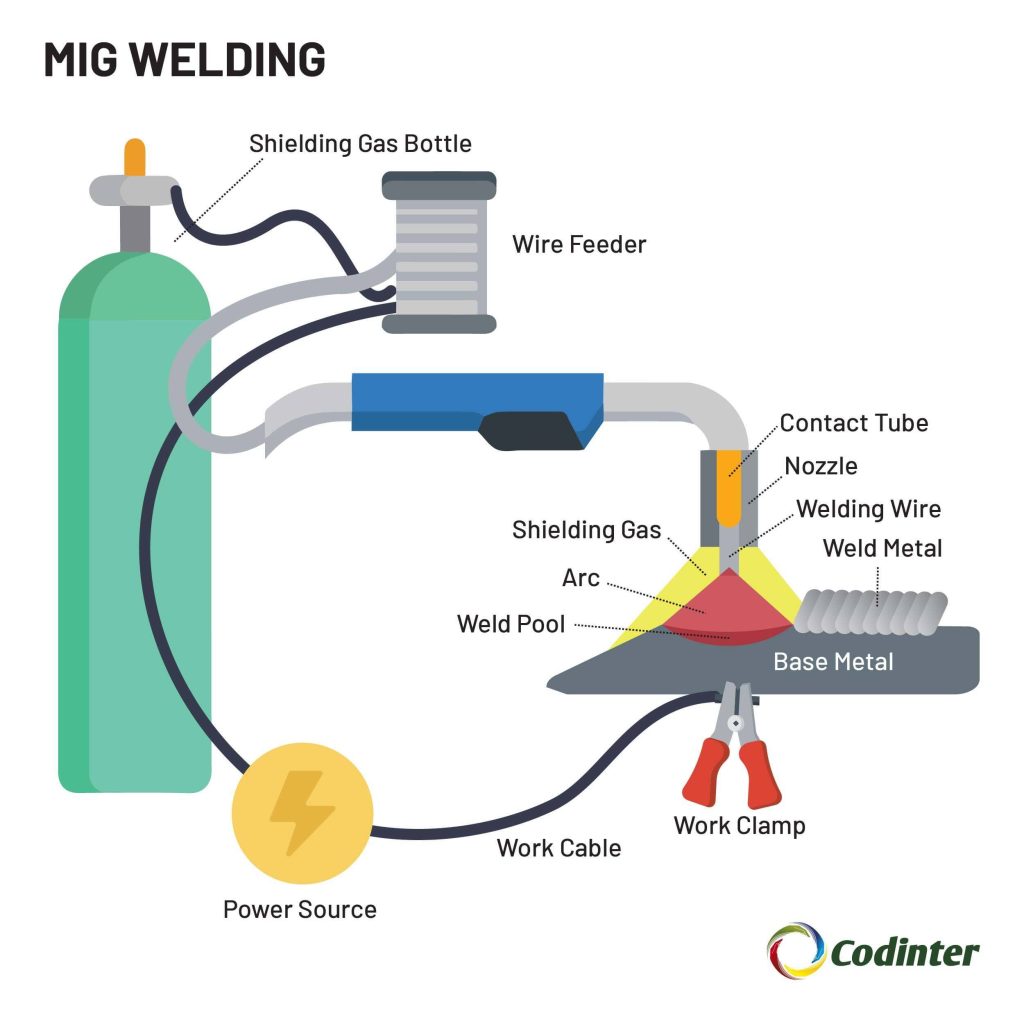
Knowing the main parts helps you set up and use the machine safely. Here are the key components:
- Power source: Supplies electricity for welding.
- Wire feed unit: Pushes the welding wire through the cable.
- Welding gun (torch): Where the wire comes out; you hold this part.
- Ground clamp: Completes the electrical circuit.
- Shielding gas cylinder: Contains the gas that protects your weld.
- Control panel: Lets you adjust settings like voltage and wire speed.
Understanding each part will make setup and troubleshooting much easier.
Safety First: Essential Precautions
Welding can be dangerous if you’re not careful. Here are critical safety tips:
- Wear safety gear: Always use a welding helmet with a proper shade (9–13 for MIG), fire-resistant gloves, a long-sleeve jacket, and closed-toe shoes.
- Work in a ventilated area: Shielding gas and hot metal create fumes. Use a fan or welding fume extractor if possible.
- Clear your workspace: Remove flammable items—paper, oil, or sawdust—from your area.
- Check your equipment: Inspect cables for damage. Replace worn parts before you start.
- Keep a fire extinguisher nearby: A small flame can quickly become a big problem.
Many beginners ignore ventilation, which can cause headaches or even long-term health problems. Always protect your lungs.
Setting Up Your Mig Welder
Setting up your MIG welder correctly is vital for smooth welding. Follow these steps carefully:
1. Connect The Ground Clamp
Attach the ground clamp to clean, bare metal on your workpiece. This completes the electrical circuit and ensures a stable arc.
2. Insert The Wire Spool
Open the side panel of your welder and place the wire spool onto the spindle. Make sure the wire is the correct size and type for your job (e. g. , 0. 023”, 0. 030”, or 0. 035” for mild steel).
3. Thread The Wire
Feed the wire through the drive rollers and into the welding gun’s liner. Squeeze the trigger to advance the wire until it comes out of the gun tip.
4. Connect The Shielding Gas
Attach the gas regulator to your cylinder (usually argon, CO2, or a mix). Connect the hose to your welder and adjust the flow rate (typically 20–25 cubic feet per hour for most jobs).
5. Select The Correct Polarity
For most MIG welding with solid wire, connect the gun to the positive terminal and the ground clamp to the negative.
6. Adjust The Settings
Set your voltage and wire feed speed based on the thickness and type of metal. Most machines have a chart inside the cover as a starting point.
7. Double-check Everything
Inspect all connections, check your wire tension, and ensure the gas is turned on.
Choosing The Right Wire And Gas
Not all wires and gases work for every job. Here’s how to choose:
Wire Types
- ER70S-6: Common for mild steel; works well with a CO2/argon mix.
- Stainless steel wire: Use with argon/CO2 mix.
- Aluminum wire: Needs pure argon and a special spool gun.
Shielding Gas Options
- 100% CO2: Cheap, deep penetration, but more spatter.
- 75% Argon/25% CO2: Cleaner welds and less spatter. Best for most mild steel work.
- 100% Argon: Needed for aluminum.
A common mistake is using the wrong gas for aluminum or stainless steel—this leads to poor weld quality.
Wire Size Vs. Metal Thickness
Here’s a helpful guide to match wire size and metal thickness:
| Wire Size (inches) | Best For Metal Thickness |
|---|---|
| 0.023″ | Up to 1/8″ (thin sheet metal) |
| 0.030″ | 1/8″ to 1/4″ |
| 0.035″ | 1/4″ and thicker |
Preparing The Metal
Good welds start with good preparation. Skipping this step is a top reason for weak welds.
- Clean the surface: Use a wire brush or grinder to remove rust, paint, oil, or dirt.
- Remove mill scale: On new steel, this thin layer can cause poor welds.
- Fit up your joint tightly: Gaps make welding harder and create weak spots.
- Clamp your work: Prevents parts from moving as you weld.
Even a small bit of oil or paint can lead to porosity (tiny holes) in your weld.
Setting The Correct Welding Parameters
Each welder is different, but there are three main settings to adjust:
1. Voltage
Controls the height and width of the weld bead. Too low, and the weld piles up; too high, and it burns through the metal.
2. Wire Feed Speed
Sets how fast the wire comes out. Too slow, and the wire burns back to the tip; too fast, and it pushes the gun away.
3. Gas Flow Rate
Typical range is 20–25 CFH (cubic feet per hour). Too low, and you get porosity; too high, and you waste gas.
Most machines have a chart inside the side panel:
| Metal Thickness | Voltage (V) | Wire Speed (IPM) |
|---|---|---|
| 1/16″ | 14–16 | 120–200 |
| 1/8″ | 16–18 | 200–300 |
| 1/4″ | 18–20 | 250–350 |
Tip: Always start with the recommended settings, then adjust based on your results.
Mig Welding Techniques
Now you’re ready to weld. Here’s how to do it step by step:
1. Positioning The Gun
Hold the gun at a 15-degree angle from vertical, pointing the tip toward the direction you’ll weld. The tip should be about 1/4” from the metal.
2. Trigger Control
Squeeze the trigger to start. The arc will form, and wire will feed automatically.
3. Travel Speed
Move the gun smoothly and steadily. Too slow, and the weld piles up; too fast, and the weld is thin and weak.
4. Welding Patterns
You can use a straight line, small circles, or a zigzag motion. For beginners, a straight line is easiest.
5. Pushing Vs. Pulling
- Pushing the gun (leading the weld) gives a wider, flatter bead and less penetration.
- Pulling (dragging) gives deeper penetration and a higher, narrower bead.
For most thin metals, pushing is better.
6. Watching The Weld Pool
The weld pool is the small area of molten metal. Keep your focus here—if it’s too big or too small, adjust your speed or settings.
Non-obvious insight: Many beginners look at the arc instead of the weld pool. Always watch the weld pool, not the sparks.
Making Your First Weld
Let’s put it all together:
- Set up your workpieces: Clamp two pieces of clean metal.
- Attach the ground clamp: To bare metal, close to your weld.
- Select your settings: Use recommended voltage and wire speed.
- Hold the gun at 15 degrees: About 1/4” from the metal.
- Squeeze the trigger: Start welding in a straight line.
- Move steadily: Watch the weld pool and adjust your speed.
- Finish and release the trigger: Let the weld cool.
After your first weld, examine the bead. A good weld will be smooth, slightly raised, and the same width all along.
Common Welding Joints
You’ll come across several main types of joints in welding:
1. Butt Joint
Two pieces side by side. Common for sheet metal.
2. Lap Joint
One piece overlaps the other. Good for thin metals.
3. T-joint
One piece stands at 90 degrees to another. Used for frames and supports.
4. Corner Joint
Two pieces meet at the corner to form an “L”.
5. Edge Joint
Two pieces side by side, joined along their edges. Used for thin sheets.
Each joint type may require a slightly different technique or position. For example, lap joints need a wider, flatter bead to cover both pieces.
Troubleshooting Common Problems
Even with good technique, problems can happen. Here are some common issues and how to fix them:
1. Porosity (tiny Holes In Weld)
- Causes: Not enough shielding gas, dirty metal, or drafts.
- Fix: Increase gas flow, clean the metal, block drafts.
2. Spatter (metal Drops Everywhere)
- Causes: Too high voltage or wire speed, or incorrect gas.
- Fix: Lower settings, use a better gas mix, keep tip clean.
3. Burn-through (holes In Metal)
- Causes: Too high voltage, slow travel speed, or thin metal.
- Fix: Lower voltage, move faster, use thicker metal.
4. Weak Welds
- Causes: Wrong wire, poor joint fit-up, dirty surface.
- Fix: Use correct wire, tighten joints, clean thoroughly.
5. Wire Feeding Issues
- Causes: Kinked liner, wrong tension, or dirty wire.
- Fix: Clean or replace liner, adjust tension, use clean wire.
Non-obvious insight: Many wire feed problems are due to cheap or rusty wire. Always use good quality wire and store it dry.
Cleaning And Finishing Your Weld
A weld isn’t finished until it’s cleaned and checked. Here’s how:
- Remove slag or spatter: Use a chipping hammer or wire brush.
- Grind the weld: If you want a smooth finish, use an angle grinder.
- Inspect the weld: Look for cracks, holes, or undercut (where the weld eats into the base metal).
- Paint or coat: To prevent rust, cover the weld with paint or a protective coating.
If your weld looks rough but is strong, that’s okay for most beginner projects. Over time, your skills—and your welds—will improve.
Maintenance And Care Of Your Mig Welder
Proper care keeps your welder running smoothly:
- Check cables and connectors regularly for wear.
- Clean the liner and tip every few hours of use.
- Store wire spools in a dry place to prevent rust.
- Close the gas cylinder when not in use.
- Service your machine as recommended by the manufacturer.
Tip: Don’t forget to replace tips and nozzles when they get worn. This small step can solve many welding problems.
Upgrading Your Skills
Once you’re comfortable, try these to level up:
- Practice on scrap metal: Try different joints, angles, and positions.
- Experiment with different wires and gases: See how they change the weld.
- Learn to weld aluminum or stainless steel: These require special wire and gas.
- Read the manual for your specific welder—each model has unique features.
If you want to see expert welders in action, check out the Wikipedia page on MIG welding for more detailed diagrams and explanations.
Comparison: Mig Vs. Other Welding Types
It helps to understand how MIG compares with other common welding methods:
| Welding Type | Skill Level | Best For | Pros | Cons |
|---|---|---|---|---|
| MIG | Beginner | General purpose, automotive, light fabrication | Easy to learn, fast, clean | Needs shielding gas, not great outdoors |
| Stick (SMAW) | Intermediate | Construction, repair, outdoor work | Works in wind, versatile | Messier, more spatter |
| TIG | Advanced | Precision, thin metals, artistic work | Clean, precise, strong welds | Slow, requires skill |
For most home and light shop projects, MIG welding is the best place to start.
Practical Project Ideas For Beginners
If you want to practice, try these simple projects:
- Repair a broken lawnmower deck: Good for learning to weld thin steel.
- Build a small metal table: Practice T-joints and corner joints.
- Create a tool rack: Use scrap steel and basic butt joints.
- Fix exhaust pipes: Learn to weld thin, round metal.
Start with small projects before moving to more complex work.
Essential Tips For Better Mig Welding
- Keep your gun steady: Use both hands, or rest one hand on the table for control.
- Listen to the sound: A good weld sounds like bacon frying—steady and crisp.
- Practice makes perfect: Don’t worry if your first welds are ugly. Every welder improves with time.
- Record your settings: Write down what works for each project.
- Protect your eyes and skin: Even brief exposure to the arc can cause burns.
Frequently Asked Questions
What Metals Can I Weld With A Mig Welder?
MIG welders can join mild steel, stainless steel, and aluminum. Each metal may need a different wire and shielding gas. For example, aluminum needs pure argon gas and special wire.
Do I Need Gas For All Mig Welding?
Most MIG welding uses a shielding gas. However, you can use flux-cored wire for outdoor work or when you don’t have gas, but it creates more spatter and smoke.
Can I Use A Mig Welder On Car Panels?
Yes, MIG welding is ideal for car panels because it’s gentle on thin metal and produces clean welds. Use a small wire size (like 0.023”) and practice on scrap before working on your car.
Why Does My Wire Keep Sticking Or Feeding Poorly?
This problem often comes from wrong wire tension, a dirty liner, or rusty wire. Check your drive rollers, clean or replace the liner, and always use fresh wire.
How Do I Know If My Weld Is Strong Enough?
A good weld should be smooth, even, and slightly raised. Test strength by trying to break a practice weld with a hammer. If it bends or cracks easily, adjust your technique or settings.
Using a MIG welder can seem complicated at first, but with practice and attention to detail, you’ll quickly improve. Always remember that good preparation, correct settings, and safety are key. Don’t be afraid to experiment and make mistakes—each weld teaches you something new.
The skills you build now can help you create, repair, and build with confidence for years to come.