Every home eventually faces a clogged drain or toilet. When water rises instead of going down, it’s easy to feel frustrated. But before you call a plumber, there’s a simple tool that often solves the problem: the plunger. Many people own one, but not everyone knows how to use it properly. Using a plunger the right way can save you time, money, and a lot of stress.
This guide will show you exactly how to use a plunger, explain why technique matters, and cover tips that most beginners miss. You’ll also learn how to choose the right plunger for the job, how to avoid common mistakes, and when to try something else.
If you want to feel confident handling household clogs, keep reading. You’ll find clear advice, practical steps, and expert insights you can trust.
Understanding The Plunger: What It Is And Why It Works
A plunger is a simple tool with a rubber cup on a stick. When you push the cup against a drain and move it up and down, it creates suction and pressure. This action can loosen clogs in toilets, sinks, tubs, and showers.
The plunger works by forcing water and air through the pipe. This pressure can break apart soft blockages, like hair, paper, or food. It’s important to use the right type of plunger for your drain, or you might not get good results.
The Science Behind Plunging
When you press a plunger down, you increase pressure in the pipe. When you pull up, you create suction. This back-and-forth movement shakes and loosens the clog. Sometimes, the clog is pushed deeper and breaks apart. Other times, it’s pulled back toward the opening and removed.
The science is simple but effective. Pipes are designed to carry water and waste away, but they’re not always straight. Clogs usually get stuck at bends or narrow points. The pressure and suction from plunging can move the blockage past these tricky spots.
One thing many people don’t realize is that the water itself is what actually moves the clog—not the air. That’s why having enough water in the bowl or sink is key.
A good seal between the plunger and the drain is what makes all this possible. Without a seal, the energy escapes into the open air instead of pushing through the clog. This is why technique matters as much as strength.
If you ever wonder why your plunging isn’t working, check your seal first. Also, the way you move the plunger—steady, quick motions rather than slow or uneven pushes—makes a big difference in breaking up tougher clogs.
Types Of Plungers And Their Uses
Not all plungers are the same. Using the wrong one can make your work harder or even damage your drain. Here’s a look at the most common types:
| Plunger Type | Best For | Key Features |
|---|---|---|
| Cup Plunger | Sinks, tubs, showers | Flat rubber cup, wide opening |
| Flange Plunger | Toilets | Extra rubber flap (flange) for tight seal |
| Accordion Plunger | Toilets (tough clogs) | Hard plastic, high pressure |
Cup Plunger
This is the classic plunger with a straight rubber cup. It works best on flat drains found in sinks, tubs, and showers. It’s not ideal for toilets because it can’t seal the curved opening.
The cup plunger’s simple shape makes it easy to use on any surface that’s flat. If you have a slow-draining bathroom sink or a bathtub that fills up as you shower, this is the tool you want. It’s also great for kitchen sinks that get clogged by food particles.
However, if you try to use a cup plunger on a toilet, you’ll notice right away that the cup doesn’t fit the opening well—resulting in poor suction and lots of splashing.
Flange Plunger
A flange plunger has a soft rubber flap (the flange) that sticks out from the cup. This design fits tightly into a toilet drain, making it much more effective for toilet clogs. You can also fold the flange in and use it like a cup plunger if needed.
The flange gives you two advantages: a better seal in toilet bowls and flexibility to use on other drains. If you only want to buy one plunger for your home, a flange plunger is often the best choice because of its versatility. Just remember to thoroughly clean it before switching between toilets and sinks.
Accordion Plunger
Accordion plungers are made from hard plastic and have a unique shape. They create strong pressure, which can help with stubborn toilet clogs. However, they can scratch porcelain, so use with care.
Some people find accordion plungers harder to use because they require more force to compress. But if you have a toilet that clogs frequently, especially with lots of paper or tougher blockages, this type can be a lifesaver. Always check that you’re not scraping the porcelain bowl, as scratches are permanent and can cause staining over time.
Non-obvious insight: Flange plungers can be used for sinks in an emergency, but cup plungers are not effective for toilets. The right seal is more important than the force you use.
Another detail many people miss: if you have a sink with a curved or oddly shaped drain, even a cup plunger might not seal well. In that case, wrapping a wet cloth around the rim of the plunger can sometimes help create a temporary seal.
Credit: www.benjaminfranklinplumbing.com
How To Choose The Right Plunger
Picking the best plunger makes the job much easier. Here’s what matters:
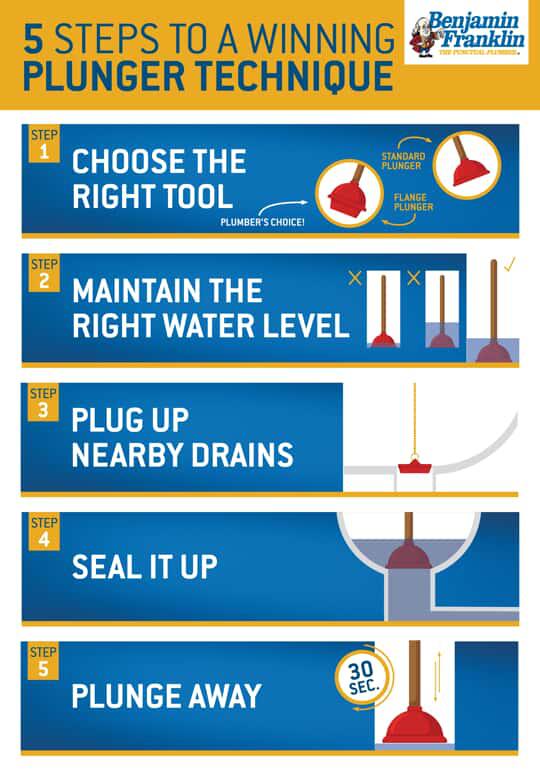
- Match the plunger to the drain. Use a cup plunger for flat drains and a flange plunger for toilets.
- Check the quality of the rubber. Softer rubber creates a better seal and is easier to use.
- Handle length matters. A longer handle gives you more control and keeps your hands away from dirty water.
- Avoid very cheap plungers. Thin rubber can fold or tear, making plunging less effective.
- Have more than one. It’s smart to keep one plunger for toilets and a different one for sinks.
Example: If you try to use a cup plunger on a toilet, you may splash dirty water without clearing the clog. Using the right plunger avoids this mess.
It’s also wise to check the handle material. Wooden handles are common, but they can get moldy if left wet. Plastic handles are easier to clean, but may feel slippery with wet hands. Some premium plungers offer ergonomic grips or angled handles for comfort.
If you have arthritis or weak grip, look for one with a comfortable, thick handle.
Non-obvious insight: Some stores sell “mini” plungers for small drains. These are rarely effective, as they can’t create enough suction. Stick to full-sized plungers for any serious clog.
Step-by-step Guide: How To Use A Plunger Properly
Many people think plunging is just about pushing hard. In reality, technique matters more than strength. Follow these steps for best results.
1. Gather Your Supplies
- The right plunger for your drain
- Old towels or rags (to clean up splashes)
- Rubber gloves (for hygiene)
- A bucket (optional, for removing excess water)
Also consider safety glasses if you’re worried about splashes, especially when dealing with toilets or after using any cleaning chemicals.
2. Prepare The Area
Put on gloves. If the toilet or sink is very full, remove some water with a bucket so it doesn’t overflow. Place towels around the base in case of splashing.
For bathroom sinks, make sure to remove any items that could get wet, such as toothbrushes or soap. If you’re working in a kitchen, clear away dishes and food scraps before you start.
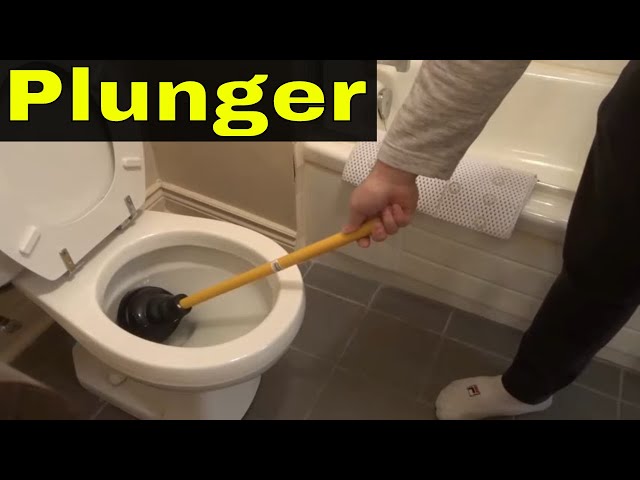
3. Position The Plunger
For toilets: Insert the flange into the drain opening. Make sure the cup covers the hole completely, forming a tight seal.
For sinks/tubs: Place the cup over the drain so it sits flat. Seal is everything—a poor seal means weak pressure.
Non-obvious insight: For double sinks, block the other drain with a wet cloth. This prevents air from escaping and increases plunging power.
It’s also important to check for overflow holes in sinks and bathtubs. Cover these with a wet rag or sponge. If you skip this step, a lot of your plunging force will escape through the overflow instead of pushing against the clog.
4. Start Slowly
Begin by pressing down gently. This pushes out excess air and forms a better seal. If you start with a strong push, you might splash dirty water.
Let the plunger fill with water before you start pumping. If you only have air in the cup, you won’t build up enough pressure to move the clog.
5. Plunge With Power
After the first gentle press, use quick, strong pushes and pulls. Keep the plunger vertical and maintain the seal. Plunge 10–20 times in a row.
Focus on short, powerful strokes rather than big, slow movements. The quick changes in pressure and suction are what break up most clogs. If you lose your seal, reposition and start again.
6. Check For Results
After several plunges, lift the plunger. If water drains away, the clog is gone. If not, repeat the process. Sometimes, it takes a few rounds.
You may hear a “gurgle” or see the water level suddenly drop—these are good signs. If nothing changes, try adjusting your technique or add more water to improve the seal.
7. Clean Up
Once clear, flush the toilet or run water to make sure the drain works. Clean your plunger with hot water and disinfectant. Wash your hands and any surfaces you touched.
If you used towels or rags, wash them immediately. Leaving dirty, wet towels can lead to odors or mildew.
Common Plunging Mistakes And How To Avoid Them
Even with the right plunger, simple errors can make clogs worse or messier. Here’s how to avoid trouble:
- Using the wrong plunger. This is the most common mistake. Always match your plunger to the drain.
- Not sealing fully. Air leaks mean no pressure. Press down firmly to create a tight seal.
- Plunging too hard at first. Start gently to avoid splashes.
- Not enough water in the bowl or sink. The cup needs water, not just air, to work. Add water if the bowl is nearly empty.
- Stopping too soon. Many clogs need 10–20 plunges. Don’t give up after just a few tries.
- Forgetting to block the overflow. In sinks and tubs, cover overflow openings with a wet rag. This makes plunging much more effective.
Example: If you plunge a dry toilet bowl, you’ll just move air. Add water until the cup is covered for best results.
Another mistake is using too much force on older or delicate plumbing. This can lead to cracks in porcelain or loosened pipes under sinks. Also, don’t use a plunger on a sink if you’ve just poured boiling water down the drain, as sudden temperature changes can damage older pipes.
Special Plunging Situations
Not all clogs are equal. Sometimes you’ll face unique challenges. Here’s what to do:
Clogged Toilets With Little Water
If the toilet bowl is nearly empty, add water until it covers the cup of the plunger. This helps create suction. Plunging without enough water won’t work.
Try using a bucket or large container to pour water quickly into the bowl—this can sometimes help dislodge the clog before you even start plunging. Just be careful not to overflow the bowl.
Sinks With Double Drains
In kitchens or bathrooms with two sinks, block the other drain before plunging. If you don’t, air will escape through the open drain, reducing pressure.
A wet rag works best for blocking the other drain, but even a tightly rolled washcloth can help. If you have a helper, ask them to hold the rag firmly in place for extra pressure.
Bathtub Clogs
Tubs often have an overflow opening near the faucet. Cover this with a wet cloth before plunging. This forces pressure down toward the clog.
You may need to plunge several times, as hair and soap clogs can be stubborn. If plunging doesn’t work after a few tries, try using a plastic hair removal tool or a small drain snake.
Floor Drains
Use a cup plunger and plunge as usual. If water backs up in several drains, you may have a main line clog and need professional help.
In basements, floor drains can collect dirt and debris. Sometimes, pouring hot water and a little dish soap down the drain before plunging helps loosen sticky clogs.
When A Plunger Won’t Work
Most soft clogs respond well to a plunger. But sometimes, the clog is too hard, deep, or made of the wrong material. Here’s when to try something else:
- Hard objects: If a toy, toothbrush, or other hard item is stuck, plunging can push it deeper. Use a toilet auger or call a plumber.
- Grease clogs: Kitchen sinks with grease may need a drain snake or enzyme cleaner.
- Main line backups: If all drains in your home are slow, the main sewer line may be blocked. Plunging individual drains won’t help.
If you suspect a hard object, avoid repeated plunging—it could damage the pipes or make removal harder. For grease, avoid chemical drain cleaners if you have older pipes, as they can cause leaks.
Non-obvious insight: If the water level rises when you run water elsewhere in the house, this is usually a sign of a main line problem, not a local clog.
Plunger Maintenance And Cleaning
A dirty plunger can spread germs. Here’s how to keep it clean:
- Rinse after every use. Use hot water to remove debris.
- Disinfect. Soak in a mix of bleach and water for 10 minutes.
- Dry before storing. Hang the plunger or set it on a tray.
- Store separately. Keep toilet and sink plungers apart to avoid cross-contamination.
If you want to avoid odors, sprinkle a bit of baking soda on the plunger before storing it. For households with children or pets, keep plungers out of reach or in a closed cabinet.
Over time, check your plunger for cracks, stiffness, or mold. Sunlight can help dry out a plunger after cleaning, but don’t leave it outdoors for too long, as UV rays can weaken rubber.
Credit: www.timrauschplumbing.com
Tools To Use With A Plunger
Sometimes, a plunger isn’t enough on its own. You can use these tools together for better results:
- Drain snake (auger): Good for hair clogs and tough blockages.
- Enzyme cleaners: Break down organic material safely.
- Wet/dry vacuum: Can pull out clogs from drains.
Example: If plunging doesn’t clear a hair clog in your shower, follow with a drain snake to pull out the blockage.
Some professionals also use a plastic “zip tool” for pulling hair from bathroom drains. These are cheap, disposable, and safer for pipes than metal snakes. Enzyme cleaners are slow but safe—pour them in at night and let them work until morning.
If using a wet/dry vacuum, switch it to liquid mode, form a tight seal over the drain, and use short bursts of suction. Be careful not to splash dirty water.
How Plungers Compare To Other Methods
How does plunging stack up against other DIY drain-clearing methods? Here’s a quick look:
| Method | Best For | Pros | Cons |
|---|---|---|---|
| Plunger | Toilets, sinks, tubs | Fast, cheap, safe | Less effective on hard clogs |
| Drain Snake | Hair, deep clogs | Reaches farther, more powerful | More effort, can scratch pipes |
| Chemical Cleaner | Soft organic clogs | Easy to use | Can harm pipes, not eco-friendly |
| Wet/Dry Vacuum | Loose debris | Strong suction | Not always practical |
While plungers are best for everyday clogs, drain snakes are essential for deeper or more stubborn blockages. Chemical cleaners should be a last resort, especially if you have older pipes or want to protect the environment. Wet/dry vacuums are rare in most homes, but can be effective for large blockages or cleaning up after a clog is removed.
Non-obvious insight: Combining methods—like plunging first, then using a snake—often gives the fastest results for tough clogs.
Plunging Safety: What You Should Know
Plunging is usually safe, but there are risks:
- Splashing dirty water: Always wear gloves. Protect your skin and eyes.
- Broken porcelain: Accordion plungers can scratch toilets. Be gentle.
- Chemical burns: Never plunge right after using a strong drain cleaner. Dangerous chemicals can splash up.
If you’ve used a chemical cleaner, wait at least an hour before plunging. Open windows for ventilation.
Also, keep children and pets out of the area while working with a plunger or chemicals. If you get any dirty water or cleaner on your skin, wash it off immediately with soap and water. Never use boiling water in toilets or porcelain sinks, as sudden heat can crack the material.
If you have an injury or cut on your hands, double up on gloves or cover the wound with a waterproof bandage to avoid infection.
Tips For Preventing Clogs
Prevention is always better than fixing a problem. Here’s how to avoid most household clogs:
- Don’t flush anything except toilet paper. Wipes, paper towels, and feminine products can block pipes.
- Use hair catchers in sinks and tubs. These stop hair before it reaches the drain.
- Avoid pouring grease down the sink. Grease hardens and traps other debris.
- Flush drains with hot water weekly. This helps clear soap and small debris.
- Teach everyone in the house what not to put down drains.
You can also run cold water for a few seconds before and after using the garbage disposal to help clear food particles. For families with small children, use toilet locks or teach kids not to throw toys in the toilet.
A little maintenance, like cleaning pop-up sink stoppers every few months, can also prevent surprise clogs.
Credit: www.youtube.com
Real-world Examples: Plunger Success Stories
Many people don’t realize how much money a simple plunger can save. Here are a few examples:
- A family in Chicago avoided a $150 plumber visit by clearing a slow toilet with a flange plunger.
- A college student fixed a clogged dorm shower by covering the overflow and plunging for 30 seconds.
- A homeowner used a cup plunger to clear a bathroom sink after hair and toothpaste built up.
Lesson: Most common clogs can be fixed in minutes with the right technique.
In another case, a landlord fixed three slow kitchen sinks in rental units by using a combination of plunging and enzyme cleaner, saving both time and tenant frustration. One homeowner found that plunging a bathtub after a child’s bath toy got stuck only made things worse—proving that knowing when not to plunge is just as important as knowing how.
Frequently Asked Questions
What If Plunging Doesn’t Clear The Clog?
If you’ve plunged for several minutes with no result, the clog may be too deep, hard, or made of the wrong material. Try a drain snake, or call a plumber if water backs up in several drains.
Can I Use A Plunger After Using Chemical Drain Cleaner?
It’s best to wait at least an hour after using chemicals. Plunging can splash dangerous chemicals onto your skin or eyes. Always wear gloves and eye protection.
How Often Should I Replace My Plunger?
Replace your plunger if the rubber cracks, becomes stiff, or if it won’t form a good seal. Most plungers last several years with proper care.
Is It Safe To Use A Plunger On All Types Of Toilets And Sinks?
Plungers are safe for most modern toilets and sinks. Be gentle with older porcelain fixtures to avoid damage. Avoid using hard plastic plungers on delicate surfaces.
Where Can I Learn More About Plumbing Basics?
You can find more information on home plumbing at the Wikipedia plumbing page, which offers detailed explanations and diagrams.
Final Thoughts
Learning how to use a plunger is a basic skill that pays off for life. With the right tool and good technique, you can solve most clogs in minutes. Remember to match the plunger to the job, maintain a tight seal, and stay patient.
Avoid common mistakes, and don’t be afraid to try again if the first attempt doesn’t work. When in doubt, there are other tools and professional help available. But for most everyday problems, a plunger is your fastest, safest, and most affordable solution.
Now, the next time water rises instead of draining, you’ll know exactly what to do.