Using a rivet gun might look simple, but mastering it can make your DIY projects, repairs, and even professional metalwork much stronger and neater. Many people feel nervous the first time they see a rivet gun. The tool seems powerful, the process feels permanent, and mistakes might seem hard to fix.
But with some clear steps and a bit of practice, you can use a rivet gun confidently and safely. This guide will take you through everything you need to know, from the different types of rivet guns, choosing the right rivet, preparing your materials, to the details of the installation process.
You’ll also learn how to solve common problems and keep your tool in top shape. Even if you have never touched a rivet gun before, by the end of this guide you will be ready to use it like a pro.
What Is A Rivet Gun And Why Use One?
A rivet gun is a tool designed to join two or more pieces of material by using a rivet, which is a small metal pin or bolt. When you use a rivet gun, you create a strong, permanent connection that does not need screws, nuts, or welding. Riveting is popular in sheet metal work, construction, car repairs, electronics, and even crafting.
There are several reasons why you might choose a rivet gun:
- Strong hold: Rivets create a durable joint that resists vibration and movement.
- Quick installation: Riveting is often faster than welding or screwing.
- No threads needed: Rivets are great when you cannot use nuts and bolts.
- Works with thin materials: Ideal for joining thin sheets of metal or plastic.
Many beginners overlook just how much time and effort a rivet gun can save. Also, unlike welding, you do not need special safety gear or skills to get started.
Types Of Rivet Guns
Understanding the types of rivet guns helps you pick the right one for your project. Each type has its own strengths and weaknesses, and knowing these can save you time and frustration.
Hand Rivet Gun
This is the most common type for home and light industrial use. It is operated by squeezing handles together, which pulls the mandrel of the rivet and creates the joint.
Pros:
- Simple to use
- Inexpensive
- Great for small jobs
Cons:
- Requires hand strength
- Not ideal for heavy-duty tasks
Lever Rivet Gun
A step up from the basic hand riveter, the lever rivet gun uses longer handles for more force with less effort.
Pros:
- Less effort needed
- Can handle larger rivets
Cons:
- Bulkier
- More expensive than basic hand riveters
Pneumatic Rivet Gun
Powered by compressed air, this type is used for larger projects and professional work.
Pros:
- Very fast
- Handles tough or frequent jobs easily
Cons:
- Needs an air compressor
- Higher cost
Battery-powered Rivet Gun
A modern solution, these use a rechargeable battery to pull the rivet.
Pros:
- Portable
- No air compressor needed
Cons:
- More expensive
- Batteries need charging
Comparison Of Rivet Gun Types
Here’s a quick look at how these rivet guns compare:
| Type | Effort Needed | Best For | Price Range |
|---|---|---|---|
| Hand Rivet Gun | High | Small repairs, hobbies | Low |
| Lever Rivet Gun | Medium | Medium projects | Medium |
| Pneumatic Rivet Gun | Low | Professional, large jobs | High |
| Battery-Powered Rivet Gun | Low | Portable, frequent use | High |
Choosing The Right Rivets
Not all rivets are the same. Picking the wrong type or size can cause weak joints or even damage your materials. Here’s what you need to know.
Types Of Rivets
- Blind (Pop) Rivets: The most common type for home and DIY. You install them from one side.
- Solid Rivets: Used in aircraft and heavy industry. Require access to both sides and often need special tools.
- Drive Rivets: Installed by hammering the mandrel, good for softer materials.
- Tubular Rivets: Used in leatherwork, electronics, or light-duty applications.
Materials
Rivets can be made from aluminum, steel, stainless steel, or copper. Match the rivet material to your workpiece. For example:
- Use aluminum rivets for aluminum sheets to avoid corrosion.
- Use stainless steel for outdoor or high-stress environments.
Sizes
Rivets come in different diameters and lengths. The diameter must match the hole in your material. The length should be enough to pass through all layers and still form a strong head.
A good rule: The rivet should be at least 1.5 times the total thickness of the materials being joined.
Rivet Size Chart Example
| Material Thickness (mm) | Recommended Rivet Length (mm) | Rivet Diameter (mm) |
|---|---|---|
| 2 | 6 | 3.2 |
| 4 | 10 | 4.0 |
| 6 | 12 | 4.8 |
| 8 | 16 | 6.4 |
Many beginners forget to check both diameter and length. Using the wrong size is one of the most common mistakes.
Preparing Your Materials
Proper preparation is key for a strong and clean rivet joint.
- Mark the Holes: Use a ruler and a marker to mark exactly where you want each rivet. Even spacing looks professional and improves strength.
- Drill the Holes: Use a drill bit that matches the rivet diameter. For example, a 3.2 mm rivet needs a 3.2 mm hole. Drill slowly and keep the drill straight.
- Deburr the Holes: Remove any sharp edges around the hole with a deburring tool or sandpaper. This helps the rivet sit flat and prevents cracks.
- Clean the Surface: Wipe away dust and oil. Clean surfaces help the rivet grip better.
- Clamp the Pieces: Use clamps to hold the materials together. This keeps everything lined up and makes riveting easier.
Neglecting to deburr or clean the holes is a mistake many people make. It can lead to weak joints or even cracks later.
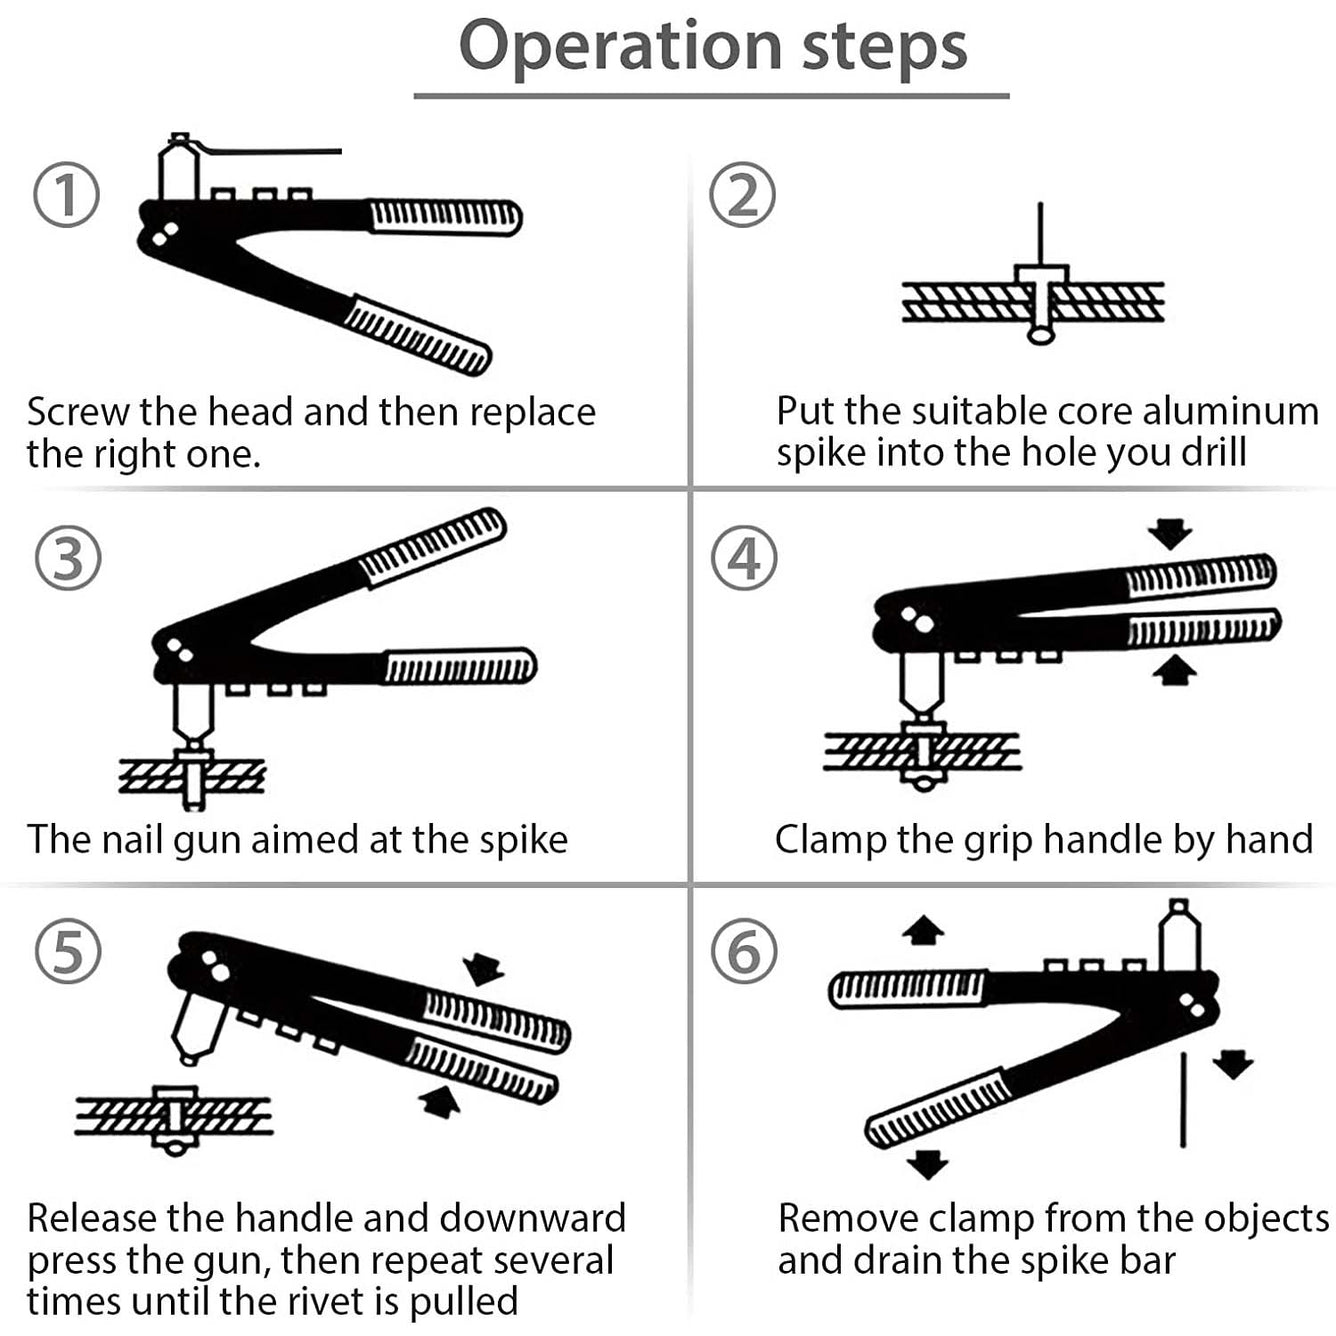
How A Rivet Gun Works: The Basics
Before you use a rivet gun, it helps to understand the basic process:
- Insert a rivet into the prepared hole.
- Place the rivet gun’s nosepiece over the rivet’s mandrel (the long pin).
- Squeeze the handles or trigger. The gun pulls the mandrel, which deforms the rivet body and creates a second “head” on the blind side.
- The mandrel snaps off, leaving the rivet in place.
This process creates a strong joint even when you can only reach one side of the workpiece.
Step-by-step: How To Use A Rivet Gun
Using a rivet gun is not difficult, but following the right steps helps you get perfect results every time. Here is a clear process for beginners and experienced users alike.
1. Gather Your Tools And Safety Gear
You will need:
- The right rivet gun for your job
- Rivets of the correct size and material
- A drill and matching drill bits
- Clamps (optional, but helpful)
- Safety glasses to protect your eyes
- A deburring tool or sandpaper
2. Prepare The Workpieces
Mark, drill, deburr, and clean the holes as explained earlier. Double-check that the holes are lined up and the correct size.
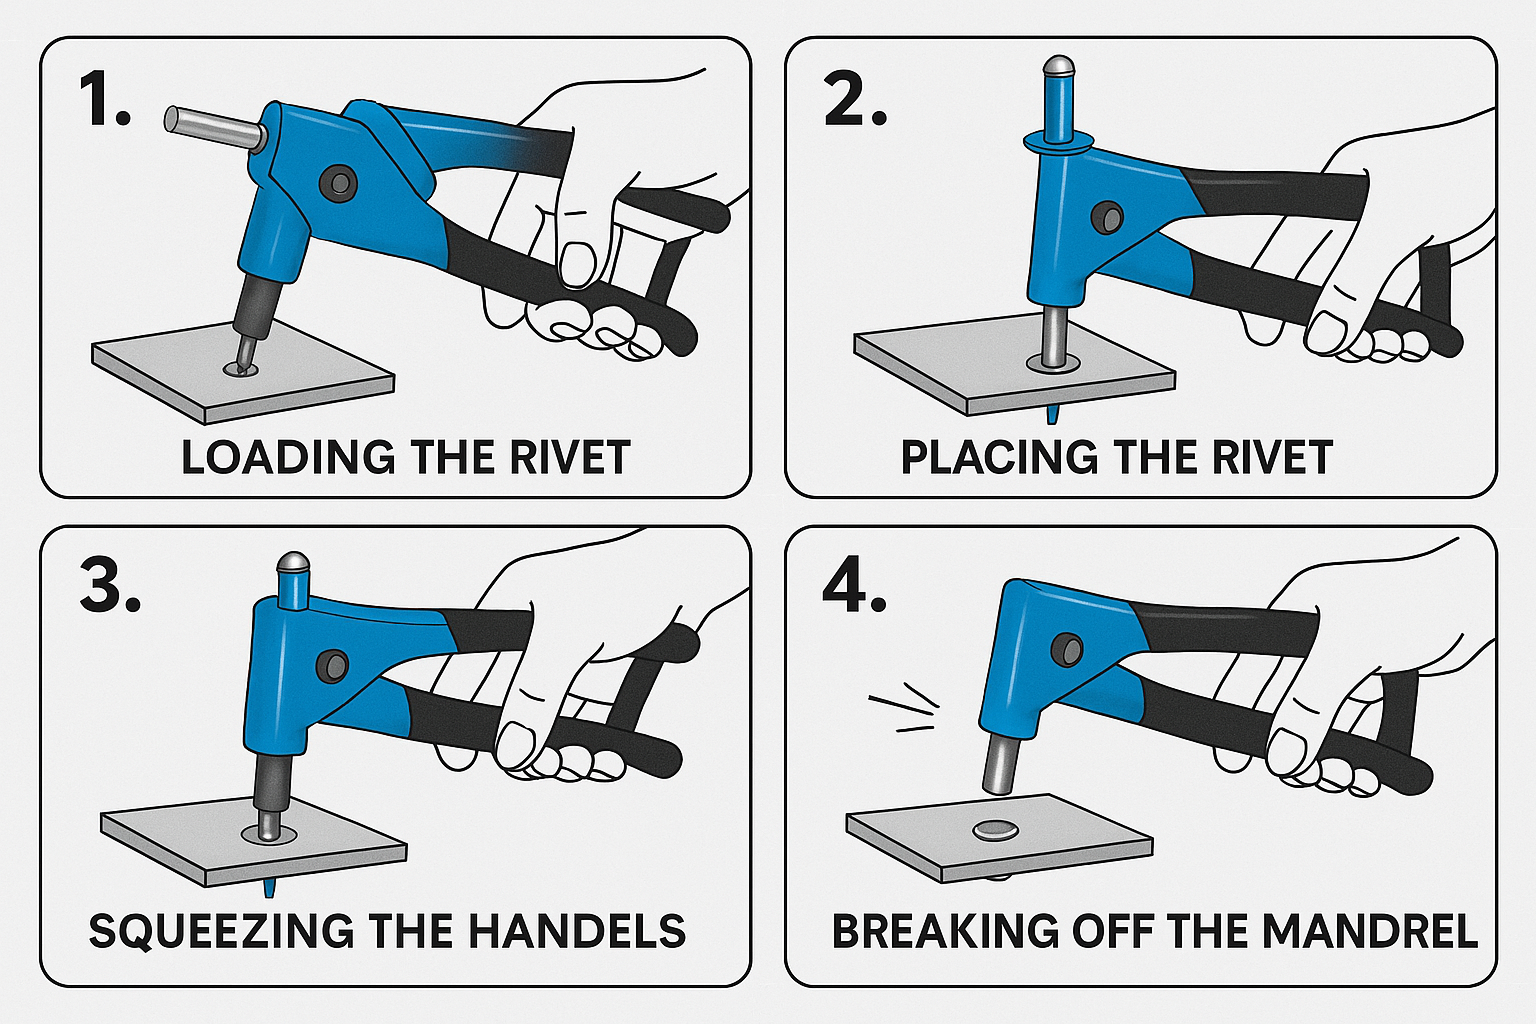
3. Load The Rivet Into The Gun
- Choose the correct nosepiece for the rivet size and attach it to your rivet gun.
- Insert the mandrel (long pin) of the rivet into the nosepiece. The rivet’s head should be outside the gun.
4. Insert The Rivet Into The Hole
Push the rivet body through the hole until the head sits flat against the material. If you are joining more than two layers, make sure the rivet goes through all of them.
5. Squeeze The Handles Or Trigger
- For a hand or lever gun: Squeeze the handles together. You may need to squeeze two or three times for larger rivets.
- For pneumatic or battery guns: Press the trigger and let the tool do the work.
You will feel resistance as the rivet body deforms.
6. Listen For The “snap”
When the mandrel breaks off, you’ll hear or feel a “snap. ” This means the rivet is fully set.
7. Remove The Mandrel
Release the handles and pull the gun away. The leftover mandrel pin will drop out (or you may need to remove it from the tool).
8. Inspect The Joint
Check that the rivet is tight and the head is flush with the material. If it is loose or crooked, remove it and try again with a new rivet.
9. Clean Up
Dispose of broken mandrels safely and clean up any metal shavings.
Common Mistakes And How To Avoid Them
Mistakes can happen, but knowing what to watch for will save you time and frustration.
- Wrong rivet size: Always double-check both the diameter and length.
- Holes not aligned: Misaligned holes cause weak joints. Clamp pieces tightly and mark holes carefully.
- Improper nosepiece: Using the wrong nosepiece can jam the gun or ruin the rivet.
- Not squeezing enough: If the rivet is loose, squeeze again until the mandrel breaks.
- Skipping deburring: Rough holes can lead to cracks or weak joints.
- Over-tightening: Don’t force the gun after the mandrel snaps, or you may damage the tool.
One non-obvious tip: Always have extra rivets on hand. Sometimes a rivet will bend or not set right, especially as you learn.
Pro Tips For Perfect Riveting
Even experienced users sometimes miss these small but important details:
- Practice on scrap material: Before working on your real project, test the process on a scrap piece. This helps you get a feel for the tool and check your rivet size.
- Use two clamps: One clamp is good, but two are better for long seams.
- Check both sides: After riveting, look at both sides. The “blind” side should have a smooth, mushroom-shaped head.
- Stay organized: Keep rivets sorted by size and material in a small box. Mixing up sizes leads to mistakes.
- Replace worn nosepieces: A worn nosepiece can deform rivets or cause jams.
Advanced Techniques: Riveting Different Materials
Riveting works on more than just metal. Here’s how to handle different materials.
Metal To Metal
This is the most common use. Use aluminum or steel rivets, and always match the rivet material to the metal type to prevent corrosion.
Metal To Plastic
Use a lower-pressure setting (if using a pneumatic gun) and choose soft aluminum rivets. Too much force can crack the plastic.
Plastic To Plastic
Use special plastic rivets, which are softer and less likely to damage the material. Drill slowly to avoid melting the plastic.
Leather And Fabric
Tubular or split rivets work best for these materials. Often, a hammer and a special setting tool are used instead of a gun.
Many beginners miss the fact that using steel rivets in aluminum causes galvanic corrosion, which weakens the joint over time.
How To Remove A Rivet
Sometimes you need to remove a rivet—maybe you made a mistake or need to repair something. Here’s how:
- Drill out the center: Use a drill bit the same size as the rivet mandrel. Drill straight into the center until the head pops off.
- Punch out the body: Use a small punch or nail to tap the rest of the rivet out of the hole.
- Clean the hole: Remove any leftover pieces and debris before inserting a new rivet.
Never try to pry a rivet out—it can damage the material. Drilling is safer and keeps the hole clean.
Maintaining Your Rivet Gun
A well-maintained rivet gun lasts longer and works better. Here are some essential care tips:
- Clean after use: Wipe off dust and metal shavings.
- Oil moving parts: A drop of light oil on the pivot points keeps the tool smooth.
- Check the nosepiece: Clean out debris and replace if worn.
- Store properly: Keep the tool in a dry place to avoid rust.
- Inspect for damage: Check for cracks or bent parts before each use.
A common mistake is forgetting to oil the tool, which leads to stiff handles or jams.
Safety Tips When Using A Rivet Gun
Rivet guns are safer than many power tools, but there are still risks if you are not careful.
- Always wear safety glasses. Metal shavings or broken mandrels can fly out unexpectedly.
- Keep fingers clear of the nosepiece and rivet.
- Secure your workpiece with clamps. Unstable materials can slip and cause injury.
- Don’t force the tool. If a rivet does not set, check for problems rather than squeezing harder.
- Dispose of mandrels properly. They are sharp and can cause cuts.
One less obvious risk: In noisy workshops, the “snap” of a mandrel can be loud. Ear protection is a good idea for large jobs.
Comparing Rivet Guns For Common Uses
Choosing the right type of rivet gun depends on your tasks. Here’s a side-by-side look at which gun fits which job:
| Task | Best Rivet Gun | Why |
|---|---|---|
| DIY Repairs | Hand Rivet Gun | Simple, affordable, good for small jobs |
| Automotive Work | Lever or Pneumatic | Handles tough materials, faster for many rivets |
| Construction | Pneumatic | Speed and power for large projects |
| Field Work | Battery-Powered | No need for air, portable, good for remote jobs |
| Crafts & Hobbies | Hand Rivet Gun | Control and precision, doesn’t need power |
Real-world Example: Repairing A Metal Sheet
Imagine you have a loose piece of metal on your garden shed. Screws keep coming loose, and welding is not practical. Using a rivet gun, you can fix it in less than 10 minutes.
- Remove old screws and clean the area.
- Mark and drill holes through both the sheet and the frame.
- Deburr and clean the holes.
- Load the correct rivet into your hand rivet gun.
- Insert the rivet and squeeze until the mandrel snaps.
- Repeat for all holes.
- The metal is now fixed strongly, with no risk of screws falling out.
This method is also used in car repairs, metal furniture assembly, and even making aluminum boats.
Troubleshooting: What To Do When Things Go Wrong
Even with care, sometimes things don’t go as planned. Here’s how to fix common issues:
- Rivet won’t set: Check if the nosepiece matches the rivet size. Try a new rivet if the mandrel is bent.
- Mandrel stuck in gun: Open the tool and remove the mandrel. Clean the nosepiece.
- Rivet spins in the hole: The hole may be too large. Use a larger rivet or fill the hole and re-drill.
- Material cracked: Use a softer rivet and drill a slightly larger hole next time.
If you face frequent problems, check your technique or consider upgrading your tool.
Environmental And Quality Considerations
You might wonder if rivets are environmentally friendly. Most rivets are made of recyclable metals, and the process produces little waste. However, always dispose of leftover mandrels and broken rivets responsibly.
Choosing high-quality rivets and a good rivet gun saves money in the long run. Cheap tools often jam or break, while low-quality rivets may not hold. Brands like Stanley, Arrow, and Astro Pneumatic are trusted in the industry.
For more on the history and science of riveting, the Wikipedia page on rivets is a solid resource.

Frequently Asked Questions
How Do I Know Which Rivet Size To Use?
Measure the total thickness of the materials you want to join. Choose a rivet with a length at least 1. 5 times this thickness. The diameter should match the hole you have drilled—too loose or too tight will cause problems.
Can I Use A Rivet Gun On Plastic Or Wood?
Yes, but use the right rivet type. For plastic, use soft aluminum or plastic rivets, and drill slowly to avoid cracking. For wood, use special wood rivets or screws, as standard rivets may not hold well.
What Should I Do If The Mandrel Gets Stuck In The Gun?
Open the nosepiece and remove the mandrel with pliers. Clean the inside, and make sure you are using the correct size nosepiece and rivet.
Are Rivet Joints Waterproof?
Most rivet joints are not completely waterproof on their own. To make them watertight, use a sealant around the rivet before setting it. Some rivets are designed with waterproof features, but check the packaging.
How Long Does A Rivet Gun Last?
With regular cleaning and light oiling, a quality rivet gun can last for many years. Replace worn nosepieces and handles as needed, and avoid forcing the tool if something feels wrong.
A rivet gun might seem like a simple tool, but with the right knowledge, it opens up a world of strong, lasting connections for all kinds of materials. From home repairs to professional builds, learning to use a rivet gun saves time, money, and effort.
Take your time, follow the steps, and soon you’ll be creating secure, professional joints every time.