Woodworking is full of tools that can change how you work, but few are as useful as the router table. If you want to make smooth edges, cut grooves, or create decorative details, a router table can help you do it faster and with more control. Many beginners find router tables confusing or even a bit scary at first. But with the right steps, anyone can use a router table safely and get professional-looking results.
In this guide, you’ll learn how to use a router table step by step. We’ll look at how a router table works, how to set it up, and how to make different types of cuts. You’ll also find safety tips, practical advice, and real-life examples that will help you avoid common mistakes.
Whether you’re a hobbyist or want to improve your workshop skills, this article will give you everything you need to get started with confidence.
What Is A Router Table And Why Use One?
A router table is a flat work surface with a hole for mounting a woodworking router upside down. Instead of moving the router over your workpiece, you move the wood across the spinning bit. This gives you more control, especially for small or narrow pieces that are hard to hold by hand.
Here’s why many woodworkers love using a router table:
- It’s easier to make repeatable, accurate cuts.
- You can keep both hands on the wood for better control.
- Small pieces are safer to cut.
- You can use special jigs and fences for complex tasks.
Example: If you want to add a decorative edge to a picture frame, using a router table lets you guide the frame smoothly along the bit for a perfect finish every time.
Types Of Router Tables
Not all router tables are the same. Knowing the different types will help you choose the right one for your workshop.
| Type | Main Features | Best For |
|---|---|---|
| Benchtop Router Table | Small, sits on a workbench, portable | Hobbyists, small workshops |
| Floor-Standing Router Table | Larger, stable, has storage, heavy-duty | Frequent use, professionals |
| Extension Wing Table | Fits onto a table saw as an extra wing | Saving space, multi-use shops |
Non-obvious tip: Think about your space. If you have a small workshop, a benchtop table is easier to move and store. For bigger jobs or heavy routers, a floor-standing table is more stable.
Key Parts Of A Router Table
Before you start, it’s important to know the main parts of a router table:
- Tabletop: The flat surface where you move your wood.
- Router insert plate: Holds the router in place and keeps it level.
- Fence: Guides your wood for straight cuts.
- Miter gauge slot: Lets you use miter gauges for angled cuts.
- Featherboards: Help keep wood pressed against the fence or table.
- Dust port: Connects to a vacuum to remove sawdust.
Example: If you want to cut a straight groove, you’ll use the fence to keep your wood moving in a straight line.
Setting Up Your Router Table
Proper setup is key for safety and good results. Here’s how to get your router table ready:
1. Attach The Router
First, you need to mount your router under the table. Most tables use an insert plate that fits your router.
- Unplug your router before starting.
- Line up the holes on the plate with your router’s base.
- Use the right screws to secure the router.
- Make sure the router bit is centered in the opening.
Non-obvious insight: Some routers need special plates or adapters. Double-check compatibility before buying.
2. Install And Adjust The Router Bit
Choose the right bit for your job (straight, roundover, chamfer, etc. ). Insert the bit into the router’s collet and tighten it securely.
- The bit should be inserted at least 3/4 into the collet for safety.
- Use the router’s adjustment mechanism to set the bit height.
Practical tip: Measure the bit height with a ruler or height gauge for precise results.
3. Set The Fence Position
The fence keeps your workpiece straight. Move the fence so the bit’s cutting edge lines up with the fence’s opening.
- Lock the fence in place.
- Make sure it’s parallel to the miter slot if you plan to use one.
4. Attach Safety Accessories
- Featherboards press your wood against the fence or table for safer, cleaner cuts.
- Use push blocks or sticks to keep your hands away from the spinning bit.
- Connect a dust extractor to the dust port if you have one.
5. Check Everything
Before plugging in, double-check:
- The bit is tight and the correct height.
- The fence is locked.
- All safety accessories are in place.
- The router switch is off.
Basic Router Table Operations
Now you’re ready to start making cuts. Here are the most common ways to use a router table:
Edge Routing
Edge routing shapes the sides of your workpiece. You can make round edges, decorative profiles, or simple chamfers.
- Hold the wood against the fence and move it from right to left.
- Keep steady pressure against both the table and fence.
- Use a push block for narrow pieces.
Example: To make a roundover on a 3/4-inch board, use a 3/8-inch roundover bit and adjust the height so only part of the bit cuts the edge.
Grooving And Dados
To cut a groove (a slot along the wood), use a straight bit.
- Set the fence for the groove’s position.
- Lower the bit so it cuts only as deep as needed (usually 1/4 to 1/2 inch).
- Feed the wood slowly and steadily.
Tip: Make several shallow passes instead of one deep cut to avoid burning or kickback.
Rabbet Cuts
A rabbet is a step-shaped cut on the edge of a board. It’s often used for joining pieces, like making picture frames or cabinet backs.
- Use a straight or rabbet bit.
- Set the fence to expose the right part of the bit.
- Make multiple passes for wide rabbets.
Using Template Guides
You can use templates with a bearing-guided bit for repeating shapes.
- Attach the template to your workpiece.
- The bearing follows the template while the bit cuts the wood.
Non-obvious insight: Templates work best with climb cuts, but these are risky. Only do climb cuts if you have experience and proper safety gear.
Making Advanced Cuts
Once you’re comfortable, you can try more advanced cuts.
Raised Panel Doors
A raised panel door has a thick center panel with sloped or shaped edges.
- Use a panel-raising bit.
- Make several shallow passes.
- Move the panel slowly and evenly for a smooth finish.
Joinery Cuts
Router tables are great for making joints:
- Tongue and groove: Use a matched set of bits.
- Box joints: Use a jig to guide the workpiece.
- Dovetails: Special dovetail jigs make these strong joints possible.
Molding And Decorative Edges
You can create custom moldings for doors, windows, or furniture.
- Use multi-profile bits or stack different bits for unique shapes.
- Test on scrap wood to fine-tune the look.
Example: By stacking a cove bit and a roundover bit, you can create a unique edge not found in stores.
Credit: kmtools.com
Essential Safety Tips
A router table is powerful and can be dangerous if used incorrectly. Here are the most important safety tips:
- Always wear eye and ear protection. Wood chips can fly, and routers are loud.
- Never reach near the spinning bit. Use push blocks or sticks.
- Feed the wood from right to left. This goes against the bit’s rotation for safe control.
- Use featherboards. They keep your hands away and hold the wood steady.
- Don’t force the cut. If the router bogs down, slow your feed rate or make shallower cuts.
- Keep the bit sharp and clean. Dull bits burn wood and may grab unexpectedly.
- Disconnect power before changing bits. Accidents can happen if you forget.
Non-obvious tip: Static electricity can build up on plastic router tables and attract sawdust. Wipe the table with an anti-static cloth to keep it clean.
Common Mistakes And How To Avoid Them
Many beginners make the same errors when learning to use a router table. Avoid these to get better results and stay safe.
1. Using Dull Or Wrong Bits
A dull bit burns wood and is harder to control. Using the wrong bit type can damage your project or your table.
How to avoid: Buy high-quality carbide bits and keep them sharp. Learn which bit does what before starting.
2. Cutting Too Deep In One Pass
Trying to remove too much wood at once can stall the router or cause kickback.
How to avoid: Make several shallow passes instead of one deep pass. This is safer and gives a cleaner finish.
3. Not Using The Fence Properly
If the fence isn’t aligned, your cuts will be crooked or uneven.
How to avoid: Always check fence alignment before starting. Use a straightedge to confirm.
4. Skipping Featherboards
Without featherboards, wood can slip or twist, leading to bad cuts or accidents.
How to avoid: Use featherboards for almost every cut, especially with narrow workpieces.
5. Not Testing On Scrap Wood
Jumping straight to your final piece without a test run can ruin your project.
How to avoid: Always test the bit height and fence setup on scrap wood first.
Credit: sawsonskates.com
How To Choose The Right Router Table For Your Needs
If you haven’t bought a router table yet, consider these factors:
Size And Space
- Benchtop tables fit small spaces but may be less stable.
- Floor-standing tables are better for heavy work and bigger routers.
Tabletop Material
Router tables come with tops made of MDF, aluminum, or cast iron.
| Material | Pros | Cons |
|---|---|---|
| MDF | Affordable, smooth | Can sag over time |
| Aluminum | Durable, flat | Noisy, more expensive |
| Cast Iron | Very stable, stays flat | Heavy, costly |
Practical insight: If you move your table often, choose aluminum or MDF. For permanent workshop setups, cast iron is best.
Fence Quality
A solid, easy-to-adjust fence is important for accurate work. Some fences have split faces, which help with dust collection and reduce tear-out.
Router Compatibility
Check if your router fits the table’s insert plate. Some tables include multiple plates for different brands.
Dust Collection
A dust port helps keep your workspace clean and protects your lungs.
Price And Brand
Well-known brands like Bosch, Kreg, and Incra make reliable tables. Prices range from $100 to over $500.
Non-obvious insight: Spending more on a good fence and flat table will improve your results more than fancy extras.
Step-by-step Example: Making A Simple Edge Profile
Let’s walk through a basic project: adding a rounded edge to a pine board.
- Install the router bit. Choose a roundover bit and secure it in the router.
- Set the bit height. Adjust so the profile matches what you want.
- Adjust the fence. Set the fence so only the round part of the bit is exposed.
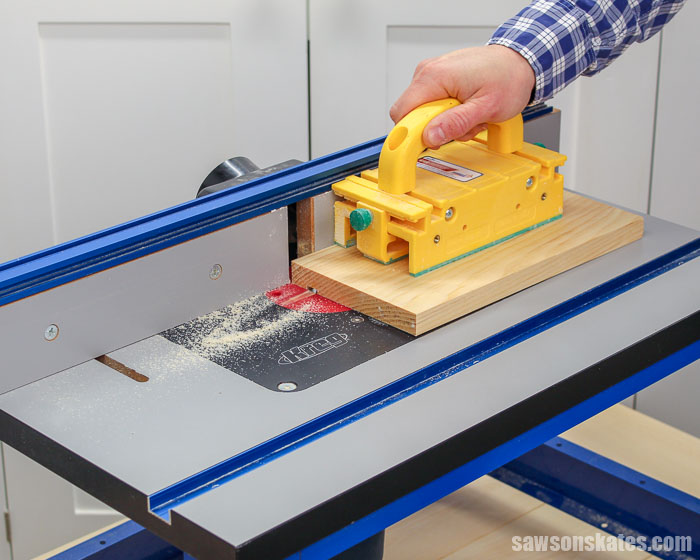
- Attach featherboards. Place one on the table and one on the fence.
- Test on scrap wood. Run a test cut to check the profile.
- Route the real piece. Hold your board firmly and feed it from right to left.
- Check the result. If the edge is smooth, you’re done. If not, adjust the height or fence and try again.
Tip: Go slowly, especially at the start and end of the cut, to avoid tear-out.
Maintenance And Care Of Router Tables
A router table will last for years if you take care of it.
- Clean the tabletop after every use to remove sawdust and resin.
- Check the insert plate for flatness. If it sags, adjust or replace it.
- Lubricate moving parts like the fence adjustment or lift.
- Sharpen or replace bits regularly.
- Inspect the power cord for wear or damage.
Non-obvious tip: If your table’s surface is sticky, rub it with paste wax for a smoother feed.
Router Table Accessories Worth Having
A few accessories can make your router table more useful and safer.
- Featherboards: Keep wood pressed against the fence or table.
- Push blocks and sticks: Protect your hands.
- Router lifts: Allow fast, precise bit height adjustments.
- Bit storage: Keeps your bits organized and clean.
- Miter gauge: Helps with angled or cross-grain cuts.
- Stop blocks: Let you repeat the same cut on many pieces.
- Digital height gauge: For precise bit height adjustments.
Practical insight: You don’t need all these at once. Start with featherboards and push blocks, then add more as your skills grow.
Troubleshooting: Fixing Problems With Your Router Table Cuts
Even with good setup and safety, things sometimes go wrong. Here’s how to fix the most common issues:
Burn Marks On Wood
Cause: Bit is dull, feed rate too slow, or cutting too deep.
Fix: Sharpen or replace the bit, feed faster, or make shallower passes.
Tear-out Or Chipping
Cause: Cutting against the grain, using a dull bit, or poor support.
Fix: Use a sharp bit, support the wood with featherboards, and take light passes. For tricky grain, use a backer board.
Crooked Or Uneven Cuts
Cause: Fence is misaligned or wood isn’t held firmly.
Fix: Realign the fence and use featherboards or a miter gauge.
Bit Slips Down During Cut
Cause: Bit wasn’t tightened enough or collet is dirty.
Fix: Clean the collet, insert the bit fully, and tighten securely.
Lots Of Sawdust Left Behind
Cause: Poor dust collection or wrong bit for the job.
Fix: Use the dust port, and check if the bit is designed for plunge or table use.
Real-life Examples: Router Table In Action
Making Drawer Boxes
Router tables are perfect for making drawer joints. Use a straight bit and fence to cut grooves for drawer bottoms. Then, use a box joint jig for strong corners.
Creating Custom Trim
Need a special trim for a unique window or shelf? Stack different bits or adjust bit heights to make one-of-a-kind moldings that match your style.
Cutting Multiple Identical Parts
For projects like small boxes or picture frames, set up stop blocks and make repeat cuts. This ensures every piece is exactly the same size and shape.
Shaping Small Parts
Trying to round over a tiny piece by hand is dangerous. On a router table, featherboards and push sticks let you safely shape even very small parts.
Non-obvious insight: When routing small parts, start with a larger piece, shape the edge, then cut it to final size. This keeps your fingers safer.
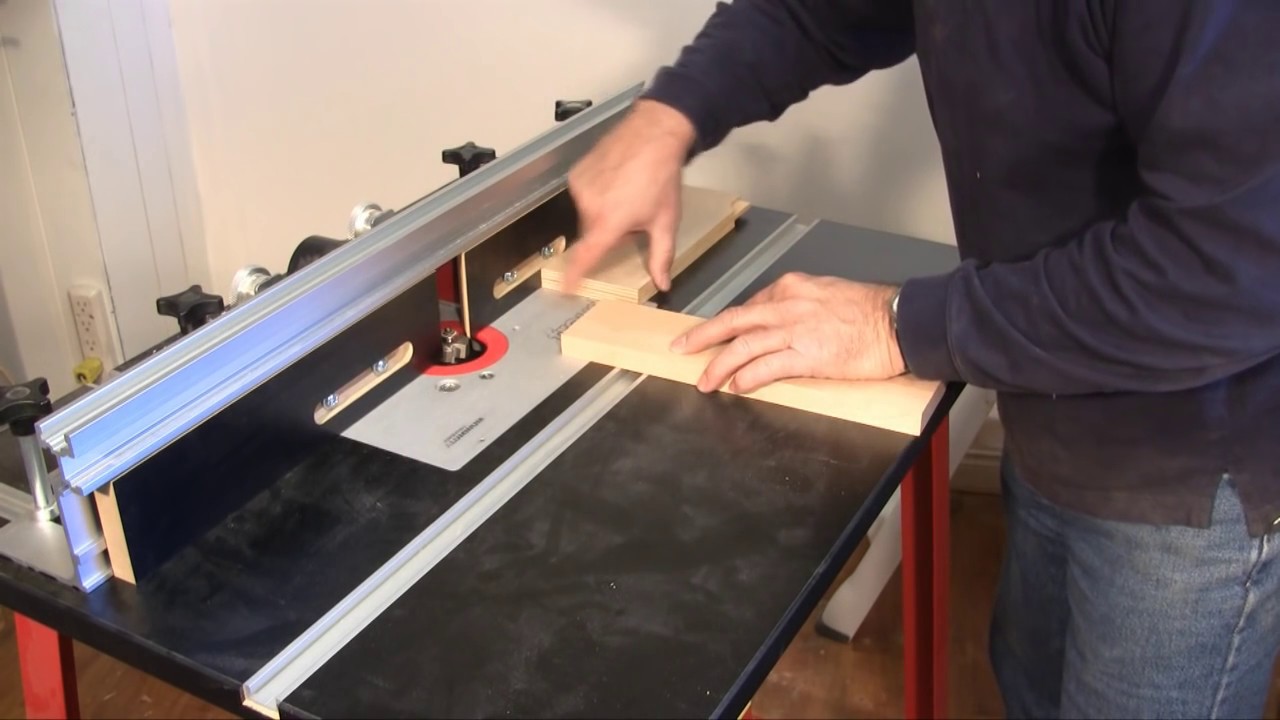
Credit: www.youtube.com
Comparison: Router Table Vs. Handheld Router
Some woodworkers wonder if they need a router table or if a handheld router is enough. Here’s a quick comparison:
| Feature | Router Table | Handheld Router |
|---|---|---|
| Control | More control for small parts | Good for large pieces |
| Repeatability | Easy to repeat cuts | Harder to get exact matches |
| Safety | Safer for small, narrow parts | Safer for big panels |
| Versatility | Great for joinery and edge work | Better for freehand or plunge cuts |
Practical advice: Most serious woodworkers use both. A router table excels at precise, repetitive cuts; a handheld router is best for large or fixed panels.
Tips For Getting The Best Results
- Always work with sharp, clean bits.
- Take your time setting up; a few extra minutes can save hours of frustration.
- Use dust collection whenever possible for a cleaner shop and better health.
- Make test cuts before every project, even if you’ve done it before.
- Label and organize your bits to avoid confusion.
- Don’t ignore noise and dust. Both can harm your health over time.
- Practice on scrap wood until you’re comfortable with new techniques.
Non-obvious insight: Write down your setup details (bit height, fence position, etc.) for future projects. This makes repeating a successful cut much easier.
Frequently Asked Questions
What Types Of Router Bits Can I Use On A Router Table?
You can use almost any router bit designed for woodworking, including straight, roundover, chamfer, rabbeting, and molding bits. Avoid very large panel-raising bits on small tables, and always check the manufacturer’s recommendations for your router’s speed and table compatibility.
How Do I Prevent Tear-out When Routing?
To prevent tear-out, use a sharp bit and cut with the grain whenever possible. Support the workpiece with featherboards and a backer board. For delicate woods, take several shallow passes instead of one deep cut.
Is Dust Collection Important For Router Tables?
Yes, dust collection is very important. Router tables make a lot of fine dust, which can harm your lungs and make your workspace messy. Many router tables include a dust port for connecting a shop vacuum or dust extractor. For more on dust hazards, see this Wikipedia article on wood dust.
Can I Build My Own Router Table?
You can build your own router table if you have some woodworking experience. Many plans are available online. Make sure your homemade table is flat, stable, and can safely hold your router. Pay extra attention to fence quality and insert plate alignment.
What’s The Right Feed Direction On A Router Table?
Always feed your workpiece from right to left (against the bit’s rotation). This gives you more control and prevents the bit from grabbing the wood and pulling it from your hands.
Learning how to use a router table opens up many possibilities in woodworking, from simple edge finishing to complex joinery and custom trims. With the right setup, good safety habits, and practice, you’ll find a router table is one of the most valuable tools in your shop.
Take your time, start with simple projects, and enjoy the precision and creativity a router table brings to your work.