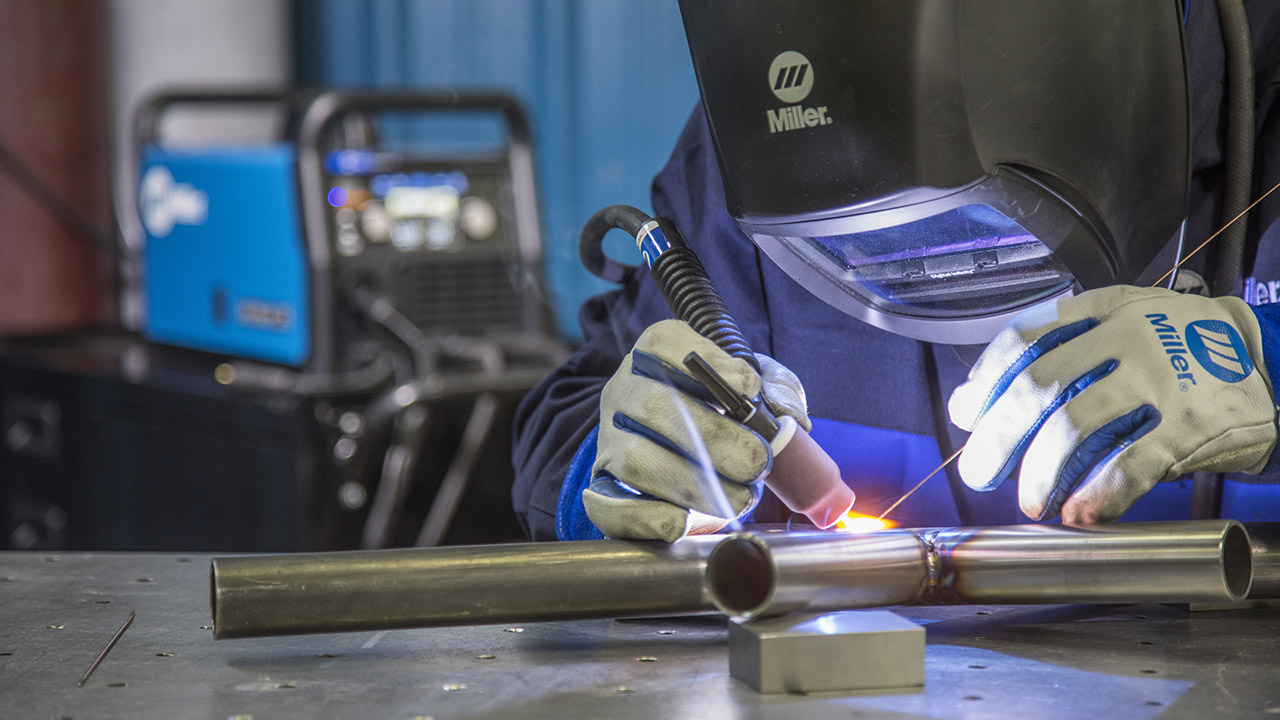
Welding is a skill that can open many doors, whether you want to fix a car, build a metal sculpture, or work in heavy industry. Among all welding methods, TIG welding (Tungsten Inert Gas welding, also called GTAW) stands out for its precision, clean welds, and ability to work with many metals. At first glance, TIG welding can look complex, but once you understand the basics and develop some muscle memory, it becomes much easier—and even enjoyable. In this guide, you’ll learn how to use a TIG welder step by step, what equipment you need, how to prepare safely, how to master the welding process, and how to avoid common mistakes. If you’re just starting out, you’ll also discover tips that even many beginners overlook.
What Is Tig Welding?
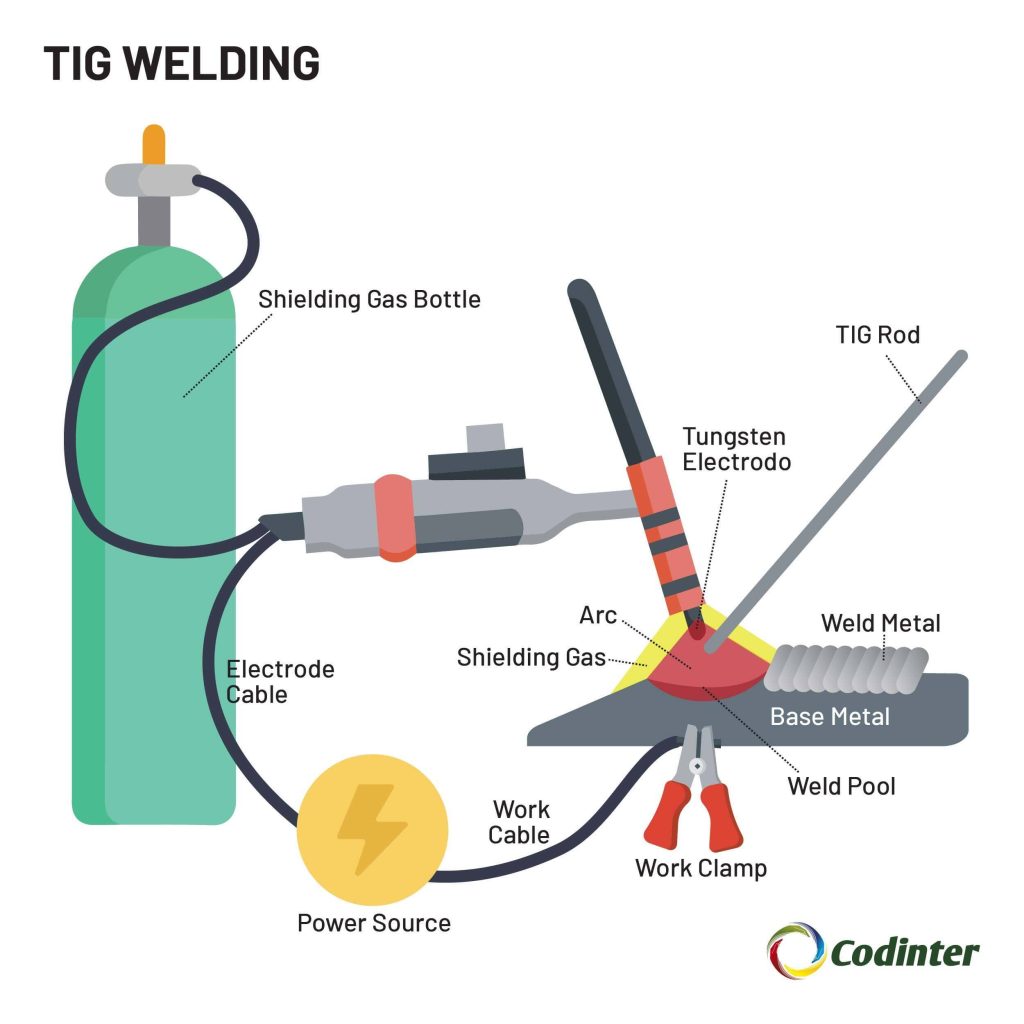
TIG welding uses a non-consumable tungsten electrode to produce a weld. You hold a welding torch in one hand and a filler rod in the other. An inert gas—usually argon—flows over the weld area to protect it from air, preventing contamination. Unlike stick or MIG welding, TIG allows you to control the heat and filler metal separately, which gives you very clean, precise welds.
Some of the main benefits of TIG welding include:
- Superior weld quality: TIG welds are clean, strong, and have little spatter.
- Works with many metals: Such as steel, stainless steel, aluminum, copper, and more.
- Precise control: Ideal for thin materials and detailed work.
But TIG welding also has some challenges:
- Slower speed: It takes longer than MIG or stick welding.
- Steeper learning curve: It requires coordination and patience.
- More expensive equipment: TIG welders and consumables often cost more.
If you want to create beautiful, strong welds on a wide range of metals, TIG welding is worth learning.
Essential Tig Welding Equipment
Before you start TIG welding, you need the right equipment. Each piece has a specific purpose, and using the correct setup makes your work safer and easier.
Tig Welder
The TIG welding machine is the main tool. It controls the electric current that melts the metal and keeps the arc stable. Modern TIG welders often have settings for AC/DC output, amperage control, and pulse features. For aluminum, you need a TIG welder with AC capability; for steel, DC is enough.
Torch
The TIG torch holds the tungsten electrode and directs the shielding gas. There are air-cooled and water-cooled torches. Air-cooled torches are lighter and simpler, ideal for short jobs or lower amperage. Water-cooled torches are better for high-amperage or long welding sessions because they stay cooler.
Tungsten Electrode
This non-consumable electrode creates the arc. Different types of tungsten (pure, thoriated, ceriated, lanthanated) suit different metals and amperages. For example, 2% thoriated tungsten is popular for steel, while pure tungsten is often used for aluminum.
Shielding Gas And Regulator
Argon is the most common shielding gas for TIG welding. Some applications use argon-helium mixes, especially for thicker metals. The regulator controls gas flow, usually set between 10–20 cubic feet per hour (CFH).
Filler Rods
You add filler metal by hand. Choose a rod that matches your base metal (ER70S-2 for mild steel, ER308L for stainless, ER4043 for aluminum, etc.). The diameter of the rod depends on the thickness of the metal you are welding.
Protective Gear
Welding can be dangerous without proper protection. Always use:
- Auto-darkening welding helmet (shade 9–13 for TIG)
- TIG gloves (thinner than MIG gloves for better control)
- Long-sleeve, flame-resistant shirt
- Welding apron or jacket
- Safety glasses
- Closed-toe leather shoes
Other Helpful Tools
- Angle grinder (to clean metal)
- Wire brush (stainless for aluminum or stainless steel)
- Clamps and magnets (to hold workpieces)
- Foot pedal (for hands-free amperage control)
- TIG finger (heat shield for your pinky)
Having the right gear makes TIG welding safer and more enjoyable. Beginners often skip on protective clothing or use the wrong tungsten type—mistakes that are easy to avoid with proper preparation.
Preparing For Tig Welding
Preparation is key in TIG welding. A clean, organized workspace and properly prepared materials make a huge difference in weld quality and safety.
Setting Up Your Work Area
Choose a well-ventilated area, free from flammable materials. Place your welder on a stable surface. Make sure you have good lighting—TIG welds are small, and you need to see them clearly.
Clear away oil, paint, rust, and dirt from your workpieces. TIG welding is sensitive to contamination; even a tiny bit of grease can ruin a weld. Use an angle grinder or wire brush for cleaning. For aluminum, always use a dedicated stainless steel brush.
Assembling The Torch
Insert the correct tungsten electrode into the torch collet. Let about 1/8 inch of tungsten stick out for most jobs (a bit more for fillet welds, a bit less for tight corners). Tighten the back cap, but not too much—just snug.
Attach the gas hose and check for leaks. Set your shielding gas flow to around 15 CFH to start.
Selecting The Right Settings
- Amperage: Start with 1 amp per 0.001 inch of metal thickness as a general rule. For 1/8″ steel (0.125″), try around 125 amps.
- Polarity: Use DCEN (Direct Current Electrode Negative) for steel, AC for aluminum.
- Pre-flow and post-flow: Set pre-flow to 0.5–1 seconds and post-flow to 3–5 seconds to shield the weld area before and after welding.
Checking Safety
Confirm that your helmet works and auto-darkens properly. Put on all protective gear. Make sure your ground clamp is attached to clean metal, not painted or rusty surfaces.
Taking time to prepare saves you from problems during welding. Many beginners rush this stage and struggle with dirty welds or poor arc starts.
Tig Welding Technique: Step-by-step
Now you’re ready to weld. TIG welding requires coordination, focus, and patience. Here’s a step-by-step guide to help you learn the basic process.
1. Striking An Arc
Hold the torch like a pen at a 10–15 degree angle from vertical, with the tungsten close (but not touching) the metal. Press the foot pedal or torch button to start the gas, then touch the tungsten to the work and lift it quickly—a small, bright arc will appear.
Keep the tungsten about 1/8 inch above the metal. If the tungsten touches the work, stop and regrind it—contaminated tungsten causes bad welds.
2. Creating The Weld Pool
Pause for a second to let a small, shiny puddle (the weld pool) form. This is where the metal melts. The pool should be about the width of your filler rod.
3. Adding Filler Metal
Feed the filler rod into the leading edge of the pool, not the center. Dip the rod, then pull it back, moving the torch and rod together along the joint. Keep the rod in the gas shield to prevent oxidation.
Practice keeping a steady hand. The goal is to form a neat, even bead. Move slowly and don’t rush.
4. Moving Along The Joint
Advance the torch smoothly, keeping the arc length (distance between tungsten and work) consistent. Move the filler rod in rhythm with the torch. If you move too fast, you’ll get a thin, weak weld; too slow, and you risk burning through.
5. Ending The Weld
When you reach the end, pause for a moment to let the weld pool cool under the shielding gas (post-flow). This prevents cracks and oxidation.
Release the pedal or trigger and let the gas flow for the set post-flow time.
6. Inspecting The Weld
A good TIG weld should be shiny, smooth, and even, with no holes, dark spots, or contamination. If the weld is dull, gray, or rough, check your settings and technique.
Tig Welding Tips For Beginners
Here are two insights beginners often miss:
- Tungsten shape matters: Sharpen your tungsten to a point for steel, but use a rounded tip for aluminum. The point influences the arc shape and stability.
- Torch angle and gas coverage: Keeping your torch angle low and close ensures the shielding gas covers the weld—if you lift it too high, air can sneak in and cause porosity.
Common Tig Welding Mistakes (and How To Avoid Them)
Learning TIG welding takes practice, and mistakes are part of the process. But knowing what to watch out for can save you time and frustration.
Touching The Tungsten To The Weld
If the tungsten touches the molten metal or filler rod, it gets contaminated. The arc may become unstable or “spit. ” Always regrind the tungsten if this happens. It’s tempting to keep going, but you’ll only make the problem worse.
Inconsistent Arc Length
Moving the torch too far from the work makes the arc unstable and the weld wide and weak. Too close, and you risk touching the tungsten to the weld. Find a comfortable hand rest (like a TIG finger or your pinky) to steady your movement.
Poor Shielding Gas Coverage
If you see sparks, porosity (tiny holes), or a gray, dirty weld, check your gas flow and torch angle. Leaks, low flow, or holding the torch too far away can let air contaminate the weld.
Overheating The Workpiece
TIG welding produces intense heat. On thin metal, move quickly and use lower amps. Overheating leads to warping, burn-through, or ugly welds.
Not Cleaning The Metal Properly
Oil, rust, or paint left on the workpiece causes contamination. Always grind or brush your base metal before welding. For aluminum, clean just before welding to remove the oxide layer.
Choosing The Wrong Tungsten Or Filler Rod
Using the wrong tungsten type or filler rod can make welding much harder. Always match your electrode and filler to the metal you’re working with.
Forgetting Pre-flow Or Post-flow
Skipping pre-flow or post-flow lets oxygen reach the weld pool, leading to discoloration or cracks. Make sure your machine is set for 0. 5–1 second pre-flow and 3–5 seconds post-flow.
Tig Welding On Different Metals
TIG welding works on many metals, but each has its own quirks. Adjust your setup to match the material for the best results.
Steel
Steel is the most common metal for TIG welding. Use DCEN polarity, 2% thoriated tungsten, and ER70S-2 filler rod. Steel is forgiving, but clean surfaces are still important.
Stainless Steel
Stainless steel needs extra attention to cleanliness. Use DCEN, 2% ceriated or lanthanated tungsten, and ER308L filler rod. Use lower amperage to avoid overheating, which causes “sugaring” (rough, grainy welds).
Aluminum
Aluminum is trickier due to its oxide layer and high thermal conductivity. Use AC polarity, pure or zirconiated tungsten, and ER4043 or ER5356 filler rod. Clean with a stainless steel brush just before welding. Use a higher gas flow, as aluminum needs better shielding.
Copper
Copper conducts heat very well, so you’ll need higher amperage. Use DCEN, 2% thoriated tungsten, and a matching filler. Preheat thick copper to help create a stable weld pool.
Titanium
Titanium is very sensitive to contamination. Use extra post-flow gas, keep the weld area super clean, and use a dedicated titanium filler rod.
Here’s a quick comparison of TIG welding settings for different metals:
| Metal | Polarity | Tungsten Type | Filler Rod | Shielding Gas |
|---|---|---|---|---|
| Steel | DCEN | 2% Thoriated | ER70S-2 | Argon |
| Stainless Steel | DCEN | 2% Ceriated/Lanthanated | ER308L | Argon |
| Aluminum | AC | Pure/Zirconiated | ER4043/ER5356 | Argon |
| Copper | DCEN | 2% Thoriated | Matching Filler | Argon |
| Titanium | DCEN | 2% Lanthanated | Matching Filler | Argon (extra post-flow) |

Key Settings And Controls On A Tig Welder
Understanding your machine’s controls helps you get better results. Here’s what you’ll find on most modern TIG welders.
Amperage Control
Controls how hot the arc is. Use a foot pedal or torch switch for variable control as you weld. This is especially helpful for welding thinner metal, where you may need to back off the heat.
Ac Balance
For aluminum, AC balance lets you control how much time the current spends cleaning the oxide layer versus melting the base metal. More cleaning means less penetration, so adjust until the weld looks shiny but not too wide.
Pulse Feature
Pulsed TIG lets you alternate between high and low amperage. This helps control heat, reduces distortion, and makes neat weld beads. Beginners often skip this feature, but it’s worth learning.
Gas Pre-flow And Post-flow
Ensures shielding gas is present before and after welding, protecting the weld from air.
High-frequency Start
Makes it easier to start the arc without touching the tungsten to the workpiece, which keeps the electrode clean.
Here’s a breakdown of what these controls do:
| Control | Purpose | When to Adjust |
|---|---|---|
| Amperage | Sets arc heat | Based on metal thickness |
| AC Balance | Controls cleaning vs. penetration (aluminum) | For cleaner or deeper welds |
| Pulse | Reduces heat input, neatens bead | Thin metals, appearance |
| Pre-flow/Post-flow | Protects weld area | Every weld |
| High-Frequency Start | Easy arc starting | Every arc start |
Tig Welding Safety Tips
TIG welding is safer than some other types, but there are still hazards. Protecting yourself and your workspace should always come first.
Electric Shock
Never touch the electrode or metal parts while the welder is on. Always keep gloves dry, and make sure you’re standing on an insulated mat if possible.
Fumes And Gases
TIG produces fewer fumes than stick or MIG, but metals like stainless steel and some fillers can create harmful gases. Always weld in a well-ventilated area, and use a fume extractor if possible.
Uv And Infrared Radiation
The welding arc emits strong UV and IR rays. Always wear a helmet, and cover exposed skin to prevent burns.
Fire Hazards
Keep flammable materials away from your work area. Have a fire extinguisher nearby.
Eye And Skin Protection
Always use safety glasses under your helmet to protect against flying debris when grinding or brushing.
Advanced Tig Welding Techniques
Once you’re comfortable with the basics, you can try more advanced techniques for special projects or better results.
Walking The Cup
This technique is used for pipe welding. You rest the ceramic cup on the metal and “walk” it along the joint in a controlled motion, creating very uniform welds.
Back Purging
When welding stainless steel or titanium, the back side of the weld can oxidize. Back purging uses extra argon gas to shield the rear, resulting in a shiny, strong weld.
Pulse Welding
Experimenting with pulse settings can help control heat and create beautiful stacked-dime welds, especially on thin stainless steel.
Tack Welding
Before making a long weld, place small tack welds at intervals to hold the parts in place. This helps prevent warping and makes the final weld neater.
Welding Out Of Position
TIG welding is usually done flat, but you may need to weld vertical or overhead. Practice controlling the puddle and using less filler rod to prevent drips.
These advanced skills take time to master, but they can greatly expand your TIG welding abilities.
Maintaining Your Tig Welder And Accessories
Keeping your equipment in good condition helps you get the best results and extends the life of your tools.
Cleaning The Torch And Collets
After each session, check the torch for spatter, melted parts, or cracks. Clean the collet and cup with a brush. Replace worn parts as needed.
Regrinding Tungsten Electrodes
Tungsten wears down and can become contaminated. Regrind to a clean point or ball as needed. Use a dedicated grinding wheel to avoid contamination.
Checking Cables And Connections
Inspect power and gas cables for cracks or leaks. Tighten all connections before use.
Storing Consumables
Keep filler rods and electrodes in a dry, clean place to prevent oxidation or contamination.
Regular maintenance makes welding smoother and avoids problems that can ruin a project.
Practical Projects For Beginners
The best way to learn TIG welding is by practicing on simple projects. Here are a few ideas:
- Practice beads: Lay straight beads on a piece of scrap metal. Focus on consistency.
- Corner joints: Weld two pieces of steel at a 90-degree angle.
- Lap joints: Lay one piece over another and weld along the edge.
- Butt joints: Weld two pieces edge to edge.
- Metal art: Try simple sculptures or decorative pieces for fun.
Start with steel, as it’s the easiest to learn on, then move to stainless or aluminum as you get better.
Troubleshooting Tig Welding Problems
Even experienced welders run into issues. Here’s how to fix common problems:
- Porosity (holes in weld): Check gas flow, torch angle, and cleanliness.
- Dull, gray welds: Usually from poor gas coverage or contaminated tungsten.
- Arc won’t start: Check ground clamp, tungsten position, and machine settings.
- Tungsten melting: Too much amperage, wrong tungsten, or incorrect polarity.
- Weld cracking: Preheat thicker metals, use correct filler rod, and control cooling rate.
If something looks wrong, stop and check your setup before continuing.
Comparing Tig Welding To Mig And Stick Welding
TIG isn’t the only type of welding. Here’s a quick comparison to help you understand the differences:
| Feature | TIG Welding | MIG Welding | Stick Welding |
|---|---|---|---|
| Precision | Very high | Medium | Low |
| Cleanliness | Very clean | Some spatter | Lots of spatter |
| Speed | Slow | Fast | Medium |
| Metal Types | Most metals | Mainly steel, some aluminum | Steel and iron |
| Difficulty | Harder to learn | Easy for beginners | Moderate |
| Cost | Higher | Medium | Low |
For more detailed comparisons and guides, you can check resources like Wikipedia: Gas Tungsten Arc Welding.
Frequently Asked Questions
What Is The Best Tungsten Type For Beginners?
For steel, 2% thoriated tungsten is easiest for beginners. It’s stable and forgiving. For aluminum, use pure or zirconiated tungsten with AC current.
How Thick Can You Weld With A Tig Welder?
Most entry-level TIG welders handle up to 1/4″ (6 mm) in steel with multiple passes. Higher-powered machines can weld thicker. Always match amperage and filler rod to the material’s thickness.
Can You Tig Weld Without Filler Rod?
Yes, you can autogenously weld (fusion weld) thin metals by melting the edges together without filler. This is common for stainless steel or thin aluminum, but not ideal for thicker joints.
Why Does My Weld Look Dull Or Gray?
Dull or gray welds mean poor shielding gas coverage or contaminated tungsten. Check for leaks, increase gas flow slightly, and regrind your tungsten.
Is Tig Welding Stronger Than Mig Welding?
TIG welds are often stronger and cleaner when done properly, especially for thin metals or specialty alloys. However, strength also depends on technique, material, and joint design.
Learning how to use a TIG welder takes time, but each session builds your skill and confidence. With practice, patience, and careful attention to detail, you’ll be able to create welds that are both beautiful and strong. TIG welding is not just a practical skill—it’s a craft.
Keep learning, stay safe, and enjoy the process of mastering this valuable technique.