A clamp meter is an essential tool for anyone working with electricity. Whether you are a professional electrician, a maintenance worker, or a curious homeowner, learning how to use a clamp meter can help you measure current safely and efficiently.
But for many people, clamp meters look complicated. The good news is, with the right guidance, anyone can use this tool with confidence.
This article will help you understand how to use a clamp meter, from the basics to more advanced techniques. You will learn what a clamp meter does, the main parts, how to prepare for measurement, and common mistakes to avoid.
Real-life examples, practical tips, and clear steps will make sure you get the most accurate results. By the end, you will have all the knowledge you need to use a clamp meter like a pro.
What Is A Clamp Meter?
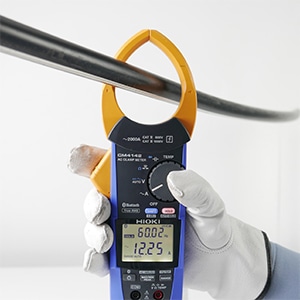
A clamp meter is a device that measures electric current without touching or disconnecting wires. It uses a pair of jaws that open and close around a wire. This makes it much safer than traditional meters, especially for high-current circuits.
Most clamp meters also measure voltage, resistance, and sometimes other values like frequency or temperature. But their main feature is measuring current (in amperes, or “amps”) directly through a wire, even when the circuit is live.
Main Parts Of A Clamp Meter
- Jaws: These open and close to surround the wire you want to measure. They detect the magnetic field created by the current.
- Display Screen: Shows the value you are measuring.
- Selection Dial: Lets you choose what to measure, such as amps, volts, or ohms.
- Trigger: Opens the jaws.
- Input Jacks: Where you plug in test leads for voltage, resistance, or continuity checks.
- Hold Button: Freezes the reading on the screen, useful if you need to look away.
Why Use A Clamp Meter?
The main reason is safety. Measuring current with a traditional multimeter means breaking the circuit and connecting the meter in line. This can be dangerous, especially in high-power circuits. A clamp meter, however, measures current by simply clamping around the wire. There’s no need to touch bare wires or disconnect anything.
Other reasons include:
- Speed: Quick measurements without stopping the circuit.
- Versatility: One tool can measure current, voltage, resistance, and more.
- Non-intrusive: No risk of damaging the wire or circuit.
Credit: www.hioki.com
Types Of Clamp Meters
Not all clamp meters are the same. There are two main types:
| Type | What It Measures | Main Use | Price Range (USD) |
|---|---|---|---|
| AC Clamp Meter | Alternating Current (AC) only | Household circuits, industrial power lines | $30–$200 |
| AC/DC Clamp Meter | AC and Direct Current (DC) | Automotive, solar panels, batteries | $50–$300 |
Some advanced models can also measure:
- Inrush current (the surge when equipment starts)
- True RMS (accurate measurement for complex waveforms)
- Temperature
- Frequency
Preparing To Use A Clamp Meter
Before you start, it’s important to get ready. Skipping preparation can lead to wrong readings or even accidents.
1. Check The Clamp Meter
- Make sure it’s working. Turn it on and check the display.
- Check the battery level. A weak battery can give false readings.
- Clean the jaws. Dust or dirt can affect accuracy.
2. Read The Manual
Each model is different. The manual will tell you about special features or limits, such as maximum current the meter can handle.
3. Inspect The Circuit
- Look for exposed wires or damaged insulation.
- Make sure the area is dry. Water and electricity are a dangerous mix.
- Identify the wire you need to measure. In a bundle, only clamp around one wire at a time.
4. Choose The Right Setting
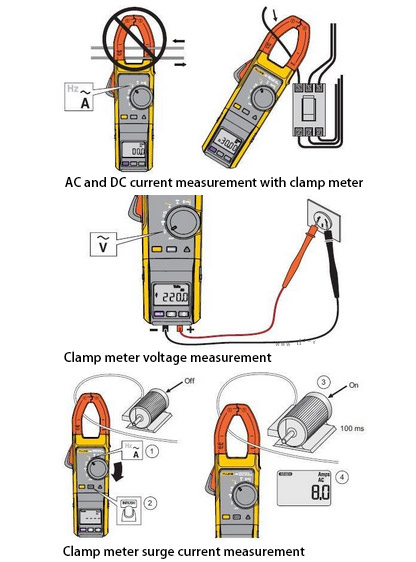
Set the dial to the correct function (AC or DC amps). If you want to measure voltage or resistance, plug in the test leads.
Practical Tip: Always start with the highest range if your clamp meter is not auto-ranging. This protects the meter.
Credit: www.ato.com
How To Use A Clamp Meter: Step-by-step
Now, let’s walk through the process of measuring current with a clamp meter.
Step 1: Turn On The Meter
Press the power button. Wait for the display to show zero or a ready signal.
Step 2: Select The Current Measurement Mode
Use the selection dial to choose AC (A~) or DC (A⎓) current, depending on your circuit.
Step 3: Open The Jaws
Press the trigger to open the jaws wide enough to fit around the wire.
Step 4: Place The Jaws Around A Single Conductor
Clamp the jaws around only one wire at a time. If you clamp around both the live and neutral wires together, the meter will read zero. This is a common mistake.
Step 5: Close The Jaws Completely
Let go of the trigger so the jaws close fully around the wire. The jaws must be completely shut for an accurate reading.
Step 6: Read The Measurement
Look at the display. The number shown is the current in amperes (A) flowing through the wire.
Step 7: Remove The Meter
Open the jaws and take the clamp meter off the wire.
Step 8: Turn Off The Meter
Switch off the meter to save battery.
Non-obvious Insight: Some clamp meters can store the highest reading. This is useful when the current changes quickly.
Measuring Other Values With A Clamp Meter
Clamp meters can do more than measure current. Most models can also measure voltage, resistance, and sometimes continuity.
Measuring Voltage
- Plug the black test lead into the COM jack.
- Plug the red lead into the VΩ jack.
- Set the dial to V (choose AC or DC).
- Touch the leads to the circuit points.
- Read the voltage on the screen.
Measuring Resistance
- Plug in the test leads as above.
- Set the dial to Ω (ohms).
- Make sure the circuit is off before measuring resistance.
- Touch the leads to both ends of the component.
- Read the value.
Checking Continuity
This checks if a wire is unbroken.
- Set the dial to the continuity setting (often a diode symbol).
- Touch the leads to both ends of the wire.
- If you hear a beep, the wire is continuous.
Practical Example: If a lamp is not working, use the clamp meter to check if current is flowing. If not, check voltage at the socket. If there’s voltage but no current, the lamp may be faulty.
Advanced Features And When To Use Them
Modern clamp meters come with extra features that can help in special situations.
True Rms
Some clamp meters have True RMS (Root Mean Square) measurement. This gives accurate readings even when the current waveform is not a perfect sine wave. This is important for devices like variable speed drives or computers.
Inrush Current
Inrush current is the surge of current when a motor or device first turns on. Some clamp meters have a special button for this. Use it to check if a device is drawing too much power at startup.
Data Hold
The hold button keeps the number on the screen even after you remove the clamp. Very useful in tight spaces.
Min/max Function
This feature records the highest and lowest readings. It’s helpful when you need to watch current over a period of time.
Flashlight
Some clamp meters have a built-in light. This helps in dark electrical panels.
Non-obvious Insight: Some clamp meters can measure low current in milliamps (mA). This is useful for checking control signals in automation or HVAC systems.
Safety Tips When Using A Clamp Meter
Working with electricity is always risky. Follow these safety tips every time:
- Never touch bare wires when the circuit is live.
- Use only one hand if possible. Keep your other hand away from metal or grounded surfaces.
- Wear insulated gloves and safety glasses.
- Check that your clamp meter is rated for the voltage and current you are measuring.
- If the meter or leads are damaged, do not use them.
- Always clamp around a single wire. Never around a cable with both live and neutral.
- Work in dry conditions. Wet hands or floors increase risk of shock.
Practical Tip: Stand on a rubber mat when working in high voltage areas.
Interpreting Clamp Meter Readings
Getting a number from the clamp meter is just the start. You need to know what it means.
- Normal current: Compare the reading to the device’s label or manual. For example, if a motor should draw 5A but your meter reads 10A, something is wrong.
- Zero or very low reading: Check if you have clamped only one wire. Clamping both live and neutral cancels the current.
- Fluctuating readings: This can be normal for devices like refrigerators, but could also mean a loose connection.
Example: If a household air conditioner is rated for 8A but the clamp meter shows 12A, the motor may be failing, or the filter may be blocked.
Common Mistakes And How To Avoid Them
Even experienced users make mistakes. Here are errors to watch out for:
- Clamping around multiple wires: Always clamp around a single conductor.
- Wrong setting: Double-check if you need AC or DC mode.
- Measuring resistance on a live circuit: Always turn off power first.
- Using a damaged meter or leads: This can cause inaccurate readings or injury.
- Ignoring the meter’s limits: Never try to measure more current than the meter’s maximum rating.
Practical Example: A beginner clamps around a whole cable (both live and neutral). The reading is zero. The correct way is to clamp around the live wire only.
Choosing The Right Clamp Meter For Your Needs
There are many clamp meters on the market. How do you pick the right one?
| Feature | Basic Model | Advanced Model |
|---|---|---|
| Current Measurement | AC only | AC/DC, True RMS |
| Other Measurements | Voltage, resistance | Inrush, min/max, temperature |
| Display | Basic LCD | Backlit, multi-line |
| Price | $30–$70 | $100–$300 |
What Matters Most?
- Current range: Make sure it covers the highest current you need.
- Accuracy: True RMS is better for modern electronics.
- Safety ratings: Look for CAT III or CAT IV for work in panels or industrial sites.
- Extra features: Data hold, flashlight, min/max may help in your work.
Common Buyer Mistake: Choosing a very cheap meter without checking its safety rating. For serious work, always choose a meter with certified safety standards.
Practical Examples: Real-world Clamp Meter Uses
Let’s look at situations where clamp meters are especially useful.
1. Troubleshooting A Tripping Circuit Breaker
A home breaker keeps tripping. Use the clamp meter to measure the current in each wire. If one wire is drawing more than the breaker’s rating, you’ve found the problem.
2. Checking Appliance Power Draw
Want to know how much current your air conditioner uses? Clamp around the live wire and read the amps. If it’s higher than normal, the unit may need service.
3. Testing Solar Panels
Solar panels use DC. An AC/DC clamp meter lets you check the current output of each panel without disconnecting anything.
4. Automotive Testing
Modern cars have many electrical systems. Use a clamp meter to check the alternator current, starter motor, or battery charging.
5. Industrial Motor Maintenance
Motors in factories must not overheat. Use a clamp meter to check if the current is within safe limits.
Non-obvious Insight: Clamp meters can also be used to find “phantom loads”—devices that use power even when turned off. Measuring current on each branch circuit helps identify these.

Credit: mme-ae.com
Clamp Meter Vs. Multimeter: What’s The Difference?
Many people confuse clamp meters and multimeters. Here’s how they compare:
| Feature | Clamp Meter | Multimeter |
|---|---|---|
| Current Measurement | Non-contact, up to 1000A or more | Contact, usually up to 10A |
| Voltage/Resistance | Yes (with test leads) | Yes |
| Best Use | High current, live circuits | Low current, bench work, electronics |
| Safety | Safer for current | Less safe for current |
Key Point: Use a clamp meter for measuring large or live currents, and a multimeter for small electronics or when you need high-precision voltage and resistance readings.
Maintaining Your Clamp Meter
A clamp meter is an investment. Taking care of it means it will last longer and stay accurate.
- Clean the jaws regularly. Dust and metal shavings can affect readings.
- Store the meter in a protective case. Avoid dropping it.
- Change the battery when the display dims or shows a warning.
- Calibrate the meter every 1-2 years, or as recommended. Some professional services offer calibration.
- Don’t use the meter in extreme temperatures or wet environments.
Non-obvious Insight: If you drop your meter, check the jaws for alignment. Misaligned jaws can give false readings even if the display looks normal.
Troubleshooting Inaccurate Readings
If your clamp meter gives strange results, try these steps:
- Check battery: Weak batteries can cause errors.
- Clean jaws: Remove any dirt or metal pieces.
- Zero the display: Some meters need to be zeroed before measuring DC current.
- Clamp only one wire: Double-check you are not clamping more than one.
- Check for strong magnetic fields: Nearby motors or transformers can affect readings.
If problems continue, contact the manufacturer or service center.
Tips For Beginners Using Clamp Meters
If you’re new to clamp meters, these tips can help you avoid common problems:
- Practice on low voltage circuits first, like batteries or small appliances.
- Read the manual, even if you think you know how to use the meter.
- Always double-check the setting before measuring.
- Use the hold function if you need to write down readings.
- Don’t force the jaws open wider than designed. This can break the meter.
- If you feel unsure, ask a qualified electrician for help.
Practical Tip: Label your meter with your name or number if you work in a place with many users. This prevents mix-ups.
Frequently Asked Questions
What Is The Maximum Current A Clamp Meter Can Measure?
Most clamp meters can measure up to 400A–1000A in AC circuits. Some industrial models can handle even more, up to 2000A. Always check your meter’s manual to avoid overloading.
Can A Clamp Meter Measure Current In A Multi-core Cable?
No, you must clamp around a single conductor. Clamping around all wires in a cable gives a zero reading because the magnetic fields cancel each other. To measure, separate out the wire you want to check.
Is It Safe To Use A Clamp Meter On A Live Wire?
Yes, if you follow safety rules and use the meter correctly. That’s one of the main benefits of clamp meters. However, always wear protective gear and make sure the meter is rated for the voltage and current you are testing.
Why Does My Clamp Meter Show Zero When I Know Current Is Flowing?
This usually happens if you clamp around both the live and neutral wires together. The fields cancel out. Always clamp around just one wire to get an accurate reading.
Where Can I Learn More About Clamp Meters?
You can read more detailed guides and get safety information on the official Wikipedia page about clamp meters.
Using a clamp meter is a valuable skill for anyone working with electricity. With the right preparation, careful attention, and practice, you can measure current safely and accurately. Clamp meters make electrical work faster, safer, and more reliable. Take your time to learn, avoid common mistakes, and you’ll get great results every time you use this important tool.