Lippert slide-out problems often stem from issues with the motor, wiring, or track alignment. Regular maintenance and inspection can prevent these common issues.
Slide-outs enhance the living space in RVs, making them popular among campers and travelers. Despite their benefits, slide-outs can encounter various problems that may disrupt your travel plans. Understanding these issues is crucial for any RV owner. Common problems include motor failures, misalignment, and electrical glitches.
Regular maintenance, such as checking the seals and tracks, can help prolong the life of your slide-out. Familiarizing yourself with troubleshooting techniques can save time and money. This guide will explore common Lippert slide-out problems and provide practical solutions to keep your RV in top shape. Stay informed to ensure a smooth travel experience.
Introduction To Lippert Slide Out Issues
Lippert slide outs are popular in many RVs. They provide extra space and comfort. However, they can face various problems. Understanding these issues helps RV owners maintain their units effectively.
Common Problems Faced By Rv Owners
Many RV owners report similar problems with Lippert slide outs. Here are the most common issues:
- Stuck slide outs: Slides may not extend or retract.
- Uneven movement: Slides may move unevenly, causing gaps.
- Mechanical failures: Motors may stop working or malfunction.
- Water leaks: Improper seals can lead to water damage.
- Electrical issues: Faulty wiring can disrupt operations.
Identifying these problems early can prevent larger repairs.
The Significance Of Timely Maintenance
Regular maintenance is vital for Lippert slide outs. It helps in several ways:
- Prevents unexpected breakdowns.
- Extends the lifespan of the slide out.
- Ensures smooth operation.
- Protects against water damage.
- Enhances overall RV enjoyment.
Simple maintenance tasks include:
- Inspecting seals and gaskets.
- Lubricating moving parts.
- Checking electrical connections.
Staying proactive can save time and money.
Stuck Slide Outs: Causes And Immediate Actions
Dealing with stuck slide outs can be frustrating. Understanding the causes helps you act quickly. Here, we explore how to identify issues and take immediate action.
Identifying The Root Cause
Stuck slide outs often have clear reasons. Here are common causes:
- Mechanical Failure: Broken components can block movement.
- Electrical Issues: A blown fuse may stop the slide out.
- Obstruction: Objects may block the slide’s path.
- Hydraulic Problems: Low fluid levels can cause issues.
Look for signs around the slide out. Check for noise or jerking. Inspect the area for any visible blockages. Knowing these signs helps in quick diagnosis.
Manual Override: Step-by-step
Use the manual override as a quick fix. Follow these steps:
- Locate the manual override switch. This is usually near the slide out control panel.
- Ensure the power is off. Safety is key.
- Turn the manual override handle clockwise. This should allow movement.
- Gently push the slide out. Help it move smoothly.
- Once extended, check for any obstructions. Ensure nothing blocks the path.
- Restore power and test the slide out again.
Always refer to your owner’s manual for specific instructions. Each model may have unique features. Regular maintenance keeps slide outs functioning well.
Electrical Malfunctions: Diagnostics And Solutions
Electrical malfunctions can cause serious issues with Lippert slide-outs. Identifying the problem early helps prevent further damage. This section covers diagnostics and solutions for electrical issues.
Troubleshooting The Electrical System
Start troubleshooting by checking the power source. Follow these steps:
- Inspect the main power switch. Ensure it is in the “On” position.
- Check the battery voltage. A low battery can cause problems.
- Examine the wiring for any visible damage or corrosion.
- Look for loose connections at the control panel.
Use a multimeter to measure voltage at the slide-out motor. If it reads low, there may be a wiring issue.
Replacing Fuses And Circuit Breakers
Fuses and circuit breakers protect the electrical system. If they fail, the slide-out won’t operate. Follow these steps for replacement:
- Locate the fuse box or circuit breaker panel.
- Identify the blown fuse or tripped breaker.
- Replace the blown fuse with one of the same rating.
- Reset the circuit breaker by flipping it back to “On.”
Check the new fuse or breaker after installation. If it blows again, further investigation is necessary.
Keep a supply of spare fuses handy. It ensures quick fixes on the road.
Hydraulic System Failures: Understanding And Fixing
Hydraulic system failures can cause major issues with your Lippert slide-out. Understanding these problems helps in quick fixes. Let’s explore leak detection, repair, and hydraulic fluid management.
Leak Detection And Repair
Detecting leaks early is vital. Here are common signs of hydraulic leaks:
- Visible fluid puddles under the slide-out.
- Unusual noise during operation.
- Slow or jerky movement of the slide-out.
To fix leaks:
- Inspect hoses and connections for damage.
- Check seals for wear and tear.
- Use a hydraulic fluid dye to find hidden leaks.
Repairing leaks quickly prevents further damage. Always use the right tools for repairs.
Hydraulic Fluid Management
Proper hydraulic fluid management ensures smooth operation. Follow these tips:
| Fluid Type | Recommended Change Interval |
|---|---|
| ATF (Automatic Transmission Fluid) | Every 30,000 miles |
| Hydraulic Oil | Every 10,000 miles |
Check fluid levels regularly. Low fluid can lead to serious issues. Here’s how to manage hydraulic fluid:
- Always use the recommended fluid type.
- Monitor the fluid level frequently.
- Replace old fluid to avoid contamination.
Taking these steps ensures your hydraulic system runs smoothly. Regular maintenance prevents future problems.
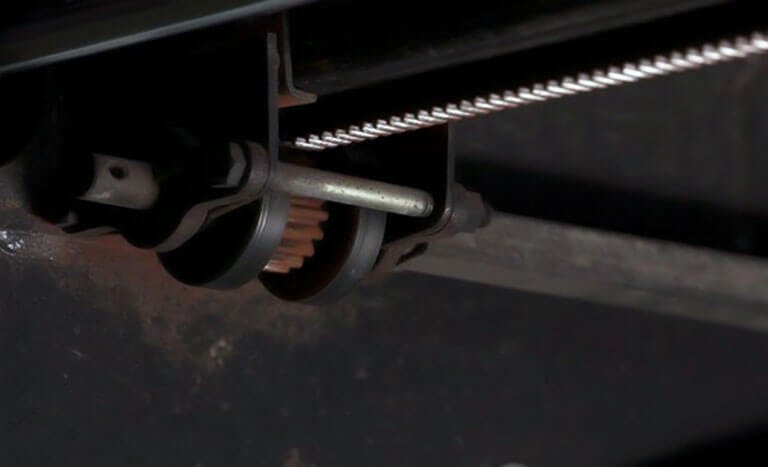
Mechanical Wear And Tear: Prevention And Repair
Mechanical wear and tear can cause serious issues in Lippert slide-outs. Regular maintenance prevents costly repairs. Understanding lubrication and alignment helps keep your slide-out in top shape.
Lubrication: Types And Application Methods
Proper lubrication is vital for slide-out functionality. Different types of lubricants serve various purposes. Here’s a quick guide:
| Lubricant Type | Application Method | Benefits |
|---|---|---|
| Grease | Apply with a brush or cloth | Lasts longer; reduces friction |
| Silicone Spray | Spray directly on components | Water-resistant; protects against rust |
| Lithium Grease | Use a grease gun or tube | Good for high-pressure areas |
Follow these steps for effective lubrication:
- Clean the slide-out components.
- Choose the right lubricant type.
- Apply evenly to all moving parts.
- Wipe off excess lubricant.
Adjusting Slide Out Alignment
Proper alignment is crucial for smooth operation. Misalignment can cause wear and tear. Here’s how to adjust it:
- Inspect the slide-out for any visible gaps.
- Use a level to check alignment.
- Loosen the mounting bolts slightly.
- Adjust the slide-out until aligned.
- Tighten the bolts securely.
Check the alignment regularly. Early detection prevents bigger problems. Keep your Lippert slide-out operating smoothly.
Weather Sealing: Protecting Your Slide Out
Weather sealing is essential for maintaining your Lippert slide out. Proper sealing prevents water leaks and keeps the interior dry. It enhances comfort and prolongs the life of your RV.
Inspecting And Replacing Weather Stripping
Regularly inspect the weather stripping on your slide out. Check for cracks, tears, or wear. Replace any damaged sections immediately to ensure a tight seal.
- Start at one end of the slide out.
- Look for gaps or misalignment.
- Use a flashlight to spot any hidden damage.
To replace the weather stripping:
- Remove the old weather stripping carefully.
- Clean the surface to remove any debris.
- Measure and cut the new weather stripping.
- Press the new strip into place firmly.
Sealant Application Tips
Applying sealant enhances protection. Choose a quality sealant designed for outdoor use. Follow these steps for a successful application:
| Step | Description |
|---|---|
| 1 | Clean the area to remove dirt and old sealant. |
| 2 | Apply sealant in a continuous bead. |
| 3 | Use a caulking tool for a smooth finish. |
| 4 | Allow the sealant to cure as per instructions. |
Check the seal regularly. Reapply as needed to maintain a strong barrier.
Smart Maintenance Tips For Longevity
Maintaining your Lippert slide-out system is crucial for its longevity. Regular care prevents issues and enhances performance. Follow these smart maintenance tips to keep your RV slide-outs functioning smoothly.
Regular Inspection Checklist
Use this checklist for routine inspections:
- Visual Inspection: Look for cracks or wear.
- Lubrication: Apply grease to moving parts.
- Electrical Connections: Check for loose wires.
- Seals: Inspect seals for damage.
- Drainage: Ensure water drains away from the slide-out.
Regular inspections help catch problems early. This saves time and money in repairs.
Seasonal Preparation For Your Rv
Prepare your RV for each season:
| Season | Preparation Steps |
|---|---|
| Spring |
|
| Summer |
|
| Fall |
|
| Winter |
|
Seasonal checks keep your slide-outs in top shape. Follow these steps for optimal performance.
Professional Help Vs. Diy: Making The Right Choice
Choosing between professional help and DIY for Lippert slide out problems is crucial. Understanding your skills and the issue’s complexity matters. Here’s how to decide.
When To Call In A Professional
Not all slide out problems are easy fixes. Here are signs you need a pro:
- Severe mechanical issues: If the mechanism won’t move.
- Electrical failures: If the slide out does not respond.
- Water damage: If there are leaks or dampness.
- Complex repairs: If multiple systems are involved.
Professionals have the right tools and experience. They can prevent further damage. This saves time and money in the long run.
Tools Every Rv Owner Should Have
Being prepared can help with minor repairs. Here’s a list of essential tools:
| Tool | Purpose |
|---|---|
| Socket set | For tightening loose bolts. |
| Screwdriver set | For adjusting various components. |
| Multimeter | For checking electrical connections. |
| Lubricant | For sliding mechanisms. |
| Leveling tool | To ensure proper alignment. |
These tools can help you tackle small problems. Regular maintenance prevents larger issues. Always prioritize safety during repairs.
Frequently Asked Questions
What Are Common Lippert Slide Out Issues?
Common issues include electrical malfunctions, misalignment, and hydraulic leaks that can hinder slide out functionality.
How To Troubleshoot Lippert Slide Out Problems?
Start by checking the power source, inspecting for obstructions, and ensuring proper alignment of the slide out.
What Causes Lippert Slide Out To Malfunction?
Malfunctions can stem from electrical problems, wear and tear, or debris blocking the slide mechanism.
Can I Fix Lippert Slide Out Myself?
Many minor issues can be fixed with basic tools, but complex problems may require professional assistance.
How Often Should I Maintain My Lippert Slide Out?
Regular maintenance every six months helps prevent issues and prolongs the life of your slide out system.
Conclusion
Addressing Lippert slide-out problems can prevent costly repairs and improve your RV experience. Regular maintenance is crucial for optimal performance. Stay informed about common issues and solutions to enhance your travels. By being proactive, you ensure a smoother journey and enjoy the comforts of your RV without interruptions.
Safe travels await!