If you want to create stunning nails at home or in a salon, using a nail drill can make your work faster and more professional. But many people feel unsure about how to use nail drill bits correctly. They worry about damaging their nails, hurting their skin, or just not getting the results they want.
The truth is, with a bit of guidance and practice, anyone can learn to use these tools safely and with confidence.
In this guide, you’ll learn everything you need to know about nail drill bits—what they are, how to choose the right bit, and how to use them step by step. You’ll also discover safety tips, cleaning advice, and expert secrets that can help you avoid common mistakes. Whether you’re a beginner or want to improve your technique, this article covers every aspect so you can achieve beautiful, long-lasting nails.
Understanding Nail Drill Bits
A nail drill bit is a small attachment that fits into your electric nail drill. Each bit has a different shape, size, and material. This changes how it works on natural nails, acrylics, or gels.
Types Of Nail Drill Bits
There are many different bit types, each designed for a specific task. Here are the most common:
1. Mandrel And Sanding Bands
The mandrel holds a sanding band, which is a disposable sleeve. Sanding bands are great for prepping the nail surface, shaping, and removing shine. They come in different grits, from coarse to fine.
2. Carbide Bits
Carbide is a hard metal, making these bits great for removing acrylic or gel quickly. They are sharp and cut through product instead of grinding it away. Carbide bits come in different shapes, such as barrel, cone, and safety.
3. Ceramic Bits
Ceramic bits are long-lasting and stay cool while working. They are good for removing gel polish or thin layers of product. Their surface is less likely to heat up, which lowers the risk of burning the nail.
4. Diamond Bits
Diamond bits are covered with fine diamond particles. They are mainly used for gentle work like cuticle cleaning and shaping the nail edge. They do not cut as aggressively as carbide bits.
5. Safety Bits
Safety bits have a rounded top to prevent cuts and are ideal for beginners. They are good for refining, smoothing, and working close to the cuticle.
6. Specialty Bits
There are bits for under-nail cleaning, creating smile lines, or making nail art. These are usually for advanced users.
Bit Grit And Coarseness
Bits come in different grits—coarse, medium, and fine.
- Coarse bits remove product quickly but can leave scratches.
- Medium bits are for shaping and smoothing.
- Fine bits are used for finishing and shining.
Choosing the right grit is important for getting the best result and protecting the nail.
Nail Drill Bit Materials
Most bits are made of:
- Carbide: Durable and sharp, used for fast removal.
- Ceramic: Stays cool and lasts long, good for sensitive nails.
- Diamond: Gentle, for natural nails and cuticles.
- Sanding bands: Disposable, for prepping and smoothing.
Each material has strengths and weaknesses. For example, carbide is best for removing hard product, while diamond is better for delicate work.
How To Choose The Right Nail Drill Bit
Picking the right bit is essential for safe and effective nail work. Here’s how to make the best choice:
Consider Your Task
First, ask yourself what you want to do:
- Removing gel or acrylic: Use a carbide or ceramic bit.
- Shaping and smoothing: Use a medium grit barrel or cone bit.
- Cuticle work: Use a diamond or safety bit.
- Surface prep: Use a sanding band.
Bit Shape And Size
The shape affects how the bit works. For example:
- Barrel bit: Flattens and shapes large surfaces.
- Cone bit: Reaches sidewalls and under the nail.
- Needle bit: Cleans under the nail or does detailed work.
The size matters too. Smaller bits are better for detailed areas, while larger bits cover more surface.
Your Skill Level
If you’re new, start with safety bits. They reduce the risk of cuts and are easier to control. As you become more skilled, you can try sharper or more advanced bits.
Nail Type
- Natural nails: Use gentle bits like diamond or fine sanding bands.
- Acrylic or gel: Use stronger bits like carbide or ceramic.
Common Mistakes When Choosing
- Picking a bit that’s too coarse for natural nails (can cause damage)
- Using a sharp bit near the cuticle (can cut the skin)
- Buying cheap bits that wear out quickly
Here’s a quick comparison of popular bit types and their uses:
| Bit Type | Best For | Skill Level |
|---|---|---|
| Sanding Band | Surface prep, smoothing | Beginner |
| Carbide | Removing acrylic/gel | Intermediate/Advanced |
| Ceramic | Removing gel polish | Beginner/Intermediate |
| Diamond | Cuticle, shaping | Beginner |
| Safety Bit | Refining, smoothing | Beginner |
Preparing To Use Nail Drill Bits
Before you start, it’s important to set up your space and tools. This will help you work safely and get better results.
Gather Your Tools
You’ll need:
- A nail drill (also called an e-file)
- Drill bits (choose the right type for your task)
- Dust brush or soft brush
- Cuticle pusher
- Lint-free wipes
- Sanitizer or alcohol
Clean Your Bits
Always clean and disinfect your bits before use. This prevents infections and keeps your tools working well.
Soak metal and ceramic bits in disinfectant for 10-15 minutes, then rinse and dry. Sanding bands are disposable—use a new one each time.
Set Up Your Nail Drill
- Plug in your drill.
- Insert the chosen bit. Make sure it’s secure.
- Set the speed. Beginners should start at a low speed (5,000-10,000 RPM).
Prepare Your Nails
- Remove old polish.
- Push back cuticles.
- Trim and shape nails with a regular nail file if needed.
- Wash hands to remove oils and dust.
Safety First
- Wear a dust mask if possible.
- Work in a well-lit area.
- Never use a broken or bent bit.
How To Use Nail Drill Bits: Step-by-step Guide
Here’s a detailed process for using nail drill bits safely and effectively.
Step 1: Choose And Insert The Right Bit
Pick the bit that matches your task. Insert it into the drill’s chuck and twist or click to lock it in place.
Step 2: Test The Speed
Start your drill at the lowest speed. Test it on a practice nail or a plastic tip before using it on your own nails.
Step 3: Hold The Drill Like A Pencil
Hold the drill as you would a pen. Keep your grip relaxed but firm. This gives you more control.
Step 4: Begin Drilling
Place the bit on the nail surface. Use gentle, even pressure. Let the drill do the work—never push hard.
- For removing bulk (acrylic or gel), use a barrel or cone bit. Move in short, light strokes.
- For cuticle cleaning, use a diamond or safety bit. Gently sweep around the cuticle area.
- For surface smoothing, use a fine sanding band or ceramic bit.
Always move in one direction and keep the drill moving. Staying in one spot can cause heat buildup and pain.
Step 5: Check Your Progress
Stop often to check your work. Brush away dust and look at the nail. This prevents over-filing and damage.
Step 6: Switch Bits As Needed
If you need to change tasks, switch to another bit. Always turn off the drill before changing bits.
Step 7: Finish And Clean Up
After filing, use a fine bit or buffer to smooth the nail. Brush away any dust. Clean your bits and drill after each use.
Here’s a summary of tasks and the recommended bits:
| Task | Recommended Bit | Speed (RPM) |
|---|---|---|
| Remove gel polish | Ceramic barrel | 10,000–15,000 |
| Remove acrylic | Carbide barrel | 15,000–20,000 |
| Cuticle cleaning | Diamond ball | 5,000–8,000 |
| Surface smoothing | Sanding band (fine) | 7,000–10,000 |
| Under nail cleaning | Needle or flame bit | 8,000–12,000 |
Safety Tips For Using Nail Drill Bits
Using a nail drill is safe if you follow proper techniques. Here’s how to avoid injury and get the best results.
Start Slow
Always begin with a low speed. High speed can burn the nail, cause grooves, or damage the nail bed.
Use The Right Bit For Each Job
Never use a coarse bit on natural nails. This can cause pain and thin the nail plate. Stick to gentle bits for delicate areas.
Keep The Bit Moving
If you hold the bit in one spot, it can heat up and burn the nail. Move the bit smoothly and evenly.
Don’t Press Hard
Let the bit do the work. Heavy pressure damages nails and makes the drill harder to control.
Check For Heat
If you feel heat or pain, stop immediately. Take breaks between fingers to avoid overheating.
Clean Bits Regularly
Bits collect dust and nail debris, which can lead to infection. Clean and disinfect after every client or session.
Avoid Skin Contact
Be careful near the cuticle and sidewalls. Using a safety bit helps, but always use gentle strokes.
Replace Worn Bits
Old or worn bits lose their effectiveness and can be rough on nails. Replace them as soon as they look dull or damaged.
Cleaning And Maintenance Of Nail Drill Bits
Proper cleaning keeps your bits effective and safe. Here’s the best way to clean and store them.
After Each Use
- Remove the bit from the drill.
- Brush off dust with a stiff brush.
- Wash with soap and water if possible.
Disinfect Metal And Ceramic Bits
- Soak bits in a professional disinfectant for 10–15 minutes.
- Rinse well and dry completely.
- Store in a clean, dry case.
Sanding Bands
These are single-use. Throw away after each client or use.
Check For Damage
Inspect bits before every use. Look for chips, cracks, or dullness. Replace damaged bits right away.
Store Properly
Keep bits in a dedicated box or holder. Don’t mix clean and dirty bits.
Here’s a simple comparison of cleaning needs by bit material:
| Bit Material | Cleaning Method | Reusable? |
|---|---|---|
| Carbide | Brush, disinfectant soak | Yes |
| Ceramic | Brush, disinfectant soak | Yes |
| Diamond | Brush, disinfectant soak | Yes |
| Sanding Band | Dispose after use | No |

Advanced Tips And Insights
Learning to use nail drill bits is about more than just technique. Here are advanced tips, including two insights many beginners miss.
Understand Nail Plate Thickness
Not all nails are the same. Some people have thin, flexible nails, while others have thick, hard nails. Adjust your drill speed and pressure based on the natural nail’s strength. Beginners often use the same settings for everyone, which can lead to over-filing or missed spots.
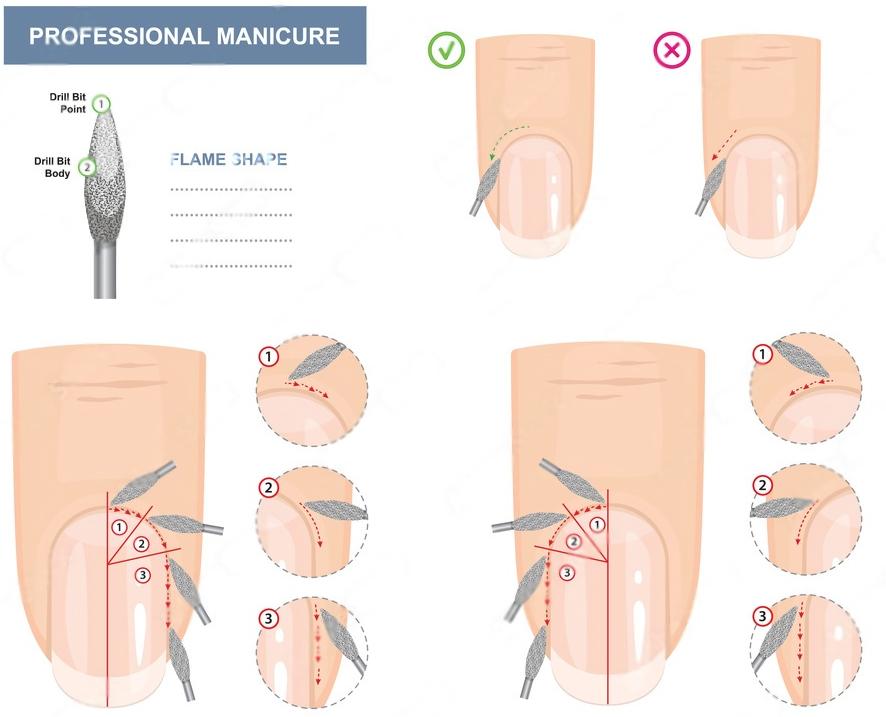
Watch Your Angle
The angle of the bit to the nail makes a big difference. Hold the bit at a 45-degree angle for most tasks. This gives you more control and prevents “ring of fire”—a common beginner mistake where a groove forms around the nail from holding the bit too flat.
Use The Full Range Of Bits
Many people only use one or two bits for every step. In reality, using a separate bit for each job (removal, shaping, cuticle, smoothing) gives cleaner, more professional results.
Practice On Practice Tips
Before working on real nails, practice on plastic tips. This lets you test speed, pressure, and technique without risk.
Know When To Stop
Over-filing is a major problem. If you see heat, white spots, or grooves, stop and reassess. Less is often more.
Troubleshooting Common Nail Drill Problems
Even with care, you may run into problems. Here’s how to solve the most frequent issues.
Bit Gets Hot
This means you’re staying in one place too long or using too much pressure. Keep the bit moving and use lighter strokes.
Nail Plate Burns
Reduce speed and pressure. Use a finer bit for the natural nail. Take breaks between nails.
Bits Dull Quickly
Cheap bits wear out fast. Invest in quality bits and clean them after every use.
Vibration Or Wobble
Check that the bit is inserted correctly. If the drill vibrates, the bit may be bent or the drill may need servicing.
Cuts Or Nicks
Always use a safety bit near the cuticle. Work slowly and don’t rush.
Nail Drill Bit Myths And Facts
There are many myths about nail drills. Let’s clear up a few:
- Myth: Nail drills always damage nails.
Fact: With the right bit and gentle technique, drills are safe.
- Myth: You only need one bit for everything.
Fact: Using the right bit for each task gives better results.
- Myth: Only professionals can use nail drills.
Fact: With practice and safety, anyone can learn.
- Myth: All bits work for all nails.
Fact: Some bits are made only for acrylic or gel, not for natural nails.
Nail Drill Bit Care For Salon Professionals
If you’re a pro, there are extra rules to follow:
- Use a new sanding band for each client.
- Disinfect bits between every client.
- Label bits for different services (natural, gel, acrylic).
- Replace old bits often to keep services safe and effective.
Following these rules protects your clients and your reputation.

When To Replace Nail Drill Bits
Even the best bits wear out over time. Here’s how to know when it’s time to replace:
- Bit feels dull or doesn’t remove product as fast.
- Visible chips, cracks, or rust.
- The bit vibrates or wobbles in the drill.
- Discoloration or rough feeling, even after cleaning.
Old bits can cause more harm than good. Professionals often replace their most-used bits every 2–3 months.
Where To Learn More
If you want to dive deeper, try online courses, YouTube tutorials, or nail tech forums. The Wikipedia page on nail drills has useful background info.
Frequently Asked Questions
What Is The Safest Nail Drill Bit For Beginners?
The safety bit is best for beginners. Its rounded top prevents accidental cuts and makes it easier to work close to the cuticle.
How Often Should I Clean My Nail Drill Bits?
Clean metal and ceramic bits after every use. Soak in disinfectant, rinse, and dry. Sanding bands should be thrown away after each client or use.
Can I Use The Same Bit For Natural And Acrylic Nails?
You can, but it’s better to use gentle bits for natural nails and stronger bits (like carbide) for acrylic or gel. Using the wrong bit can damage the nail or be less effective.
Why Does My Nail Feel Hot When Using A Drill Bit?
Heat means you’re staying in one spot too long or pressing too hard. Always keep the bit moving and use gentle pressure.
How Do I Know When To Replace My Nail Drill Bits?
Replace bits when they become dull, chipped, or start to vibrate. Old bits don’t work well and can damage the nail.
Learning how to use nail drill bits opens up a world of creative nail art and makes manicures easier and safer. By choosing the right bits, using gentle technique, and maintaining your tools, you’ll get salon-quality results every time. Practice, patience, and proper care will give you the confidence to achieve beautiful nails—whether you’re doing your own or working as a professional.