Making your own cabinet doors can seem difficult, especially if you do not own expensive woodworking tools. However, you can create strong, beautiful cabinet doors with just basic hand tools and a bit of patience. Many people think they need advanced equipment like table saws or routers, but this is not true.
With smart planning, careful measuring, and some simple skills, you can achieve professional results without a workshop full of machines.
This guide will show you how to make cabinet doors from start to finish using only basic tools. You will learn about the materials you need, measuring and cutting wood, assembling the door, adding finishing touches, and common mistakes to avoid.
If you are a beginner or have never tried woodworking before, do not worry. You will find simple explanations, clear steps, and helpful tips so you can build your own cabinet doors at home.
Why Make Cabinet Doors Yourself?
Building your own cabinet doors offers several benefits, especially if you are working with limited tools or a tight budget.
- Save Money: Purchasing new cabinet doors or hiring a carpenter can be expensive. Making them yourself reduces costs, especially if you already have some wood or can recycle old pieces.
- Custom Sizes: Not all cabinets are standard sizes. Making your own doors lets you fit any cabinet perfectly, even odd-sized or vintage cupboards.
- Personal Satisfaction: Completing a project with your own hands feels rewarding. You also gain new skills and confidence for future DIY tasks.
- Quality Control: You choose the materials and the finish, so you can create sturdy, long-lasting doors that match your style.
Many beginners miss one important point: cabinet doors do not need to be complicated. Even basic designs can look stylish and professional if made carefully.
What You Need: Tools And Materials
You do not need a big collection of tools. Here is what you should gather before starting:
Essential Hand Tools
- Measuring tape (at least 2 meters)
- Carpenter’s square or a simple right-angle ruler
- Handsaw (a fine-tooth saw works best for smoother cuts)
- Clamps (2–4 pieces, to hold parts together while gluing)
- Hammer and nails (small brad nails are best)
- Screwdriver (manual or electric, for attaching hinges)
- Wood glue
- Sandpaper (medium and fine grit)
- Pencil
Optional But Helpful
- Miter box (for cutting straight or angled corners)
- Drill (for making holes for handles or hinges)
- Chisel (for cleaning up joints if needed)
Materials
- Wood boards (Pine, poplar, or plywood is affordable and easy to work with)
- Wood finish (paint, stain, or clear varnish)
- Hinges and door handles (choose styles that match your kitchen)
- Brads or small nails (for extra strength)
If you want to keep things truly simple, you can even use reclaimed wood or cut down old furniture panels.
Planning Your Cabinet Door Design
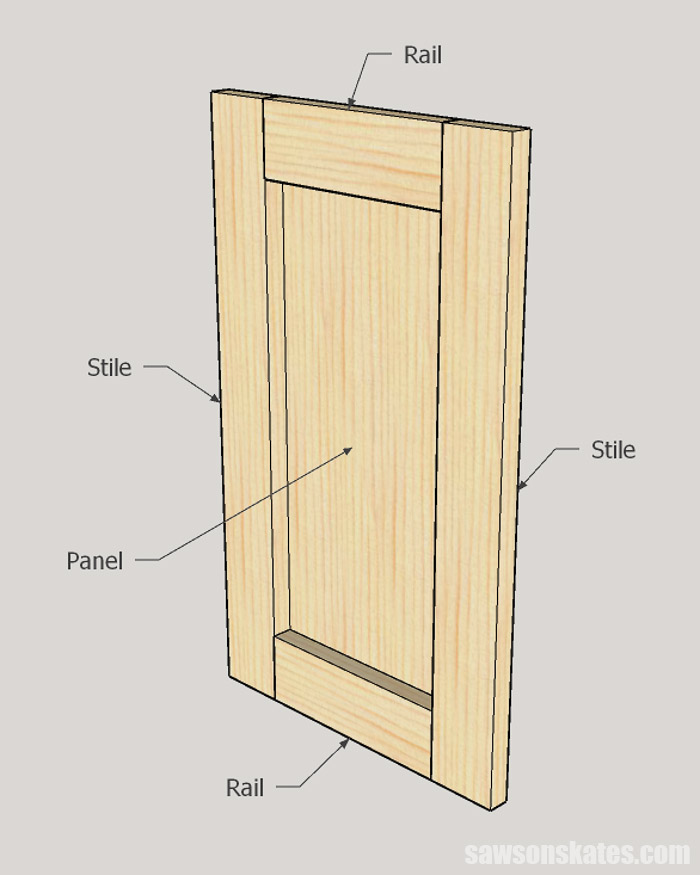
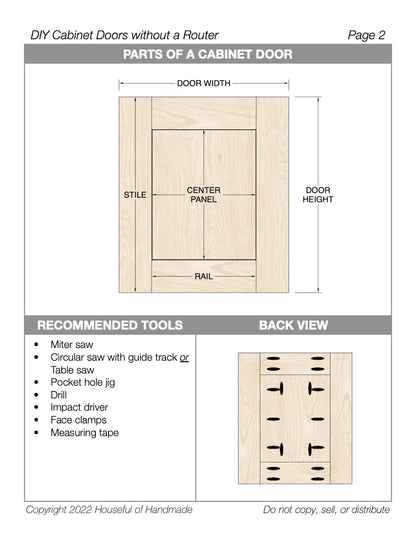
Before you start cutting, you need a plan. Cabinet doors come in many styles, but the most common for beginners is the shaker style. This design uses four frame pieces and a flat center panel. It is simple, classic, and suits almost any kitchen.
Measuring For The Door
- Measure the height and width of the cabinet opening.
- Decide if you want the door to cover the opening completely (full overlay) or sit inside the frame (inset).
- Add 2 centimeters to both height and width if you want a full overlay.
For example, if your cabinet opening is 50 cm x 40 cm, your door should be 52 cm x 42 cm for a full overlay.
Pro tip: Always measure twice before cutting. Wood is expensive, and mistakes are hard to fix.
Choosing Wood Thickness
Most cabinet doors use wood between 1.5 cm and 2 cm thick. Thicker doors are stronger, but heavier. If you use plywood, make sure it is furniture grade and at least 1.2 cm thick.
Step-by-step: Making Cabinet Doors Without Special Tools
Let’s break down the process so each step is clear and simple. We will focus on a basic shaker-style door, but these steps also work for plain slab doors.
1. Prepare Your Workspace
Clear a large, flat area to work on. A sturdy table or even the floor with a protective sheet will do. Good lighting helps you see marks and edges more clearly.
2. Mark And Cut Your Wood
You will need:
- Two long stiles (vertical sides)
- Two short rails (top and bottom)
- One center panel (the flat piece in the middle)
For a 52 cm x 42 cm door, you might cut:
- Stiles: 52 cm long, 5 cm wide (2 pieces)
- Rails: 32 cm long, 5 cm wide (2 pieces) – subtract the width of both stiles from total width
- Panel: 42 cm wide, 42 cm high (1 piece) – adjust to fit inside the frame
Mark your measurements carefully with a pencil and square. Use the handsaw to cut each piece. Go slowly and let the saw do the work. If you have a miter box, use it to help guide the saw for straight cuts.
Non-obvious tip: Place masking tape along your cut lines. This helps prevent splintering, especially with plywood.
3. Sand All Edges
Smooth all cut edges and surfaces with medium grit sandpaper (120 grit). Then switch to fine grit (220 grit) for a smoother finish. This step is important for a professional look and to avoid splinters later.
4. Assemble The Frame
Lay out the stiles and rails on your table to form a rectangle. The rails fit between the stiles at the top and bottom.
Apply a thin bead of wood glue to the ends of each rail where they meet the stiles. Clamp the frame together and check that the corners are square using your carpenter’s square.
For extra strength, hammer in two small brad nails at each joint. Wipe away any glue that squeezes out.
Let the frame dry for at least 30 minutes (or as the glue instructions say).
5. Fit The Center Panel
If you want a classic shaker look, the center panel should fit snugly inside the frame. Lay the panel inside the frame. If it is too tight, sand the edges a little at a time until it fits flat.
Apply a small amount of glue along the inside edges of the frame, then set the panel in place. You can add a few nails through the frame into the edge of the panel for extra strength.
Insight: Many beginners try to glue the panel very tightly. But wood needs space to expand or shrink with humidity. Leave a tiny gap (1–2 mm) so the panel can move.
6. Sand The Assembled Door
After the glue dries, sand the whole door again. Pay extra attention to the corners and edges where the frame meets the panel. This will help the paint or finish stick better later.
7. Attach Hinges
Decide which side of the door you want the hinges. Mark the spots for the screws, about 10 cm from the top and bottom edges.
If you have a drill, use it to make small pilot holes for the screws. If not, use a nail to make a starter hole so the wood does not split.
Screw the hinges onto the door. Do not attach to the cabinet yet—wait until after painting or finishing.
8. Finish And Paint
Wipe down the door with a dry cloth to remove dust.
Apply paint, stain, or clear varnish with a brush or roller. Allow each coat to dry fully before adding more. Two coats usually give a strong, even finish.
If you want a smooth, modern look, lightly sand between coats with fine sandpaper.
Pro tip: Paint the back and sides as well as the front, so the wood is fully protected against moisture.
9. Attach Handles
After the finish is completely dry, mark where you want the door handle or knob. Drill a small hole if needed and screw the handle in place.
10. Install The Door
Hold the door up to the cabinet opening. Mark where the hinge plates should go on the cabinet frame. Attach the hinges and test that the door opens and closes smoothly.
If the door is uneven, adjust the hinges or sand the edges slightly until it fits well.
Comparing Popular Cabinet Door Styles You Can Make Without Special Tools
Different door styles require different skills and tools. Here’s a quick comparison of three designs you can make easily:
| Style | Look | Difficulty | Best For |
|---|---|---|---|
| Shaker | Simple frame with flat panel | Easy | Modern, classic kitchens |
| Slab | Flat, single board | Very easy | Minimalist, budget projects |
| Beadboard | Flat panel with grooves | Medium | Country or cottage style |
For absolute beginners, shaker or slab doors are easiest. Beadboard needs extra steps, like adding grooves, but can still be made by gluing thin strips of wood side by side.
How To Choose The Right Wood Without Special Equipment
Not all wood is the same. Here’s what to consider:
- Pine: Soft, affordable, and easy to cut with hand tools. Good for painted doors.
- Poplar: Slightly harder, smooth grain, takes paint well.
- Plywood: Stable, flat, and available in large sheets. Choose furniture grade for best results.
- MDF: Very smooth for painting, but heavier and not as strong as wood.
Wood Comparison Table
| Wood Type | Cost | Ease of Cutting | Best For |
|---|---|---|---|
| Pine | Low | Easy | Beginner projects, painting |
| Poplar | Medium | Easy | Smooth painted finishes |
| Plywood | Low–Medium | Easy | Large doors, budget builds |
| MDF | Low | Easy (but dusty) | Very smooth painted doors |
Non-obvious insight: Always check the wood for warping or twisting before buying. Even slight bends make it hard to build a flat door, and correcting warped wood without power tools is nearly impossible.
Tips For Clean Cuts And Strong Joints
Working without power tools means you need to be extra careful with your cuts and joints.
- Use a sharp saw blade: Dull blades crush the wood fibers, making rough, uneven edges.
- Cut slowly: Let the saw do the work. Rushing increases the risk of mistakes.
- Support your wood: Place the board on a stable surface and clamp it down if possible.
- Double-check angles: Use a square for every mark and cut to avoid gaps.
- Dry-fit parts before gluing: Assemble the frame without glue first to check that everything fits.
If you notice small gaps in your joints, you can fill them with wood filler before painting.
Common Mistakes Beginners Make (and How To Avoid Them)
Many first-time builders run into similar problems. Here are some to watch for:
- Cutting wrong sizes: Always double-check measurements before cutting. Mark each piece clearly.
- Using too much glue: Excess glue oozes out and is hard to remove. Use a thin, even bead.
- Forgetting to sand: Skipping sanding leaves rough spots that show through paint.
- Not clamping: Unclamped joints can shift and dry crooked.
- Ignoring wood movement: Wood expands and contracts. Leave small gaps in panels.
- Rushing the finish: Paint or varnish needs time to dry. Rushing leads to drips and fingerprints.
If you make a mistake, do not panic. Many small errors can be fixed with filler, extra sanding, or careful trimming.
How To Make Slab-style Cabinet Doors With Only Basic Tools
If you want the simplest possible cabinet door, try the slab style. This design uses a single flat board—no frame, no panel.
Steps For A Slab Door
- Measure the opening as before.
- Cut a single piece of wood (plywood or MDF works best) to size.
- Sand all edges smooth.
- Paint or stain as you like.
- Attach hinges and handle as described above.
Advantages
- Fast and easy: Only one board to cut.
- Modern look: Flat, clean lines.
- Low cost: Less wood and fewer tools.
Watch out: Slab doors can warp if the wood is thin or not sealed properly. Always finish both sides with paint or varnish.
Making Beadboard-style Cabinet Doors Without Routers
Beadboard doors are popular for cottage or farmhouse kitchens. Normally, making grooves (beads) requires a router. But you can fake the look with strips of wood or even clever painting.
The Strip Method
- Cut a flat panel as for a slab door.
- Cut thin strips of wood (about 2 cm wide, 0.5 cm thick).
- Glue the strips side by side onto the panel, leaving small gaps between each for the beadboard effect.
- Clamp and let dry.
- Sand and paint for a seamless look.
You can add a simple frame around the edge if you want a more finished appearance.
Non-obvious tip: For a quick beadboard look, you can also score lines into MDF with a sharp knife and straightedge, then paint over.
Finishing Your Doors: Paint, Stain, Or Varnish?
The finish you choose affects both the look and durability of your cabinet doors.
Paint
- Best for: Hiding wood flaws, matching modern kitchens
- Tip: Use a primer first for even color
Stain
- Best for: Showing off natural wood grain
- Tip: Wipe excess quickly to avoid blotchy color
Clear Varnish
- Best for: Protecting natural wood, keeping a light look
- Tip: Apply thin coats and sand lightly between them
Important: Always finish both front and back to protect against moisture and warping.
Comparison Of Finishing Options
| Finish | Look | Protection | Skill Level |
|---|---|---|---|
| Paint | Solid color, hides wood flaws | High | Easy |
| Stain | Shows wood grain | Medium | Medium |
| Clear Varnish | Natural look | High | Easy |
How To Install Your New Cabinet Doors
When your doors are finished and dry, it is time to install them.
- Mark hinge locations on the cabinet frame.
- Pre-drill holes for screws (if possible).
- Screw hinges to cabinet. Hold the door in position and mark where hinge plates should go.
- Check alignment. Make sure the door closes smoothly and sits flat.
- Adjust if needed by loosening screws, shifting slightly, and re-tightening.
Non-obvious insight: If your cabinet frame is not perfectly square (many are not), you may need to sand the door edges slightly to help it fit.
Troubleshooting: What If Something Goes Wrong?
Even with the best planning, problems can happen. Here’s how to solve the most common issues:
- Door does not close flat: Check if the hinges are aligned and tight. Sand high spots on the cabinet frame if needed.
- Gaps around the door: Use small shims (thin pieces of wood) behind the hinges to adjust the fit.
- Paint runs or drips: Sand lightly and repaint.
- Panel rattles inside frame: Remove the door and add a tiny amount of glue in one corner.
If you need more detailed guidance, there are many free resources and videos online. One helpful site is Family Handyman, which offers step-by-step pictures and tips.
Frequently Asked Questions
How Do I Make Sure My Cabinet Doors Are Square?
After cutting your frame pieces, always dry-fit them and check the corners with a carpenter’s square before gluing. When you clamp the frame, measure both diagonals (from top left to bottom right, and top right to bottom left). If the measurements are equal, your frame is square.
What Is The Easiest Wood To Use For Beginners?
Pine is a great choice for beginners. It is soft, easy to cut with hand tools, and low cost. For painted doors, MDF or poplar are also good options.
Can I Make Cabinet Doors From Old Furniture?
Yes! Reusing panels from old tables, doors, or dressers saves money and gives your cabinets a unique look. Just be sure to sand off old paint or finish and check the wood for damage or warping.
How Do I Prevent The Wood From Splitting When Nailing?
Use small brad nails and make a tiny pilot hole with a thin nail or drill bit before hammering. Do not place nails too close to the edge of the wood.
Do I Need To Seal The Back Of The Cabinet Door?
Yes, always finish both the front and back with paint, stain, or varnish. This protects the wood from moisture and keeps the door from warping over time.
Building cabinet doors without special tools is possible for anyone with patience, care, and a few basic tools. You do not need a workshop full of machines to create attractive, strong doors for your kitchen or bathroom. By following the steps above, you can upgrade your space, save money, and gain valuable DIY skills—all with your own two hands.