Keeping your saw blades sharp is one of the best ways to improve your woodworking, metalworking, or general DIY projects. A dull blade slows down work, causes rough cuts, and can even be dangerous. Many people throw away saw blades when they stop cutting well, but you don’t need to.
With the right knowledge, you can sharpen most saw blades at home and restore their performance. You’ll save money, enjoy smoother cuts, and even extend the life of your tools.
Understanding how to sharpen saw blades is not just about making them cut better. It’s also about safety and efficiency. A sharp blade reduces the chance of kickback and needs less force to push through wood or metal. This means less strain on both you and your saw.
While sharpening does take a little time and care, almost anyone can learn this skill. In this guide, you’ll learn about the tools you need, the steps for different types of saw blades, helpful tips, and important safety advice. Whether you work with circular saws, hand saws, or band saws, you’ll find clear steps to bring any blade back to life.
Why Saw Blade Sharpness Matters
A sharp saw blade is essential for several reasons. First, it produces cleaner cuts. When a blade is dull, it tears fibers instead of slicing them, leading to rough or splintered edges. This is especially important in fine woodworking, where the final appearance matters.
Second, sharp blades are safer. Dull blades force you to use more pressure, increasing the risk of slipping or binding. This can cause accidents, especially with power saws. A sharp blade moves smoothly and is less likely to grab or kick back.
Third, sharp blades protect your tools. A dull blade creates more friction, making the saw’s motor work harder. Over time, this can wear out your equipment faster. By keeping your blades sharp, you’ll extend the life of both the blade and the saw itself.
Types Of Saw Blades And Their Sharpening Needs
Before you start, it’s important to know what kind of saw blade you have. Different blades need different sharpening techniques and tools. Let’s look at the most common types:
1. Circular Saw Blades
These are round, flat blades used in circular saws, table saws, and miter saws. They often have carbide-tipped teeth, which stay sharp longer but can be more delicate to sharpen. Some circular blades are all steel.
2. Hand Saw Blades
Hand saws come in various forms, such as crosscut saws and rip saws. Their teeth are shaped differently depending on the job. Hand saws usually need to be sharpened more often than power tool blades.
3. Band Saw Blades
Band saw blades are long, flexible strips formed into a loop. They are used for curved or detailed cuts. These blades are thinner and have smaller teeth, which require careful handling when sharpening.
4. Chainsaw Blades
Chainsaws use a chain with sharp cutting teeth rather than a solid blade. They must be sharpened frequently because they dull quickly, especially if cutting dirty wood or hitting stones.
5. Speciality Saw Blades
This includes Japanese saws, back saws, and bow saws, each with unique tooth designs. Sharpening these may need special files or approaches.
Tools And Materials Needed For Sharpening
To sharpen saw blades effectively, you’ll need a few essential tools. The exact items depend on the type of blade, but most sharpening jobs require:
- Saw files – Flat, triangular, or round, depending on the saw tooth shape.
- Diamond file or sharpening stone – For carbide-tipped blades.
- Saw set – A tool to bend teeth back into proper alignment.
- Sharpening jig or clamp – To hold the blade steady.
- Work gloves and safety glasses – For personal protection.
- Cleaning brush or rag – To remove debris before sharpening.
For power saw blades, a bench grinder with a fine wheel or a dedicated blade sharpener can speed up the process, but hand tools are usually enough for most people.
Preparing The Blade For Sharpening
Proper preparation makes sharpening easier and more effective. Here are the key steps:
- Unplug or remove the blade – If it’s a power saw, always disconnect it from power before removing the blade.
- Clean the blade – Use a stiff brush and mild cleaner to remove pitch, resin, and dust. This exposes the teeth and makes sharpening more accurate.
- Inspect for damage – Look for missing, bent, or chipped teeth. Severely damaged blades may need professional repair or replacement.
- Check for straightness – A warped blade won’t cut well, even if sharp. Lay the blade on a flat surface to check.
Skipping these steps can lead to uneven results and may even damage your blade further.
How To Sharpen Circular Saw Blades
Circular saw blades are common in woodworking and construction. Most have carbide-tipped teeth, which need special care. Here’s how to sharpen them:
Step 1: Secure The Blade
Clamp the blade in a sharpening jig or use a vise with soft jaws to prevent scratching. The blade should not move during sharpening.
Step 2: Identify The Tooth Type
Look at the teeth. Most blades use an alternate top bevel (ATB) pattern, where the teeth are angled left and right in turn. Some use flat-top or combination patterns.
Step 3: Mark Your Starting Point
Use a marker to color the first tooth. This helps you keep track so you don’t sharpen the same tooth twice or miss any.
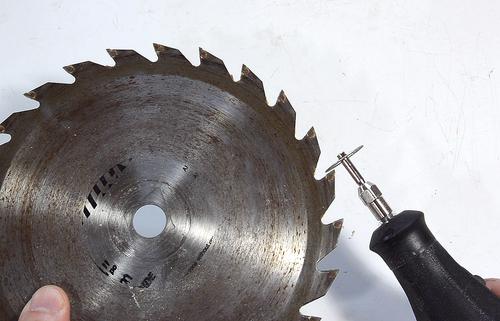
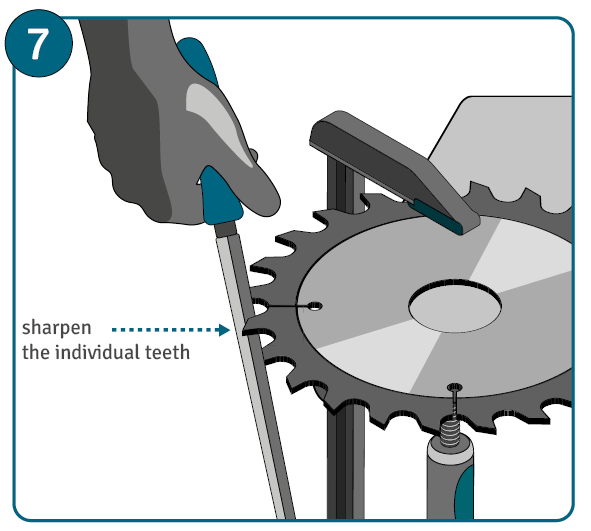
Step 4: Sharpen The Teeth
Use a diamond file or a fine sharpening stone. For each tooth:
- Hold the file at the same angle as the tooth’s bevel (usually 15–20 degrees).
- Make 2–3 gentle strokes, moving only in one direction.
- Repeat for every tooth, working around the blade.
Carbide teeth are hard, so don’t use too much force. If the blade is very dull or chipped, it’s best to take it to a professional service.
Step 5: Check Tooth Height
Teeth should be the same height. If some are much lower, the blade may need re-tipping or replacement.
Step 6: Clean And Reinstall
Wipe the blade clean to remove filings. Reinstall it, following your saw’s safety instructions.
Example: Sharpening A 24-tooth Carbide Circular Blade
A typical 24-tooth blade takes about 15 minutes to sharpen by hand. Each tooth needs 2–3 strokes. If you use a sharpening jig, you can maintain the correct angle more easily, leading to better results.
How To Sharpen Hand Saw Blades
Hand saws are still popular for their control and precision. Sharpening them is a rewarding skill. Here’s a detailed process:
Step 1: Secure The Saw
Clamp the saw blade in a saw vise or a regular vise with wooden jaws. The blade should be upright, with the teeth exposed.
Step 2: Joint The Teeth
Run a flat file lightly along the tops of the teeth. This makes all the teeth the same height and reveals which need more sharpening.
Step 3: File The Teeth
Choose a triangular file for most hand saws. For each tooth:
- Hold the file at the correct angle (crosscut saws: 15–20 degrees; rip saws: 0–8 degrees).
- File each tooth until the flat spot disappears.
- Work in one direction, using smooth, even strokes.
Step 4: Set The Teeth
After filing, use a saw set to bend each tooth slightly outward, alternating left and right. This prevents the saw from binding in the cut.
Step 5: Remove Burrs
Lightly run a fine file or stone along the sides of the teeth to remove any burrs.
Insight: Avoid Over-filing
Beginners often file too much, removing too much metal and shortening the blade’s life. Just enough to restore the edge is best.
How To Sharpen Band Saw Blades
Band saw blades are thin and flexible, often with many small teeth. Here’s the best way to sharpen them:
Step 1: Leave The Blade On The Saw
Most people sharpen band saw blades while they’re still installed. This saves time and keeps the blade steady.
Step 2: Clean The Blade
Use a small brush to remove dust and resin.
Step 3: Use A Dremel Or Diamond File
A Dremel tool with a fine grinding stone works well. You can also use a small diamond file.
- Gently touch each tooth’s tip and face.
- Keep the tool at the same angle as the original grind.
Step 4: Go Slow
Band saw teeth are delicate. Too much pressure can ruin the blade. A single pass per tooth is often enough.
Step 5: Replace When Needed
If the blade has missing or broken teeth, or if it’s badly worn, it’s safer to buy a new one.
Non-obvious Tip
Sharpening band saw blades too many times can reduce their ability to track straight. If your blade wanders after sharpening, it may be time to replace it.
How To Sharpen Chainsaw Blades
Chainsaw blades (chains) need frequent sharpening, especially after hitting dirt or rocks. The process is a bit different:
Step 1: Secure The Saw
Lock the chain brake and clamp the bar so the saw doesn’t move.
Step 2: Choose The Right File
Use a round file that matches your chain’s tooth size. Check your chain’s manual for the correct diameter.
Step 3: File Each Tooth
- Place the file in the notch of the tooth.
- Keep the file at the correct angle (usually 25–35 degrees).
- File with smooth, forward strokes.
- Count the number of strokes and use the same for each tooth.
Step 4: Advance The Chain
After sharpening a section, move the chain forward to access the next group of teeth.
Step 5: Check Depth Gauges
The small bumps in front of each tooth (called rakers or depth gauges) control how deep the tooth cuts. Use a depth gauge tool to check and file them down if needed.
Example: Typical Chainsaw Sharpening
A 16-inch chain has about 56 teeth. Sharpening all of them by hand takes about 20–30 minutes.
How To Sharpen Specialty Saw Blades
Japanese saws, back saws, and bow saws have unique tooth patterns. For these:
- Use the correct type and size of file (consult the saw’s manual or manufacturer).
- Follow the original tooth angle closely.
- For very fine or specialized teeth, consider professional sharpening.
How Often Should You Sharpen Saw Blades?
The answer depends on the material you cut and the frequency of use. General guidelines:
- Circular and table saw blades: After every 2–4 days of heavy use, or when cuts become rough.
- Hand saws: Every few projects or when you feel more resistance.
- Band saw blades: When they start to wander or burn the wood.
- Chainsaw chains: After every few hours of use, or sooner if you hit dirt.
Some signs that your blade needs sharpening:
- Increased effort to cut
- Burning or smoking wood
- Rough, splintered edges
- The saw “grabs” or vibrates
Common Mistakes To Avoid
Even experienced users make mistakes when sharpening saw blades. Avoid these common errors:
- Wrong file size – Using the wrong file can ruin the tooth shape.
- Inconsistent angles – Not matching the original tooth angle leads to poor performance.
- Over-filing – Removing too much metal reduces blade life.
- Skipping teeth – Missing some teeth leads to uneven cutting and vibration.
- No tooth set – Forgetting to set the teeth causes the blade to bind.
A helpful insight: Always mark your starting point and work methodically. It’s easy to lose track, especially on blades with many teeth.
Manual Vs. Power Sharpening
Both manual and power sharpening have pros and cons. Here’s how they compare:
| Method | Pros | Cons | Best For |
|---|---|---|---|
| Manual Sharpening | Precise, low cost, less risk of overheating | Slower, requires steady hand, can be tiring | Hand saws, small jobs, carbide tips |
| Power Sharpening | Fast, good for many blades | Risk of overheating, higher cost, needs skill | Large shops, frequent sharpening |
For most home users, manual sharpening is enough. Power tools are best for professionals who sharpen many blades daily.
When To Replace Instead Of Sharpening
Not all blades can or should be sharpened. Replace your blade if:
- Teeth are missing, bent, or chipped badly
- The blade is warped or cracked
- Sharpening no longer improves performance
Sometimes, the cost of sharpening is close to buying a new blade, especially for cheap or small blades.
Cost And Benefits Of Sharpening
Sharpening saw blades at home saves money. A professional sharpening service can cost $10–$20 for a circular blade, and $5–$10 for a hand saw. If you sharpen three or more blades per year, buying a few files or a sharpening jig pays for itself quickly.
Sharpening also reduces waste. Instead of throwing away dull blades, you can use them for years. This is better for your wallet and the environment.
Saw Blade Sharpening Angles And Tooth Types
Understanding tooth geometry helps you sharpen more accurately. Here are some key terms and angles:
- Bevel angle: The tilt of the tooth’s face. Crosscut saws have more bevel for slicing; rip saws are closer to square.
- Gullet: The space between teeth that carries away chips.
- Set: The sideways bend of each tooth.
| Saw Type | Typical Bevel Angle | File Type | Set (Left/Right) |
|---|---|---|---|
| Circular Saw (ATB) | 15–20° | Diamond file | Alternating |
| Hand Saw (Crosscut) | 15–20° | Triangular file | Alternating |
| Hand Saw (Rip) | 0–8° | Triangular file | Alternating |
| Chainsaw | 25–35° | Round file | Alternating |
Matching the original angles maintains the saw’s performance. If you’re unsure, check the manufacturer’s website or manual.
Essential Safety Tips
Sharpening saw blades is not without risks. Always:
- Wear safety glasses to protect your eyes from metal filings.
- Use work gloves when handling sharp blades.
- Keep your work area clean and well-lit.
- Disconnect power before removing blades from machines.
- Clamp blades securely; never try to sharpen a blade that can move.
A surprising fact: Most sharpening injuries happen not during sharpening, but when handling the blade before or after. Always handle blades with care.

Practical Tips For Better Sharpening Results
Here are some extra tips that can help you achieve professional results:
- Use a magnifying glass to inspect your work, especially on small teeth.
- Keep files clean – A clogged file works poorly. Use a file card or wire brush.
- Replace worn files – Dull files can damage teeth.
- Check for burrs – After sharpening, lightly run a stone along the sides to remove tiny burrs.
- Sharpen regularly – Don’t wait until the blade is completely dull.
Storage And Care After Sharpening
After sharpening, it’s important to store your blades properly to keep them sharp. Hang hand saws on hooks or store in a dry toolbox. For circular and band saw blades, use blade protectors or wrap them in cloth. Always keep blades dry to prevent rust.
Applying a light coat of oil to steel blades helps prevent corrosion, especially if you don’t plan to use them soon.
Sharpening Services Vs. Diy
While sharpening at home is cost-effective, some blades require professional touch. Complex tooth patterns, carbide-tipped blades with major damage, or expensive specialty blades are often best left to experts. Many woodworking shops and hardware stores offer this service.
For more on when to choose professional sharpening, visit Wikipedia: Saw Sharpening for additional insights.
Frequently Asked Questions
What Tools Do I Need To Sharpen A Circular Saw Blade At Home?
You’ll need a diamond file or fine sharpening stone for carbide-tipped blades. A sharpening jig or vise to hold the blade steady is important. For all-steel blades, a fine file works. Safety glasses and gloves are also recommended.
How Do I Know If My Saw Blade Is Too Worn To Sharpen?
Check for missing, bent, or badly chipped teeth. If the blade is warped or cracked, it’s unsafe to use and should be replaced. If sharpening no longer improves cutting, replacement is likely needed.
Can I Sharpen A Saw Blade Without Removing It From The Saw?
For some blades, like band saws and chainsaw chains, sharpening on the saw is common. For circular and hand saws, it’s safer and easier to remove the blade for sharpening.
How Many Times Can I Sharpen A Saw Blade Before Replacing It?
It depends on the blade and how much metal you remove each time. A well-maintained saw blade can be sharpened 5–10 times or more. If the teeth become too short, the blade should be replaced.
Is It Worth Sharpening Cheap Saw Blades?
For very low-cost blades, the time and effort may not be worth it, especially if the blade is made from soft metal. Higher-quality blades are almost always worth sharpening. Use your judgment based on blade quality and replacement cost.
Keeping your saw blades sharp is a small investment of time that pays off with better results, safer work, and longer-lasting tools. Once you practice and develop the habit, sharpening becomes a routine part of caring for your workshop. The next time your saw slows down or leaves rough edges, you’ll know exactly what to do—and you’ll enjoy the satisfaction of restoring your tools yourself.