Testing your car’s alternator with a multimeter can save you from expensive breakdowns and repairs. Many drivers worry about their car battery, but often the real issue is a weak or failing alternator. The alternator is the heart of your vehicle’s electrical system.
It keeps the battery charged and powers everything from headlights to radio. If it stops working, your car won’t run for long. Learning how to check the alternator is not just for mechanics. With a bit of patience and a multimeter, anyone can do it.
This guide will take you from the basics to expert-level tips, using simple language and real-life examples. You’ll discover how to test an alternator with confidence, avoid common mistakes, and understand what the results mean for your car’s health.
What Does The Alternator Do?
The alternator is a key part of your car’s charging system. Its main job is to generate electricity while the engine is running. This electricity powers all the car’s electrical components—lights, windshield wipers, radio, AC, and more. It also keeps the battery charged so that your car starts smoothly every time.
When you turn the key, the battery provides the first power burst to start the engine. Once the engine is running, the alternator takes over, making sure the battery stays fully charged. Without a working alternator, your car will soon lose power, and the battery will drain quickly.
Signs Of A Bad Alternator
Knowing when your alternator might be failing is important. Some common signs include:
- Dim headlights or flickering dashboard lights
- Slow or weak electrical accessories (like power windows moving slowly)
- Battery warning light on the dashboard
- Engine stalling or difficulty starting
- Strange noises like whining or grinding from the engine area
- Dead battery, even if the battery is fairly new
If you notice these symptoms, it’s smart to check your alternator before replacing the battery.
What Is A Multimeter And Why Use One?
A multimeter is a tool that measures voltage, current (amperes), and resistance (ohms). For testing an alternator, you’ll use the voltage function. Multimeters are affordable and found in most hardware stores. They come in two types:
- Analog multimeter: Uses a needle to show readings. Less common today.
- Digital multimeter (DMM): Shows values on a digital screen. Easier to read and more accurate.
With a multimeter, you can quickly tell if your alternator is charging the battery properly. This simple test can prevent costly misdiagnosis.
Features To Look For In A Multimeter
When choosing a multimeter for car work, consider these features:
- DC voltage range up to at least 20V (most car batteries are 12V)
- Clear digital display
- Auto-ranging (optional, but makes things easier)
- Sturdy test leads
- Continuity buzzer (handy for checking fuses and wires)
Even a basic digital multimeter is enough for alternator testing.
Safety First: Essential Precautions
Before you start working on your car’s electrical system, keep safety in mind. Car batteries and alternators can deliver strong currents, which may cause sparks or burns. Always:
- Wear gloves and eye protection
- Work in a well-ventilated area
- Keep metal tools away from the battery terminals
- Do not smoke or use open flames near the battery
- Read the car’s manual for specific warnings
Never touch both battery terminals with metal tools at the same time. The battery can release dangerous gases, so avoid creating sparks.
Tools And Materials You’ll Need
For testing your alternator, prepare the following:
- Digital multimeter (DMM)
- Gloves and safety glasses
- Car owner’s manual (for reference)
- Notepad and pen (to record readings)
- Flashlight (if working in low light)
- Helper (optional, for revving the engine)
Having these items ready makes the test smooth and safe.
Step-by-step: How To Test Car Alternator With Multimeter
Checking your car’s alternator is a straightforward process. Follow these steps carefully for accurate results.
1. Get Ready
Park your car on a level surface, engage the parking brake, and turn off the engine. Open the hood and locate the battery and alternator. If unsure, check your owner’s manual.
2. Set Up The Multimeter
Turn on your digital multimeter and set it to DC voltage. Choose a range that covers 0–20 volts. Most digital meters have an auto-range function, but double-check.
- Black lead: Insert into the COM (common) port.
- Red lead: Insert into the VΩmA (voltage) port.
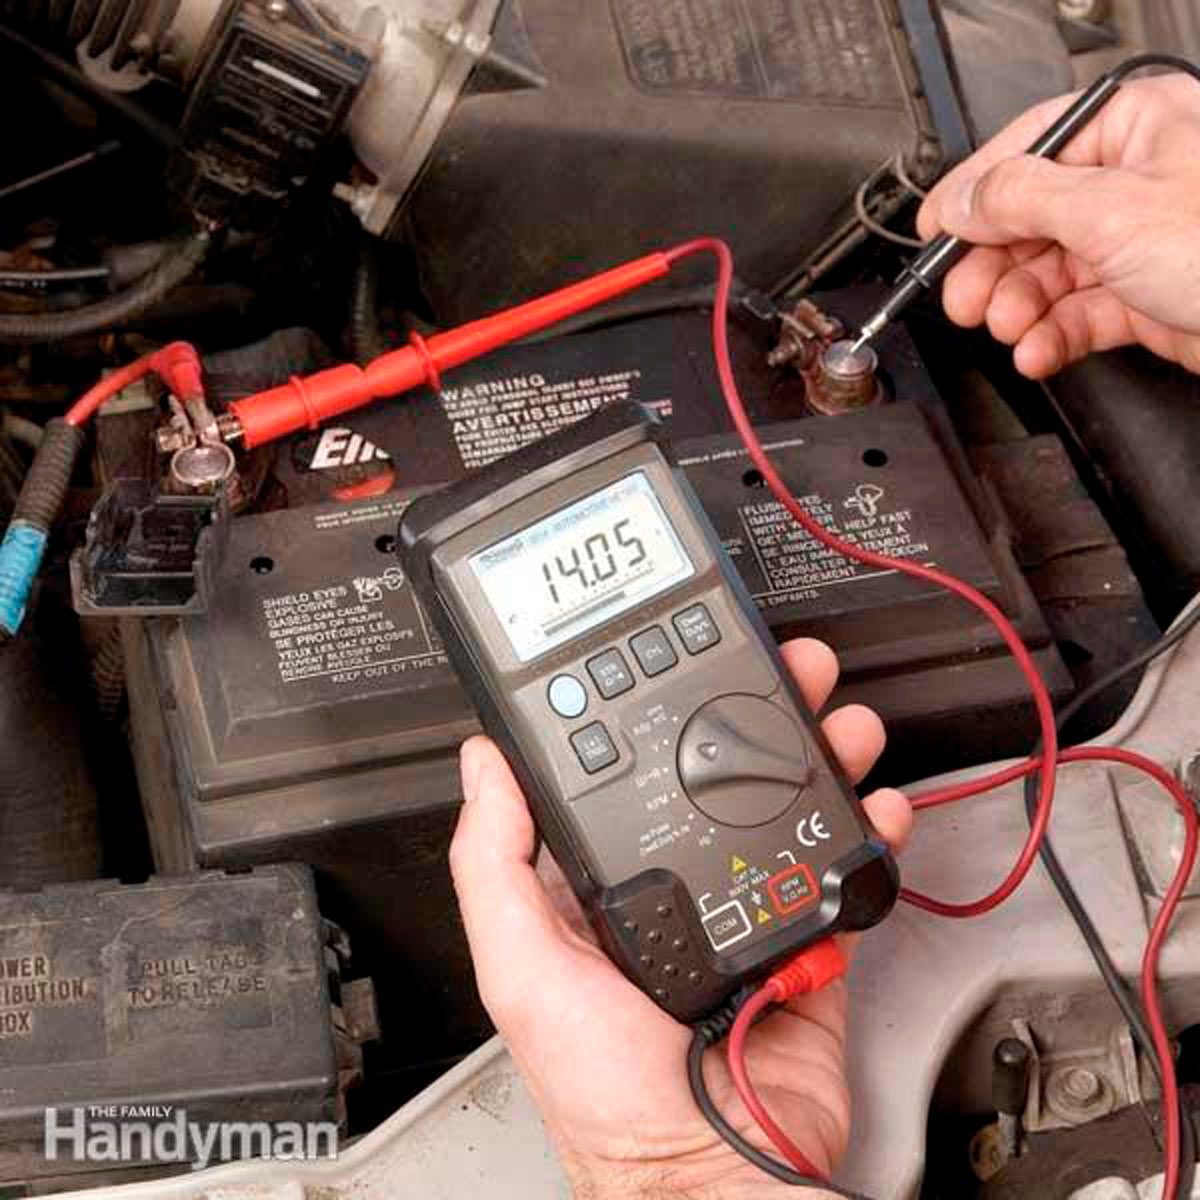
3. Check Battery Voltage (engine Off)
Before testing the alternator, measure the battery’s resting voltage.
- Place the black lead on the battery’s negative (-) terminal.
- Place the red lead on the battery’s positive (+) terminal.
- Read the value on the display.
A fully charged battery should read 12.6 to 12.8 volts. If the reading is below 12.4 volts, the battery may be weak or undercharged.
Example Battery Readings
| Battery Voltage (Engine Off) | Status |
|---|---|
| 12.6 – 12.8 V | Fully charged |
| 12.4 – 12.5 V | 75% charged |
| 12.2 – 12.3 V | 50% charged |
| 12.0 – 12.1 V | 25% charged |
| Below 12.0 V | Discharged/weak |
If your battery is below 12. 2V, charge it before testing the alternator. Testing with a weak battery can give false results.
4. Start The Engine And Measure Voltage Again
Now, start your car. Leave the headlights and accessories off for this test.
- Keep the multimeter leads on the battery terminals as before.
- Observe the reading on the screen.
A healthy alternator should raise the voltage to 13.8–14.5 volts. This means the alternator is charging the battery.
5. Test Under Load
To simulate real driving, turn on electrical accessories—headlights, radio, AC, and rear defroster.
- Watch the multimeter as you switch on each accessory.
- The voltage should stay between 13.5 and 14.2 volts.
If the voltage drops below 13. 0 volts, the alternator may not be keeping up.
Alternator Output Comparison
| Voltage (Engine On, No Load) | Voltage (Engine On, Full Load) | Alternator Condition |
|---|---|---|
| 13.8–14.5 V | 13.5–14.2 V | Normal |
| 12.5–13.5 V | Below 13.0 V | Weak/Failing |
| Above 15.0 V | Above 15.0 V | Overcharging (faulty regulator) |
6. Rev The Engine
Ask a helper to slowly increase the engine speed to about 2000 rpm. Keep an eye on the multimeter.
- The voltage should rise slightly but stay below 14.8 volts.
- If the voltage drops as rpm increases, the alternator may be failing.
- If the voltage jumps above 15 volts, the voltage regulator may be faulty.
7. Interpret The Results
- 13.8–14.5 volts at idle and under load: Alternator is working well.
- Below 13 volts: Alternator is weak or not charging.
- Above 15 volts: Alternator or voltage regulator is overcharging.
If your results are outside the normal range, further testing or professional help may be needed.
8. Check For Voltage Drop
A less obvious issue is excessive voltage drop between the alternator and battery, usually due to corroded cables or poor connections.
- With the engine running, place the black lead on the alternator output terminal and the red lead on the positive battery terminal.
- The voltage difference should be less than 0.2 volts.
- For the ground side, repeat with the black lead on the alternator housing and the red lead on the battery’s negative terminal.
A higher voltage difference means there’s resistance in the wiring that needs to be fixed.
Common Mistakes When Testing An Alternator
Many beginners make simple errors that can lead to wrong results or even damage the car. Here are mistakes to avoid:
- Testing with a dead battery: Always charge the battery first.
- Setting the wrong multimeter range: Use DC volts, not AC.
- Switching leads: Black lead must be on negative, red on positive.
- Touching both terminals with tools: Can cause sparks or short circuits.
- Ignoring safety gear: Gloves and glasses prevent injuries.
- Not checking under load: An alternator may seem fine until you turn on accessories.
- Relying only on dashboard warning lights: Sometimes, alternators fail without any warning lights.
Pay attention to these details for a safe and accurate test.
Non-obvious Insights For Accurate Testing
Experienced mechanics often look for things beginners miss. Here are two important insights:
- Alternator performance can change as it gets hot. Sometimes, a failing alternator works when cold but drops output after warming up. If your readings are borderline, retest after the engine runs for 10–15 minutes.
- Bad grounds can mimic alternator failure. If the alternator and battery grounds are dirty or corroded, voltage readings may be low, even with a good alternator. Always check and clean cable connections before replacing expensive parts.
What To Do If The Alternator Fails The Test
If your alternator doesn’t pass these tests, you have a few options:
- Check all wiring and connections. Sometimes, the alternator is fine, but cables or terminals are dirty or loose.
- Test the battery. A weak battery can drag down alternator performance.
- Replace the alternator. If wiring and battery are good, the alternator may need to be replaced.
- Have a professional diagnose it. Some problems (like internal diode failure) require advanced tools.
Many auto parts stores offer free alternator testing if you bring the car or just the alternator.
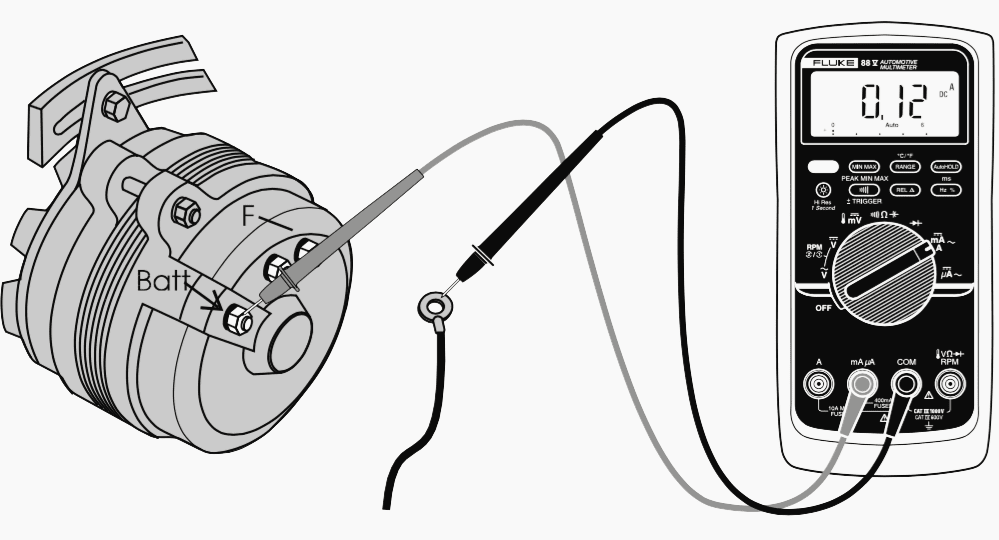
Testing The Alternator Directly (advanced)
For those comfortable with car repairs, you can test the alternator output directly at the alternator itself.
- Locate the main output terminal (usually a thick wire).
- Place the red lead on the alternator’s output terminal, and the black lead on a clean engine ground.
- With the engine running, voltage should match what you see at the battery. A big difference means there’s a wiring issue between alternator and battery.
This direct test can help pinpoint where a problem exists.
Comparing Symptoms: Battery Vs. Alternator
It’s easy to mistake a bad battery for a bad alternator. Here’s a comparison to help you decide where to focus:
| Symptom | Battery Problem | Alternator Problem |
|---|---|---|
| Car won’t start, no lights | Common | Possible |
| Starts with jump, then dies | Unlikely | Very likely |
| Dim lights when idling | Possible | Common |
| Warning light stays on | Sometimes | Very likely |
If your car starts with a jump but dies as soon as you remove the jumper cables, the alternator is likely the issue.
Practical Tips For Accurate Alternator Testing
Getting the most accurate results requires a little extra care:
- Test when the engine is cold and hot to catch intermittent problems.
- Record readings at each step for comparison and future troubleshooting.
- Clean battery terminals before testing to avoid false readings.
- Use a helper to safely rev the engine and operate accessories.
- Check the multimeter battery to ensure your tool is accurate.
- Test after long drives or when symptoms appear, not just in the garage.
These tips help you avoid wasted time and money.
When To Seek Professional Help
There are times when DIY testing is not enough. Seek help if:
- You get inconsistent or confusing readings
- Your car has modern electronics or “smart” alternators
- The alternator is hard to access
- You suspect a problem with the voltage regulator or computer-controlled charging system
Professional mechanics have advanced tools like oscilloscopes and load testers, which can find problems that a multimeter cannot.
The Role Of The Voltage Regulator
The voltage regulator is often built inside the alternator in modern cars. Its job is to keep the voltage steady, protecting the battery and electronics from overcharging. If the regulator fails, you may see:
- Overcharging: Voltage above 15 volts. Can damage battery and electronics.
- Undercharging: Voltage stays below 13 volts. Battery will not charge.
If your readings show these problems, replacing the alternator (or regulator, if separate) is usually needed.
Testing Alternators In Modern Cars
Newer vehicles often have complex charging systems. Some use “smart alternators” controlled by the car’s computer. These systems adjust charging based on driving conditions and battery health. In these cars:
- The alternator may not always show 14 volts at idle.
- The computer can change the voltage to save fuel or battery life.
- You may need a scan tool to read charging data.
If your modern car shows charging problems, check the owner’s manual or consult a professional.

Environmental Factors That Affect Alternator Testing
Certain outside factors can affect your test results:
- Extreme cold: Batteries and alternators work less efficiently in low temperatures.
- High heat: Can speed up alternator wear and cause early failure.
- Corrosion: Moisture and road salt can damage cables, leading to voltage drops.
Always consider the environment when interpreting your results.
How Often Should You Test Your Alternator?
It’s wise to test your alternator:
- Every 6–12 months as routine maintenance
- Before long trips
- When you buy a used car
- If you notice any electrical problems
Regular checks can catch issues early and keep your car reliable.
Frequently Asked Questions
What Voltage Should A Good Alternator Show On A Multimeter?
A healthy alternator should show 13.8–14.5 volts at the battery terminals with the engine running and no major accessories on. If the voltage is lower, the alternator may be weak. If it’s higher than 15 volts, the voltage regulator could be faulty.
Can A Car Run With A Bad Alternator?
A car can run for a short time with a bad alternator if the battery is fully charged. However, the battery will not recharge, and the car will soon stall when the battery runs out of power. It’s not safe to drive far with a failing alternator.
Do I Need To Remove The Alternator To Test It?
No, you can test the alternator in the car using a multimeter, as described above. However, if you get confusing results or want a more thorough test, you can remove the alternator and have it checked at an auto parts store.
Is It Safe To Test The Alternator Myself?
Yes, if you follow basic safety rules: wear gloves, avoid touching both battery terminals with metal tools, and work in a well-ventilated area. Always set the multimeter to DC voltage and double-check your connections.
Where Can I Learn More About Alternator Testing?
For more technical details and diagrams, you can check the Wikipedia page on automotive alternators. This resource offers in-depth information on how alternators work and how they are tested in professional settings.
Testing your car alternator with a multimeter is a skill that pays off for years. With these clear steps, tables, and expert tips, you can diagnose charging problems like a pro and keep your car running strong.