If you have a woodworking project, you know how important it is to get clean, precise cuts. A router is one of the most versatile tools you can own, but it’s the router bits that truly define what your router can do. Whether you’re shaping edges, cutting grooves, or making intricate joints, using the right router bit—and knowing how to use it properly—can make all the difference. Many beginners feel lost with so many bit types, materials, and setup options. But with the right approach, anyone can achieve professional results.
This guide will walk you through everything you need to know about using router bits. You’ll learn about different types, how to set them up safely, practical techniques, and tips that experienced woodworkers wish they knew when starting out. Even if you’re new to routers, by the end of this article you’ll feel ready to tackle your next project with confidence.
Understanding Router Bits
Before you begin, it’s important to understand what router bits are and how they work. A router bit is a cutting tool attached to a router, used to shape, hollow, or finish wood and other materials. The bit spins at high speeds, carving or shaping the material as you guide the router along your workpiece.
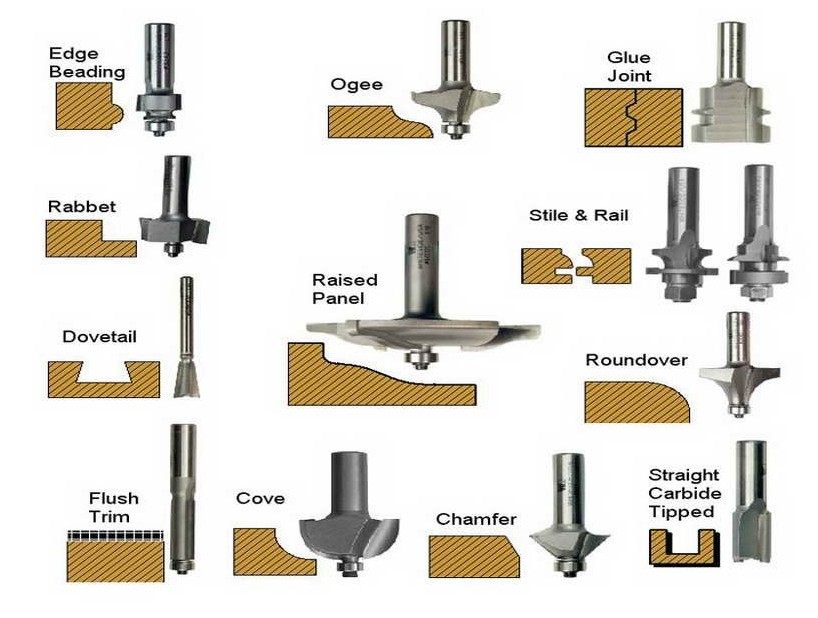
Common Types Of Router Bits
- Straight bits: For cutting straight grooves, dados, or mortises.
- Flush trim bits: Used to trim the edge of one material flush with another.
- Round-over bits: Create smooth, rounded edges.
- Chamfer bits: Cut angled edges, often for decorative or joinery purposes.
- Rabbeting bits: Make rabbet joints (L-shaped cuts).
- Cove bits: Produce concave, decorative edges.
- Beading bits: Add a rounded bead detail to edges.
- V-groove bits: Cut V-shaped grooves, often for lettering or decorative lines.
- Dovetail bits: Create dovetail joinery for strong, interlocking joints.
- Slot cutter bits: Cut slots for shelves, glass panels, or joints.
Each bit is designed for a specific task. Choosing the right bit is the first step to a successful project.
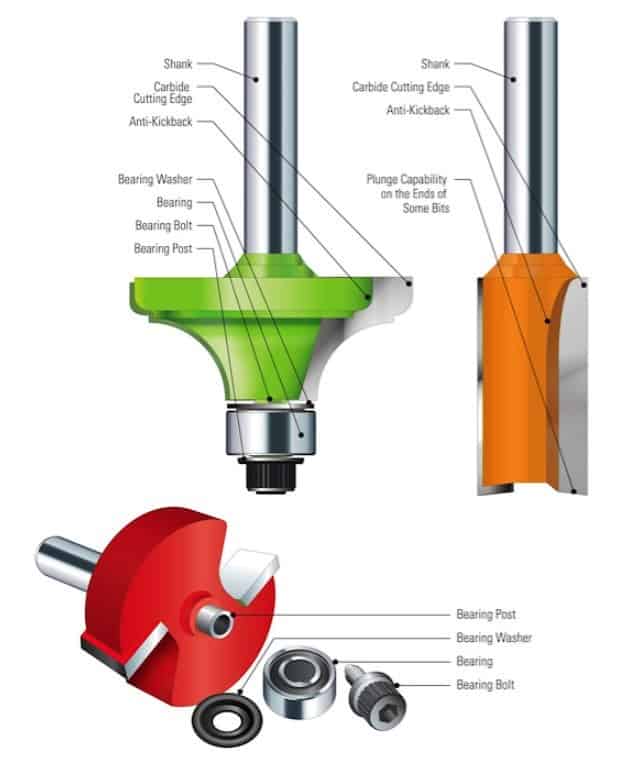
Router Bit Anatomy
A typical router bit consists of:
- Shank: The part that fits into the router’s collet. Common sizes are 1/4-inch and 1/2-inch.
- Body: The main part of the bit that holds the cutting edges.
- Cutting edge: The part that actually cuts the material.
- Bearing: Some bits have a bearing to guide the bit along the edge of the workpiece.
Larger bits usually have 1/2-inch shanks for strength and less vibration. Smaller bits may have 1/4-inch shanks and are often used for lighter tasks.
Materials And Quality
Router bits are typically made from:
- High-Speed Steel (HSS): Affordable, but dulls quickly. Good for softwood and occasional use.
- Carbide-Tipped: More expensive, but stays sharp much longer and handles hardwoods well.
- Solid Carbide: Extremely hard and long-lasting, but can be brittle.
Investing in carbide-tipped bits is wise for most users. They give cleaner cuts and last much longer than HSS.
Choosing The Right Router Bit
The bit you choose depends on the task, the material, and the finish you want.
Match The Bit To The Task
- For edge shaping (like rounding or beading), use round-over or beading bits.
- For joining wood (dovetails, rabbets, grooves), choose the matching joinery bit.
- For decorative details, cove, ogee, and V-groove bits work well.
Consider The Material
Hardwoods require sharper, harder bits (carbide-tipped or solid carbide). Softer woods or MDF are easier on bits, but resinous woods (like pine) can gum up bits quickly.
Shank Size
A 1/2-inch shank is more stable and vibrates less than a 1/4-inch shank. If your router accepts both, use 1/2-inch bits whenever possible.
Cutting Diameter And Profile
The size of the bit’s cutting edge controls the depth and shape of the cut. Larger bits remove more material but require slower speeds and more powerful routers. Always check your router’s manual to see what sizes it can safely handle.
Quality Matters
Cheap bits often have poor balance, dull quickly, and can burn or tear wood. A quality set of carbide-tipped bits is a smart investment, even for beginners.
Setting Up Your Router And Bits
Proper setup is critical for safety and results. Many accidents happen because of rushing or poor preparation.
Installing The Bit
- Unplug your router before changing bits.
- Insert the bit’s shank into the collet at least 3/4 of the way. Leave a small gap (about 1/8 inch) between the end of the shank and the bottom of the collet.
- Tighten the collet firmly using the correct wrenches. Don’t overtighten, but make sure the bit is secure.
- Spin the bit by hand to check for any wobble or looseness.
Adjusting Cut Depth
Raise or lower the router base (or the bit, for plunge routers) to set the depth of cut. For deep cuts, it’s better to make several shallow passes instead of one deep pass. This gives a cleaner result and reduces stress on the bit and router.
Setting Router Speed
Routers have variable speeds, often from 8,000 to 24,000 RPM. Use slower speeds for large bits, and faster speeds for small bits. Here’s a quick reference:
| Bit Diameter | Recommended Speed (RPM) |
|---|---|
| Up to 1 inch | 22,000 – 24,000 |
| 1 – 2 inches | 18,000 – 22,000 |
| 2 – 2.5 inches | 12,000 – 16,000 |
| Over 2.5 inches | 8,000 – 12,000 |
Never exceed the recommended speed for a bit. Overspeed can cause burning or even breakage.
Securing Your Workpiece
Clamp your workpiece securely to your workbench. Moving wood can ruin your cut or cause kickback. Use non-slip pads or sacrificial boards to protect your project.
Using A Fence Or Guide
A router fence or edge guide helps keep your cuts straight and accurate, especially for grooves or dados. For edge profiling, a bearing-guided bit often follows the edge itself, but for longer cuts, a straightedge or template can be helpful.
Safe Practices When Using Router Bits
Routers are powerful tools. Safety must come first.
Basic Safety Rules
- Wear safety glasses and hearing protection.
- Keep hands away from the bit at all times.
- Always feed the router against the rotation of the bit (usually from left to right).
- Wait for the bit to stop spinning before setting the router down.
Avoiding Kickback
Kickback happens when the router catches the wood and jerks suddenly. To reduce risk:
- Don’t take off too much material in one pass.
- Use sharp, quality bits.
- Hold the router firmly with both hands.
- Feed the router at a steady, moderate pace.
Dealing With Dust And Chips
Routers create a lot of fine dust. Use a vacuum or dust collection system if possible. Wear a dust mask if you’re routing for long periods.

Credit: www.youtube.com
Router Bit Techniques For Common Tasks
Knowing how to use router bits for different tasks is key to good results. Here are practical techniques for the most common jobs.
Edge Shaping
To make a clean, rounded or decorative edge:
- Install the right bit (round-over, ogee, cove, or chamfer).
- Set the cut depth so only the cutting edge touches the wood, not the bearing.
- Run the router along the edge, keeping the base flat and steady.
- For tear-out on end grain, start with a light pass on each end, then complete the long edges.
Cutting Grooves And Dados
For shelves or panels:
- Use a straight bit or slot cutter.
- Mark your cut lines clearly.
- Use a straightedge guide clamped to your workpiece.
- Make several shallow passes for wide grooves.
Flush Trimming
To make two pieces exactly the same shape:
- Rough-cut the top piece slightly oversized.
- Attach it to the template or bottom piece.
- Use a flush trim bit with a bearing.
- Run the bearing along the template; the cutter will trim the top to match.
Joinery (rabbets, Dovetails, And More)
Joinery bits can be intimidating, but they create strong joints:
- Rabbeting bits cut L-shaped edges for joining boards.
- Dovetail bits are used with a dovetail jig for interlocking joints.
- Slot cutters make grooves for splines or panels.
Always make test cuts on scrap first to fine-tune the fit.
Making Decorative Patterns
V-groove, beading, and cove bits add detail to panels, doors, or trim:
- Use a fence or template to keep lines straight.
- For curved work, use a bearing-guided bit and move smoothly.
- Sand lightly after routing for a clean finish.
Advanced Tips And Lesser-known Insights
Some router bit techniques are not obvious to beginners but can make a big difference:
Climb Cutting (with Caution)
Normally, you feed the router against the bit’s rotation. “Climb cutting” means moving with the rotation, which can give a cleaner cut on tricky grain but is riskier. Only try this with a firm grip, small cuts, and experience.
Using A Starter Pin
On a router table, a starter pin helps guide the workpiece safely into the bit, especially for freehand shaping of small pieces.
Bit Sharpening
Dull bits cause burning and rough cuts. Carbide-tipped bits can be touched up with a diamond hone. For best results, have them professionally sharpened.
Bit Storage
Store router bits in a clean, dry place. Use foam or racks to avoid damaging the cutting edges. Bits that bump together can chip or dull quickly.
Bit Cleaning
Pitch and resin can build up, especially with softwoods. Clean bits regularly with a solvent designed for router bits, or use household cleaners like Simple Green. A clean bit cuts better and runs cooler.
Template Routing
For making multiple identical shapes, use a template and a guide bushing or bearing-guided bit. This is how cabinet shops produce repeatable, accurate parts.
Credit: canadianwoodworking.com
Comparing Router Bit Types
Choosing the right bit for the job often comes down to the cut profile and the finish you want. Here’s a quick comparison:
| Bit Type | Common Use | Edge Profile | Beginner Friendly? |
|---|---|---|---|
| Straight | Grooves, dados, mortises | Flat-bottom | Yes |
| Round-over | Edge shaping | Rounded | Yes |
| Chamfer | Beveled edges | Angled | Yes |
| Flush trim | Template work | Flat, matched | Yes |
| Dovetail | Joinery | Angled, interlocking | No (needs jig) |
Common Mistakes When Using Router Bits
Even experienced woodworkers make mistakes. Here are some you can avoid:
- Using dull bits: Causes burning, rough edges, and unsafe cuts.
- Routing too deep in one pass: Stresses the bit and router, risking tear-out or breakage.
- Wrong speed: Too fast burns wood; too slow leaves rough cuts.
- Improper bit installation: Bits can slip, vibrate, or even fly out.
- No test cuts: Always test on scrap to set depth and fit before cutting your actual workpiece.
- Ignoring grain direction: Routing against the grain can cause tear-out.
- Not using dust collection: Dust harms lungs and hides your cut.
- Poor workpiece support: Unclamped or unsupported wood can shift, causing bad cuts or injury.
- Using the wrong bit for the material: For example, using HSS on hardwood will dull quickly.
Maintenance And Care For Router Bits
If you want your bits to last and perform well, some simple maintenance goes a long way.
Cleaning
After each use, wipe off pitch and dust. For heavy buildup, soak the bit in bit cleaner or a degreaser, then scrub with a soft brush.
Sharpening
Carbide bits can be sharpened, but only lightly with a diamond file. Too much sharpening removes the carbide, so rely on professional sharpening for expensive bits.
Lubrication
Apply a light oil to the shank to prevent rust, especially if you live in a humid climate.
Storage
Store bits in a rack, case, or foam-lined box to keep edges sharp and protected. Never toss bits in a drawer where they can bump together.
Inspection
Check for chips, cracks, or damage before each use. Damaged bits are unsafe and should be replaced.
When To Replace Router Bits
A router bit doesn’t last forever. Here’s how to know it’s time to replace:
- The bit leaves burn marks even when used properly.
- The cut quality is rough, torn, or uneven.
- You see visible chips or cracks on the carbide.
- The bit vibrates or wobbles, even after reinstallation.
- Sharpening no longer restores a clean edge.
Don’t wait for a bit to break during use. Replace worn bits to avoid damaging your project—or yourself.
Using Router Bits With A Router Table
A router table adds control and safety for many tasks. Here’s how to get the most from your bits on a table:
- Mount the router securely, and make sure the bit is centered in the opening.
- Adjust the fence for consistent, repeatable cuts.
- Use featherboards to hold the workpiece against the fence and table.
- For small parts, use push blocks or sticks to keep hands away from the bit.
- Always use the guard and dust collection if available.
Router tables are great for edge profiling, joinery, and template work.
Router Bit Starter Kit For Beginners
If you’re just starting, you don’t need every bit right away. A good starter set includes:
- Straight bit (1/4″ or 1/2″) for grooves and dados
- Flush trim bit for template work
- Round-over bit for softening edges
- Chamfer bit for decorative angles
- Rabbeting bit for joints
These five bits cover 90% of beginner projects. Add more as your skills and needs grow.
Real-world Example: Making A Picture Frame
Let’s look at how these tips come together with a simple project—a wooden picture frame.
- Cut the frame pieces to size.
- Use a straight bit to cut a rabbet on the inside edge for the glass and picture.
- Shape the outer edge with a round-over or ogee bit for a soft, decorative look.
- Use a chamfer bit to add a subtle angle on the back edge.
- Sand, finish, and assemble.
By picking the right bits, setting depth correctly, and making test cuts, you’ll get a frame that looks store-bought.
Troubleshooting Problems
Even with care, sometimes things go wrong. Here’s how to fix common router bit issues:
- Burn marks: Try cleaning the bit, reducing speed, and making shallower passes.
- Tear-out: Route in the correct direction, use sharp bits, and make light passes.
- Rough edges: Increase speed slightly, check for dull bits, and sand lightly after routing.
- Vibration: Ensure the bit is installed properly and the shank matches the collet size.
- Bit slips in collet: Clean the shank and collet, and tighten firmly.
If you’re stuck, check your router manual or ask for help in a woodworking forum or local club.
Router Bit Safety And Regulations
In some regions, router bits must meet safety standards. Look for bits with clear manufacturer markings, safety certifications, and instructions. Never use bits with unknown origins or missing labels.
If you want deeper technical details, the Wikipedia article on routers covers more about router types, bit design, and advanced applications.
Frequently Asked Questions
What’s The Difference Between 1/4-inch And 1/2-inch Shank Router Bits?
A 1/2-inch shank provides greater stability, less vibration, and a smoother cut. If your router can use both, choose 1/2-inch shank bits whenever possible. 1/4-inch bits are for lighter work or small routers.
How Do I Know Which Speed To Use For A Router Bit?
Larger bits need slower speeds to avoid burning or bit failure. Check your router manual and the bit’s packaging for recommended RPM. As a general rule, the bigger the bit, the slower the speed.
Can I Use Metal-cutting Router Bits On Wood?
Metal-cutting bits are not designed for wood routers. They may not fit, and they won’t cut cleanly. Use woodworking router bits for the best results and safety.
What Should I Do If My Router Bit Burns The Wood?
Burning is usually caused by a dull bit, too slow a feed rate, or running at too high a speed. Clean or sharpen the bit, make shallower passes, and adjust speed as needed.
How Do I Clean Resin Or Pitch From Router Bits?
Soak the bit in a bit cleaner or a degreaser like Simple Green, then scrub with a soft brush. Avoid wire brushes, which can scratch the carbide.
With the right router bits and proper techniques, you can tackle almost any woodworking project. Start with the basics, build your skills, and always put safety first. The results will speak for themselves.
Credit: www.rigpl.com