Setting up a TIG welder can feel overwhelming, especially for beginners. There are many parts, settings, and safety steps to remember. But once you break it down, the process is much easier than it seems. TIG welding gives you precise control and clean results, making it a favorite for car restorers, artists, and professionals.
Whether you’re starting a new project or want to improve your skills, learning to set up your TIG welder correctly is the first step toward quality welding.
This guide will walk you through every part of the process. You’ll learn what equipment you need, how to assemble the machine, and which settings to use for different metals. You’ll also discover common mistakes, safety tips, and insights that most beginners miss.
By the end, you’ll feel confident to set up your own TIG welder, ready to make strong and beautiful welds.
Understanding Tig Welding
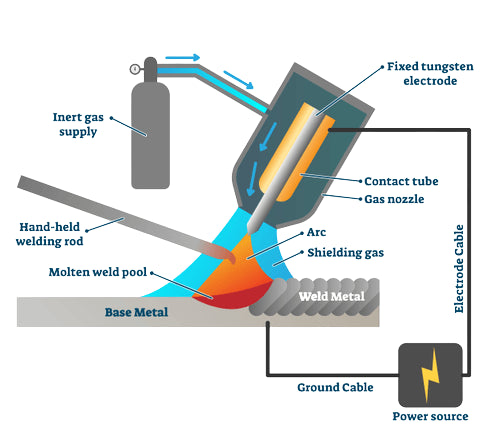
Before you start, it helps to know what makes TIG welding special. TIG stands for Tungsten Inert Gas. It uses a non-consumable tungsten electrode to create the weld. The process is also called GTAW (Gas Tungsten Arc Welding). A shielding gas, usually argon, protects the weld from air contamination.
TIG welding is popular because it produces very clean, precise welds. It works on many metals, including aluminum, stainless steel, and mild steel. It is slower than MIG or stick welding, but gives you better control. This makes TIG welding a top choice for thin materials and projects where appearance matters.
Essential Equipment For Tig Welding
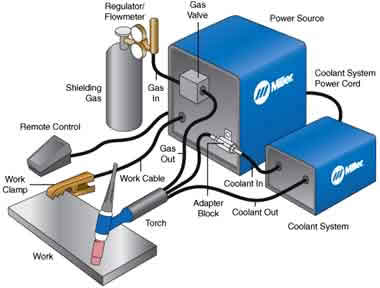
To set up a TIG welder, you need more than just the machine. Here’s what you’ll need:
- TIG welding machine – The main unit that controls power and settings.
- TIG torch – Holds the tungsten electrode and delivers shielding gas.
- Tungsten electrode – The non-melting tip that creates the arc.
- Shielding gas cylinder – Usually argon or argon mix.
- Regulator and flowmeter – Controls the gas flow from the cylinder.
- Ground clamp and cable – Connects to your workpiece for safety and circuit completion.
- Filler rods – Extra metal to add to the weld, if needed.
- Power source – A suitable outlet for your machine.
- Foot pedal or hand control – For adjusting amperage during welding (optional, but helpful).
- Protective gear – Helmet, gloves, jacket, and safety glasses.
Extra Accessories
Some welders use water-cooling units for the torch, especially at high power. If you weld aluminum, you’ll need a machine with AC (alternating current) capabilities. For steel, DC (direct current) is enough.
Choosing The Right Machine
Not all TIG welders are the same. Some are small hobby units, while others are heavy-duty industrial machines. Key things to look for:
- AC/DC function – Needed for welding different metals.
- Amperage range – Lower minimum (5-10A) for thin metals, higher maximum (over 200A) for thick parts.
- Pulse settings – Helpful for thin materials.
- Portability – Important if you move your welder often.
Preparing Your Workspace
A clean, organized workspace is important for safety and good welds.
- Work in a well-ventilated area. TIG welding produces less smoke than stick welding, but fumes can still be harmful.
- Remove flammable items and clutter.
- Set up a solid workbench made of metal.
- Make sure you have easy access to a fire extinguisher.
A common mistake is welding near open windows or fans. Even a small breeze can blow away your shielding gas, causing contamination in your weld.
Assembling The Tig Welder
Let’s move step by step through assembling your TIG welder. This process applies to most modern machines, but always check your manual for details.
1. Connecting The Power
Plug your TIG welder into the correct outlet. Most hobby machines use 110V or 120V, but bigger units may need 220V or 240V. Make sure your outlet matches the welder’s requirements. Using the wrong voltage can damage the machine.
2. Setting Up The Gas Cylinder
- Place the argon cylinder upright and secure it with a chain or stand.
- Remove the cap and briefly open the valve to clear dust (stand to the side).
- Attach the regulator to the cylinder valve. Tighten with a wrench.
- Connect the gas hose from the regulator to your welder.
- Make sure all connections are tight, but don’t overtighten.
3. Attaching The Tig Torch
- Screw the TIG torch cable into the front of the machine.
- If your torch has a separate gas hose, connect it to the gas outlet.
- Insert the tungsten electrode into the torch collet. The tip should stick out about 1/4 inch (6mm).
- Tighten the back cap to hold the tungsten in place.
4. Connecting The Ground Clamp
Attach the ground clamp cable to the negative output terminal on your welder (for DCEN – Direct Current Electrode Negative, which is standard for most metals). Clip the clamp securely to a clean, bare spot on your workpiece.
5. Setting Up Controls
- Plug in your foot pedal or hand control if using one.
- Make sure the power switch is off before turning on the machine.
6. Checking Everything
Go over all connections:
- No loose wires or hoses.
- Gas hose has no leaks (check with soapy water).
- Cables are not twisted or pinched.
- The electrode is sharp and clean.
Choosing And Preparing The Tungsten Electrode
Tungsten comes in several types and sizes. The right choice affects your weld quality.
Types Of Tungsten Electrodes
| Type | Color Code | Main Use |
|---|---|---|
| Pure Tungsten | Green | AC welding (aluminum, magnesium) |
| 2% Thoriated | Red | DC welding (steel, stainless) |
| 2% Ceriated | Grey | Low amperage, AC or DC |
| 2% Lanthanated | Blue | AC or DC, versatile |
Non-obvious insight: Many beginners think all tungsten types are the same. But using the wrong one can make starting the arc harder or cause unstable welding.
Sizing The Electrode
- For thin sheet metal (under 1/8 inch or 3mm), use 1/16 inch (1.6mm) or 3/32 inch (2.4mm) tungsten.
- For thicker material, use 1/8 inch (3.2mm) or larger.
Sharpening The Tungsten
A sharp tip gives better arc control. Use a dedicated bench grinder or a tungsten sharpener.
- Grind along the length, not around the tip.
- For aluminum (AC), round off the tip slightly (ball end).
- For steel (DC), a sharp point is best.
Tip: Don’t use the same grinder for tungsten and other metals. Contamination can ruin your weld.
Installing The Filler Rod
Filler rod selection depends on the metal you’re welding.
- For steel, use ER70S-2 or ER70S-6 rods.
- For stainless, use ER308L or similar.
- For aluminum, choose ER4043 or ER5356.
The rod’s diameter should match the thickness of your base metal—usually 1/16 inch (1. 6mm) for thin metal, 3/32 inch (2. 4mm) for thicker parts.
Insight: Beginners often use too thick a rod, which makes puddle control difficult. Start small and adjust as needed.
Setting Gas Flow And Regulator
Proper shielding gas flow protects your weld from contamination. Too much gas can disturb the puddle; too little lets in air.
- Set your argon flow to 15–20 cubic feet per hour (CFH) for most jobs.
- For small torches or indoor work, 10–15 CFH is enough.
- If you hear a loud hissing, your flow is probably too high.
| Material | Gas Type | Recommended Flow Rate (CFH) |
|---|---|---|
| Steel | 100% Argon | 15-20 |
| Stainless Steel | 100% Argon | 15-20 |
| Aluminum | 100% Argon | 18-22 |
Check for leaks around the regulator and hose connections using soapy water. Bubbles mean a leak—fix before welding.
Setting Machine Controls
Different welders have different controls. These are the most common:
- Amperage – Controls the heat.
- AC/DC switch – AC for aluminum, DC for steel.
- Pre-flow and post-flow – Time the gas flows before and after the arc.
- Pulse settings – For thin materials.
- Start method – Lift start, high frequency (HF), or scratch start.
Amperage Guide
As a general rule:
- 1 amp per 0.001 inch (0.025mm) of material thickness
So, for 1/8 inch (3mm) steel, start at about 125 amps.
Pro tip: Too much amperage will burn through thin metal. Start low and increase as needed.
Ac Vs Dc
- AC (alternating current) is needed for aluminum and magnesium. It helps break up the oxide layer.
- DC (direct current) is used for most other metals. Set to DCEN (electrode negative) for best results.
Common mistake: Forgetting to switch to AC when welding aluminum results in weak, dirty welds.
Pre-flow And Post-flow
- Pre-flow (0.5–1 sec): Lets gas flow before arc starts, protecting the tungsten.
- Post-flow (2–5 sec): Keeps gas on the hot weld, preventing oxidation.
Longer post-flow is needed for higher amperage or larger tungsten.
Start Method
- Lift start: Touch, then lift the tungsten to start the arc. Simple, but can contaminate the tip.
- HF start: High-frequency signal creates the arc without touching the workpiece. Cleanest, best for aluminum.
- Scratch start: Like striking a match. Basic, but can damage tungsten.
Most modern machines support HF or lift start.
Preparing Your Metal
Clean metal is essential for TIG welding. Any oil, rust, or paint will contaminate the weld.
- Steel: Use a wire brush, grinder, or sandpaper to remove mill scale and rust.
- Aluminum: Use a stainless steel brush (dedicated for aluminum only).
- Stainless: Wipe with acetone or alcohol, and use a clean brush.
Non-obvious insight: Even fingerprints can cause weld defects. Wear clean gloves when handling metal.
Final Pre-weld Checks
Before you strike an arc:
- Double-check all connections.
- Make sure your gas is on and flowing.
- Confirm machine settings match your material.
- Clamp your workpiece securely.
- Wear all safety gear: Helmet, gloves, jacket, and closed shoes.

Striking The Arc And Getting Started
If you have a foot pedal, set your starting amperage to about 50–70% of the max. Press gently to start the arc, then increase as needed.
- Hold the torch about 1/8 inch (3mm) above the metal.
- Angle the torch about 15 degrees from vertical, pointing the gas toward the weld.
- Move smoothly and steadily.
- Add filler rod as needed by dipping it into the leading edge of the puddle.
Adjusting For Different Metals
Different metals need different settings and techniques.
Steel
- Use DCEN (direct current electrode negative).
- Thoriated or lanthanated tungsten.
- Argon at 15–20 CFH.
- Clean, sharp tungsten tip.
Aluminum
- Use AC.
- Pure or ceriated tungsten with a rounded tip.
- Higher gas flow (18–22 CFH).
- Keep the workpiece and filler rod extra clean.
Stainless Steel
- Use DCEN.
- Lanthanated or ceriated tungsten.
- Argon at 15–20 CFH.
- Use a backing gas if welding pipe or thin sections.
Data: TIG welding can produce welds with less than 0.5% porosity, making it ideal for food and medical equipment.
Troubleshooting Common Problems
Welding doesn’t always go as planned. Here’s how to fix common issues.
Porosity (holes In Weld)
- Check for drafts or gas leaks.
- Clean metal and filler rod.
- Increase gas flow slightly.
Tungsten Contamination
- Don’t touch the tungsten to the workpiece or filler rod.
- Regrind if the tip is dirty or balled (for DC).
Poor Arc Start
- Use the right tungsten type.
- Check the ground clamp connection.
- Increase pre-flow or use HF start.
Excess Spatter
- Lower your amperage.
- Move the torch slower and closer to the work.
- Use the correct filler rod.
Insight: Many beginners assume poor welds are due to skill only, but setup problems are often the real cause.
Maintenance And Storage
A well-kept TIG welder lasts longer and works better.
- Clean your torch and cables after each session.
- Store tungsten electrodes in a dry place.
- Close the gas cylinder valve when not in use.
- Check hoses for cracks or leaks monthly.
Tip: Cover your welder to protect it from dust, especially if you work in a garage.
Safety Precautions
TIG welding is safer than stick or MIG, but it still has risks.
- Always wear a welding helmet with the right shade (usually #10–#13).
- Use fire-resistant gloves and clothing.
- Work in a ventilated area to avoid gas buildup.
- Keep a fire extinguisher nearby.
- Never weld near flammable liquids or gases.
Data: The arc can reach temperatures over 6,000°F (3,300°C). Eye and skin protection are a must.
Practical Tips And Advanced Insights
- Torch Movement: Move the torch in small, controlled motions—don’t rush. A steady hand makes for cleaner welds.
- Practice on Scrap: Always test settings on scrap metal before welding your real part.
- Filler Rod Angle: Feed the rod at a shallow angle to avoid blocking the shielding gas.
- Foot Pedal Control: Practice adjusting the heat with the pedal for tricky joints.
- Tungsten Stick-Out: Too much electrode sticking out can cause poor gas coverage.
Non-obvious insight: The color of your weld can reveal problems. Shiny silver is good. Blue, brown, or black means too much heat or not enough gas.
Example Tig Welder Setup (step-by-step)
Here’s a sample setup for welding 1/8 inch (3mm) mild steel:
- Choose a 2% thoriated tungsten, 3/32 inch (2.4mm).
- Sharpen to a point.
- Set machine to DCEN.
- Set amperage to 120 amps.
- Use ER70S-2 filler rod, 1/16 inch (1.6mm).
- Set gas flow to 15 CFH.
- Set pre-flow: 0.5 sec; post-flow: 3 sec.
- Attach ground clamp to clean metal.
- Hold torch at 15-degree angle.
- Start the arc, create a puddle, and add filler rod smoothly.
Comparing Tig To Other Welding Methods
It helps to see why TIG is chosen over other methods like MIG or stick welding.
| Welding Type | Main Uses | Advantages | Disadvantages |
|---|---|---|---|
| TIG | Thin metals, aluminum, stainless | Clean, precise, strong welds | Slower, requires more skill |
| MIG | General fabrication, auto repair | Fast, easy for beginners | More spatter, less precise |
| Stick | Outdoor, heavy steel work | Works in wind, cheap equipment | More cleanup, not for thin metal |
Mistakes To Avoid
- Using dirty metal or filler rods.
- Forgetting to turn on the shielding gas.
- Using the wrong tungsten or not sharpening it correctly.
- Overheating thin materials.
- Not wearing enough safety gear.
Fixing these mistakes early saves time and prevents frustration.
When To Seek Help
Sometimes, even after following all steps, you may struggle. If your welds are weak or full of holes, ask a more experienced welder to review your setup. Local welding clubs, online forums, and training centers can give valuable feedback and help you troubleshoot.
Continuing Your Tig Welding Education
Setting up the machine is just the start. To get really good at TIG welding, practice often and study advanced techniques. Try different metals, joint types, and positions. Watch videos from trusted sources like Miller or Lincoln Electric. For in-depth reading, the Wikipedia article on Gas Tungsten Arc Welding is a solid reference.
Frequently Asked Questions
What Is The Best Shielding Gas For Tig Welding?
The most common and effective gas is 100% argon. It works for steel, aluminum, and stainless steel. For some special applications, a small amount of helium or hydrogen may be added, but pure argon is best for most jobs.
How Do I Know If My Tungsten Is Contaminated?
Signs of contamination include a discolored tip, difficulty starting the arc, or unstable arc performance. If you see black spots or the tungsten tip melts, grind the tip clean before continuing.
Can I Use The Same Tungsten For All Metals?
Not always. Pure tungsten is best for aluminum (AC), while thoriated or lanthanated types are better for steel and stainless (DC). Using the wrong type can cause poor arc stability and contamination.
Why Does My Weld Look Dirty Or Have Holes?
This usually means your shielding gas isn’t working properly. Check for leaks, drafts, or dirty metal. Make sure your gas flow is set correctly and your filler rod is clean.
Is Tig Welding Safe For Beginners?
Yes, if you follow all safety precautions. Wear the right protective gear, work in a ventilated area, and always check your equipment before welding. Start with practice pieces and take your time.
Setting up a TIG welder can seem complex, but with the right steps and attention to detail, anyone can do it safely and successfully. As you gain experience, you’ll discover the small adjustments that make your welds stronger and more beautiful.
Take the time to learn, and you’ll have a valuable skill for years to come.