Testing a breaker with a multimeter is one of the most important skills for anyone working with home electrical systems. Whether you’re a DIY homeowner, an apprentice electrician, or just curious about your electrical panel, knowing how to check a breaker can save money, prevent hazards, and give peace of mind.
But many beginners feel nervous about using a multimeter or opening a breaker panel. The process is actually safe and straightforward if you follow the right steps. In this guide, you’ll learn everything you need to know, from understanding circuit breakers to using your multimeter like a pro.
What Is A Circuit Breaker And Why Test It?
A circuit breaker is a safety device that cuts off electricity if there’s a problem, such as an overload or short circuit. It’s designed to protect people and equipment from electrical fires, shocks, and damage. Over time, breakers can wear out, trip for no reason, or fail to trip when needed. Testing a breaker helps you:
- Identify faulty breakers before they cause bigger problems
- Prevent electrical fires or damage to appliances
- Troubleshoot power issues in your home
Many people only check their breakers when the power goes out or something stops working. But regular testing can catch problems early, saving time and money.
Understanding Breaker Panels And Multimeters
Before you test anything, it’s helpful to know the basics of your breaker panel and your multimeter.
- The breaker panel (or fuse box) is usually a gray metal box, often found in basements, garages, or utility rooms. It contains rows of breakers controlling different parts of your home.
- A multimeter is a handheld tool that measures voltage, current, and resistance. Digital multimeters are most common, and they have a screen, a dial or buttons for selecting modes, and two leads (red and black).
There are many types of breakers and panels. Here’s a quick comparison:
| Panel Type | Common Use | Main Features |
|---|---|---|
| Main Breaker Panel | Most homes | Has a main switch; controls all power |
| Subpanel | Garages, additions | Smaller; fed from main panel |
| Fuse Box | Older homes | Uses fuses, not breakers |
Tip: Always check your local regulations before opening or working on your electrical panel.
Safety First: Precautions Before Testing
Working with electricity can be dangerous. Before you test a breaker, follow these safety steps:
- Wear insulated gloves and rubber-soled shoes. Never work barefoot or on a wet floor.
- Use only a quality multimeter with intact leads and no cracks.
- Turn off all appliances connected to the circuit you’re testing.
- Let others in your home know you’re working on the panel.
- Stand to the side of the panel when opening it, in case of a spark.
One thing beginners often overlook: always check your multimeter on a known live circuit first. This confirms your tool is working before you start.
Tools And Materials You’ll Need
Gather everything before you start. Here’s what you’ll need:
- Digital multimeter (with voltage and continuity functions)
- Insulated screwdriver (for panel screws)
- Flashlight (if the area is dim)
- Notepad or phone (to record readings)
- Safety glasses
- Insulated gloves
- Label stickers (optional, for marking breakers)
Having tools ready means you won’t need to fumble or rush—a common cause of accidents.
How To Set Up Your Multimeter
Multimeters can look confusing, but for breaker testing, you’ll use just two main settings:
- AC Voltage (V~): For live circuits (household current).
- Continuity or Resistance (Ω): For testing when power is OFF.
Here’s how to prepare your multimeter:
- Plug the black lead into the COM (common) jack.
- Plug the red lead into the VΩ jack.
- Set the dial to AC Voltage (often marked V~ or VAC). For home breakers, choose a range that covers 120–240 volts.
- Double-check your leads are secure and the screen works.
If your multimeter has a continuity setting (with a sound symbol), you’ll use that later.
Important: Never switch settings while connected to a live circuit. This can damage your meter or cause injury.
Identifying The Breaker To Test
Find the breaker you want to test. Usually, breakers are labeled (e. g. , “Kitchen,” “Bedroom 2,” “Dryer”). If not, you may need to turn each off, one by one, and see what loses power.
A typical residential panel looks like this:
| Breaker Number | Label | Amperage | Common Appliance |
|---|---|---|---|
| 1 | Kitchen Outlets | 20A | Coffee Maker, Toaster |
| 2 | Lights – Living Room | 15A | Lamps, TV |
| 3 | Dryer | 30A | Electric Dryer |
If a breaker feels warm, is humming, or trips frequently, it’s a good idea to test it.
Step-by-step: How To Test A Breaker With A Multimeter
Let’s walk through the process. We’ll cover both voltage testing (for live breakers) and continuity testing (for breakers removed from the panel).
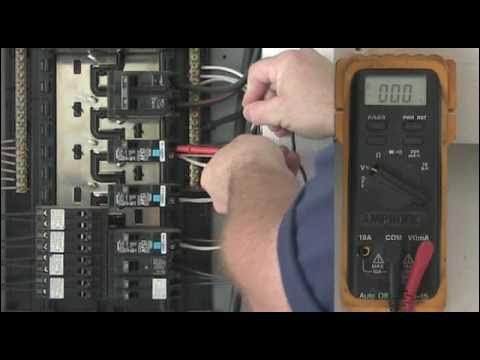
Step 1: Testing For Voltage (live Breaker Test)
This checks if the breaker is delivering power as it should.
- Turn the breaker ON (flip to the “on” position).
- Remove the panel cover using your insulated screwdriver.
- Set your multimeter to AC Voltage (V~).
- Touch the black lead to the neutral bus bar (usually a row of screws with white wires).
- Touch the red lead to the terminal screw of the breaker you want to test.
- Read the voltage on the screen.
- For 120V breakers, you should see 110–125 volts.
- For 240V breakers, expect 220–250 volts.
If the reading is much lower or zero, the breaker may be faulty or there may be a wiring issue.
Caution: Never touch both leads to the breaker at the same time. Always keep your fingers behind the probe guards.
Step 2: Testing For Continuity (breaker Removed)
This method is safer but requires removing the breaker, so only do this if you’re comfortable.
- Turn OFF the main power to the panel (main breaker).
- Test a known outlet with your multimeter to ensure power is off.
- Remove the suspect breaker from the panel. Some snap out, others have a screw.
- Set your multimeter to continuity (sound symbol) or resistance (Ω).
- Touch one lead to the “in” terminal (where wire enters) and one to the “out” terminal (where wire exits).
- If the multimeter beeps (continuity) or shows low resistance (close to zero), the breaker is conducting.
- If there’s no beep or the reading is infinite, the breaker is faulty.
Many beginners forget to test the breaker in both the ON and OFF positions. A good breaker should have continuity when ON and none when OFF.
Step 3: Confirming The Results
Compare your readings to the expected values:
- Voltage present: Breaker likely good.
- No voltage: Breaker may be tripped, faulty, or there’s a wiring issue.
- Continuity ON, none OFF: Breaker is working.
- No continuity at all: Breaker is bad and should be replaced.
If unsure, test a working breaker for comparison.
Common Problems And What They Mean
Understanding what your test results mean is key. Here are some common scenarios:
- Voltage present but appliance doesn’t work: Problem is in the wiring or device, not the breaker.
- No voltage, breaker ON: Breaker is likely bad.
- Breaker trips immediately: There’s probably a short circuit or overload.
- Low voltage: Could be a loose connection or a failing breaker.
- Breaker feels hot: Replace immediately. This is a fire risk.
A common mistake is not resetting a tripped breaker fully. You must switch it OFF and then ON again.
Replacing A Faulty Breaker
If your test shows the breaker is faulty, replacing it is usually simple:
- Turn off the main power to the panel.
- Remove the panel cover carefully.
- Disconnect the wire from the old breaker.
- Snap out or unscrew the old breaker.
- Insert the new breaker of the same type and amperage.
- Reconnect the wire and tighten the screw.
- Replace the panel cover and turn the main power back on.
Always use a breaker rated for your panel and circuit.
Advanced Tips For Accurate Results
Testing breakers can be tricky. Here are some expert tips:
- Test during normal load: If possible, test when the circuit is under its usual load (e.g., toaster running on a kitchen outlet). Some faults only appear under load.
- Check for double-tapped breakers: Sometimes, two wires are connected to one breaker (not allowed in most panels). This can cause unreliable readings.
- Document your readings: Write down your voltage and continuity results. This helps track changes over time.
- Inspect for corrosion or burning: Any sign of rust or burn marks means the breaker or panel needs attention.
- Test both legs of 240V breakers: For large appliances, test each hot terminal to neutral.
One thing beginners miss: sometimes the breaker is fine but the panel’s bus bar is corroded or loose. If you see discoloration, call a pro.
Interpreting Multimeter Readings: What The Numbers Mean
Numbers on your multimeter can be confusing. Here’s a quick reference:
| Reading | Breaker Status | What to Do |
|---|---|---|
| 0V (voltage test) | Not working / tripped | Check if fully ON; if yes, replace breaker |
| 110–125V (120V breaker) | Working | No action needed |
| 220–250V (240V breaker) | Working | No action needed |
| Low voltage (e.g., 60V) | Faulty or loose | Check connections; consider replacement |
| Continuity ON only | Good breaker | No action needed |
| No continuity at all | Broken | Replace breaker |
Troubleshooting: When Things Don’t Go As Expected
Sometimes, the problem isn’t the breaker. Here’s what to check:
- Multimeter not working: Try new batteries or test on a known live outlet.
- No voltage at any breaker: Main breaker or panel problem.
- Breaker keeps tripping: Unplug all devices and reset. If it trips again, the fault is in the wiring or breaker.
- Reading fluctuates: Check for loose wires or corrosion.
If you’re ever unsure, do not guess. Electricity can be dangerous. Call a licensed electrician for help.

When To Call A Professional
Testing a breaker is usually safe for careful DIYers, but some situations require a pro:
- Burn marks or melted wires in the panel
- Repeated breaker tripping even after testing and replacing
- Old or unlabeled panels with confusing wiring
- Wet or damp panels (never work on these)
- No main disconnect in your panel
Professionals have tools and training to handle complex or hazardous situations.
How Often Should You Test Breakers?
Most experts recommend testing your main breakers once a year, and branch breakers every 2–3 years. Test immediately if you notice:
- Frequent tripping
- Burning smells or sounds
- Flickering lights
Regular testing is a small effort that can prevent major electrical problems.

Common Myths About Breaker Testing
Many homeowners believe some myths:
- “If the switch is ON, the breaker is fine.” Not always true! Internal faults can stop power flow even if the handle moves.
- “You can test with just a screwdriver.” A screwdriver may show sparks, but only a multimeter gives real data.
- “Breakers last forever.” Most have a lifespan of 15–30 years. Older breakers are more likely to fail.
- “All breakers are the same.” Breakers must match your panel brand and type.
Understanding these facts makes you a safer, smarter homeowner.
Extra Tips For Safe And Effective Breaker Testing
- Label your breakers: If your panel isn’t labeled, take time to do this now. It saves effort in future tests.
- Keep your multimeter manual: Every model is different. If you lose the manual, find a digital version online.
- Practice with batteries: Try testing a 9V battery with your multimeter to get comfortable before working on the panel.
- Store your tools together: Keep your multimeter, gloves, and screwdriver in a bag near the panel for quick access.
One more advanced tip: If you suspect a breaker issue but can’t find it, use a circuit tracer to follow the wiring path.
Helpful Resources
Learning to test breakers is just one step in home electrical safety. For more details on electrical codes and safety, check the National Electrical Code (NFPA).
Frequently Asked Questions
What If My Breaker Tests Good But Power Is Still Out?
If your breaker passes both voltage and continuity tests but the outlet or light still doesn’t work, the problem is likely in the wiring, outlet, or fixture. Check for loose connections or damaged wires. Sometimes, a GFCI outlet may be tripped further down the line.
Can I Test A Breaker Without Turning Off The Main Power?
You can test for voltage with the power ON, but for continuity or to remove a breaker, you must turn off the main power. Working live is dangerous and not recommended for beginners.
Is It Safe To Use A Multimeter If I’ve Never Used One Before?
Yes, but practice first. Try measuring batteries or a wall outlet (with proper safety) before testing a breaker. Always read your multimeter’s manual and follow safety guidelines.
How Do I Know What Amperage My Breaker Should Be?
Look at the number printed on the breaker handle (e. g. , 15, 20, 30). This is the amp rating. Replace only with the same rating and type. Using the wrong breaker can be a fire risk.
What’s The Difference Between A Bad Breaker And A Tripped Breaker?
A tripped breaker has shut off due to overload or fault—resetting it usually restores power. A bad breaker won’t supply power even after resetting, or it trips instantly for no reason. Testing with a multimeter helps you tell the difference.
Learning how to test a breaker with a multimeter is a smart step for any homeowner or DIYer. It’s a skill that not only protects your home but also gives you more confidence in handling everyday electrical problems. With the right tools, a careful approach, and a bit of practice, you can test breakers safely and accurately.
If you ever feel unsure, don’t hesitate to call a professional. Your safety is the top priority.