Changing the blade on a reciprocating saw might seem simple, but doing it the right way makes your work faster, safer, and extends the life of your tool. Whether you’re a professional contractor or a home DIYer, knowing the proper method means you save time and avoid frustration.
Many people accidentally damage their saw, bend the blade, or even hurt themselves by missing small but important steps. This guide will walk you through the entire process, sharing expert advice, troubleshooting tips, and a few insights most beginners miss.
Understanding The Reciprocating Saw And Its Blades
A reciprocating saw is a powerful tool used for demolition, remodeling, and cutting through different materials like wood, metal, and plastic. Its blade moves back and forth rapidly, making it effective for both rough and detailed work. Unlike a circular saw, the blade in a reciprocating saw is exposed and easy to replace.
Many people choose a reciprocating saw for its versatility. For example, you can use it to cut out old window frames, slice through thick tree branches, or even trim metal pipes during plumbing repairs. The open design of the blade makes it especially useful in tight spaces, like between wall studs or under sinks.
Types Of Reciprocating Saw Blades
Not all blades are created equal. Choosing the correct blade for your material is critical for a clean cut and long tool life.
- Wood-cutting blades: Typically have larger, widely spaced teeth.
- Metal-cutting blades: Smaller, finer teeth for a smoother cut.
- Demolition blades: Thicker and stronger for nails and tough jobs.
- Specialty blades: Designed for cutting plastic, fiberglass, or specific metals.
The tooth count (measured in TPI, or teeth per inch) is also important. Lower TPI (6-10) is best for fast cuts in wood, while higher TPI (14-24) is good for metal. Specialty blades can have coatings for heat resistance or be made from bi-metal for extra durability.
Example: If you try to cut a metal pipe with a wood blade, the teeth may break or dull instantly, and the saw will struggle. On the other hand, using a metal blade on wood will give you a slow, rough cut and heat up quickly.
Using the wrong blade can cause poor results or damage the saw. Always check the packaging and choose a blade suited for your task.
Blade Mounting Systems
Reciprocating saws can have different systems to hold the blade:
- Keyless (tool-less) chuck: Most common in modern saws; no extra tools needed.
- Allen (hex) screw: Older models require a hex wrench.
- Manual clamp: Simple twist or lever to lock the blade.
Identifying your saw’s system makes the blade change process much smoother.
Some newer saws even have a twist-and-lock mechanism with a simple colored lever for even faster changes. If you’re not sure which system you have, check your user manual or look for small icons or markings near the blade holder.
Essential Safety Precautions
Before you touch your saw, take the following steps:
- Unplug the saw or remove the battery. Even a quick tap of the trigger can cause injury.
- Wear safety gloves to protect your hands from sharp teeth.
- Eye protection is important in case a blade snaps or debris flies.
- Let the blade cool if you’ve just finished cutting; blades can be extremely hot.
Many accidents happen because users skip these basics. Always take a moment to prepare your workspace and body for the task.
One extra tip: Lay down a non-slip mat or use a clamp to hold your workpiece steady. This helps prevent the saw or blade from slipping while you work, reducing the risk of injury. Also, keep children and pets away from the area while you’re changing blades or using the saw.
Tools And Materials You Need
Most blade changes require minimal tools, but it’s wise to have these ready:
- The new blade (correct type for your material)
- Gloves
- Hex wrench (for older models)
- Brush or cloth to clean the blade holder
- Lubricant (optional, for stuck blades)
Having everything on hand prevents you from searching mid-task and losing focus.
For extra convenience, keep a small container or zippered pouch near your workspace with spare blades and your hex wrench. Some professionals also mark their blades with a permanent marker to quickly identify which type is which, especially if you use several types in one project.
Step-by-step Guide: How To Change A Blade On A Reciprocating Saw
Changing the blade follows the same logic for most saws, but some details depend on your model. Here’s the general process:
1. Power Down The Saw
Double-check that the saw is unplugged or the battery is removed. Even if you’re experienced, it’s easy to forget—don’t rush this step.
If your saw has a trigger lock, engage it as an extra layer of safety. This can prevent accidental starts, especially if someone else enters your workspace.
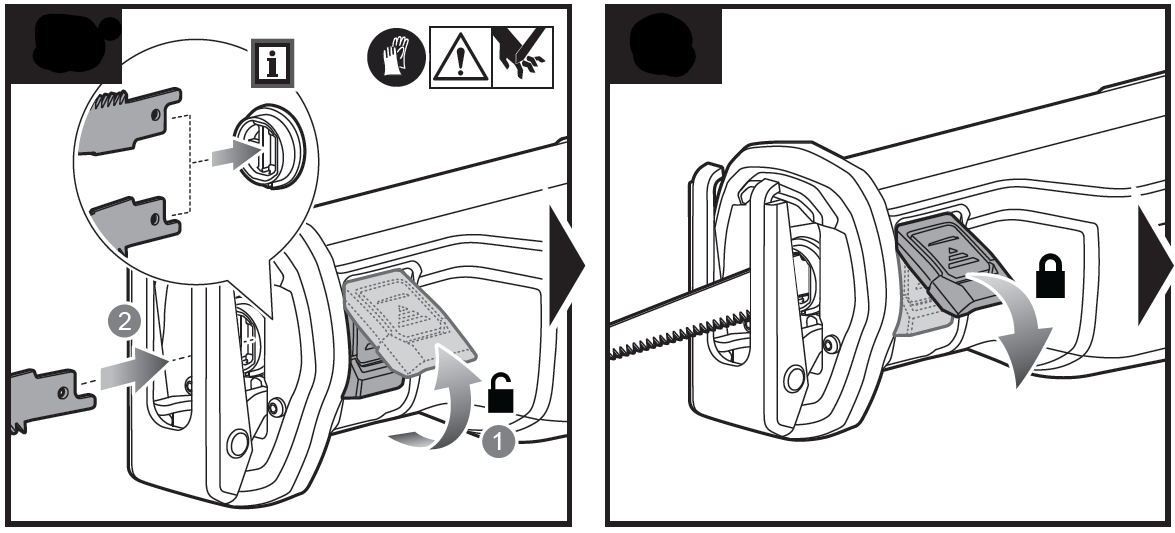
2. Locate The Blade Clamp
Find where the blade enters the saw body. Most saws have a blade clamp at the front. This is what holds the blade in place.
- Keyless chucks usually have a lever or dial.
- Screw-based clamps require a hex wrench.
Some saws have a rubber boot or cover over the clamp for dust protection. You may need to slide this back to access the release mechanism.
3. Release The Old Blade
- For a keyless system, turn or pull the lever. You may need to push or twist the collar.
- For a screw-based system, insert the hex wrench and turn counterclockwise.
The blade should slide out easily. If it sticks, gently wiggle it or use pliers. Do not force or bend the blade, as this can damage the clamp.
Non-obvious insight: Debris and sawdust can clog the clamp. Use a brush or air blower to clean the area before inserting a new blade.
If the blade is stuck due to sap, resin, or metal shavings, try adding a small drop of penetrating oil and wait a few minutes before trying again.
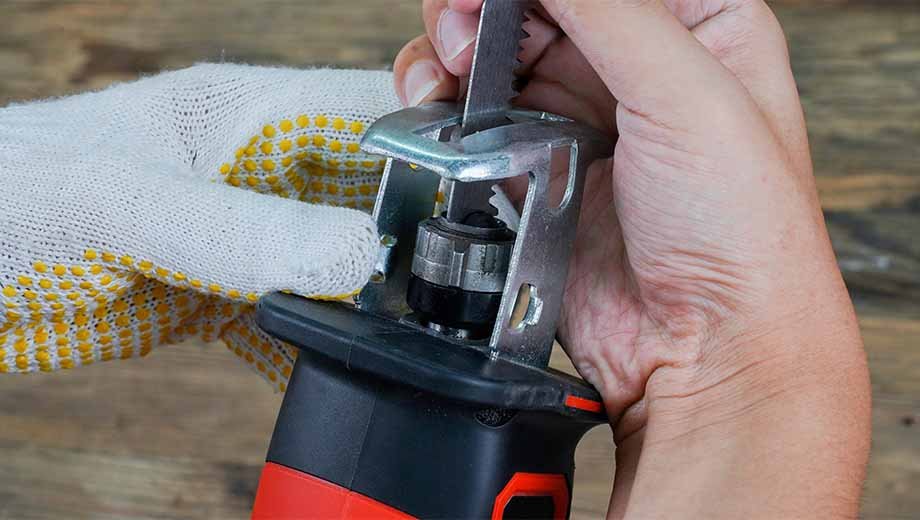
4. Remove The Old Blade Safely
Always point the blade away from your body. Wear gloves, as the teeth can be extremely sharp. Place the old blade aside—never leave it where it can be stepped on or touched accidentally.
If the blade is hot, set it on a metal tray or non-flammable surface to cool down. Never toss used blades into a regular trash can immediately after removal, as they could still be hot or sharp.
5. Inspect The Blade Holder
Look inside the clamp for debris, rust, or damage. A dirty clamp can cause the new blade to wobble or not lock in properly. Clean with a dry brush or cloth. If there’s rust, a small amount of lubricant can help.
Check for bent parts or broken springs. If the clamp does not move smoothly, it may need cleaning or replacement. A cotton swab can help reach tight spaces.
6. Insert The New Blade
Check the arrow or writing on the blade—it should point away from the saw handle, matching the cutting direction. Slide the blade into the clamp as far as it will go.
- For keyless systems, hold the lever open, insert the blade, and release to lock.
- For screw-based systems, hold the blade in place and tighten the screw.
Wiggle the blade gently to ensure it’s secure.
Non-obvious insight: Some keyless chucks have an internal spring. Make sure the blade clicks firmly into place; a loose blade can fly out during use.
If your blade has a special coating or is extra thick, you might need to apply a bit more pressure to seat it properly. Always follow the instructions for your model.
7. Test The Blade Lock
With the saw still off, pull the blade gently. It should not move or slide out. If it does, repeat the locking process. Never use the saw with a loose blade.
If your saw uses a screw clamp, double-check that the screw is tight but not over-torqued, as this can strip the threads or crack the clamp housing.
8. Restore Power And Test Operation
Plug in the saw or reinsert the battery. Hold the saw away from your body and squeeze the trigger for a short burst. Watch the blade—if it moves smoothly and stays straight, you’re ready to cut.
If the blade vibrates excessively or comes loose, repeat the installation steps.
It’s a good idea to do a quick “test cut” on a scrap piece of material. This helps you confirm the blade is seated correctly and gives you a feel for its performance before starting your main project.
Common Mistakes And How To Avoid Them
Changing blades is simple, but several mistakes can cause frustration or danger:
- Not disconnecting power: This puts you at risk of accidental starts.
- Forcing a stuck blade: This can bend the blade or damage the clamp.
- Installing the blade backward: The teeth won’t cut, and the blade might bind.
- Leaving debris in the clamp: Causes poor blade fit and wobble.
- Not testing the lock: A loose blade can fly out, causing injury.
Take your time with each step, and always double-check your work.
Another mistake is using worn-out or low-quality blades. Cheap blades may not fit well or can break unexpectedly. Investing in trusted brands might cost more up front, but saves you time and frustration later.
Troubleshooting Blade Change Problems
Sometimes things don’t go as planned. Here’s how to handle common issues:
Blade Won’t Come Out
- Check for a stuck clamp—spray a little lubricant and let it sit for a minute.
- Use gentle rocking, not force, to free the blade.
- If the clamp is rusted, you may need to replace it.
Try tapping the side of the clamp gently with a plastic tool to loosen stuck parts. If the blade is severely bent, use locking pliers to grip and pull it straight out.
New Blade Won’t Go In
- Inspect for debris or old metal shavings.
- Try a different blade to see if the first one is bent.
- Clean and lubricate the clamp if necessary.
Sometimes, the new blade might have a manufacturing defect. If it doesn’t fit, compare it side by side with your old blade to check for size differences.
Blade Keeps Coming Loose
- Make sure you’re using the correct blade for your saw brand and model.
- Check the clamp for wear or broken parts.
- If you see damage, consult your manual or a repair specialist.
If the issue continues, the internal spring or locking mechanism may be worn out. Replacing the clamp is often cheaper than buying a new saw.
Being patient and methodical with troubleshooting usually solves most problems.
When To Change Your Reciprocating Saw Blade
Knowing when to replace a blade is as important as knowing how. Dull or damaged blades reduce cutting power and can harm the tool.
- Slower cutting than normal, even with a new material.
- More vibration or chattering during use.
- Burn marks or blue coloring on the blade (overheating).
- Missing or broken teeth.
- Bent or warped blade after a cut.
Don’t wait for the blade to break. Regular replacement improves cut quality and extends your saw’s lifespan.
Another sign is if you start to smell burning wood or metal while cutting. This usually means the blade is too dull and is generating friction instead of slicing cleanly.
How Often Should You Change Blades?
It depends on what and how much you cut. For heavy demolition, a blade might last only one project. For light work, it can last months.
Here’s a general guideline:
| Material | Average Blade Life (cuts) | Signs to Replace |
|---|---|---|
| Wood (nails-free) | 100-300 | Dull teeth, slow cut |
| Wood (with nails) | 50-100 | Missing teeth, vibration |
| Metal (thin) | 50-150 | Sparks, burnt blade |
| Metal (thick) | 10-50 | Bending, blue color |
| Plastic/PVC | 200-500 | Chipping, melting |
Always inspect your blade before each job to avoid surprises.
If you notice your saw struggling, change the blade even if you haven’t reached the average number of cuts. Clean cutting is safer, faster, and puts less strain on the motor.
Key Differences Between Blade Mounting Systems
Not all reciprocating saws use the same mechanism. Understanding your tool’s system helps you avoid mistakes.
| Mount Type | Pros | Cons | Common Brands |
|---|---|---|---|
| Keyless (tool-less) | Fast, easy, no tools needed | Springs can wear out, sometimes less secure | DeWalt, Milwaukee, Makita |
| Hex (Allen) screw | Very secure, long-lasting | Requires hex wrench, slower change | Bosch, older models |
| Manual clamp | Simple, few parts to break | Slower, sometimes awkward | Entry-level brands |
Consult your saw’s manual for exact details, as even within brands, systems can vary.
An extra tip: If you often work in dirty or wet conditions, look for a saw with a sealed or protected clamp system. This helps keep out dust and moisture, making blade changes easier in the long run.
Tips For Extending Blade And Saw Life
Changing blades correctly is just one part of good saw care. Here are tips from experienced users:
- Match the blade to your material. Don’t use a wood blade on metal, or vice versa.
- Let the blade do the work. Forcing the saw burns out the motor and dulls the blade.
- Keep the blade straight. Twisting or bending during cuts can cause cracks or breaks.
- Clean the blade clamp regularly. Dust and debris can cause jamming or poor locking.
- Store blades safely. Use a blade case or sheath to prevent damage and injuries.
Many users forget to clean their saw after use. A quick wipe-down and clamp check prevent rust and keep your tool ready.
If you’re using your saw for long periods, give it a rest every 15-20 minutes. This helps keep both the motor and blade cool. Also, if you notice the blade heating up, stop and let it cool before continuing. Overheated blades dull faster and may warp.
When storing your saw, keep it in a dry place. Moisture can cause rust in both the blade and the clamp, making future blade changes difficult.
Upgrading To Advanced Blade Systems
If you frequently change blades or work in tough conditions, consider upgrading your saw:
- Quick-release systems save time and are now standard in many pro tools.
- Orbital-action saws can cut faster, but require specific blades.
- Anti-vibration models reduce fatigue and make blade changes smoother.
Some high-end models come with built-in blade storage, which is handy for switching blades mid-job. Others have LED lights near the blade holder, making it easier to see what you’re doing in dimly lit spaces.
Researching your next tool purchase can save headaches later. For more details on reciprocating saw technology, see this Wikipedia page.
Practical Examples And Real-life Scenarios
Let’s look at a few situations where proper blade change makes a big difference:
Example 1: Demolition In An Old House
You need to cut through wood with hidden nails. You start with a wood blade, but after hitting a nail, the teeth are gone. By switching to a demolition blade, your cuts go faster, and the blade lasts much longer.
A helpful habit is to keep a few demolition blades handy whenever working on older structures. Many houses have hidden metal fasteners, and stopping to swap blades when you hit one can save both time and frustration.
Example 2: Plumbing Repairs
Cutting plastic pipes requires a fine-tooth blade. Using a metal blade would melt the plastic and cause rough edges. With the correct blade, the cut is smooth, and the pipe fits perfectly.
If you’re unsure, test your blade on a scrap piece of the same material. Look for clean, chip-free edges, and adjust your speed to avoid overheating.
Example 3: Metalwork
You’re cutting steel conduit. The blade gets hot and turns blue—time to change. Swapping in a new metal blade prevents burning, keeps the saw cool, and gives a straight cut.
When working with metal, always check your blade for heat marks. A blue or purple tint means the blade is losing its hardness. It’s better to change early than risk a broken blade in the middle of a cut.
Each job teaches you to check your blade often and swap as soon as performance drops.
For large projects, some professionals even mark the expected number of cuts on the blade with a marker and track them. This helps avoid pushing a blade beyond its useful life.
Safety Reminders After Blade Change
Once you’ve changed the blade, remember:
- Tighten all screws and locks before powering up.
- Keep hands and tools clear of the blade path.
- Start cuts slowly to check for vibration or movement.
- Store old blades safely, and recycle when possible.
Regular safety checks prevent most accidents.
Never throw old blades loose into a toolbox or garbage bin. Instead, wrap them in cardboard or place them in a dedicated container. Some hardware stores offer blade recycling services.

Frequently Asked Questions
Why Does My Reciprocating Saw Blade Keep Slipping Out?
This usually means the blade clamp is worn or dirty. Clean the clamp area and check for broken parts. If the problem continues, the clamp may need replacement.
Can I Use Any Brand Of Blade With My Saw?
Most reciprocating saws use a universal shank (1/2 inch), so many blades fit. However, some brands have unique systems. Always check your manual for compatibility.
How Do I Know Which Blade To Use For Each Material?
Look for labels and tooth patterns. Wood blades have large, spaced teeth, while metal blades have fine, tight teeth. Specialty blades will say what they’re for on the package.
Is It Dangerous To Change Blades Without Gloves?
Yes. Saw blades are sharp and can easily cut skin, even when not moving. Gloves also protect you from hot metal after cutting.
What Should I Do With Old Blades?
Dispose of old blades in a safe container or blade box. Some recycling centers accept metal blades. Never throw them loose into regular trash, as they can injure others.
If you have a lot of used blades, ask your local hardware store if they accept them for recycling or look for community tool recycling events.
Changing a blade on a reciprocating saw is a basic skill, but mastering it helps you work faster, safer, and extends the life of your tool. With these steps, tips, and troubleshooting ideas, you’re well prepared for any project ahead.