A sliding miter saw is a powerful tool that changes how you cut wood, plastic, and even some metals. If you work with materials that need angled or straight cuts—like in furniture making, home building, or DIY projects—you’ve probably seen or heard about this saw.
But what actually is a sliding miter saw, how does it work, and why do professionals and hobbyists choose it over other types? Let’s explore everything you need to know, from the basics to expert tips.
Understanding The Sliding Miter Saw
A sliding miter saw is a specialized cutting tool that combines two main features: mitering and sliding. A basic miter saw can make precise angled cuts, but a sliding miter saw adds rails, allowing the blade to move forwards and backwards. This sliding action means you can cut wider boards—sometimes twice as wide as a regular miter saw can handle.
With a sliding miter saw, you can make crosscuts, miter cuts (angled across the width), bevel cuts (angled through the thickness), and compound cuts (both angles at once). The sliding rails are the key difference. They let the blade glide over the workpiece, making it possible to cut materials up to 12 inches wide or more, depending on the saw’s size.
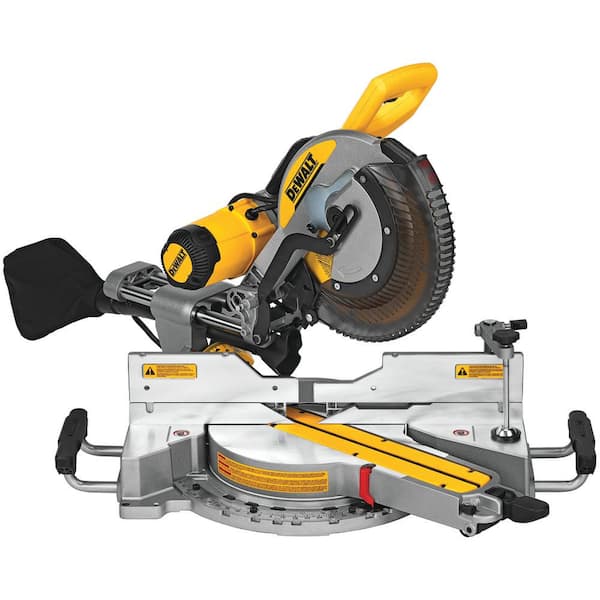
The Core Parts And How They Work
To use a sliding miter saw well, you need to know its main components:
- Saw blade: Usually 8–12 inches in diameter, made from high-speed steel or carbide-tipped for durability.
- Motor: Powers the blade, with common strengths between 10–15 amps.
- Sliding rails: Guide the saw head smoothly back and forth for wider cuts.
- Miter scale: Lets you adjust the angle for crosscuts, typically from 0° to 45° or even 60°.
- Bevel scale: Adjusts the tilt of the blade for bevel or compound cuts.
- Fence: Holds the workpiece steady, improving accuracy and safety.
- Table/base: Supports your material and keeps the saw stable.
- Handle and trigger: Where you grip and activate the saw.
- Safety features: Blade guards, electric brakes, and sometimes laser guides for precise alignment.
Knowing these parts helps you get clean, accurate cuts and reduces mistakes.

Types Of Miter Saws: Sliding Vs. Non-sliding
There are a few main types of miter saws, and it’s easy to confuse them. Here’s how a sliding miter saw compares to other common types:
| Type | Key Feature | Cutting Capacity | Common Uses |
|---|---|---|---|
| Standard Miter Saw | Angle cuts only | Narrow boards (up to ~6″) | Picture frames, small trim |
| Compound Miter Saw | Angle + bevel cuts | Narrow boards (up to ~6″) | Crown molding, furniture angles |
| Sliding Miter Saw | Angle, bevel, and sliding action | Wide boards (8–14″+) | Flooring, cabinetry, framing |
The main advantage of the sliding miter saw is its ability to cut much wider boards. This is especially useful for flooring, shelving, and framing.
How Does A Sliding Miter Saw Work?
The action of a sliding miter saw is simple but powerful. You set your angle (miter), tilt the blade if needed (bevel), pull the saw head towards you, lower the blade onto the material, and push it through the cut while the blade spins.
The sliding rails support the head, keeping the cut straight and steady.
This forward-and-back motion is what lets you cut wide planks with a clean edge. If you tried the same thing with a non-sliding saw, you’d have to flip the material and cut from both sides, which is less accurate.
Non-obvious insight: Most beginners don’t realize that a sliding miter saw requires a bit more space than a non-sliding model. You need room behind the saw for the rails to move. If your workshop is small, plan your bench setup so you don’t hit a wall or other tools.
Common Uses For Sliding Miter Saws
Sliding miter saws are found in many places:
- Framing and construction: Cut studs, headers, and joists quickly and accurately.
- Flooring installation: Trim laminate, hardwood, or engineered boards to length.
- Cabinet making: Make precise crosscuts or angled cuts for doors and frames.
- Trim and molding: Cut crown, baseboards, and chair rails with complex angles.
- DIY projects: From picture frames to garden benches, versatility is key.
- Deck building: Cut wide decking boards and structural posts.
Non-obvious insight: Some professionals use a sliding miter saw to cut aluminum or plastic with a special blade. This isn’t just for wood! Always check the saw’s manual and use the right blade for the material.
Key Benefits Of A Sliding Miter Saw
Why do so many woodworkers and builders choose sliding miter saws?
- Wide crosscut capacity: Easily handles boards 12 inches or wider.
- Multiple cut types: Straight, miter, bevel, and compound cuts.
- Speed and efficiency: Makes repeated cuts accurately, saving time.
- Clean, precise edges: The stable design and sharp blade reduce tear-out.
- Repeatability: Stops and guides let you make identical pieces quickly.
A standard miter saw is limited to small trim or narrow boards. The sliding version opens up more projects and materials.
When Should You Choose A Sliding Miter Saw?
Choosing the right saw matters for your work quality and safety. Here’s when a sliding miter saw is the best choice:
- You need to cut boards wider than 6 inches.
- Your projects require both miter and bevel angles, especially at the same time.
- You want to make many cuts quickly and accurately.
- You work with hardwoods, flooring, or wide moldings.
- You want to avoid flipping boards to finish a cut.
If you usually cut only narrow pieces, a standard miter saw is lighter and cheaper. But for versatility, the sliding model wins.
Key Features To Look For
Not all sliding miter saws are the same. Here’s what matters most when you buy or use one:
1. Blade Size
Common sizes are 8-inch, 10-inch, and 12-inch. Larger blades cut deeper and wider, but are heavier and cost more. A 10-inch saw is a good all-rounder for most users.
2. Motor Power
Measured in amps. Higher amps mean more power to cut thick hardwoods without bogging down. Look for at least 12 amps for heavy use.
3. Dual-bevel Capability
Some sliding miter saws tilt left and right (dual bevel). This is useful for making matching cuts without flipping your material.
4. Positive Stops
These are preset angles (like 0°, 15°, 22. 5°, 30°, 45°) that snap the saw into position. They speed up your work and prevent mistakes.
5. Laser Guide Or Led Shadow Line
A built-in laser or LED casts a line on your workpiece, showing where the blade will cut. This boosts accuracy, especially for beginners.
6. Dust Collection
Saws kick up a lot of dust. Good models include a port for your shop vacuum or a built-in bag.
7. Sliding Rail Design
Some saws use single rails, others double rails. Dual rails are more stable, especially on wide cuts.
8. Table Extensions
If you cut long boards, look for sliding or folding table wings to support your material.
9. Weight And Portability
Some sliding miter saws are heavy—over 50 pounds. If you need to move your saw often, look for lighter models or a rolling stand.
10. Price And Warranty
Sliding miter saws range from about $200 to over $800. Professional-grade tools cost more but last longer. Check for a good warranty, usually at least 3 years.
How To Use A Sliding Miter Saw Safely
Sliding miter saws are powerful, but accidents are rare if you follow safety steps:
- Wear safety glasses and hearing protection. The saw is loud and throws dust.
- Keep hands away from the blade. Most saws have a guard, but always stay alert.
- Secure your workpiece. Use the fence and clamps to prevent movement.
- Wait for the blade to stop. Before lifting the head after a cut, let the blade stop spinning.
- Check the blade and rails. Dull blades or sticky rails can cause poor cuts or kickback.
- Unplug when changing blades. Never change or adjust the blade while plugged in.
- Keep your area clean. Sawdust and offcuts can be tripping hazards.
Non-obvious safety tip: Don’t wear gloves when using a miter saw. Gloves can catch on the blade or moving parts, pulling your hand into danger.
Common Mistakes Beginners Make
Even smart users trip up with sliding miter saws. Here are common errors and how to avoid them:
- Wrong blade for the material: Use a wood blade for wood, metal blade for aluminum, etc.
- Not supporting long boards: If your board dips, the cut will be uneven. Always use supports.
- Cutting too fast: Rushing can burn the wood or make the blade bind.
- Improper angle settings: Always double-check the miter and bevel angles before cutting.
- Forgetting to lock the sliding rails: Some saws have rail locks—unlock before sliding, lock before transport.
Expert tip: Always make a test cut on scrap wood before cutting your actual workpiece, especially for compound angles.
Sliding Miter Saw Vs Table Saw
Many people wonder if they need both a sliding miter saw and a table saw. Here’s a quick side-by-side comparison:
| Feature | Sliding Miter Saw | Table Saw |
|---|---|---|
| Best for | Crosscuts, angles, miters | Rip cuts (lengthwise) |
| Material width | 8–14″+ (crosscut) | Unlimited (rip cut), 24–36″ usually |
| Portability | Often portable | Usually stationary |
| Setup time | Very fast | Longer |
| Cut accuracy | Excellent for angles | Excellent for straight lines |
A sliding miter saw is the best choice for quick, accurate crosscuts and angles. For long rips or breaking down full sheets of plywood, a table saw is better.
Maintenance And Care
A sliding miter saw will last for years with regular care:
- Clean the saw after each use. Remove dust from rails, blade, and motor vents.
- Lubricate the rails. Use dry lubricant to keep sliding action smooth.
- Check and replace the blade. Sharp blades cut better and are safer.
- Inspect the cord and plug. Look for damage before use.
- Test the safety features. Make sure the blade guard moves freely and the brake works.
Many users forget to check the rails for buildup. Even small amounts of sawdust or resin can make the saw stick or cut crooked.
Practical Applications: Examples
Let’s see how a sliding miter saw shines in real projects.
Flooring Installation
Imagine you’re installing hardwood floors. The boards are 7 inches wide. A standard miter saw can’t cut the full width in one pass, but a sliding miter saw glides through in seconds, making clean, repeatable cuts.
Building A Deck
Deck boards are often 6–8 inches wide. With a sliding miter saw, you can cut dozens of pieces to the same length and angle for a professional look.
Custom Picture Frames
Frames need precise 45-degree cuts at each corner. With a sliding miter saw, you can adjust for the exact angle and repeat the cut for all four sides, even on wide, decorative moldings.
Cutting Metal Or Plastic
With the right blade, you can use a sliding miter saw to cut aluminum rails for windows, or PVC pipes for plumbing. Always check the tool and blade specs first.
Selecting The Right Sliding Miter Saw For Your Needs
There are many sliding miter saws on the market. To choose the right one:
- Measure your workspace. Make sure you have room for the rails.
- Think about material size. If you rarely cut boards over 8 inches wide, a smaller saw saves space.
- Consider portability. If you move between job sites, look for lighter models.
- Decide on single or dual bevel. Dual bevel saves time if you cut lots of crown molding or complex angles.
- Check the fence quality. A tall, solid fence supports large workpieces and improves accuracy.
- Read reviews. See what other users say about accuracy and durability.
- Test the sliding action. In the store, slide the saw head. It should be smooth, not sticky or wobbly.
:max_bytes(150000):strip_icc()/20180501BP-7f53b90ed6664be29c9d44c26816457e.jpg)
Sliding Miter Saw: Pro Tips For Best Results
To get the most from your sliding miter saw:
- Mark your cut line clearly. Use a pencil or marking knife for accuracy.
- Set up good lighting. Shadows make it hard to see the blade line.
- Clamp your workpiece. Even if the fence holds it, clamps prevent slips.
- Support both ends. Use roller stands or scrap blocks for long boards.
- Keep your blade sharp. Dull blades burn wood and tear fibers.
- Double-check angles. Use a digital angle finder for critical cuts.
Pro insight: When cutting wide boards, pull the blade towards you, lower it into the material, then push through the cut. This reduces tear-out and gives a smoother edge.
The Future Of Sliding Miter Saws: New Features
Tool makers are always improving sliding miter saws. Today’s top models may include:
- Cordless motors: Battery-powered saws for job sites without power.
- Brushless motors: Last longer and need less maintenance.
- Digital angle displays: Show exact angles for miter and bevel.
- Integrated dust extraction: Connects directly to shop vacuums.
- Smart safety systems: Sensors that stop the blade if hands get too close.
If you want to see the latest innovations and top models, check Wikipedia’s miter saw page for more details.
Frequently Asked Questions
What Is The Main Difference Between A Sliding Miter Saw And A Compound Miter Saw?
A sliding miter saw has rails that let the blade move forward and backward, allowing it to cut wider boards. A compound miter saw can make angled and beveled cuts but cannot slide, so it’s limited to narrower materials.
Can A Sliding Miter Saw Replace A Table Saw?
Not completely. A sliding miter saw is better for crosscuts and angles, while a table saw is best for long, straight rip cuts. Many workshops use both for different tasks.
What Materials Can I Cut With A Sliding Miter Saw?
Most sliding miter saws are designed for wood, but with the right blade, you can cut plastic, PVC, and non-ferrous metals like aluminum. Always check the manufacturer’s recommendations before cutting anything besides wood.
How Do I Keep My Sliding Miter Saw Cutting Accurately?
Keep the rails clean and lubricated, use a sharp blade, and regularly check and adjust the angle scales. Supporting long pieces and clamping your material also helps maintain accuracy.
Is A Sliding Miter Saw Safe For Beginners?
Yes, if you follow safety instructions. Always use the blade guard, keep your hands clear, and wear safety gear. Take your time to learn the controls before making cuts.
Sliding miter saws are a smart investment for anyone serious about woodworking, remodeling, or DIY. Their ability to cut wide boards, make complex angles, and save time makes them a workshop favorite. Once you understand their features and use them safely, you’ll find many projects become easier, faster, and more enjoyable.