If you want to add elegance to a room, installing crown molding is a classic way to upgrade its appearance. Crown molding creates a beautiful transition between walls and ceiling, but the process of cutting it—especially for corners—can seem complex. The tool most people use for this job is a miter saw, prized for its accuracy and versatility. However, using a miter saw for crown molding requires more than just basic carpentry skills. You need to understand angles, positioning, and the unique tricks that ensure your molding fits perfectly every time.
This guide unpacks everything you need to know about cutting crown molding with a miter saw. Whether you’re a beginner or have tried and struggled before, you’ll find step-by-step guidance, expert tips, and solutions to common mistakes. By the end, you’ll have the confidence to tackle crown molding projects like a pro, and your rooms will have that crisp, finished look you admire in magazines and model homes.
Understanding Crown Molding And Miter Saws
Before you start cutting, it’s important to understand what crown molding is and why a miter saw is the best tool for the job.
Crown molding is a type of decorative trim that sits at an angle between your wall and ceiling. It usually has a complex profile—curves, steps, and edges that make it look more elegant than simple flat trim. The challenge is that crown molding doesn’t sit flat against either surface, so your cuts must take the angle into account.
A miter saw (sometimes called a chop saw or drop saw) is a power tool that lets you make precise angled cuts. It works by bringing a circular blade down onto your workpiece, which you can position at almost any angle. This precision is what makes the miter saw perfect for cutting both the ends and corners of crown molding.
Why Angles Matter
The most confusing part for beginners is the need to cut two types of angles at once—the miter angle (side-to-side) and the bevel angle (tilting the saw blade). When you’re working with crown molding, you’re not just making a simple 45-degree cut. You’re making a compound cut, which is why it’s often called a compound miter saw.
Key insight: Most crown molding is installed at a standard angle—usually 38°, 45°, or 52°. Knowing your molding’s “spring angle” (the angle at which it sits against the wall and ceiling) is vital. This affects your saw settings and your results.
Choosing The Right Miter Saw For Crown Molding
Not all miter saws are created equal. Choosing the right one can mean the difference between smooth, accurate cuts and frustrating mistakes.
Types Of Miter Saws
- Standard miter saw: Only rotates side-to-side for simple angled cuts. Not ideal for crown molding.
- Compound miter saw: Rotates side-to-side and tilts for bevel cuts. This is the minimum you need for most crown projects.
- Sliding compound miter saw: Same as a compound miter saw but with a sliding arm to handle wider boards—especially helpful for large molding.
Key Features To Consider
- Blade size: Most crown molding can be cut with a 10-inch blade, but a 12-inch blade gives you more capacity.
- Bevel range: Look for a saw that tilts both left and right for easier work on inside and outside corners.
- Positive stops: Built-in detents at common angles (like 45°) make setup faster and reduce mistakes.
- Laser guides: Not essential, but helpful for visualizing where the blade will cut.
Table: Comparing Popular Miter Saw Types
| Type | Bevel Capability | Sliding Feature | Best For |
|---|---|---|---|
| Standard Miter Saw | No | No | Simple trim, picture frames |
| Compound Miter Saw | Yes (Single/Double) | No | Crown molding, baseboards |
| Sliding Compound Miter Saw | Yes (Single/Double) | Yes | Large crown, wide boards |
Pro tip: For most homeowners, a 10-inch dual-bevel sliding compound miter saw offers the best mix of versatility and price.
Essential Tools And Materials
Before you start, gather these essentials for a smooth and safe crown molding project:
- Miter saw (preferably compound/sliding)
- Crown molding (measure length needed plus 10% extra for errors)
- Measuring tape and pencil
- Angle finder (for non-standard corners)
- Miter saw stand or sturdy workbench
- Clamps (to hold molding steady)
- Safety glasses and hearing protection
- Nail gun or hammer and finish nails
- Wood glue (for tight joints)
- Caulk and wood filler (for finishing touches)
- Sandpaper (for smoothing edges)
- Stud finder (for securing molding to walls)
Non-obvious insight: Always buy at least 10% more molding than your measured need. Mistakes, warping, or unexpected angles mean you’ll likely need extra.
Measuring And Marking For Accurate Cuts
Getting your measurements right is as important as making the right cuts. Even the best saw can’t fix a bad measurement.
Step-by-step Measuring Tips
- Measure wall lengths exactly where the crown will sit. Walls are often not perfectly square.
- Mark studs on the wall/ceiling so you know where to nail later.
- Identify inside and outside corners. Inside corners are where walls meet to form a “valley”; outside corners stick out like a “peak.”
- Determine the spring angle. Most molding is designed for a 38°, 45°, or 52° angle. If you’re not sure, use a protractor or angle finder.
- Transfer measurements to your molding. Mark the molding on the back or the edge—not the front face.
- Label each piece with which wall and corner it’s for. This saves confusion during installation.
Non-obvious tip: For long walls, break your molding into two pieces and join them with a scarf joint (angled cut), not a straight butt joint. This hides seams better.
Setting Up The Miter Saw For Crown Molding
Proper setup is crucial for safe, accurate, and clean cuts. Rushing this step often leads to wasted material and frustration.
Saw Positioning
- Place your miter saw on a flat, stable surface.
- Ensure there’s enough space on both sides for long molding pieces.
- Secure your saw with clamps if possible.
Blade Selection And Safety
- Install a fine-tooth blade (at least 60-80 teeth for wood). This prevents splintering and leaves a cleaner edge.
- Check the blade for sharpness and tightness.
- Wear safety glasses and hearing protection.
Adjusting For Crown Molding
There are two main ways to cut crown molding:
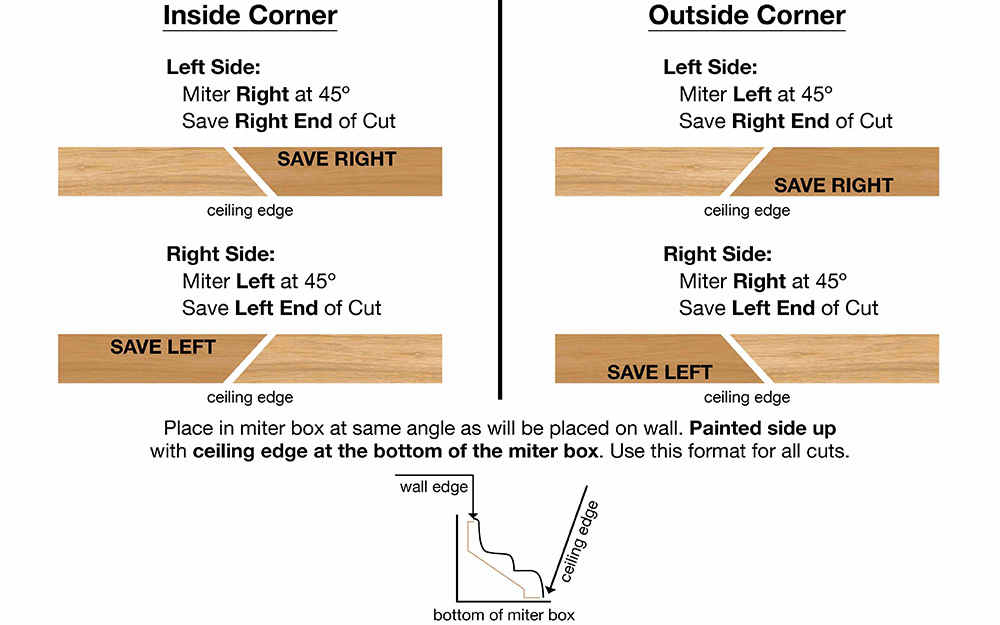
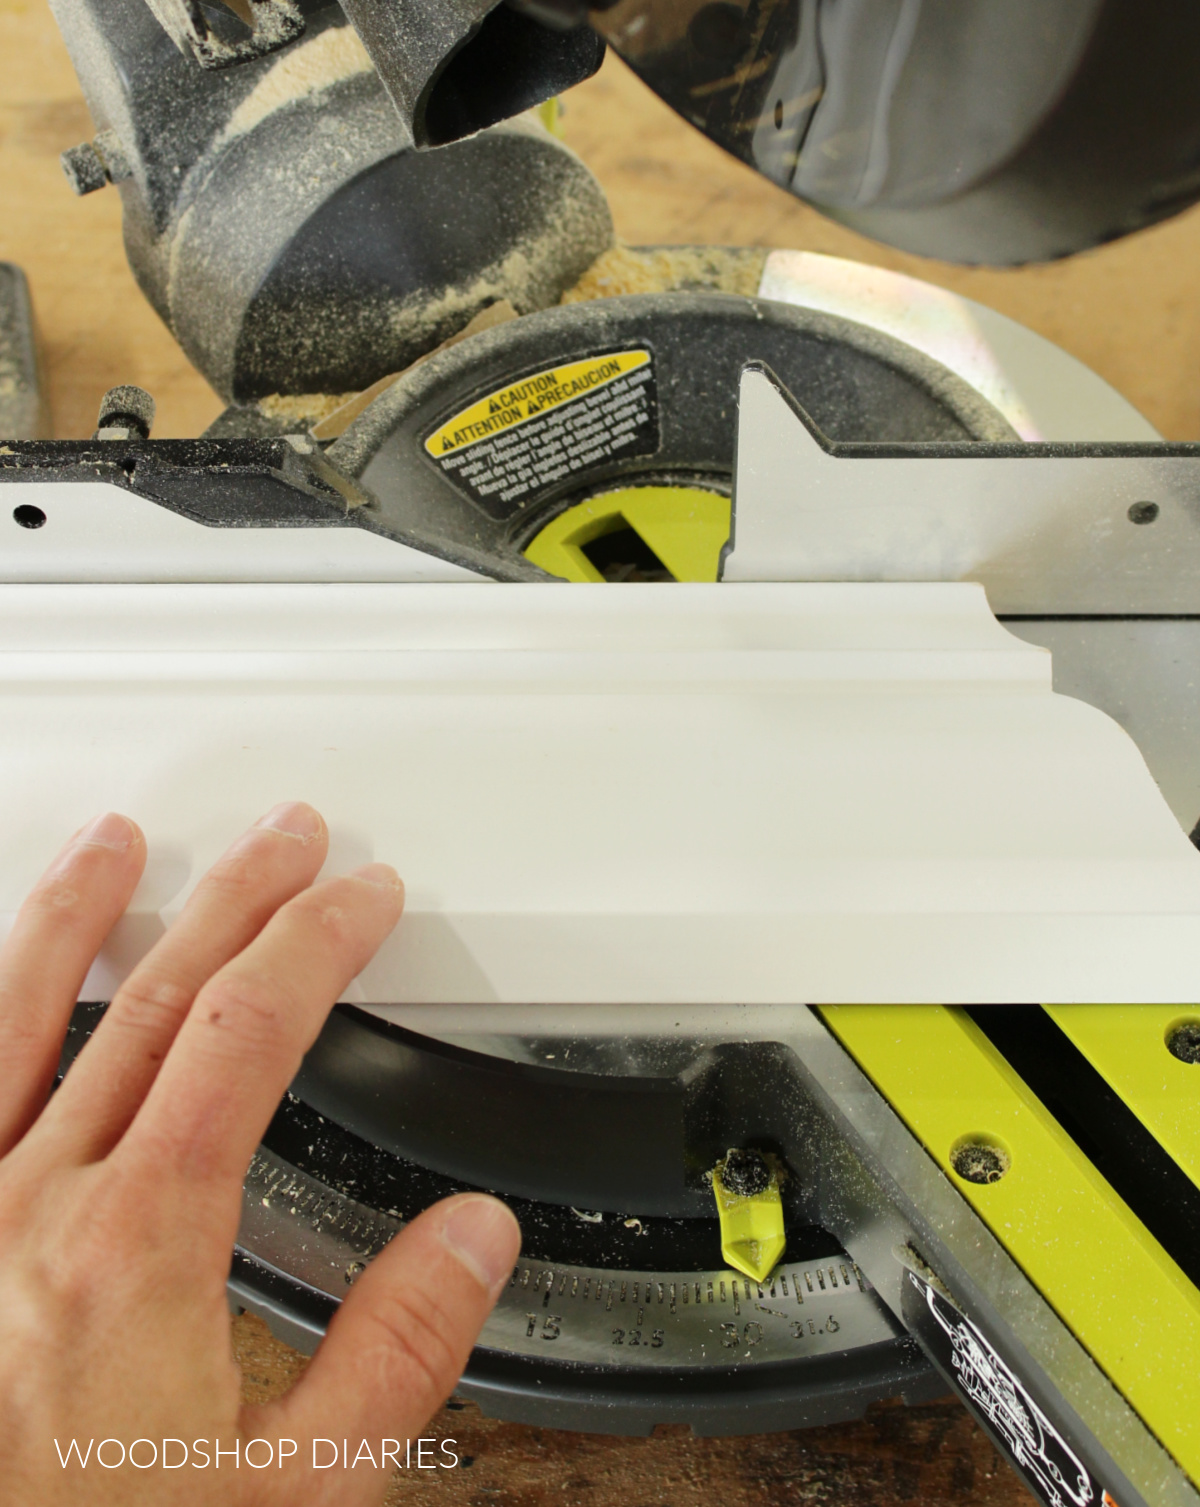
- Nested against the fence: The molding sits upside-down and backwards on the saw, at the same angle it will sit on the wall. Most pros prefer this for speed and accuracy.
- Flat on the table (compound cut): The molding lies flat, and you adjust both the miter and bevel angles.
Method 1: Nested Cutting
- Place the molding so the ceiling edge is against the saw’s fence and the wall edge is on the table.
- Set the miter angle to 45° (for 90° corners).
- Keep the molding firmly in position, matching the “spring angle” as it will appear on the wall.
Method 2: Flat Cutting (compound Cut)
- Lay the molding flat on the saw table.
- Set the miter and bevel angles according to a chart or calculator for your molding’s spring angle.
- This method is slower but helpful for very large or odd-shaped pieces.
Table: Common Miter And Bevel Settings For Crown Molding
| Spring Angle | Corner Type | Miter Angle | Bevel Angle |
|---|---|---|---|
| 38° | Inside/Outside | 31.6° | 33.9° |
| 45° | Inside/Outside | 35.3° | 30° |
| 52° | Inside/Outside | 38° | 26.6° |
Tip: Most compound miter saws have these common angles marked for quick setup.
Making The Cuts: Step-by-step Guide
Now you’re ready to cut. This is where patience and precision pay off.
Step 1: Test Cuts
- Always make test cuts using scrap pieces of your crown molding.
- Label the ceiling and wall sides for reference.
- Fit test pieces together at the intended corner to check for gaps.
Step 2: Cutting Inside Corners
Inside corners are the most common in a room. Here’s how to cut them:
- For the right side of the corner, set the miter to 45° left.
- For the left side, set the miter to 45° right.
- For nested cutting, keep the molding upside down and tight to the fence.
- Cut slowly to avoid splintering.
Coplaning tip: For a near-invisible joint, some pros use a coping saw to shape one piece to fit the profile of the other, instead of just mitering both. This is called a “coped joint.”
Step 3: Cutting Outside Corners
Outside corners are trickier because the visible seam needs to be perfect.
- The same 45° angles apply, but the direction is reversed.
- Use a sharp blade and support the molding well to avoid chipping.
- Check the fit before installing.
Step 4: Cutting Long Pieces And Scarf Joints
For walls longer than your molding, join two lengths with a scarf joint:
- Overlap the ends at a 45° angle.
- Apply wood glue and press together.
- Nail in place and sand smooth after drying.
Step 5: Label And Organize
- Place each cut piece in the order you’ll install them.
- Mark the wall and ceiling edges clearly.
Key insight: Always cut slightly long and trim down as needed. It’s easier to remove material than to add it.
Installing Crown Molding After Cutting
Cutting is only half the job. Installing the molding correctly ensures a professional finish.
Pre-installation Steps
- Dry fit all pieces in place to check corners and lengths.
- Use a stud finder to mark nail locations.
- Apply a thin bead of wood glue to joints for added strength.
Nailing And Securing
- Nail into wall studs and ceiling joists where possible.
- Use a finish nailer for speed and fewer marks.
- For delicate profiles, pre-drill nail holes to prevent splitting.
Filling And Finishing
- Fill nail holes and minor gaps with wood filler or caulk.
- Sand any rough spots for a smooth look.
- Paint or stain as desired.
Pro tip: Even pros need to use caulk to hide small gaps—walls and ceilings are rarely perfectly straight.
Advanced Tips And Troubleshooting
Even experienced DIYers can run into problems when cutting crown molding. Here are some advanced tips to help you get flawless results.
Dealing With Non-standard Angles
Not all corners are a perfect 90°. If your corner is 92° or 88°, adjust your miter angle accordingly. Use an angle finder to measure the exact angle, then divide by two for your miter setting.
Avoiding Common Mistakes
- Cutting the wrong side: Always double-check which side of the molding is the wall and which is the ceiling.
- Reversed angles: When moving from one corner to another, it’s easy to set the miter angle in the wrong direction.
- Not supporting long pieces: Use a helper or support stand to keep long molding steady during the cut.
- Ignoring blade drift: Even with a sharp blade, the saw can wander. Cut slowly and apply gentle, consistent pressure.
Table: Troubleshooting Common Problems
| Problem | Likely Cause | Solution |
|---|---|---|
| Gap at corner joint | Incorrect angle or bowed wall | Re-cut test piece, use caulk |
| Molding splinters | Dull blade or cutting too fast | Change blade, cut slower |
| Short piece | Measured incorrectly | Always cut a bit long |
| Wrong orientation | Confused wall/ceiling side | Label clearly before cutting |
Safety Tips For Cutting Crown Molding
Safety should always be your first priority when using power tools. Here’s how to protect yourself during the process:
- Wear safety glasses at all times to protect from flying debris.
- Use hearing protection—miter saws can be very loud.
- Keep hands clear of the blade. Always use clamps or supports for small pieces.
- Unplug the saw before changing blades or making adjustments.
- Clean up sawdust regularly to avoid slips and fire hazards.
- Check the blade guard to ensure it moves freely and covers the blade when raised.
Unexpected safety tip: Never cut molding shorter than 12 inches on a miter saw without a clamp or a push stick. Small pieces can kick back dangerously.
Maintenance And Storage Of Miter Saws
Keeping your miter saw in good condition ensures it stays accurate and safe.
- Clean after each use. Remove sawdust and debris from moving parts.
- Check blade sharpness. Dull blades burn wood and cause rough cuts.
- Lubricate moving parts as needed (consult your manual).
- Store in a dry place to prevent rust and corrosion.
- Check calibration every few months to maintain accurate angles.
Real-world Example: Cutting Crown Molding For A Living Room
Suppose you want to install crown molding in a 12×15 foot living room with four inside corners and one outside corner around a fireplace. Here’s how you would approach it:
- Measure each wall length, noting which ends are inside or outside corners.
- Mark and label each piece of molding.
- Make a test cut at 45° for inside corners, check the fit, and adjust as needed.
- For the outside corner, cut both pieces at 45° in the opposite direction.
- Dry fit all pieces, then nail into studs and joists.
- Fill gaps and nail holes, then sand and paint for a finished look.
By following each step carefully, even a beginner can get crisp, tight joints that add real value to a room.
Frequently Asked Questions
What Is The Best Miter Saw Size For Cutting Crown Molding?
A 10-inch or 12-inch compound miter saw works well for most crown molding projects. A 12-inch saw can handle larger molding and makes longer cuts, but a 10-inch is lighter and more affordable. Choose based on the size of your molding and the frequency of use.
How Do I Know Which Side Of The Crown Molding Goes Against The Wall?
Crown molding has a profile—one edge is usually flatter and sits against the wall, while the other has more detail for the ceiling. Hold the molding in the position it will be installed, and mark the wall and ceiling edges clearly before cutting.
Can I Use A Regular Miter Saw For Crown Molding?
You can use a standard miter saw for small, simple trim, but for crown molding you need a compound miter saw. This lets you make both miter and bevel cuts, which are essential for tight-fitting corners.
Do I Need To Cope Inside Corners, Or Will Miter Cuts Work?
You can use miter cuts for inside corners, but coping one piece gives a tighter, more professional fit—especially if your walls are not perfectly square. Coping requires a coping saw and a bit more skill, but it hides gaps better.
What If My Room Corners Are Not Exactly 90 Degrees?
Use an angle finder to measure the actual corner. Divide the angle in half, and set your miter saw to that number for each cut. For example, if your corner is 92°, cut each piece at 46°. Always test-fit your cuts before installing.
For more details on molding angles and saw setup, check resources like Wikipedia.
Adding crown molding with a miter saw may seem challenging at first, but with practice, patience, and the right tools, you can transform any room. Remember to measure carefully, label everything, and always cut test pieces before committing. With these steps, your next project will look sharp and professional, making all your efforts worthwhile.